“The replenishing thing that comes
with a nap…you end up with
two mornings a day.”
~ Pete Hamill

“The replenishing thing that comes
with a nap…you end up with
two mornings a day.”
~ Pete Hamill

What’s Cooking in Gail’s Kitchen? After the Holidays: Snickerdoodle Chocolate Chip Cookies! When my 11-year old granddaughter came for a visit, one of the things we did together was bake homemade cookies. It was a wonderful way to build social skills for life, not to mention lasting memories. Conversation flowed easily while mixing cookie dough and then afterwards licking the bowl. Her technique for cracking an egg, without getting eggshells in the dough, was to hold it securely in the palm of her hand, above a custard cup…and squeeze. Don’t laugh. It worked. Surprisingly it takes a lot more uneven pressure to break it that way, but her reasoning was, “Nana, it’s easier than trying to get my thumbs in the opening and pulling it apart.” Priceless.
SNICKERDOODLE CHOCOLATE CHIP COOKIES
Ingredients:
16.5-ounce box yellow cake mix
1/2 cup vegetable oil
2 eggs
1 cup semi-sweet chocolate chips
1/3 cup sugar
1 teaspoon ground cinnamon
Instructions:
Preheat oven to 350°. Line two baking sheets with parchment paper. Set aside. In a mixing bowl, combine yellow cake mix, vegetable oil, and eggs. Stir until thoroughly mixed. Fold in chocolate chips. Chill dough 20 minutes. Whisk together sugar and ground cinnamon in a shallow dish. Set aside. Scoop teaspoon-sized balls of cookie dough; roll in cinnamon sugar. Place on the prepared baking sheet. Bake 8-10 minutes. Remove from oven and allow cookies to cool on the baking sheet 2 minutes longer. Then transfer them to a wire rack to cool completely. Repeat with the remaining cookie dough. Store in an airtight container.
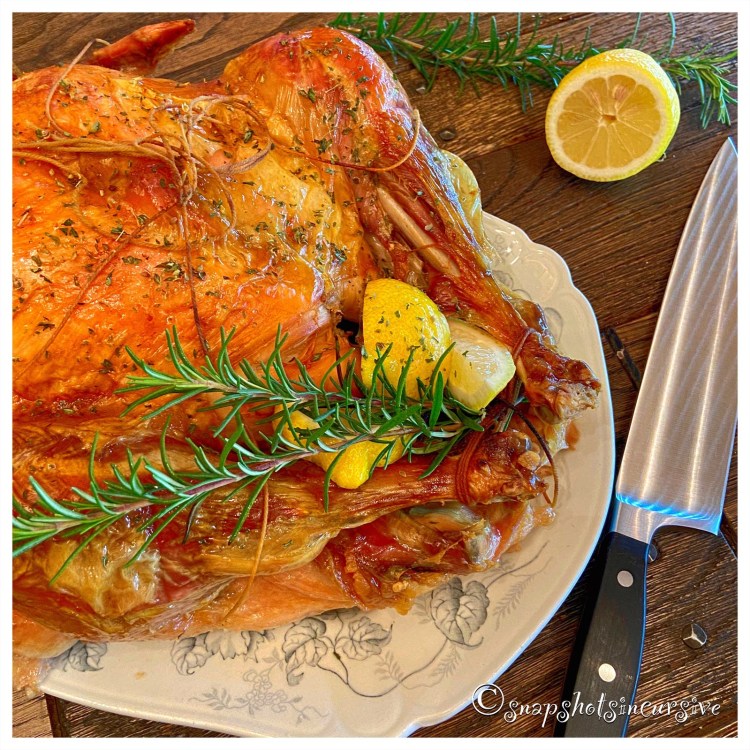
What’s Cooking in Gail’s Kitchen? After the Holidays: Rosemary Lemon Roasted Turkey! Did you know a frozen turkey will last up to two years in the freezer? First and foremost, it’s only a bargain if you have the space to store it. That being said, roasting a turkey is a great source of lean protein. A whole bird provides healthy meat that can be served several different ways. Unfortunately, our bodies need protein and cannot store it. We need to replenish protein in order to build strong bones, repair muscle, heal skin, and help keep blood sugar levels even. All the other vitamins and minerals are a bonus. A few words of advice: Remove and discard the skin of the roasted turkey, no matter how tempting that crispy, golden outer covering calls your name. It’s main purpose is to keep the meat moist. That, and for taking fabulous snapshots, of course.
ROSEMARY LEMON ROASTED TURKEY
Ingredients:
4-6 sprigs of fresh rosemary
2 lemons, quartered
12-pound turkey, thawed
2 tablespoons butter, melted
1 teaspoon kosher salt
1/2 teaspoon garlic powder
Instructions:
Preheat oven to 325°. Rinse turkey, pat dry. Insert rosemary and lemon pieces in the cavity of the turkey. Truss the turkey by wrapping the bird in cooking twine. Secure the legs and tuck the wings underneath. Transfer turkey to the roasting pan with the breast side up. Brush with melted butter. Sprinkle with kosher salt and garlic powder. Bake uncovered for 4 hours, or until a meat thermometer reads 180°. The juice of the turkey will run clear when the center of the thigh is cut. Remove from oven. Cover. Allow turkey to rest for 15 minutes before carving. Garnish with fresh rosemary sprigs and lemons.
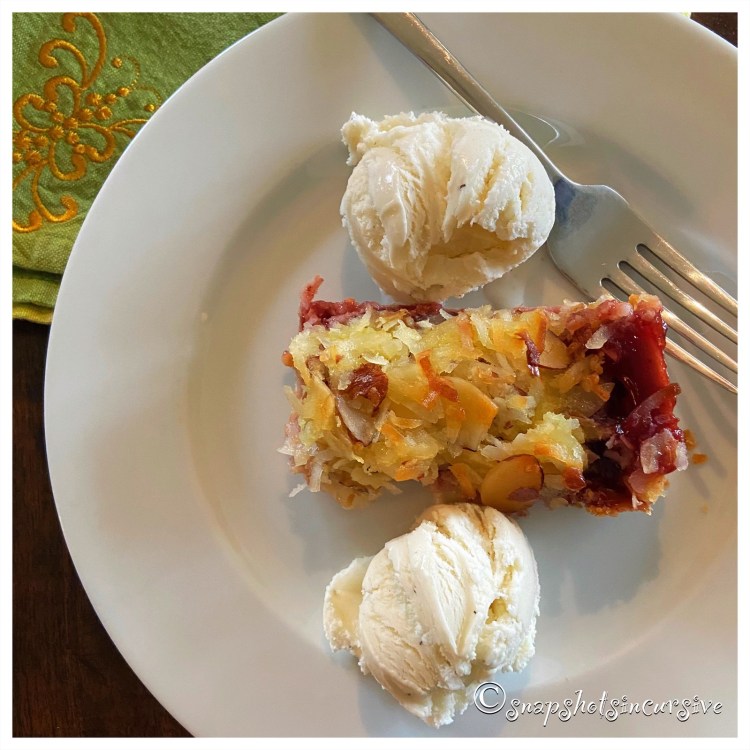
What’s Cooking in Gail’s Kitchen? After the Holidays: Quasi Cherry Almond Macaroon Slab Pie! Now that’s a mouthful. But truth-be-told when you’re talking about a dessert with mounds of plump cherry clusters, flaked coconut, and sliced nuts…well, nothing else will do. By transforming it all into a slab pie, portions become more manageable over traditional sliced servings. The crust is still flaky, even if there is less of it. Focus instead on a sweet treat with a single shot of Italian espresso or scoop of ice cream. It’s a perfect balance for the taste buds.
QUASI CHERRY ALMOND MACAROON SLAB PIE
Ingredients:
1 prepared pie crust
Ingredients for filling:
21-ounce can cherry pie filling
1/2 teaspoon cinnamon
1/8 teaspoon sea salt
1 teaspoon lemon juice
Ingredients for topping:
1 cup coconut, shredded
1/2 cup almonds, sliced
1/4 cup sugar
1/8 teaspoon sea salt
1/4 cup milk
1 tablespoon butter, melted
1/4 teaspoon almond extract
1/4 teaspoon coconut extract
1 egg, beaten
Instructions:
Preheat oven to 400°. Spray a baking sheet with nonstick oil. Roll the prepared pie crust to fit the baking sheet. Trim the dough to only fit the bottom of the pan. If necessary, use the extra dough pieces to fill in the corners. Pinch to seal. In a large bowl, combine the cherry pie filling, cinnamon, sea salt, and lemon juice. Mix thoroughly. Spoon the filling onto the pie crust. Spread in a single layer. Bake for 20 minutes. Meanwhile, for the topping, fill a mixing bowl with the shredded coconut, sliced almonds, sugar, sea salt, milk, melted butter, almond extract, coconut extract, and beaten egg. Remove the slab pie from the oven. Spread macaroon topping over all. Return slab pie to oven, bake 25 minutes longer, or until bubbly and golden brown. Cut into slices. Serve with vanilla bean ice cream.
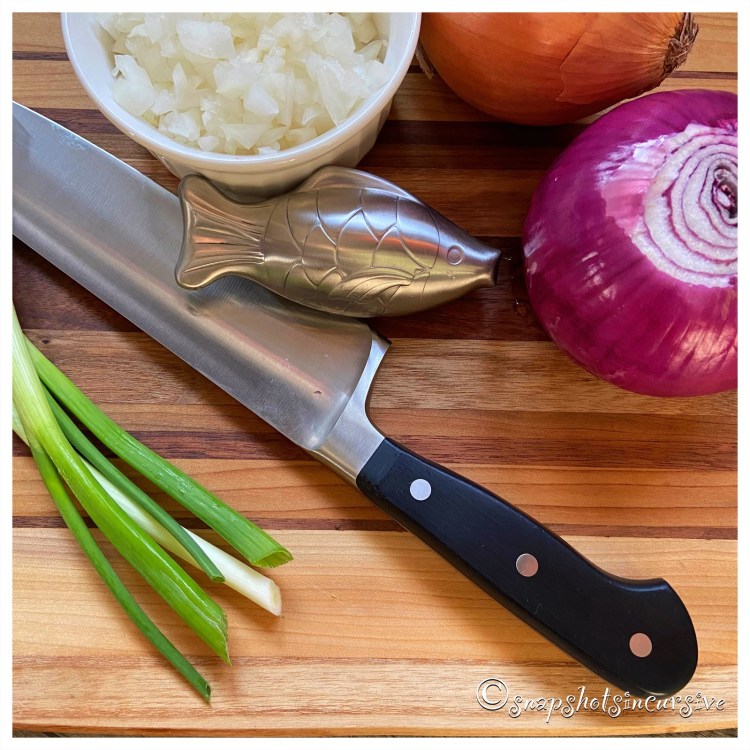
The cat is out of the bag, or rather the Fish, when it comes to nifty thrifty kitchen gadgets. I recently received this unusual object, from a dear friend of mine. At first I was totally confused. I even tried to open it, thinking there had to be something useful and remarkable inside. Was it a bottle opener? Or a refrigerator magnet? What about a cocktail ice cube? Nope. It’s kinda like assembling a coffee table from IKEA. If all else fails, read the package instructions. This quirky little fish gadget turned out to be invaluable. It’s purpose is to eliminate strong odors from smelly foods like onions, garlic, and you guessed it…fish. Too often we rinse our hands with soap, lemon juice, or vinegar without success. Most times the odor is heightened rather than diminished due to the sulfur molecules. Evidently stainless steel is a negative-charged metal that, when combined with the positive-charged amino acids in cold water, will remove irritating odors. I know this to be true because I put it to the test. I was chopping raw onions to toss onto a steaming bowl of homemade chili, so naturally I scooped up the onions with my hands. Afterwards my hands smelled pungent, like onions. I turned on the faucet, placed the fish in the palm of my hands, and vigorously rubbed together under the stream of cold water for about 15 seconds. It miraculously worked. Poof, like magic the odor had disappeared. Thanks, Judy. Your gift is pure genius.

What’s Cooking in Gail’s Kitchen? After the Holidays: Plum Coffee Cake! Plums have a way of making a person feel special. They’re not as plentiful as apples, but when they’re available I can’t wait to snag a few to plunk into a homemade coffee cake. The sweet flavor reminds me of stepping into a pastry shop where fruit-filled delicacies are placed front and center in the glass-domed showcase. From mini fruit tarts overflowing with ripe, juicy berries to cheesecakes smothered in exotic options. Turnovers become too tempting when a smidgen of filling seeps out. And just look at the succulent strudels and rustic galettes. But I digress. Today’s feature is all about the mouthwatering palatable pleasure of the plum.
PLUM COFFEE CAKE
Ingredients:
1 1/4 cup flour
1 teaspoon cinnamon
1/4 teaspoon nutmeg
1/8 teaspoon cardamom
2 teaspoons baking powder
1/2 teaspoon sea salt
1/3 cup butter, softened
3/4 cup sugar
1 teaspoon vanilla extract
1 egg, room temperature
1/2 cup buttermilk
1/2 pound plums, pitted and sliced
Powdered sugar, for dusting
Instructions:
Preheat oven to 350°. Spray a 9” cake pan with nonstick oil. Set aside. In a bowl, whisk together flour, cinnamon, nutmeg, cardamom, baking powder, and sea salt. Set aside. In another bowl cream together butter and sugar, using an electric mixer, for 3 minutes. Add vanilla extract and egg. Beat on Low speed until well mixed. Gradually add the flour mixture, alternating with buttermilk. Beat on Low speed until smooth. Transfer the batter to the prepared pan. Arrange sliced plums on top in a circular pattern. Bake for one hour until golden brown. Center is set when a cake tester comes out clean. Cool cake on a wire rack. Dust with powdered sugar before serving.

What’s Cooking in Gail’s Kitchen? After the Holidays: Oregon Pear Dessert Tray! Nothing says a light dessert like fruit, cheese, and nuts. Think about it. When you eat this combination before the meal, chances are you may overdo it simply because it’s all about timing. You certainly don’t intend to gorge yourself, yet conversation flows leading to munching without hesitation. Besides, everyone is doing it. Now fast-forward to the end of the meal. Your appetite has been sated and a little something would make it even more perfect. Ripe fruit that is naturally sweet blends well with a savory cheese and salty crunch of roasted nuts. Who knows? You may even find a sip of sherry or dessert wine to be the crowning touch of a great meal.
OREGON PEAR DESSERT TRAY
Ingredients:
1 Oregon pear, sliced with core removed
2-4 ounces Swiss cheese, cut into wedges
1/4 cup cherries, halved with pits removed
1/2 cup mixed nuts
5 ounces dessert wine, per serving
Instructions:
Wash pears; pat dry. Slice with skin on, removing stem and core. Transfer to dessert plate or tray. Arrange cherry halves. Add wedge of savory cheese. Finish with a side serving of mixed nuts. Serve with a glass of sherry or dessert wine.

“The belief that one’s own view
of reality is the only reality
is the most dangerous
of all delusions.”
~ Paul Watzlawick

“Copper is a superb cooking metal,
conducting heat so evenly it has
unparalleled control, especially
at low temperatures.”
~ Andrew Zimmern
