Eating My Way Through the Alphabet; Letter V

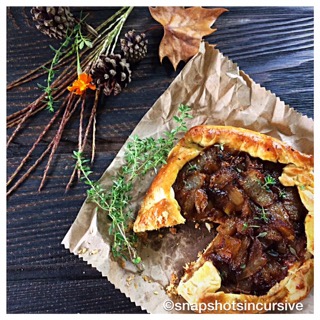
What’s Cooking in Gail’s Kitchen? Timeless Classics: Vidalia Onion Tart! For those of you who adore caramelized onions, but need the confidence to make them at home, read on for some helpful hints that bring astounding results. Begin with yellow sweet onions. I choose Vidalias right now because they are in season. Slice them thicker than you would for a sandwich. If the onions are too thin, they burn and stick to the bottom of the pan. This is not the time to be using olive oil. Butter is your friend. The flavor is makes a difference, so do not scorch the butter. Make sure the onions are coated, top and bottom, with melted butter. It helps them to turn soft and caramelized. Also, make sure the pan is large enough to prevent overcrowding. The last thing you want is steam, which turns the onions mushy. Maintain a constant heat for the onions’ sugars to caramelize. If they char a little, don’t sweat it. Believe me, the results are worth the wait. Besides, the aromas will drive everyone else crazy, too. 
VIDALIA ONION TART
Ingredients for Tart:

1 cup flour

1/4 teaspoon sea salt

6 tablespoons butter, chilled and cut into chunks

4-5 tablespoons iced water
Instructions:

Using a food processor, mix together flour and sea salt. Add the chilled butter and pulse until mixture resembles small peas. With the machine running, gradually add iced water until dough forms a ball. Remove dough, flatten into a disk, wrap it in plastic, and refrigerate for one hour. 
Remaining Ingredients:

5 tablespoons butter, unsalted 

2 large Vidalia sweet onions, thinly sliced

1 teaspoon Worcestershire sauce

1 teaspoon Herbs de Provence 

Sea salt and cracked black pepper, to taste

1 tablespoon corn meal, coarsely ground 

2 slices baby Swiss cheese

1 egg yolk, beaten

Fresh tarragon for garnish
Instructions:

Preheat oven to 375°. In a medium skillet over medium high heat, melt the butter. Do not scorch. Add the Vidalia onions and cook until soft and translucent, about 10 minutes. Reduce heat to low. Add Worcestershire sauce, Herbs de Provence, sea salt, and black pepper. Cook until onions are golden, about 35-45 minutes longer. Remove from heat and let cool. Line a baking sheet with parchment paper. Sprinkle cornmeal evenly. On a lightly floured surface, divide the dough in half. Roll out each portion into an 8″ round. Transfer to the baking sheet. Place one slice of Swiss cheese in the center of each round. Spread the onions over the cheese, leaving a 1 1/2″ border. Fold the edge of the dough up and over the filling. Brush the edges with the egg yolk wash. Bake for 40 minutes, until the bottom crust is brown. Transfer the baking sheet to the top shelf and continue baking 5 minutes longer. Top crust will be golden brown. Cool tarts on a wire rack to prevent them from getting soggy. Garnish with fresh tarragon. Cut into wedges and serve warm. Makes two tarts. 

Eating My Way Through the Alphabet; Letter U

What’s Cooking in Gail’s Kitchen? Timeless Classics: Upcountry Apple Crumble! Take a trip to the local apple orchard. It’s overflowing with bushels of newly-picked produce in several varieties. Red Delicious. Jonagold. Gala. Cortland. And the abundance of ready-made market items puts visitors to the test: nutty caramel apples, chunky applesauce, icy cider slushes, Dutch apple pies, and gooey apple turnovers. Don’t let Autumn slip away without bringing the crisp textures, bakery goodness, spicy aromas, and locally grown produce back home into your favorite dishes. 
UPCOUNTRY APPLE CRUMBLE 
Ingredients:

2-3 large apples

1 teaspoon lemon zest

2 tablespoons lemon juice

1/4 cup sugar

3/4 cup flour

3/4 cup brown sugar

1/2 teaspoon cinnamon 

1/4 teaspoon nutmeg

1/4 teaspoon sea salt

1/2 cup oatmeal 

1/2 cup butter, chilled, cut into small chunks 

1/2 cup walnuts, chopped
Instructions:

Preheat oven to 375°. Lightly butter a 10″ round baking dish. Peel, core, and thinly slice apples. (A Spiralizer does a perfect job.) Combine apples with lemon zest, lemon juice, and sugar. Mix well. Arrange mixture in the bottom of the baking dish. To make the crumble topping, combine flour, brown sugar, cinnamon, nutmeg, salt, oatmeal, and butter in a food processor. Pulse mix until crumbly and butter is the size of peas. Spoon topping over apples, spreading to the edges. Sprinkle with chopped walnuts. Bake 40 minutes or until the top is brown and the apples are bubbly. Serve warm with vanilla bean ice cream. 

Eating My Way Through the Alphabet; Letter T

What’s Cooking in Gail’s Kitchen? Timeless Classics: Tex-Mex Tortilla Soup! One thing I love about Fall is the convenience of crockpot meals. Throw all the ingredients together, stir, and then forget about it for a few hours. Do something fun……and I don’t mean raking leaves or shelling walnuts. Take a nature walk, visit an apple orchard, choose a mum plant for your front door, photograph colorful pumpkins and gourds. You get the idea. Don’t let the season pass you by. Autumn is in full swing and Mother Earth has splattered the landscape with vibrant colors. 
TEX-MEX TORTILLA SOUP
Ingredients:

1 pound lean ground beef

20-ounce can diced tomatoes and green chilies, mild flavor

10-ounce can diced tomatoes, zesty flavor

15-ounce can black beans, organic

15-ounce can corn, drained

15-ounce can kidney beans, drained

4-ounce packet taco seasoning mix

4-ounce packet ranch seasoning mix

1/2 cup Monterey Jack cheese, shredded 

1/2 cup Greek yogurt

3 green onions, snipped

1/3 cup sliced jalapeño peppers 
Instructions:

Brown ground beef. Drain any liquid. Place ground beef, tomatoes (juice included), black beans, corn, kidney beans, taco dry seasoning mix, and ranch dry seasoning mix in a slow-cooker. Mix well. Cover and cook on High for 3-4 hours OR on Low for 6-8 hours. Uncover. Ladle Tex-Mex Tortilla Soup into bowl and garnish with Monterey Jack cheese, a dollop of Greek yogurt, onion snips, and jalapeño pepper rings. Serve with tortilla chips or crackers. 

Eating My Way Through the Alphabet; Letter S

What’s Cooking in Gail’s Kitchen? Timeless Classics: Stuffed Tomato Tuna Salad! Pat yourself on the back for choosing today’s recipe as a rich source of omega-3 fatty acids. For the weight-conscious, opt out for a lighter version of mayonnaise or substitute using plain Greek yogurt instead. The tomato contains a high water content, plus the fiber will provide a feeling of fullness. That being said, go stuff yourself. Permission granted. 
STUFFED TOMATO TUNA SALAD
Ingredients:

6 ounce can tuna in water, drained and flaked

1 teaspoon lemon juice

1/3 cup mayonnaise 

1/4 teaspoon sea salt

1/8 teaspoon celery seed

1/4 cup celery, chopped

1 tablespoon dill pickle relish

2 tomatoes, cored 

1 tablespoon walnuts, chopped

Fresh lemon tarragon 

Romaine lettuce leaves

Lemon halves 
Instructions:

Chill two luncheon plates. Place flaked tuna in a bowl. Sprinkle with lemon juice. Add mayonnaise, sea salt, celery seed, chopped celery, and dill pickle relish. Mix well. Chill. Cut tomatoes into 8 segments without slicing the bottom portion. Place one or two romaine lettuce leaves on a chilled plate. Transfer one tomato. Open it like a pinwheel. Spoon tuna salad into the tomato, filling it with half the portion. Garnish with walnuts, lemon tarragon, and a lemon slice. Repeat with second serving. 

Eating My Way Through the Alphabet; Letter R

What’s Cooking in Gail’s Kitchen? Timeless Classics: Rosemary Parmesan Popovers! For a light and airy alternative to reaching for the bread basket, try an herb and cheese popover instead. Rosemary provides a nice earthy pine taste which compliments the saltiness of Parmesan cheese. It’s a match made in heaven, like bread and butter. No pun intended. 
ROSEMARY PARMESAN POPOVERS 
Ingredients:

6 large eggs

2 cups light cream

1/4 cup unsalted butter, melted

1 teaspoon sea salt

3 tablespoons sugar

1 tablespoon fresh rosemary, chopped plus more for garnish

1/4 cup Parmesan cheese, grated

2 cups flour
Instructions:

Preheat oven to 400°. Move the oven rack one setting below the middle row. Grease a 12-count bouchon pan. In a food processor, combine eggs, light cream, butter, sea salt, sugar, rosemary, cheese, and flour. Blend until no large lumps remain and batter is light yellow and frothy, approximately one minute. Fill each bouchon cup 2/3 full. Do not overfill. Sprinkle tops with rosemary leaves. (Refrigerate leftover batter until ready to make the next batch. At that time, use a whisk to vigorously stir the batter.) Place bouchon pan in the oven; bake for 30 minutes or until golden brown. Do not open the oven door during baking or the popovers will deflate. When golden brown, remove from the oven. After 2 minutes in the pan, remove and transfer popovers to a wire rack. Do not allow them to cool in the pan or they may turn soggy. Serve warm as is or with a dollop of French butter. 

Eating My Way Through the Alphabet; Letter Q

What’s Cooking in Gail’s Kitchen? Timeless Classics: Quickly-Grilled Pork Loin Chops! Uncover the grill for another mouth-watering main course that is sure to please. Imagine the sound of a sizzle soon followed by an aroma-filled cloud of char-grilled pork that is enough to make your stomach growl. Within minutes, a tender moist slice is tested and savored before anything else. 
QUICKLY-GRILLED PORK LOIN CHOPS 
Ingredients:

4 bone-in pork loin chops, center cut 3/4″ thick

3-4 tablespoons olive oil

1 teaspoon Mrs. Dash Herb and Garlic seasoning

1 teaspoon seasoned salt

1 tablespoon butter, unsalted

Rosemary sprigs to garnish
Instructions:

Place 2 tablespoons olive oil in a shallow dish. Sprinkle with half the Mrs. Dash Herb and Garlic seasoning plus the seasoned salt. Place pork loin chops in a single layer, pressing down slightly to absorb the spices. Pour remaining olive oil over top; sprinkle with seasonings. Cover with plastic wrap and refrigerate one hour. Remove dish from refrigerator 15 minutes before grilling. Preheat grill on medium-high heat, about 375°. Cook pork loins for 6 minutes per side for 3/4″ chops. Turn only once. Cut time in half for thinner chops. Discard marinade. Do not over cook. The internal color of cooked pork is white fading to light pink in the center. Transfer pork loin chops to a serving platter; let rest for 10 minutes before serving. This results in juicier meat. Garnish with a dab of butter and rosemary sprigs.