Queso Casa Dip

What’s Cooking in Gail’s Kitchen? Home Cooking: Queso Casa Dip! Here’s an all-around favorite for any social gathering. The cheese delivers a smooth creamy taste followed by a “bite” of chile!  Some say it’ll curl the tines of a fork. Just kidding! But seriously, it’s so popular you’ll have your friends asking for the recipe! 

QUESO CASA DIP

Ingredients:

4 cups cheddar cheese, extra-sharp finely shredded 

1 1/2 cups Monterey Jack cheese, shredded 

1 tablespoon cornstarch 

2 tablespoons butter

1/7 teaspoon garlic powder

1/2 cup milk

1/4 cup Greek yogurt

1 ghost chile pepper, cut-up and seeds discarded*

2 Roma tomatoes, cut-up

2 green onions, cut-up

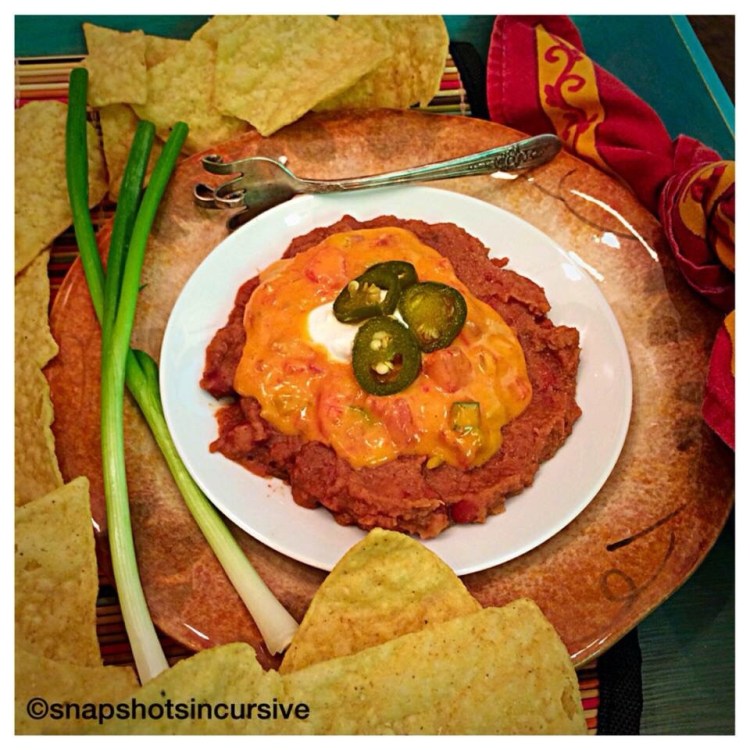
16-ounce can green-chile and lime refried beans

Greek Yogurt and jalapeños for garnish

*Ghost peppers are extremely hot, so you may substitute jalapeño peppers instead. 

Instructions:

Empty cheese into a large bowl, sprinkle with corn starch, and toss to coat. Melt butter into a large saucepan and add garlic, cheeses, and milk. Set on low heat and cook slowly, stirring mixture to keep from scorching. As it melts, fold in the 1/4 cup of Greek yogurt. Continue for 10-15 minutes until mixture is smooth and velvety. Add fresh tomatoes, green onions, and the ghost pepper. Stir gently to blend. Keep warm. Meanwhile, place refried beans in a microwave-safe dish and heat through. To serve, layer refried beans on a platter, pour Queso dip over top. Dollop with Greek yogurt. Serve with tortilla chips, café style. 

Peachy Possibilities

What’s Cooking in Gail’s Kitchen? Home Cooking: Peachy Possibilities! Nothing is more refreshing than fresh peaches, in my opinion. And the options for devouring them are endless!  At first sight, you may be tempted to sink your teeth into the juicy sweet fruit as its nectar drizzles down your chin. But if you keep your willpower in check, the benefits are rewarding.  

PEACHY POSSIBILITIES 

Here are a few ideas:  

* Adding fresh peaches to your favorite salsa intensifies the flavor. It’s a perfect compliment to spicy jalapeños and tomatoes. 

* As you prepare nutritious oatmeal, slice part of a peach, then sprinkle it with cinnamon before preparing the cooked cereal in the microwave. It’s a convenient shortcut to peach cobbler. 

* For that afternoon pick-me-up, toss a couple of frozen peaches, bananas, and strawberries in the blender. Simply add milk, a splash of orange juice, and ice cubes. Voilà, a Smoothie. 

* For the ambitious baker, see yesterday’s post for Old-Fashioned Blueberry Peach Galette a là mode! Who doesn’t love peach pie with vanilla ice cream?

Whichever way you choose, enjoy this peak seasonal fruit. Before you know it, it’ll be gone. 

Old-Fashioned Blueberry Peach Galette

What’s Cooking in Gail’s Kitchen? Home Cooking: Old-Fashioned Blueberry Peach Galette! For a rustic dessert that is sure to please, this classic French pastry is a perfect blend of natural fruit sweetness complimented by a flaky butter crust. No need for a pie plate, it is oven baked on a sheet pan. *Note: Be sure to prep the pan as directed. Otherwise, you may need to replace it. 

OLD-FASHIONED BLUEBERRY PEACH GALETTE 

Ingredients:

1/3 cup plus 1 tablespoon butter

1 cup flour

1/2 teaspoon sea salt

2-3 tablespoons ice water

3 cups peaches, sliced

1/2 cup blueberries 

2 tablespoons sugar

1/4 teaspoon cinnamon 

1 tablespoon apricot preserves, melted

1 tablespoon brown sugar

2 tablespoons almonds, sliced

Instructions:

Preheat oven to 425°. Cover a baking sheet with foil. Then line it with parchment paper. Make a 9-inch pie crust: cut butter into flour and salt until particles are the size of small peas. Sprinkle in water 1 tablespoon at a time, tossing with fork until all flour is moistened and pastry cleans the side of the bowl. Gather pastry into a ball; shape it into a flattened round on a lightly floured surface. Roll into a 9-inch crust and place on parchment paper. Combine sugar, blueberries, and sugar. Beginning in the center, arrange fruit into a fan, spiraling around the pie. Be sure to leave a border. Fold edges of dough toward the center, pressing gently to seal. The dough only partially covers the fruit. Brush the melted preserves over the fruit and along the edges of the dough. Bake 10 minutes. Reduce the oven temperature to 350° but do not remove the galette. Bake an additional 40 minutes or until lightly browned. Remove the galette from the baking sheet by lifting it with the parchment paper. It needs to cool on a wire rack to keep the bottom from getting soggy. Sprinkle with 1 tablespoon brown sugar. Serve warm. 

* Serving suggestion: Top with a dollop of whipped cream or a scoop of vanilla bean ice cream. 

No-Bake Hazelnut Bars

What’s Cooking in Gail’s Kitchen? Home Cooking: No-Bake Hazelnut Bars! Here you go. A delicious nutty chocolate treat that can be a dessert or a snack. And there is no need to heat up the oven. This combination of dietary coconut fiber and heart-healthy hazelnuts are sure to become your personal favorite. One bar may provide the nutritious energy boost you need to keep going strong. But the question is…..can you stop at just one?

NO-BAKE HAZELNUT BARS

Ingredients:

1/2 cup butter

1/3 milk

1 cup brown sugar, packed

1 cup coconut, flaked

1 cup graham cracker crumbs

1 teaspoon vanilla

1 13-ounce jar of Nutella Chocolate-Hazelnut Spread

Instructions:

Boil butter, milk, brown sugar, coconut, and cracker crumbs in a medium saucepan for 7 minutes, stirring constantly. Mix in vanilla extract.  Line a 9″x13″ pan with club crackers. Pour the filling over crackers. Top another layer of crackers. Warm Nutella in microwave for 20 seconds. Spread over all. Garnish with nut meats. Cool in refrigerator until firm. Cut into squares.

Mushroom Caps

What’s Cooking in Gail’s Kitchen? Home Cooking: Mushroom Caps! It you like mushrooms, you’ll be happy to know this is a meal in itself. If you wish to be the star of the next gathering, fix a platter and it becomes a very impressive appetizer to share!

MUSHROOM CAPS 

Ingredients:

1 pound of fresh white mushroom caps, stems removed

1 box of Low-Sodium Stove Top Stuffing 

4 tablespoons butter

1 pinch parsley

1 pinch rosemary 

1 pinch thyme

1 pinch sage

1 stalk celery, chopped finely

1 10-ounce can chicken breast in water, drained

Instructions:

Preheat oven to 350°. Prepare stuffing mix according to directions on box but add extra herbs when preparing. Once the dressing is finished, gently add the celery and cut-up chicken breast pieces. Mix well. Spoon the filling into the mushroom cavities and arrange in a shallow baking dish, cavity side up. Bake 25 minutes or until the mushrooms are tender and the filling is heated through. The mushrooms should appear golden on top. Serve warm. 

Loco Moco

What’s Cooking in Gail’s Kitchen? Home Cooking: Loco Moco! Living up to its name, this breakfast food is actually one of Hawaii’s local favorites. The serving size is so generous you might think it’s way too much for breakfast. I didn’t eat the rest of the day after trying it at a local restaurant there. However, when you prepare it at home, you have more control over serving sizes as well as the time of day for this meal. Basically, it is composed of four layers. The bottom is fried rice, the middle is a beef patty, the next is an egg over easy. And the top layer is a ladle of gravy. Don’t knock it till you try it!

LOCO MOCO

Ingredients for Rice Layer:

1 cup prepared brown rice

1 strips bacon, crisp and crumbled 

1 beef patty, crumbed*

2 ounces smoked sausage, 

cut-up

2 tablespoons sesame oil

2 tablespoons onion, cut-up

*Hawaiians favor SPAM. 

Instructions for Rice Layer:

In large skillet add sesame oil and sauté onions. Add remaining ingredients. Stir fry to blend flavors. Set aside. 

Ingredients for Beef Patty Layer:

4 1/4-pound beef patties 

1 can beef consommé 

Dash of pepper

Instructions for Beef Patty Layer:

Cook beef in consommé until tender. I did this the day before in my slow-cooker. It’s worth the effort! Save the broth for turning into gravy. 

Ingredients for Egg Layer:

4 fresh eggs

Instructions for Egg Layer:

Cook on stove to make eggs over-easy (or sunny-side up) so the yolks are still runny. 

Ingredients for Gravy Layer:

1 cup beef consommé*

2 tablespoons flour

2 tablespoons butter

*Add water if necessary to make one cup of liquid. 

Instructions for Gravy Layer:

Melt butter in saucepan. Add flour to the butter and stir to make a roux. Cook over medium-low heat until the flour is lightly browned, about 1 minute. Slowly whisk in the consommé juices and stir until thickened. 

Now serve by assembling the layers in a shallow bowl: rice, beef, egg, and gravy. Loco Moco!

Kolachy Wedding Cookies

What’s Cooking in Gail’s Kitchen? Home Cooking: Kolachy Wedding Cookies! The beauty of this wedding delicacy, popular in Central Europe, transforms every bite into a puff of pastry. Taste the splendor.  Choose one or more of your favorite fruit toppings, sprinkle with a few chocolate morsels, and let the celebration begin! I made mine into Cherry Chocolate Chip Kolachys!

KOLACHY WEDDING COOKIES

Ingredients:

1 cup butter

1 8-ounce package Neufchâtel cheese

1 tablespoon milk

1 tablespoon sugar

1 egg yolk, beaten 

1 1/2 cups flour

1/2 teaspoon baking powder 

1 can pie filling, any flavor

1/2 cups semi-sweet mini chocolate morsels

Powdered sugar for dusting

Instructions:

Cream together butter, Neufchâtel cheese, milk, and sugar. Add beaten egg yolk. Sift together flour and baking powder. Add to the creamed mixture and blend well. Refrigerate until the dough is thoroughly chilled (4 hours or overnight).  Preheat oven to 400°. Roll out dough to 1/4″ thick on well-floured board. Cut with a 2″ round cookie cutter, or small glass. Place cut-outs on an ungreased cookie sheet. Make a depression with the back of a spoon in the center of each round. Fill the center with a dollop of fruit filling. Sprinkle chocolate morsels on top. Bake 10-15 minutes or until lightly browned. Cool on a wire rack. Dust with powdered sugar before serving. 

Jarlsberg Grilled Cheese

What’s Cooking in Gail’s Kitchen? Home Cooking: Jarlsberg Grilled Cheese!  This is a perfect fusion of buttery, crisp, lightly salted Swiss-style cheese and dense artisan bread. Grilling at the correct temperature is crucial. It will result in a golden-brown crunch followed by a warm flow of oozing cheese with a sweet-tangy finish. Sounds simple, doesn’t it? It really is!

JARLSBERG GRILLED CHEESE

Ingredients:

8 ounces of Jarlsberg cheese, grated

4 tablespoons mayonnaise 

2 tablespoons red onion, chopped

Artisan bread of choice, sliced (sesame bread is pictured)

Salted Butter for browning

Instructions:

Combine cheese, mayonnaise, and red onion in a medium bowl. Mix well. Refrigerate in a covered container for one hour. Slowly melt a dab of butter in the skillet over medium-low heat before adding the bread. Do not let the butter burn. If you brown the bread on both sides first, it will hasten the melting process of the cheese inside. Once the bread is browned on both sides, spread a spoonful of the Jarlsberg cheese mixture over one piece of bread and then place the other slice on top of the sandwich. Apply light pressure being careful not to squeeze the filling out onto the pan. Swirl the sandwich to get a nice brown color, about 2 minutes. Gently flip and repeat. Serve immediately. 

Indiana Sweet Corn

What’s Cooking in Gail’s Kitchen? Home Cooking: Indiana Sweet Corn! With July on the horizon, already the taste buds begin yearning for that extra juicy sweet corn freshly picked straight from the farmer’s field. After all, it’s best eaten the day it’s picked. There’s no taste quite like it. Get connected to the Farmers Market in your area for the best produce. Then do what I do, freeze extra for those cold, wintry days. 

INDIANA SWEET CORN

Ingredients:

4 ears of Indiana sweet corn

Sea salt to taste

Butter for slathering

Instructions by Boiling:

Fill a stock pot with enough water to cover the corn. Bring it to a boil. Dissolve a tablespoon of salt in the water. Remove outer husk and silk from corn. Rinse corn. Carefully drop each ear into boiling water. Cover with lid and lower heat to medium. Cook 3-5 minutes. Remove with tongs and serve immediately with butter and sea salt. 

Instructions for Microwaving:

I cook one ear at a time when I’m only preparing a few ears for a meal. Leave corn in husk. With a sharp knife, cut off the pointed end of the corn cob. Rinse under running water. While the ear of corn is wet, wrap a paper towel around it. The water will moisten the paper towel. Place the ear of corn in the microwave and cook on 100% power for 2-3 minutes. The husk will trap and steam the corn. Watch!  Remove from microwave and let sit for a couple minutes. Use the paper towel to carefully shuck the corn. The silks come off easily. 

Whichever method you choose, the reward is a taste of sugary-sweet Indiana heaven. Enjoy!