Hibiscus Passion Tea Icing

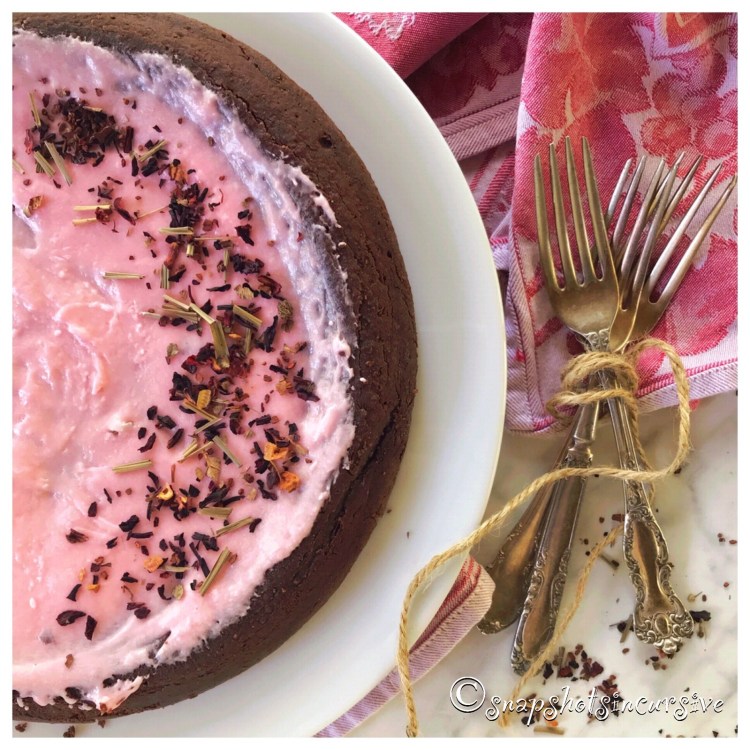
What’s Cooking in Gail’s Kitchen? Start Smart: Hibiscus Passion Tea Icing! If you ever get bored, take a stroll down the Tea Aisle at your nearby grocers. Choose from any assortment of gourmet blends; especially one containing full-leaf sachets. Read the label. In a few seconds, you will feel as though you have been transported to a magical land “bursting with life and tinged with the color of true love to make sure you never have to live a day without passion”.* And that’s only the beginning. Turn to the side panel for an invigorating adventure that awakens the senses as well as the imagination. After that when I decided to steep this delicacy to flavor buttercream icing, I knew it would be nothing short of fabulous. Perhaps you may think so, too.

HIBISCUS PASSION TEA ICING

Ingredients:

2 1/2 tablespoons brewed hibiscus passion tea

1/4 cup butter, room temperature

2 cups powdered sugar

1/2 teaspoon almond extract

Garnish with loose tea leaves

Instructions:

Brew a cup of hibiscus passion tea, according to package directions. (Since you won’t need all of it, the reserve tea can be sipped over ice.) Refrigerate until slightly cool. In a medium bowl, cream together softened butter and powdered sugar. Add the hibiscus passion tea and almond extract. Stir until smooth. Spread a thin layer of icing over your favorite cake. I made a gluten-free chocolate cake.** Open a dry tea sachet and sprinkle the tea leaves over one side. When serving, place a dollop of extra icing on the side of the plate or on top of the cake. Either way, it will disappear, I promise you that.

*TAZO Passion Tea.

**For Gluten-Free Chocolate Cake, follow the link.

http://Snapshotsincursive.com/2017/12/18

Ginger Liqueur

What’s Cooking in Gail’s Kitchen? Start Smart: Ginger Liqueur! There’s nothing worse than enjoying a specialty crafted cocktail on a remote tropical island and then returning home with a craving to have it again. That happened to me about 4,500 miles ago. What’s a girl to do? “Why not make it yourself?” my husband quipped. “Sure…easy for you to say”, I responded. Well, long story short, as long as he agreed to help me as the “taste tester”, it was worth a shot. Between the two of us, I’m pretty sure we came up with a winning combination for my new fav, Ginger Liqueur Martini. Cheers!

GINGER LIQUEUR

Ingredients:

2 cups vodka

1/2 cup sugar

1/4 cup ginger root, diced

1/2 vanilla bean, sliced horizontally and seeds scraped

Orange peel

Instructions:

Take a quart-size jar. Combine vodka, sugar, ginger root, vanilla bean, and orange peel. Stir well to dissolve sugar. Place jar, away from sunlight, in a kitchen cabinet. Swirl the jar to stir the contents every morning and night for one week. Remove the vanilla bean. Repeat swirling twice a day for 3 more days. Strain solids through a fine wire mesh strainer. Filter remaining liquid again through two coffee filters until no solids remain. Bottle the ginger liqueur. Allow it to “mellow” for another day. Store away from sunlight.

Ginger Liqueur Martini:

4 ounces vodka, chilled

1 ounce ginger liqueur

Garnish with crystallized ginger

Instructions:

Place martini glass in the freezer to chill. Remove glass and add chilled vodka. Set aside. Fill a shaker with ice cubes. Pour in ginger liqueur. Allow it to chill for one minute. Shake. Strain the ginger liqueur over vodka into the martini glass. Garnish with crystallized ginger.

Fifteen-Bean Ham Bone Stew

What’s Cooking in Gail’s Kitchen? Start Smart: Fifteen-Bean Ham Bone Stew! This time of year the nights are chilly and the days can still be warm. A slow-cooker makes preparing a satisfying meal pretty simple. Throw everything together and let it “stew” for awhile. Nowadays you can get an assortment of 15 beans ranging from pinto, garbanzo, and northern to split pea, navy, and lentil in the same package. Add that ham bone you stored in the freezer during the holidays and you’re on your way. By adding sweet onion, diced tomatoes, and bay leaves, you’ll make this a classic favorite every time.

FIFTEEN-BEAN HAM BONE STEW

Ingredients:

20-ounce package of 15 Bean Soup assortment

1 pound ham bone with ham chunks

32 ounces vegetable broth

32 ounces water

1 sweet onion, chopped

1 teaspoon chili powder

1/4 teaspoon garlic powder

4-5 bay leaves

14.5 ounce can diced tomatoes, with juice

1 tablespoon lemon juice

1 teaspoon red pepper flakes

Instructions:

Rinse beans. Place in a large pot filled with 8 cups of water. Allow beans to soak overnight. After soaking, drain water. Transfer beans to a slow-cooker. Add ham bone with meat. Cover with vegetable broth and water. Add chopped onion, chili powder, garlic powder, and bay leaves. Cook on High setting for 5 hours (or Low setting for 7-8 hours) or until beans are tender. Remove the ham bone. Let the excess meat fall off into the stew or cut it off the bone and put the meat chunks back into the crockpot. Stir in diced tomatoes, lemon juice, and red pepper flakes. Cook 30 minutes longer on Low setting. Before serving, remove bay leaves. Serve with crusty bread.

Egg Veggie Tart

What’s Cooking in Gail’s Kitchen? Start Smart: Egg Veggie Tart! Take ordinary ingredients and spread them over a prepared puff pastry crust and I promise you, your family will eat anything you serve. It’s that good. I always keep a box of frozen puff pastry on hand because it is so versatile. From main courses to desserts, they all turn out like a culinary masterpiece. For everyone to take you seriously though, be sure to wear an apron. It makes you look like a chef who means business. I think I have at least five different styles, some with pockets, some without. And I’m always open for more. Today’s version of a breakfast tart incorporates vegetables and prosciutto that not only add color, but eye appeal. Without regrets, add this recipe to your list of easy-to-assemble meals.

EGG VEGGIE TART

Ingredients:

1 sheet frozen puff pastry, thawed

4 ounces Swiss cheese, thinly sliced

2 Roma tomatoes, sliced thin

3 ounces prosciutto, cut into strips

1/4 pound green beans, cleaned and trimmed

3 eggs plus 1 egg with 1 tablespoon water

1/4 cup baby peas

1 tablespoon olive oil

1/3 cup parmesan cheese, grated

3 tablespoons green onion snips

Instructions:

Preheat oven to 400°. Line a baking sheet with parchment paper. Place puff pastry on prepared baking sheet. Using a fork, pierce the dough evenly across surface, stopping about 1/2” from the edge. At the edges, roll dough once to form a crust. This will keep the ingredients from overflowing. Bake for 5 minutes. Remove pan from oven to assemble remaining ingredients. Layer the Swiss cheese on the bottom of the crust. Arrange tomatoes, prosciutto, and green beans. Crack 3 eggs onto the dough. Try to place the eggs where the vegetables will “hold” them into place. Sprinkle tart with baby peas. Drizzle with olive oil. Divide grated parmesan cheese over all. Brush the crust all the way around the tart with the egg/water mixture. This gives the crust that beautiful golden color when baked. Bake 30 minutes, or until pastry is cooked through. Garnish with green onion snips. Cut into squares. Serve immediately.

Date Chile Salad

What’s Cooking in Gail’s Kitchen? Start Smart: Date Chile Salad! One of the best kept secrets in cooking is infused olives oils. It kicks things up a notch. The flavors intensify ordinary ingredients by beginning with organic and aromatic extra virgin olive oils, which in turn, are infused with delightful natural flavors. Some oils contain the essence of herbs, while others may be crushed with fresh citrus or toasted seeds. Be adventurous. Visit a specialty store where premium olive oils and balsamic vinegars are sold. Most stores offer samples to encourage “taste testing”. One of my favorites is Lime Olive Oil and Strawberry Balsamic Vinegar. Another is Sicilian Lemon Olive Oil paired with Pomegranate Balsamic Vinegar. Recently I added an Italian Black Truffle Oil to my collection. I was told it tastes divine drizzled over popcorn or as a finishing oil on pizza. I can’t wait!

DATE CHILE SALAD

Ingredients:

2 navel oranges, pith and peel removed

1/3 cup dried dates, chopped

1/4 cup feta cheese, crumbled

1/2 red or green jalapeño pepper, sliced into rings

1/2 serrano chile pepper, sliced into rings

1/4 cup fresh mint leaves

1-2 tablespoons lime olive oil

Sea salt and cracked black pepper, to taste

Instructions:

Slice oranges into thin rounds. Arrange on two salad plates or bowls. Divide chopped dates between them. Sprinkle on crumbled feta cheese. Add jalapeño and serrano pepper rings. Tuck in mint leaves. Drizzle lime olive oil over salads. Season with sea salt and cracked black pepper. Serve.

Cheese-Stuffed Jalapeño Piggies

What’s Cooking in Gail’s Kitchen? Start Smart: Cheese-Stuffed Jalapeño Piggies! Sooo, when you’re looking at a bounty of jalapeños and you’ve already pickled several jars, what’s next? Jalapeño poppers, with a bacon twist! These fiery devils will awaken your taste buds, so it’s a good idea to cool things down a bit with dairy products. Hence the need for a melted cheese filling and a yogurt-ranch dipping sauce. My husband and I feasted on a plate of these one night, so you can too—-if you dare!

CHEESE-STUFFED JALAPEÑO PIGGIES

Ingredients:

12-14 jalapeño peppers, red or green

2 tablespoons olive oil

1/8 teaspoon garlic powder

1/8 teaspoon seasoned salt

1/2 cup cheddar cheese, shredded

3-4 mozzarella string cheese sticks

2 slices bacon, precooked and crumbled

Crushed tortilla chips

Cilantro for garnish

Instructions:

Preheat oven to 400°. Line a baking sheet with foil. Spray a wire rack with nonstick oil and place on the baking sheet. Set aside. Wash the jalapeño peppers. Pat dry. Wearing gloves, slice the top of each jalapeño vertically, removing a small section to create a well. Remove seeds and ribs. Discard. Brush each jalapeño pepper with olive oil. Sprinkle on seasonings. Place jalapeños on the wire rack with cut side down. Bake 10 minutes; then set broiler to High and broil 2-3 minutes until peppers are slightly charred. Remove from oven. Cool slightly. Using a tongs, flip them over. Divide the cheddar cheese between the jalapeño peppers. Using a kitchen shears, cut the string cheese into strips. Layer over cheddar cheese. Sprinkle the bacon crumbles over the cheese-filled jalapeños. Top with crushed tortilla chips. Broil stuffed “piggies” on High another 2-3 minutes or until the cheese is melted. Remove pan from oven and let cool slightly before transferring stuffed jalapeños to a platter. Serve with ranch salad dressing that has a dollop of Greek yogurt mixed in. Garnish with fresh cilantro.

Bowlful of Cherries

What’s Cooking in Gail’s Kitchen? Start Smart: Bowlful of Cherries! Aren’t they lovely? Ripe cherries are an ideal snack, by the handful. For some, it’s so simple to remove the pit with your teeth. I knew a guy once who could tie the cherry stem into a bow. (I think he did it to impress his wife.) Ripe cherries pair well with Goat cheese, Camembert cheese, or Bleu cheese garnished with a sprig of thyme, basil, or mint. Their ruby-red color is as appealing as their natural sweetness. The possibilities are endless. Add chocolate pieces for a dessert charcuterie board if you like a relaxed atmosphere at the end of a meal. Whatever you choose, get a pound of cherries before they’re gone. And don’t forget a nice bottle of Chardonnay.

BOWLFUL OF CHERRIES

1 pound ripe cherries, stems on

1/2 pound cheese of choice

Fresh herbs

Dark Chocolate candies

Instructions:

Fill a small bowl with sweet cherries. Set aside. Make available a plate of pitted cherries. To pit a cherry, place the fruit on a cutting board. Using a sharp paring knife, press down gently on one side of the stem. Firmly slice an incision from top to bottom until the cherry loosens the pit. Do not crush the cherry. Gently pull on either side to expose the pit. Remove it with your fingernail. One side will have the stem, the other will not. Provide colorful toothpicks for piercing.

Apple Orchard Pie

What’s Cooking in Gail’s Kitchen? Start Smart: Apple Orchard Pie! Nothing conjures up autumnal nostalgia like a slice of apple pie, still warm enough from the oven to soften a scoop of vanilla ice cream. Inhale the aromas of cinnamon, nutmeg, and allspice. It’s delectable, isn’t it? I realize making pies may not be on the top of the list for everyone who loves it. So, I’m telling you today, it’s okay to begin with a prepared pie crust. There are some pretty decent brands out there for you to try. Some refrigerated brands are made to unroll and crimp the edges; others are frozen and meant to be thawed. Some are buttery, super-flaky, and even taste as good as homemade. That’s where you’ll need the help of an assistant, or taste-tester, so to speak. Just remember, pie doesn’t have to be picture perfect to taste spot on. It’s dessert, after all.

APPLE ORCHARD PIE

Ingredients:

1 prepared pie crust, 9”

4-5 large sweet apples, peeled, cored, and sliced

4 large tart apples, peeled, cored, and sliced

1 cup sugar

1/2 teaspoon cinnamon

1/4 teaspoon nutmeg

1/4 teaspoon allspice

1/4 teaspoon sea salt

2 tablespoons butter

Ingredients for Crumb Topping:

1 cup flour

3/4 cup brown sugar

1/3 cup butter, softened

1/2 teaspoon cinnamon (optional)

Instructions:

Preheat oven to 350°. Form prepared pie crust into a pie plate that has been sprayed with nonstick oil. Crimp edges. Set aside. Combine sugar, flour, cinnamon, nutmeg, allspice, and sea salt. Sprinkle about a quarter cup of mixture over the bottom of the pie crust. In a large bowl, toss the apple slices with the remaining sugar mixture. Coat well. Transfer apples to the pie plate, forming a mound in the center. Dot with 2 tablespoons of butter. Bake for 30 minutes. Meanwhile, combine flour, brown sugar, butter, and cinnamon for crumb topping. It should resemble small peas when mixed. Carefully add the topping to the apple pie. Bake 30 minutes longer. If necessary, cover the pie with foil to prevent burning.

Start Smart

The secret to a good cook is pretty basic. Look to their kitchen for essential tools and you will discover why food preparation comes as naturally as breathing. Start Smart. For instance, a chef’s knife makes short work for cutting and chopping. Wooden spoons are perfect for stirring and mixing, plus they look great in a counter caddy. My son recently introduced me to the handy-dandy fat separator for making unbelievable lump-free gravy. How did I not know of this? It’s pure genius! I could go on and on about food processors, dutch ovens, spiralizers, and rice cookers, but you get the idea. Recently I froze some Farmers Market corn by removing the kernels from the cob with my corn peeler. (There really is such a thing.) Now you know…anyone can be a gourmet chef…like me. lol. Some of my posts have been favored by the “Food Network” on Twitter (Snapshotsincursive @DornaGail) as well as Ina Garten’s The Barefoot Contessa, on Instagram (gail _dorna). You can even find me on Pinterest at Gail Dorna. I’d love to connect with you there as well. I also met Chef Michelle Tribble of Hell’s Kitchen reality cooking show. Fun times. Experience different flavors and textures one bite at a time. Catch a glimpse of “Eating My Way Through the Alphabet: Start Smart.” This remarkable journey of the palate is unique because it gives me a few moments with you. Thanks very much to all of my guests and followers on http://snapshotsincursive.com for the uplifting support, award nominations, and moving words of encouragement. As of this writing, WordPress has acknowledged that I’m on a 1641-day streak. Let’s keep it going!