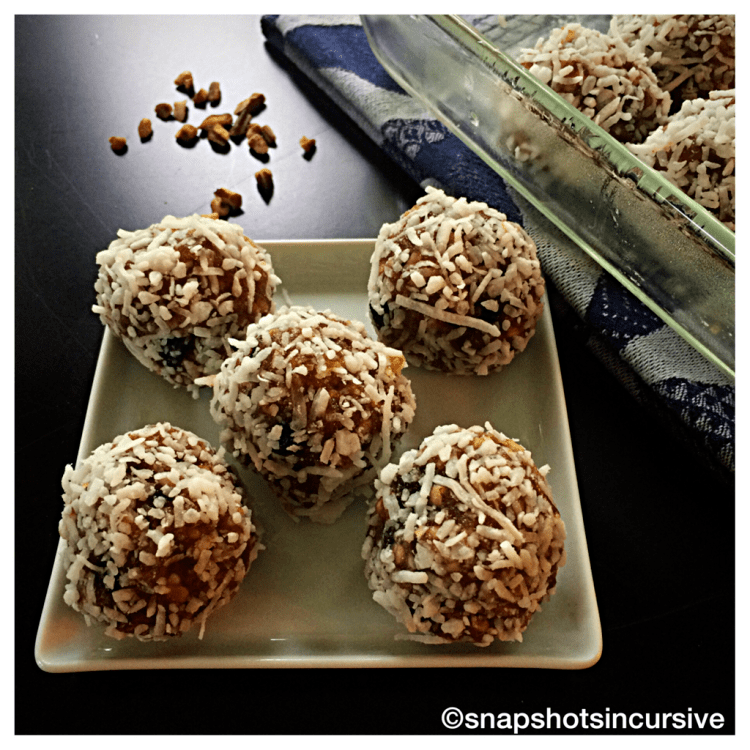
Red Chili Garlic Chicken

What’s Cooking in Gail’s Kitchen? The Next Step: Red Chili Garlic Chicken! If you are a fan of stir-fry, this sauce is often a staple inspired by the fusion flavors of the Far East. Take a quick peek at the ingredient list to see what I mean: ginger and garlic popular in China, chili peppers from Thailand, Vietnamese soy sauce, and sweet rice vinegar used in Japan. It’s all in there. Personally I’m a fan of the sweet heat mixed with the cashew crunch. Skip the take-out for tonight and try this version for yourself.

RED CHILI GARLIC CHICKEN

Ingredients:

1/2 cup dried red chiles

1-2 tablespoons olive oil

1 pound chicken tenders, boneless and skinless

1/4 teaspoon sea salt

1/8 teaspoon black pepper

1/4 teaspoon garlic powder

3/4 cup brown sugar

1/4 cup rice vinegar

2 tablespoons red wine

1 tablespoon soy sauce

1 tablespoon corn starch

1 teaspoon ginger powder

1 teaspoon paprika

1/8 teaspoon garlic powder

1/2 cup cashews

1 tablespoon toasted sesame seeds

3 green onions, snipped

Instructions:

In a microwave-safe bowl, heat 1 cup water for 2 minutes. Add clili peppers; cover. Set aside for 30 minutes, then drain water. Meanwhile, warm olive oil in medium skillet. Turn heat to high setting and add chicken tenders. Season with sea salt, black pepper, and 1/4 teaspoon garlic powder. After 3-4 minutes, when chicken turns brown, flip over. Reduce the heat to medium setting and cover. Cook chicken until firm, about 5 minutes longer. The chicken will release itself from the surface when it is ready. Set pan aside. For the sauce, in a medium skillet combine brown sugar, rice vinegar, red wine, soy sauce, corn starch, ginger powder, paprika, and garlic powder. Bring to a gentle boil on medium-high heat. Stir often. Mixture should not foam. Sauce will thicken after 7-8 minutes. Remove from heat. Pour sauce over chicken tenders. Add drained chiles, cashews, sesame seeds, and green onion snips. Heat through, stirring occasionally, to blend flavors. Serve with choice of cooked rice.

Quiche Keto-Friendly

What’s Cooking in Gail’s Kitchen? The Next Step: Quiche Keto-Friendly. So, in case you don’t know the difference between keto, paleo, and gluten-free, here’s a quick study. Keto focuses on fat, carbs, and protein without grains or breads. Paleo avoids most dairy, legumes, and grains. And gluten-free basically means you’ve given up wheat, rye, and barley. So you can be on a gluten-free diet and still be keto-friendly. What I’ve done today is eliminate the crust in the traditional quiche making it similar to an omelette, only thicker. No worries. You won’t miss the crust because the ham and cheese filling is worth the trade-off.

QUICHE KETO-FRIENDLY

Ingredients:

8 eggs

1/2 cup milk

1/2 cup Greek yogurt

1/2 teaspoon seasoned salt

1 cup ham chunks

1 cup cheddar cheddar, shredded

1 tablespoon onion, minced

Instructions:

Preheat oven to 325°. Beat eggs, milk, Greek yogurt, and seasoned salt. Add ham chunks into egg mixture; stir to combine. Fold in shredded cheese and minced onion. Pour into a greased loaf pan. Bake uncovered 40-45 minutes until set. Top should appear golden brown.

Pulled Pork BBQ Pizza

What’s Cooking in Gail’s Kitchen? The Next Step: Pulled Pork BBQ Pizza! Need a break from ordinary pizza? Here’s a unique twist on an old classic. Take southern pulled pork, usually served on a toasted bun, lose the bread, and spread the pork over pizza crust instead. Tangy barbecue sauce is used in lieu of marinara, providing just enough zing to alert the taste buds. Since barbecue sauces come in a multitude of options from hickory smoke to brown sugar sweet, you may want to blend two flavors together like I’ve done here. The results will astound you.

PULLED PORK BBQ PIZZA

Ingredients:

1 prepared pizza crust

1-2 tablespoons olive oil

1/8 teaspoon garlic powder

1 tablespoon cornmeal

3/4 cup barbecue sauce

1/4 cup chili cocktail sauce

1 cup pulled pork

2 cups mozzarella cheese, shredded

Instructions:

Preheat oven to 400°. Rub both sides of prepared pizza crust with olive oil. Season bottom with garlic powder. Sprinkle cornmeal over the bottom side. Bake on a pizza stone for 5 minutes. Remove from oven. Combine barbecue sauce and chili cocktail sauce. Mix well. Spoon onto pizza dough. Top with pulled pork and mozzarella cheese. Return to oven and bake 15-20 minutes until cheese is melted and crust is golden brown.

Omelet 101

What’s Cooking in Gail’s Kitchen? The Next Step: Omelet 101. You’re having a get-together and need an effortless, but impressive, breakfast. While everyone is huddling in the kitchen, because this is what people do, pour them a cuppa joe and get started. Making the perfect omelet will have you feeling like a gourmet chef. It’s pretty basic. Use an 8-inch sauté pan with slanted edges and plenty of butter. Fresh veggies and shredded cheese are always a good idea. If you’re nervous about the “flip”, simply do what I do. Put a lid on it.

OMELET 101

Ingredients: (per omelet)

2 eggs

Pinch sea salt

Pinch black pepper

2 tablespoons water

2 tablespoons butter

2 tablespoons smokey Swiss cheese, shredded

Sautéed asparagus tips

Sautéed mushrooms

Instructions:

In a mini chopper, combine eggs, sea salt, black pepper, and water. Beat until light yellow in color. Warm butter in pan over medium-low heat. Do not scorch butter. Pour egg mixture into pan. Do not stir. Swirl the pan so eggs cover the edge. Cook until bottom begins to set, about one minute. Tilt the pan to allow liquid to flow underneath. Slide a rubber spatula around the surface to loosen omelet. Arrange shredded cheese, asparagus tips, and sliced mushrooms across the center of the egg, forming a vertical line. Reduce heat to low. Cover pan with a lid to absorb liquid, about 30-45 seconds. The center will remain creamy. Remove lid. Fold one-third of omelet onto itself. Gently transfer omelet to a plate. Serve immediately.

Nature’s Tomato Naan

What’s Cooking in Gail’s Kitchen? The Next Step: Nature’s Tomato Naan. Who likes ooey gooey melted mozzarella cheese? I do, I do! Now add nature’s juicy ripened tomatoes for fresh garden flavor that will have you wiping your chin after the first bite. Be careful of those cheese pulls, though. Steam may be trapped between the naan crust and the pizza stone. Besides, there’s nothing worse than burning the roof of your mouth from lack of patience. Let your eyes create desire. After all, everyone wants eating to be an enjoyable experience.

NATURE’S TOMATO NAAN

Ingredients:

One prepared naan crust

1-2 tablespoons olive oil

1 tablespoon cornmeal

1/4 teaspoon garlic powder

3 Campari tomatoes, sliced

5 grape tomatoes, sliced

1/2 teaspoon sea salt

1/8 teaspoon oregano

1/8 teaspoon basil

1/8 teaspoon marjoram

8 ounces fresh mozzarella, sliced

1/8 teaspoon red pepper flakes

1/4 cup parmesan cheese, shaved

Instructions:

Preheat oven to 400°. Spread olive oil on both sides of naan bread. Sprinkle cornmeal over bottom crust. Sprinkle garlic powder over top crust. Place cornmeal side down on a pizza stone. Bake for 5 minutes. Meanwhile, slice tomatoes on a cutting board. Sprinkle tomatoes with sea salt, oregano, basil, and marjoram. Remove naan from oven. Carefully layer mozzarella cheese over crust. Then arrange sliced tomatoes. Sprinkle with red pepper flakes. Bake 15 minutes longer or until cheese is melted and bubbly. Top with parmesan cheese before serving.

Mandarin Orange Cake

What’s Cooking in Gail’s Kitchen? The Next Step: Mandarin Orange Cake! For all those gloomy days out there, a taste of sunshine comes to greet you in a naturally sweet cake. Did you realize mandarin oranges don’t only come in a can? Actually, you know them by other names in the produce department: “Halos” and “Cuties”. Sometimes people refer to mandarin oranges as clementines or tangerines. Small world, huh? Whatever you choose to call them, their pretty color and ease in peeling make them a popular choice. This cake recipe is versatile enough to be baked in a muffin tin, miniature bundt molds, or as a single-layer coffeecake. Something else to think about. The sugary glaze tops it all.

MANDARIN ORANGE CAKE

Ingredients:

1 1/4 cup flour

2 teaspoons baking powder

3/4 cup sugar

1/3 cup butter, melted

1 large egg

1/2 teaspoon orange extract

1/2 teaspoon vanilla extract

zest of one orange

1/2 cup milk

Ingredients for Orange Glaze:

1 cup powdered sugar

2 tablespoons orange juice

Orange peel zest, for garnish

Instructions:

Preheat oven to 350°. Spray miniature bundt molds with nonstick oil with added flour. Sift together flour and baking powder in a bowl. Set aside. Cream together sugar and butter in a medium bowl. Add egg; mixing well before adding orange extract, vanilla extract, and zest of one orange. Gently fold in flour mixture, alternating with milk. Stir until combined. Divide mixture into miniature bundt molds, filling 2/3 full. Bake 30 minutes or until a cake tester comes out clean. Prepare orange glaze by combining powdered sugar and orange juice. Stir until smooth. When cakes are golden brown, remove from oven. Cool slightly before inverting molds onto a wire rack. Remove molds. Transfer cakes to a platter to finish cooling. Drizzle with orange glaze and garnish with orange zest. Serve warm.

Li Hing Pineapple

What’s Cooking in Gail’s Kitchen? The Next Step: Li Hing Pineapple! Talk to any adult who is native to Hawaii and you’ll discover a craze from their youth. It’s Li Hing Mui, a powdered flavoring that can be sprinkled on anything from fruit to candy to popcorn, and even rimming the glasses of adult cocktails. No kidding. So what exactly is this mysterious flavoring, you wonder. Li Hing is plum powder made from dried plums. It has a combination of sweet, salty, and tangy taste. Local children love it on sour gummy worms or shave ice. Anything goes. One taste and you’ll find yourself giggling like a kid.

LI HING PINEAPPLE

Ingredients:

Fresh pineapple

Li Hing powder

Instructions:

Peel and core fresh pineapple. Cut into chunks. Using a sifter, lightly dust the fresh pineapple chunks with Li Hing powder. Let rest for a minute. Serve.

Kimchi Shrimp

What’s Cooking in Gail’s Kitchen? The Next Step: Kimchi Shrimp! Brace yourself for a wickedly sour Korean flavor with a crazy spicy kick. Some say it can be a bit salty, especially if you keep an eye on that sort of thing. Others notice the strong leaning toward fish, which is why I dove head first into this dish by adding naturally sweet shrimp, and of course, butter. Did you just do a double take? Stick around. You may end up on the hook.

KIMCHI SHRIMP

Ingredients:

1/2 cup prepared kimchi, chopped

1 pound frozen cooked jumbo shrimp, thawed

2-3 tablespoons butter

1 teaspoon ginger root, finely chopped

1/4 teaspoon garlic powder

1/2 teaspoon red pepper flakes

Romaine lettuce leaves

Green onions, for garnish

Instructions:

Using a mini chopper, pulse the prepared kimchi into a paste. Set aside. In a large skillet over medium heat, warm the butter. Layer the shrimp in the pan. Add chopped ginger. Sprinkle with garlic powder and red pepper flakes. Cook shrimp for one minute, then flip over. Add the kimchi paste, stirring to coat shrimp. Cook 2-3 minutes longer. Serve over romaine lettuce leaves. Garnish with green onion snips.