Zapata Tequila Shots

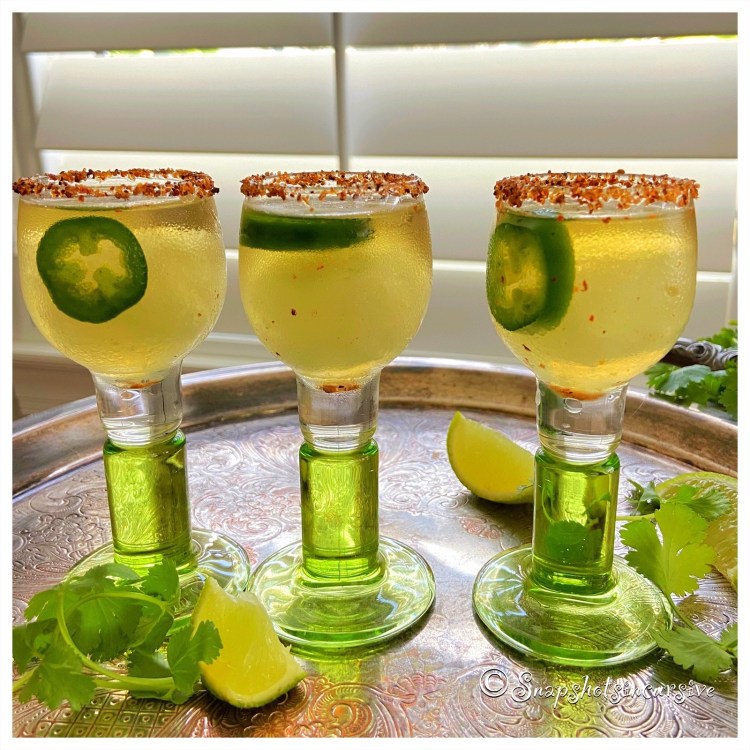
What’s Cooking in Gail’s Kitchen? Uplifting Aromas: Zapata Tequila Shots! You’re either going to love me or hate me for this recipe, so first hear me out. I’m a tequila-girl; not a crazy one, but one who has a zest for life. I like chili peppers, too. As you read through the recipe, let me offer alternative ways to “tone down” the cocktail. Because the non-alcoholic margarita mix is frozen into cubes, they can be dropped into a blender and made into a tasty frozen margarita. Simply adjust the amount of spicy tequila (or not) to suit your taste. A slushy is also very tasty, using the non-alcoholic margarita mix ice cubes and adding sparkling water. Now you see, everyone can be happy with this tasty margarita. 

ZAPATA TEQUILA SHOTS

Ingredients:

Chili-lime seasoning blend

1 cube of frozen margarita mix*

1 1/2 ounces pepper-infused tequila**

Jalapeño slice, for garnish 

Lime wedge, for garnish

Instructions:

Sprinkle the chili-lime seasoning onto a saucer. Circle the rim of a stemmed cocktail shot glass with a fresh cut lime. Dip the glass onto the saucer of chili-lime seasoning to create a flavorful rim. Add one cube of frozen margarita mix. Pour the pepper-infused tequila over the ice cube. Add a jalapeño slice and lime wedge for garnish. Serve. 

Advanced Instructions for Frozen Margarita Mix Ice Cubes:

*Using small 15-count square silicone ice cube trays, fill each tray with your favorite margarita mix. Freeze overnight. Remove cocktail ice cubes and store in zipper freezer bags. Repeat until all the margarita mix is frozen into ice cubes. 

Advanced Instructions for Pepper-Infused Tequila:

**To make your own version of pepper-infused tequila, begin with 750 mL of blue agave tequila gold. Using gloves, slice 2-3 chili peppers. Remove stems and partial seeds to control heat; discard. Add the sliced chili peppers to bottle of tequila. Reseal; shake bottle. Store in a cool, dry area for one week. Then pour the tequila through a fine mesh sieve into a large measuring cup. Transfer the pepper-infused tequila back into the bottle. Seal and store in the refrigerator. 

Yellow & White Cake Mix Cookies

What’s Cooking in Gail’s Kitchen? Uplifting Aromas: Yellow & White Cake Mix Cookies! I never want to live in a world where there are no cookies. I’m one of those people who insist on tasting a freshly baked cookie, still warm from the oven. My kitchen, my rules. I also like the idea of choices. By taking a simple cake mix and ramping up the extra ingredients, I was able to offer my family plain, powdered sugar, and turbinado sugar cookies. Does that mean I needed three taste-tests? I’ll never tell. 

YELLOW & WHITE CAKE MIX COOKIES

Ingredients:

15-ounce box yellow cake mix

2 eggs

1/3 cup oil

1 cup white chocolate chips

1/2 cup macadamia nuts, chopped

Powdered sugar, for rolling

Turbinado sugar, for rolling

Instructions:

Preheat the oven to 350°. Combine the yellow cake mix, eggs, and oil together in a large bowl; stir. The batter will be thick. Fold in the white chocolate chips and chopped macadamia nuts. Use a cookie scoop to form the cookies. Place them two inches apart on a nonstick baking sheet. Bake 8-10 minutes until the cookies appear slightly brown on the edges. Allow them to cool slightly before rolling in powdered sugar or turbinado sugar. Cool on a wire rack. Repeat baking steps until all the cookie dough has been used. 

Xio Sticky Rice

What’s Cooking in Gail’s Kitchen? Uplifting Aromas: Xio Sticky Rice! Advanced planning can make all the difference in a satisfying dish. In this case, soaking the rice overnight allows the grains of rice to absorb moisture, which eliminates the risk of biting into a hard grain of rice that didn’t soften during the cooking process. No one wants that. When steamed, the rice will be translucent and appear glossy. 

XIO STICKY RICE

Ingredients:

1 cup dry sticky rice

1/2 teaspoon sea salt

1 tablespoon olive oil 

Instructions:

Place sticky rice in a bowl. Fill the bowl with water to cover 2 inches over the rice. Cover. Soak the rice overnight. The next day, using a fine mesh sieve, wash the rice until the water runs clear. Place the rice in a rice cooker. Add 1 1/4 cups water, sea salt, and olive oil; stir. Cover and cook according to the rice cooker directions. Transfer the cooked sticky rice to a bowl, fluff with a wooden spoon, and serve. 

Wild Salmon Avocado Toast

What’s Cooking in Gail’s Kitchen? Uplifting Aromas: Wild Salmon Avocado Toast! Receiving gourmet food makes for an exciting day. I mean, name a foodie who doesn’t like yummy surprises of that nature. When I received a box of Pacific Northwest Smoked Wild Salmon from dear family members living on the opposite coast, I practically jumped up and down. Everything was fully-cooked, ready to serve, smoked, and vacuumed sealed, needing absolutely no refrigeration. I couldn’t ask for more. I am so thankful we live in a very special time when gourmet and specialty foods can be ordered online and practically delivered next day. Now there’s no reason to miss out on those fabulous items that were once restricted to geographical locations. We can have it all at the click of a button. 

WILD SALMON AVOCADO TOAST

Ingredients:

2 slices baguette, toasted

1 tablespoon sea salt butter

1 small avocado, pitted and slightly mashed

1 slice red onion, roughly chopped 

2 ounces smoked wild salmon, flaked 

1 teaspoon capers

Everything But Bagel seasoning

Instructions:

To build-a-breakfast, place warm baguette slices on a plate. Spread each with sea salt butter. Cover each piece of toast with the slightly mashed avocado. Add the red onions. Arrange the smoked wild salmon as the next layer. Top with capers. Sprinkle Everything But Bagel seasoning over all. Serve with eggs, if desired. 

Vine-Ripened Tomato Flatbread

What’s Cooking in Gail’s Kitchen? Uplifting Aromas: Vine-Ripened Tomato Flatbread! I miss my vegetable garden. Although it wasn’t huge, it provided me with tomatoes in all shapes and sizes. I used to snack on cherry tomatoes as I picked a handful for the evening dinner salad. Sometimes the juices would squirt out of my mouth, which made me thankful no one was around to be the target of such fluid madness. The Roma tomatoes were perfect when puréed into a delectable sauce for pasta or pizza. And the beefsteak varieties provided enough texture to hold everything together in a salty BLT smothered in mayonnaise. Talk about a sensory explosion. Ah, yes, tomatoes make me very happy. 

VINE-RIPENED TOMATO FLATBREAD 

Ingredients: 

1 naan flatbread 

1 tablespoon olive oil

1 tablespoon cornmeal 

1/8 teaspoon garlic powder 

1/4 teaspoon sea salt

2 tomatoes, sliced and halved 

4 ounces fresh mozzarella, sliced

1/4 cup provolone cheese, shredded 

1/2 teaspoon dried Italian herb blend

Fresh Basil, for garnish

Instructions:

Preheat oven to 400°. Brush the bottom of the naan flatbread with olive oil. Dust with cornmeal. Sprinkle with garlic powder and sea salt. Bake flatbread, seasoned side down, on a pizza pan for 5 minutes. Remove pan from oven. Arrange tomato slices over the top of the flatbread. Cut mozzarella cheese slices in half and cover the tomatoes. Top with shredded provolone cheese. Sprinkle Italian herb blend over all. Bake 10 minutes longer, or until cheese is gooey and tomatoes have softened. Drizzle with more olive oil, if desired.  Garnish flatbread with fresh basil. 

Urban Pea Salad

What’s Cooking in Gail’s Kitchen? Uplifting Aromas: Urban Pea Salad! It’s funny. I remember eating pea salad when I went to visit my mother. I also remember placing a spoonful of pea salad on my plate at a church dinner buffet. In addition, I remember adding pea salad as a flavorful choice from a bountiful restaurant salad bar. But I don’t ever remember making pea salad at home for myself or my family. And I’m not sure why not. I guess as we age, we peruse our memory banks to revisit those satisfying moments that bring a smile to our faces. Don’t be surprised if you discover more of these bits of nostalgia for yourself. After all, they’re only a memory “snapshot” away. 

URBAN PEA SALAD

Ingredients:

1/4 cup mayonnaise 

2 cups frozen baby peas, slightly thawed

4 slice’s applewood smoked bacon, cooked until crisp; crumbled

1/4 cup red onion, finely sliced 

1/3 cup sharp cheddar cheese, finely shredded

Instructions:

Gently combine the mayonnaise, baby peas, bacon crumbles, red onion, and shredded cheddar cheese in a bowl. Stir until the peas are coated and everything is mixed. Cover with plastic wrap; refrigerate two hours. Serve slightly chilled. 

Tuna Sushi Tower

What’s Cooking in Gail’s Kitchen? Uplifting Aromas: Tuna Sushi Tower! Poke is very quickly becoming a popular food to eat at home or when dining out. I became quite a fan while wintering on the island of Kauai. Eating fresh fish and seafood became as natural as a daily walk along the beach. The secret to good poke is buying sashimi-grade tuna, since it is eaten raw. Poke translates to “chunk” in the Hawaiian language. Basically, raw fish is cut into chunks and marinated. Choosing fresh tuna over frozen is the most favorable option, so always have a chat with your seafood specialist to learn how they supply it. If frozen, be sure each portion is individually vacuum packed. Always allow it to thaw in the refrigerator. After that, the difficulty is in deciding which way to prepare it. 

TUNA SUSHI TOWER

Ingredients:

8-ounce ahi tuna steak, sushi grade, cut into chunks

2 tablespoons fresh chili paste

2 tablespoons toasted sesame oil 

1/4 cup ponzu sauce

1 avocado, cut into chunks

1 1/2 cups cooked sushi rice

Sliced Scallions, for garnish

Pickled Ginger, for garnish

Instructions:

Combine the ahi tuna chunks, fresh chili paste, sesame oil, and ponzu sauce. Lightly toss and allow to marinate in the refrigerator for 2 hours. To assemble the “tower”, use a 3-inch round ring mold. Place it in the center of a plate. Begin with 6 tablespoons of sushi rice. Lightly press down using the back of a spoon to make the layer compact. For the next layer, use 6 tablespoons of avocado chunks, pressing lightly and smoothing as you go. Finally spoon the marinated ahi tuna chunks on top. Transfer the mold to the refrigerator to chill. Make another tower, with the remaining ingredients, repeating the same steps. To serve, slowly remove the mold ring. Garnish with pickled ginger and sliced scallions. Offer wasabi paste, if desired. 

Sesame Crusted Ahi

What’s Cooking in Gail’s Kitchen? Uplifting Aromas: Sesame Crusted Ahi! Even if you prefer a t-bone steak well done, remember that ahi tuna is different from beef. For one reason, ahi tuna can get as tough as shoe leather and as dry as dust when it is overcooked. Pink does not mean raw. Fresh tuna is dark red in color. That’s raw. For those who are trying to maintain a low-fat diet, reduce cholesterol, and strive for good heart health, ahi tuna is nice and lean. The taste is delicious and seems to be rising in popularity. 

SESAME CRUSTED AHI

Ingredients:

3 tablespoons toasted sesame seeds, black and white

1 teaspoon fried garlic

1 teaspoon kosher salt

1 teaspoon black pepper 

1 teaspoon sugar

1 teaspoon dried Italian seasoning blend

12-ounce ahi tuna steak, sushi grade

1 tablespoon soy sauce

2 tablespoons vegetable oil

Instructions:

In a small shallow dish, combine toasted sesame seeds, fried garlic, kosher salt, black pepper, sugar, and dried Italian seasoning blend. Mix well. Pat dry the ahi steak. Coat both sides and the ends with soy sauce. Generously cover both sides of the ahi steak with the sesame seed coating. Press down onto the flesh to adhere spices to the fish. First of all, in order to get a nice golden sear, heat a cast iron skillet over medium high heat until the pan is very, very hot. Add the oil to coat the pan. Carefully place the ahi tuna into the skillet, pressing it into the pan with a metal spatula. Sear for 60 seconds, or until golden brown. Carefully flip. Sear for another 60-90 seconds until golden. Use a tongs to hold it upright to sear the sides, if preferred. Place the seared ahi steak onto a cutting board. Using a very sharp knife, slice thinly and serve. The middle should have a very nice pink color. Enjoy! 

Raspberry Nut Granola Bars

What’s Cooking in Gail’s Kitchen? Uplifting Aromas: Raspberry Nut Granola Bars! The jury is still out on whether this fruit crumble can be eaten for breakfast, dessert, or late-night snack. I can attest to the deliciousness of it with my morning cuppa joe. The espresso bitterness balances out the sweetness with perfection. And overnight guests definitely gave it a stamp of approval with a scoop of ice cream on top, making it almost cobbler-like in the dessert category. Giving it a quick zap in the microwave warmed it up as well. My third category, the late-night snack,  must also be true. When I arose the next morning, I noticed there was one less serving under the cake dome than when I turned in the night before. Huh. Must’ve been the family dog. After all, we know they watch TV.

RASPBERRY NUT GRANOLA BARS

Ingredients for Bars:

2 cups flour

1 cup sugar

1/2 teaspoon sea salt

3/4 cup butter, unsalted

1 cup raspberry preserves

3/4 cup fresh raspberries 

2 teaspoons lemon juice 

3 tablespoons brown sugar 

1/3 cup cinnamon almond granola

Instructions:

Preheat oven to 350°. Spray a 9”x13” glass baking dish with nonstick oil. Set aside. Using a mixer, combine flour, sugar, and sea salt for about 10 seconds. Slowly add butter, one tablespoon at a time, on low speed until all the butter has been used. In a couple minutes the dough will pull away from the side of the bowl. Reserve a quarter of the mixture; set aside. Transfer the remaining 3/4 dough mixture to the prepared pan, pressing it create a single layer of crust. For the raspberry filling, combine the raspberry preserves, fresh raspberries, and lemon juice. Lightly mash the larger pieces of fruit, yet allowing a chunky appearance. Pour the raspberry filling over the crust, spreading the filling into an even layer. Crumble the remaining dough mixture over the filling. Cover the top with brown sugar. Finish with a layer of cinnamon almond granola. Bake 20-30 minutes, or until the filling is bubbly. The topping will be golden brown. Allow the bars to cool slightly before cutting into squares.