Versatile Fig-Glazed Cornish Hen

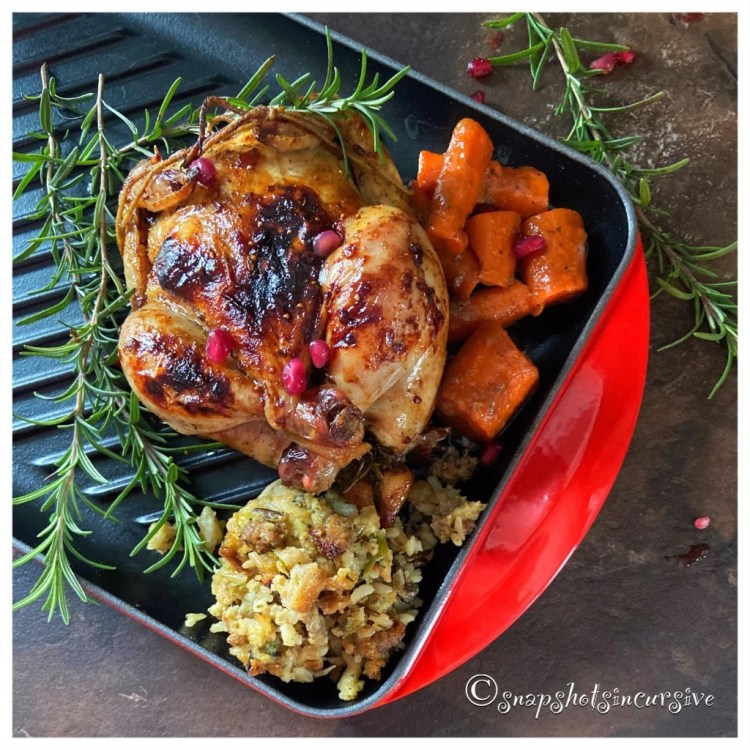
What’s Cooking in Gail’s Kitchen? Here Come the Holidays: Versatile Fig-Glazed Cornish Hen! When an evening meal becomes a dinner date for two, make it extra-special by choosing something out of the ordinary. A luxury, so to speak. Cornish hens are an individual serving, which makes them that much more appealing on the dinner plate. Typically they run in size around 1 1/2 pounds, which is perfect. The meat is quite tender and moist with a subtle chicken flavor. Whether it’s a romantic celebration or just because, turn on some music, open a bottle of wine, gaze into each other’s eyes, and enjoy the ambiance. Candlelight is purely optional.

VERSATILE FIG-GLAZED CORNISH HEN

Ingredients for Cornish Hens:

20-ounce each Cornish hens, twin pack, frozen and thawed

1 teaspoon kosher salt

1/4 teaspoon black pepper

2 sprigs fresh rosemary

2 tablespoons unsalted butter, room temperature

Ingredients for Fig Glaze:

1/4 cup chili-fig jam

1/4 cup port wine

1/4 cup balsamic reduction

1/4 cup unsalted butter

Freshly squeezed lemon juice, quarter lemon

Pinch of kosher salt

Cracked black pepper

Instructions:

Preheat oven to 400°. Spray a dutch oven with nonstick oil. Set aside. Wash the Cornish hens; pat dry. Season the cavities with kosher salt and cracked black pepper. Place a rosemary sprig inside. Secure the legs and wings with cooking twine. Transfer birds to the dutch oven. Dot the top of each Cornish hen with butter. Bake 45 minutes. While the hens are roasting, make the fig glaze. Place a small pan on the stovetop over medium-high heat. Add chili-fig jam, port wine, balsamic reduction, butter, lemon juice, kosher salt, and black pepper. Stir well to combine. Allow mixture to reduce to a syrupy consistency, about 20 minutes, stirring occasionally. Baste the birds with the fig sauce during the last 10 minutes of roasting. The Cornish hens are done when a meat thermometer inserted into the thickest part of the thigh registers 165°, and juices run clear. The skin should be golden brown and crispy. Remove pan from oven. Tent the pan with aluminum foil to keep warm. Allow the birds to rest for 10 minutes before serving.

The Power of Encouragement

Thank you to all those viewers who have brightened my days. Your actions have touched my heart with lasting impressions by showing me you take time to share kindness. Blessings! 🍃🍓

Always, Gail

“Nothing is impossible,

the word itself says

“I’m possible.”

~ Audrey Hepburn

Unbelievable Egg Nog Cake

What’s Cooking in Gail’s Kitchen? Here Come the Holidays: Unbelievable Egg Nog Cake! Did you know you can freeze eggnog for up to six months? You can. And isn’t it a relief to know that you won’t be pouring money down the drain? Too much of anything can take away the joy. We all get caught up in holiday indulgences, thinking it’s the only time of year to appreciate our favorite treats. No more. Rather than feeling like a glutton for punishment, followed by waves of guilt, here’s a way to stretch the cheer throughout the winter months. When the nights are dark and the fire warms your feet, snuggle up with a slice of nostalgia. You deserve it.

UNBELIEVABLE EGG NOG CAKE

Ingredients:

16.5-ounce yellow cake mix

3-ounce vanilla instant pudding mix

1 cup eggnog

4 eggs

1/3 cup vegetable oil

1 teaspoon nutmeg

1/4 cup water

1 teaspoon vanilla extract

Ingredients for Glaze:

1/4 cup butter, warmed

1/4 cup eggnog

1/2 teaspoon vanilla extract

1/4 teaspoon rum

1/2 teaspoon nutmeg

2 cups powdered sugar

Garnish with rosemary sprigs and pomegranate arils

Instructions:

Preheat oven to 350°. Spray a bundt pan (or 8 mini bundt pans) with nonstick oil containing flour. Set aside. In a large bowl, combine yellow cake mix, dry vanilla pudding mix, eggnog, eggs, vegetable oil, nutmeg, water, and vanilla extract. Beat with a mixer for 2 minutes until thoroughly combined, scraping down the sides as needed. Pour batter into pan(s). Bake 50 minutes for large, or 25 minutes for small bundt cakes, until a cake tester comes out clean. Remove from oven to cool for 10 minutes before inverting on a wire rack. Allow to cool 10 minutes longer before transferring to a cake plate. While cakes are cooling make the glazed icing. In a bowl, whisk together butter, eggnog, vanilla extract, rum, and nutmeg until smooth. Sprinkle in powdered sugar, stirring with a spoon, until smooth. Drizzle glaze over cake. Garnish with rosemary sprigs and pomegranate arils for a festive finish.

Tails of Maine Lobster

What’s Cooking in Gail’s Kitchen? Here Come the Holidays: Tails of Maine Lobster! There’s an upside to living through a pandemic. Practically everything is available to order from computer-to-doorstep. And that includes Maine hard shell lobsters, especially when you live in a state that is landlocked. Of course, you still have to do a little homework by reading reviews and asking questions on Live Chat websites. We found talking directly to a customer service representative can answer a lot of confusing questions and bring clarity. In turn, you never know when an actual salesperson of the company will offer an unexpected special to entice the purchase further. I guarantee you, it’s absolutely worth the time. The results are simply delicious.

TAILS OF MAINE LOBSTER

Ingredients:

2 6-ounce frozen lobster tails, thawed

2 tablespoons sea salt

1 cup unsalted butter

1 lemon, for zest

1 lemon, quartered for garnish

Instructions:

Before cooking the lobster tails, make the clarified butter. In a small, heavy bottomed saucepan, warm the butter over medium-low heat. Do not stir. Allow the butter to melt without turning brown. Gradually a white foam will appear on the surface. Allow the melted butter to stand for 5 minutes. Tilt the saucepan to carefully spoon the white foam off the top. This may take several steps. Strain the clarified butter through a cheesecloth to remove any milk solids. This will discard any brown bits on the bottom of the pan. Transfer clarified butter back to the saucepan to keep warm. Divide the lemon zest into single-serving dipping bowls. Set aside. To make the lobster tails, bring a pot of water to a boil. Reduce heat to a soft boil and add sea salt. Drop tails in one at a time. Cook the lobster for 5 minutes. Set a timer to avoid overcooking. The lobsters will be bright red when done. Using metal tongs and a large strainer, take the tails out of the boiling water. Transfer to two dinner plates. Pour the clarified butter over the lemon zest in the dipping bowls. Garnish with lemon wedge. Serve immediately.

Snickerdoodle Chocolate Chip Cookies

What’s Cooking in Gail’s Kitchen? Here Come the Holidays: Snickerdoodle Chocolate Chip Cookies! When my 11-year old granddaughter came for a visit, one of the things we did together was bake homemade cookies. It was a wonderful way to build social skills for life, not to mention lasting memories. Conversation flowed easily while mixing cookie dough and then afterwards licking the bowl. Her technique for cracking an egg, without getting eggshells in the dough, was to hold it securely in the palm of her hand, above a custard cup…and squeeze. Don’t laugh. It worked. Surprisingly it takes a lot more uneven pressure to break it that way, but her reasoning was, “Nana, it’s easier than trying to get my thumbs in the opening and pulling it apart.” Priceless.

SNICKERDOODLE CHOCOLATE CHIP COOKIES

Ingredients:

16.5-ounce box yellow cake mix

1/2 cup vegetable oil

2 eggs

1 cup semi-sweet chocolate chips

1/3 cup sugar

1 teaspoon ground cinnamon

Instructions:

Preheat oven to 350°. Line two baking sheets with parchment paper. Set aside. In a mixing bowl, combine yellow cake mix, vegetable oil, and eggs. Stir until thoroughly mixed. Fold in chocolate chips. Chill dough 20 minutes. Whisk together sugar and ground cinnamon in a shallow dish. Set aside. Scoop teaspoon-sized balls of cookie dough; roll in cinnamon sugar. Place on the prepared baking sheet. Bake 8-10 minutes. Remove from oven and allow cookies to cool on the baking sheet 2 minutes longer. Then transfer them to a wire rack to cool completely. Repeat with the remaining cookie dough. Store in an airtight container.

Rosemary Lemon Roasted Turkey

What’s Cooking in Gail’s Kitchen? Here Come the Holidays: Rosemary Lemon Roasted Turkey! Did you know a frozen turkey will last up to two years in the freezer? First and foremost, it’s only a bargain if you have the space to store it. That being said, roasting a turkey is a great source of lean protein. A whole bird provides healthy meat that can be served several different ways. Unfortunately, our bodies need protein and cannot store it. We need to replenish protein in order to build strong bones, repair muscle, heal skin, and help keep blood sugar levels even. All the other vitamins and minerals are a bonus. A few words of advice: Remove and discard the skin of the roasted turkey, no matter how tempting that crispy, golden outer covering calls your name. It’s main purpose is to keep the meat moist. That, and for taking fabulous snapshots, of course.

ROSEMARY LEMON ROASTED TURKEY

Ingredients:

4-6 sprigs of fresh rosemary

2 lemons, quartered

12-pound turkey, thawed

2 tablespoons butter, melted

1 teaspoon kosher salt

1/2 teaspoon garlic powder

Instructions:

Preheat oven to 325°. Rinse turkey, pat dry. Insert rosemary and lemon pieces in the cavity of the turkey. Truss the turkey by wrapping the bird in cooking twine. Secure the legs and tuck the wings underneath. Transfer turkey to the roasting pan with the breast side up. Brush with melted butter. Sprinkle with kosher salt and garlic powder. Bake uncovered for 4 hours, or until a meat thermometer reads 180°. The juice of the turkey will run clear when the center of the thigh is cut. Remove from oven. Cover. Allow turkey to rest for 15 minutes before carving. Garnish with fresh rosemary sprigs and lemons.

Quasi Cherry Almond Macaroon Slab Pie

What’s Cooking in Gail’s Kitchen? Here Come the Holidays: Quasi Cherry Almond Macaroon Slab Pie! Now that’s a mouthful. But truth-be-told when you’re talking about a dessert with mounds of plump cherry clusters, flaked coconut, and sliced nuts…well, nothing else will do. By transforming it all into a slab pie, portions become more manageable over traditional sliced servings. The crust is still flaky, even if there is less of it. Focus instead on a sweet treat with a single shot of Italian espresso or scoop of ice cream. It’s a perfect balance for the taste buds.

QUASI CHERRY ALMOND MACAROON SLAB PIE

Ingredients:

1 prepared pie crust

Ingredients for filling:

21-ounce can cherry pie filling

1/2 teaspoon cinnamon

1/8 teaspoon sea salt

1 teaspoon lemon juice

Ingredients for topping:

1 cup coconut, shredded

1/2 cup almonds, sliced

1/4 cup sugar

1/8 teaspoon sea salt

1/4 cup milk

1 tablespoon butter, melted

1/4 teaspoon almond extract

1/4 teaspoon coconut extract

1 egg, beaten

Instructions:

Preheat oven to 400°. Spray a baking sheet with nonstick oil. Roll the prepared pie crust to fit the baking sheet. Trim the dough to only fit the bottom of the pan. If necessary, use the extra dough pieces to fill in the corners. Pinch to seal. In a large bowl, combine the cherry pie filling, cinnamon, sea salt, and lemon juice. Mix thoroughly. Spoon the filling onto the pie crust. Spread in a single layer. Bake for 20 minutes. Meanwhile, for the topping, fill a mixing bowl with the shredded coconut, sliced almonds, sugar, sea salt, milk, melted butter, almond extract, coconut extract, and beaten egg. Remove the slab pie from the oven. Spread macaroon topping over all. Return slab pie to oven, bake 25 minutes longer, or until bubbly and golden brown. Cut into slices. Serve with vanilla bean ice cream.

Plum Coffee Cake

What’s Cooking in Gail’s Kitchen? Here Come the Holidays: Plum Coffee Cake! Plums have a way of making a person feel special. They’re not as plentiful as apples, but when they’re available I can’t wait to snag a few to plunk into a homemade coffee cake. The sweet flavor reminds me of stepping into a pastry shop where fruit-filled delicacies are placed front and center in the glass-domed showcase. From mini fruit tarts overflowing with ripe, juicy berries to cheesecakes smothered in exotic options. Turnovers become too tempting when a smidgen of filling seeps out. And just look at the succulent strudels and rustic galettes. But I digress. Today’s feature is all about the mouthwatering palatable pleasure of the plum.

PLUM COFFEE CAKE

Ingredients:

1 1/4 cup flour

1 teaspoon cinnamon

1/4 teaspoon nutmeg

1/8 teaspoon cardamom

2 teaspoons baking powder

1/2 teaspoon sea salt

1/3 cup butter, softened

3/4 cup sugar

1 teaspoon vanilla extract

1 egg, room temperature

1/2 cup buttermilk

1/2 pound plums, pitted and sliced

Powdered sugar, for dusting

Instructions:

Preheat oven to 350°. Spray a 9” cake pan with nonstick oil. Set aside. In a bowl, whisk together flour, cinnamon, nutmeg, cardamom, baking powder, and sea salt. Set aside. In another bowl cream together butter and sugar, using an electric mixer, for 3 minutes. Add vanilla extract and egg. Beat on Low speed until well mixed. Gradually add the flour mixture, alternating with buttermilk. Beat on Low speed until smooth. Transfer the batter to the prepared pan. Arrange sliced plums on top in a circular pattern. Bake for one hour until golden brown. Center is set when a cake tester comes out clean. Cool cake on a wire rack. Dust with powdered sugar before serving.

Oregon Pear Dessert Tray

What’s Cooking in Gail’s Kitchen? Here Come the Holidays: Oregon Pear Dessert Tray! Nothing says a light dessert like fruit, cheese, and nuts. Think about it. When you eat this combination before the meal, chances are you may overdo it simply because it’s all about timing. You certainly don’t intend to gorge yourself, yet conversation flows leading to munching without hesitation. Besides, everyone is doing it. Now fast-forward to the end of the meal. Your appetite has been sated and a little something would make it even more perfect. Ripe fruit that is naturally sweet blends well with a savory cheese and salty crunch of roasted nuts. Who knows? You may even find a sip of sherry or dessert wine to be the crowning touch of a great meal.

OREGON PEAR DESSERT TRAY

Ingredients:

1 Oregon pear, sliced with core removed

2-4 ounces Swiss cheese, cut into wedges

1/4 cup cherries, halved with pits removed

1/2 cup mixed nuts

5 ounces dessert wine, per serving

Instructions:

Wash pears; pat dry. Slice with skin on, removing stem and core. Transfer to dessert plate or tray. Arrange cherry halves. Add wedge of savory cheese. Finish with a side serving of mixed nuts. Serve with a glass of sherry or dessert wine.