“While there’s life,
there’s hope.”
~ Cicero

“While there’s life,
there’s hope.”
~ Cicero

“It was going to be okay.
They were going to be okay.
Life was, after all, just a series of
hops over all the little stuff.”
~ Cathleen C. Robinson
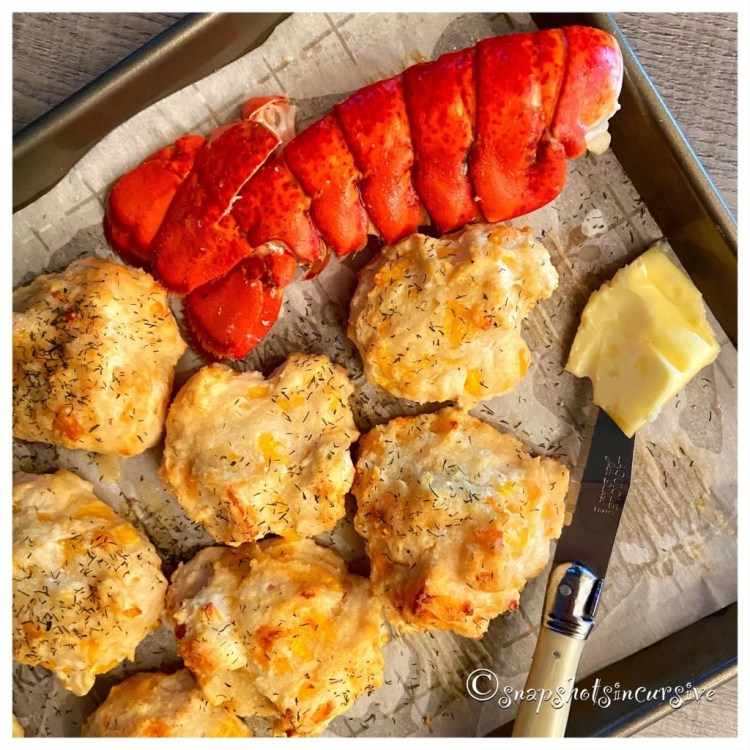
What’s Cooking in Gail’s Kitchen? Here Come the Holidays: Lobster-Mate Cheddar Biscuits! Having to shelter-in-place during the pandemic does not mean that restaurant cravings just stop. I see you nodding your head in agreement. If I named a restaurant, chances are you would say, “Oh, I love their…steak burgers, iced tea, queso dip, sweet potato wedges, or cheddar biscuits.” Admit it, dining out is a fact of life and we miss it right now. So, the alternative is to give it our best shot at home. Thanks to my friend, Colleen, for her blog post* on a name-brand seafood restaurant’s copycat recipe for the bread basket. These cheddar biscuits are spot on. I guarantee you, the results will astound you.
LOBSTER-MATE CHEDDAR BISCUITS
Ingredients:
4 cups prepared baking mix
1/2 cup cheddar cheese, shredded
1 1/3 cup water
1/2 cup unsalted butter, melted
1 teaspoon garlic powder
1 teaspoon onion salt
Dill weed, for garnish
Instructions:
Preheat oven to 375°. Line two baking sheets with parchment paper. Set aside. Combine baking mix, cheddar cheese, and water in a bowl. Mix well. Drop biscuits by spoonful on the prepared baking sheets. Bake for 10-12 minutes until golden brown. In a small bowl, combine melted butter, garlic powder, and onion salt. Brush butter mixture over warm cheddar biscuits. Sprinkle with dill weed. Serve warm.
*Check out Colleen’s recipe at

What’s Cooking in Gail’s Kitchen? Here Come the Holidays: Kielbasa Grilled Romaine! When the sun comes out and the wind dies down, it’s not unusual to see Northerners uncover the gas grill for a momentary glimpse of Summer. Everyone needs a reprieve from the winter doldrums, right? Nothing works better than a protein-rich complex carbohydrate meal, in my opinion. And grilled foods definitely lift the mood like a breath of fresh air. Sound painless? It pretty much is. Even the birds are chirping louder than usual.
KIELBASA GRILLED ROMAINE
Ingredients:
1 pound kielbasa sausage link
2 romaine hearts
3 tablespoons olive oil
1/4 teaspoon seasoned salt
1/4 teaspoon garlic and herb seasoning
1/8 teaspoon red pepper flakes
1/2 pint cherry tomatoes, halved
4 ounces parmesan cheese, crumbled
Instructions:
Remove kielbasa sausage link from package. Rinse and pat dry. Transfer to a platter. Rinse romaine lettuce hearts. Pat dry. Trim the end stalks, leaving enough to keep the bunches intact. Transfer to a platter. In a small dish, combine olive oil, seasoned salt, garlic and herb seasoning, and red pepper flakes. Using a silicone brush, coat the leaves of the romaine hearts, inside and out with the olive mixture. Halve the cherry tomatoes; place in a serving bowl. Preheat the outdoor grill on High setting. Using tongs, transfer the seasoned romaine lettuce hearts directly to the grill. Repeat with kielbasa sausage link. Grill for 3 minutes. Flip the romaine lettuce and grill 2 minutes longer. Rotate the kielbasa sausage for even browning. Remove all to clean platters. To serve, place charred romaine lettuce hearts on a dinner plate. Divide the kielbasa sausage between plates. Add cherry tomato halves. Top with crumbled parmesan cheese. Drizzle with remaining olive oil mixture. Serve immediately.
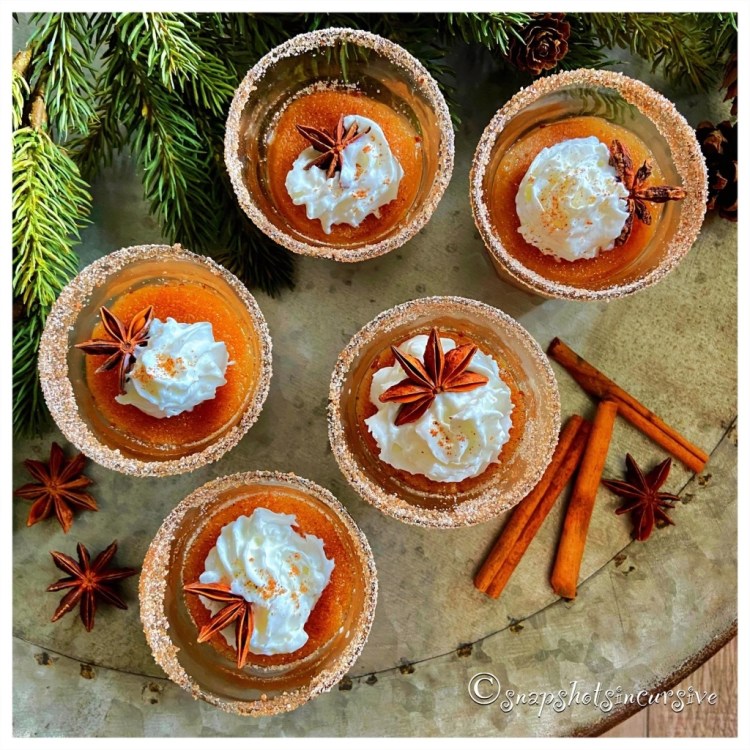
What’s Cooking in Gail’s Kitchen? Here Come the Holidays: Jiggers of Apple Cider Jello Shots! It’s a chilly winter’s evening where the crackling flames encompass the fireplace logs. My husband and I are snuggling under woolen blanket throws as we binge-watch another series on Netflix. I think we’re addicted. No judgement, please. Outside the windows, the ground takes on a blueish tint as the snow and ice reflect the elusive rays of fading daylight. From time to time, gusts of air beguile the wind chimes into dancing around in synchronized motion. It’s times like these where I slip my toes into sherpa-lined slippers and pad my way to the kitchen for a sinfully delicious elixir of life. You may, too. For adults only.
JIGGERS OF APPLE CIDER JELLO SHOTS
Ingredients for Jello Shots:
1 cup bourbon
2 cinnamon sticks
1 cup apple cider
1/4 cup sugar
2 packets gelatin
Ingredients for Serving:
1 cup sugar
4 teaspoons ground cinnamon
Lemon wedge
Whipped cream, for garnish
Star anise, for garnish
Instructions:
In a glass jar, combine bourbon and cinnamon sticks. Cover. Infuse flavor for two days; remove cinnamon sticks and discard. Set aside. Lightly spray 10-12 shot glasses with nonstick oil. Wipe away excess. In a saucepan, combine apple cider and sugar. Sprinkle gelatin over top. Allow to sit for 3 minutes, or until surface has a wrinkled appearance. Warm mixture on medium heat until sugar and gelatin have dissolved, about 2 minutes. Mixture will be smooth. Stir in spiced bourbon. Pour into prepared shot glasses. Refrigerate until firm, about 4 hours. To finish, combine sugar and ground cinnamon. Transfer mixture to a plate. Rub the lemon wedge around the rim of the shot glass. Dip into the cinnamon sugar topping. Place shot glass on a tray. Repeat with remaining desserts. Keep refrigerated. To serve, add a dollop of whipped cream and a star anise. Serve chilled.
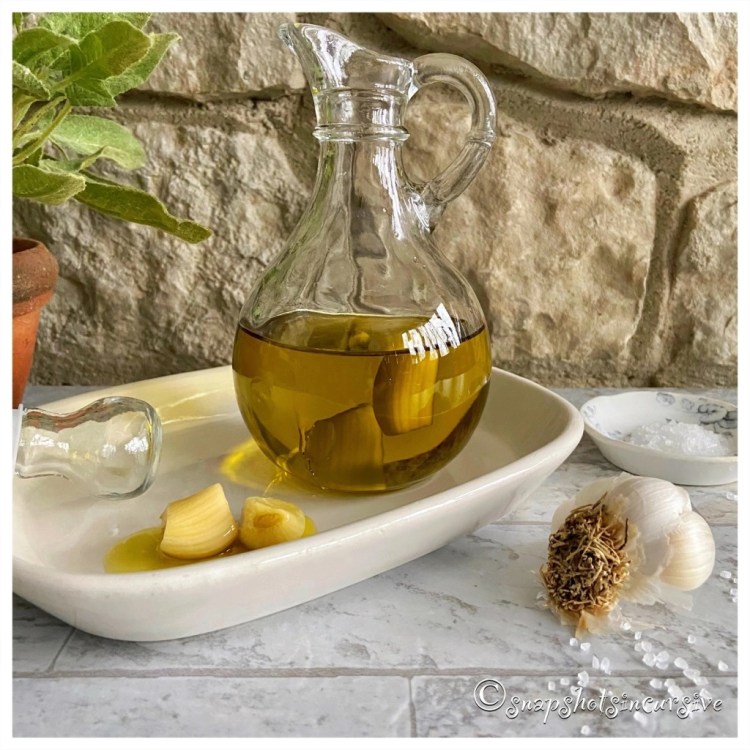
What’s Cooking in Gail’s Kitchen? Here Come the Holidays: Infused-Garlic Olive Oil! If you’ve ever had the opportunity to visit a specialty store that sells infused olive oils and flavored vinegars, you understand the value of the tasting bar within. Tasting is believing, in my opinion, especially when it’s difficult to narrow down the choices. My favorites so far are lemon extra virgin olive oil and strawberry balsamic vinegar or lime infused extra virgin olive oil and pomegranate balsamic vinegar. Of course, Italian balsamic vinegar and garlic-infused extra virgin olive oil are staples in my kitchen. Think about it a minute. Garlic tastes wonderful on crusty breads, drizzled over roasted vegetables, marinated in meats, and stirred into homemade sauces. When making your own infused olive oil, repeat after me, “Always use extra virgin olive oil.” EVOO is made from pure, cold-pressed olives without adding processed oils. The test is proven when olive oil is refrigerated. It will solidify like butter. If it doesn’t, it is unrefined and will remain liquid. Don’t be fooled.
INFUSED-GARLIC OLIVE OIL
Ingredients:
1 cup extra virgin olive oil
3 cloves garlic, peeled
Instructions:
Sterilize a glass jar, with airtight lid, and set aside. Warm olive oil, in a small saucepan, over low heat only. Remove from heat when the oil is barely warm to the touch. Do not boil. Add garlic cloves. Set aside for 24 hours. At that time, pour the olive oil through a fine strainer into the sterilized jar. Discard garlic cloves. Seal the jar. Store infused oil in the refrigerator until ready to use.

What’s Cooking in Gail’s Kitchen? Here Come the Holidays: Half-Baked Skillet Pizza Dip! Who likes bread dough? I do, I do. Who keeps a bag of frozen bread dough rolls in their freezer? Me, too. Whether you’re making this amazing pizza dip as an afternoon snack, midday appetizer, or late-night dinner, you will impress yourself with the chewy bread dough base. That is, until the mouthwatering moment you feast your eyes on the gooey strands of pizza cheese. Melted mozzarella cheese pulls can stretch from the iron skillet to your mouth like a tightrope stretched across Niagara Falls. Either snap it off in one bite or twirl it around your index finger for satisfying nibbling. Did I fail to mention the layers of deliciousness? Read on to see what I mean.
HALF-BAKED SKILLET PIZZA DIP
Ingredients for Crust:
12 frozen dinner roll dough balls
4 tablespoons butter, melted
1/4 teaspoon garlic powder
1/4 teaspoon black pepper
1/8 teaspoon sea salt
1/8 teaspoon red pepper flakes
1 teaspoon parsley flakes
Ingredients for Dip:
8 ounces cream cheese, softened
1/2 cup mayonnaise
1 teaspoon zesty Italian salad dressing mix
1/2 cup parmesan cheese, grated
1/2 cup provolone cheese, shredded
2 cups mozzarella cheese, shredded
1/2 cup prepared pizza sauce
5 slices deli-style hard salami, cut into triangles (or mini pepperoni slices)
Fresh Parsley, for garnish
Instructions:
Preheat oven to 400°. Spray an iron skillet with nonstick oil. Remove frozen bread dough rolls from the freezer. Set aside. In a small bowl, combine melted butter, garlic powder, black pepper, sea salt, red pepper flakes, and parsley flakes. Mix well. Coat each frozen bread dough roll with butter mixture and arrange around the outside edge of the iron skillet. Cover pan with a tea towel, place in a warm area, and allow the dough to rise for 20 minutes for a half-baked doughy crust. Meanwhile, to prepare dip filling, combine cream cheese, mayonnaise, Italian seasoning, and grated parmesan cheese. Mix well. Fold in shredded provolone cheese and 1 1/2 cups shredded mozzarella cheese. Spoon half the filling into the center of the iron skillet. Add a layer of pizza sauce. Spoon the remaining cheese filling on top. Sprinkle the rest of the mozzarella cheese over all. Arrange with salami or pepperoni slices. Place the iron skillet in the preheated oven. Bake for 20-25 minutes, or until crust is golden brown and pizza dip is bubbly. Remove from oven. Garnish with fresh parsley. Serve warm.

“Reputation is what other people
know about you. Honor is what
you know about yourself.”
~ Lois McMaster Bujold

“If you tell the truth, you don’t
have to remember anything.”
~ Mark Twain
