Eating My Way Through the Alphabet: Letter S

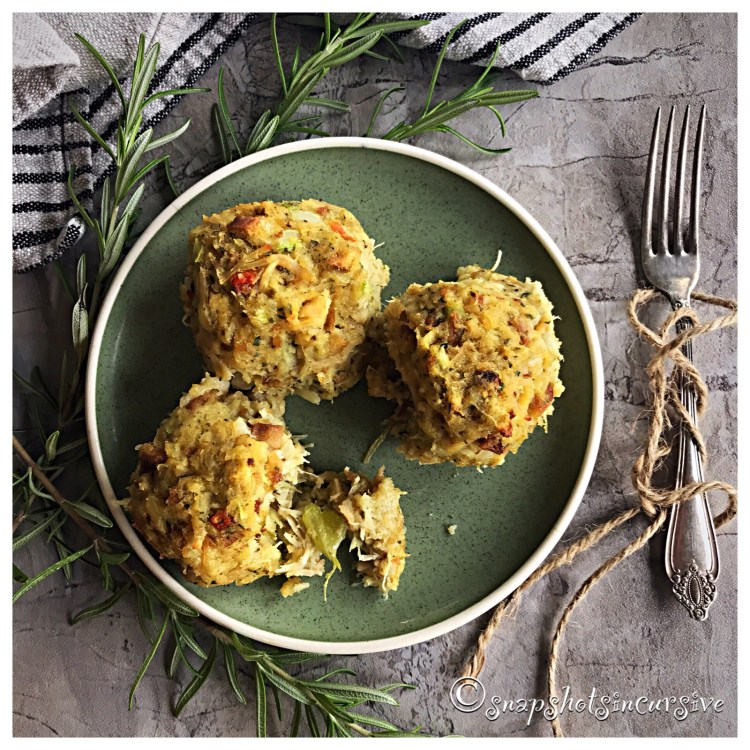
What’s Cooking in Gail’s Kitchen? The Color of Food: Sensational Stuffing Balls! Two words: OMG, YUM! Seriously, this is the answer to a prayer when asked, “What is a good side dish to serve with meat?” Personally, I like the make-ahead option of having a bag of Stuffing Balls on hand in the freezer. I guess you could even serve them as an appetizer for your next gathering. They’re that tasty. As usual, you can opt out of the shortcut version provided here and make your own stuffing with 5 cups of cubed cornbread, wheat bread, or day-old white bread crumbs. You decide. Go crazy with garden herbs, diced apples, or skip the meat completely. I chose golf ball-size over baseball-size, but that’s totally up to you. After all, you’re the one who will reap the accolades.

SENSATIONAL STUFFING BALLS

Ingredients:

1/3 cup butter

1/4 cup yellow onion, finely chopped

1/2 cup celery, finely chopped

1/2 cup parsley, chopped

1/4 teaspoon black pepper

1 teaspoon sea salt

1/2 teaspoon poultry seasoning

1 egg, well beaten

1/4 cup chicken broth

12.5 ounce can cooked chicken breast, drained and flaked

6-ounce box chicken stuffing mix

Instructions:

Preheat oven to 375°. Line a baking sheet with foil that has been sprayed with nonstick oil. Set aside. In a large skillet, melt butter over medium-low heat. Do not scorch. Add chopped onion and celery. Sauté until soft. Add chopped parsley, black pepper, sea salt, poultry seasoning, beaten egg, chicken broth, flaked chicken, and dry stuffing mix. Stir well to combine. Shape into golf ball-size portions. Place stuffing balls on the prepared baking sheet. Bake for 20 minutes until set.

Eating My Way Through the Alphabet: Letter R

What’s Cooking in Gail’s Kitchen? The Color of Food: Roasted Chickpeas! If you’re like me, some days instead of three squares, you graze your way through the day. It helps to have a high-protein snack on hand when the cravings kick in for something crisp and crunchy. Sure, potato chips might be handy, but would you really feel good after downing an entire bag while perusing the internet? I think not. Seasoned chickpeas can be just as satisfying with their naturally nutty flavor and fiber-filling benefits. Season them with maple syrup for sweetness, a kick of cayenne for spice, garlic for pizazz, or savory ranch flavoring. The best part is you get to choose. Just remember the basic rules: drain, pat dry, peel the skins, and bake. “Bada-bing bada-boom!”

ROASTED CHICKPEAS

Instructions:

30-ounces canned chickpeas, drained and patted dry. Skins removed.

2 tablespoons olive oil

2 tablespoons butter, melted

1 teaspoon Worcestershire sauce

1 teaspoon seasoned salt

1/4 teaspoon garlic powder

Instructions:

Preheat oven to 400°. Line a baking sheet with parchment paper. Combine olive oil, melted butter, Worcestershire sauce, seasoned salt, and garlic powder. Mix well. Drain chickpeas. Transfer to a clean tea towel. Cover and rub gently over the chickpeas. This will loosen the skins so you can easily peel them away and discard. When dry, place the chickpeas in a ziplock gallon bag. Pour olive oil seasoning mixture over chickpeas. Seal bag, squeeze out the air, and toss bag to coat the chickpeas all over. Transfer seasoned chickpeas to the parchment paper-lined baking sheet. Roast 30 minutes, turning every 10 minutes. Adjust time, if necessary. They should appear browned and crunchy. Do not burn. Cool 10 minutes.

Eating My Way Through the Alphabet: Letter Q

What’s Cooking in Gail’s Kitchen? The Color of Food: Quick-Mix Cheesy Grits! Step away from the usual breakfast smoothie for an occasional southern meal of cheesy grits, eggs-over-easy, and crispy applewood bacon. Grits are not only quick and easy, they’re delicious and filling. This fail-safe method is spot on and can be whipped up in no time at all. It’s packed with enough protein to keep hunger pangs at bay. Save the weekends when you have more time for making grits from scratch.

QUICK-MIX CHEESY GRITS

Ingredients:

1/2 cup instant grits

2 cups water

1/4 teaspoon sea salt

4 ounces sharp cheddar cheese, finely shredded

Pat of butter, for garnish

Instructions:

Combine instant grits, water, and sea salt in a quart microwave-safe measuring cup or bowl. Stir. Microwave on HIGH 3 minutes or until thickened when stirred. Add cheese; stir. Cook 1 minute longer or until cheese melts into a creamy texture. Spoon cheesy grits into individual bowls and add a pat of butter to each bowl. Serves 4.

Eating My Way Through the Alphabet: Letter P

What’s Cooking in Gail’s Kitchen? The Color of Food: Poke Tuna Bowl! Allow me to introduce you to the rice cooker. In a mere 10 minutes, sweet Asian rice is transformed into a steamy sticky rice that can be eaten with your fingers. Simply scoop it into a ball, dip it in your favorite sauce, and nibble away. It’s that good. And gluten-free. Join the craze of poke bowls by adding ahi tuna and avocado chunks. Basically, you can dress it up to match your taste buds. It’s healthy, it’s colorful, and most of all, it’s Yumolicious!

POKE TUNA BOWL

Ingredients:

2 ahi tuna steaks, skinless

1 tablespoon olive oil

1 tablespoon vegetable oil

1/2 teaspoon sesame oil

2 tablespoons furikake seasoning

1 teaspoon toasted sesame seeds

1 1/4 cup water

1 cup sweet rice

1 tablespoon olive oil

1 ripe avocado, peeled and cut into chunks

Instructions:

To prepare ahi steaks, combine olive oil, vegetable oil, and sesame oil in a shallow dish. Sprinkle with furikake seasoning and toasted sesame seeds. Marinate ahi tuna steaks ten minutes per side to coat evenly. Remove from marinade and set aside. In a medium skillet over medium-high heat, warm oil mixture. Cook steaks 2-3 minutes per side. Remove from heat. Transfer ahi steaks to a cutting board and tent with foil for 10 minutes. To prepare rice, combine water, sweet rice, and olive oil in a rice cooker. Secure lid with knob set to Pressure. Set timer for 10 minutes and press Start. Meanwhile, cut ahi tuna into 1/4” thick slices. Chop avocado into chunks. When rice is finished, turn lever to Steam on rice cooker; wait until steam is released and then carefully remove lid. Scoop sticky rice into bowls. Add sliced ahi tuna and avocado chunks. Serve with dipping sauce.*

*For homemade Vietnamese Dipping Sauce, follow the link.

https://snapshotsincursive.com/2017/04/17

Eating My Way Through the Alphabet: Letter O

What’s Cooking in Gail’s Kitchen? The Color of Food: Oval Pizza Rolls! Do you ever get the munchies during that last hour of late-night tv? When it hits me and the commercials seem to become more frequent, my willpower eventually wanes and I succumb to the nibbling temptation. I’m here to say, this is a perfect bedtime snack. Just the right sized portion to satisfy those late night cravings under the bluish glow of a 42-inch screen. You no longer have to sit and devour an entire pizza while being absorbed in your favorite program or professional sports. Permission granted.

OVAL PIZZA ROLLS

Ingredients:

1 prepared pizza crust

1/2-3/4 cup pizza sauce

3 ounces provolone cheese, sliced

4 ounces smoked ham, thinly sliced

2 ounces pepperoni slices

1 cup mozzarella cheese, shredded

1 tablespoon parmesan cheese, shredded

3 tablespoons olive oil

2 tablespoons cornmeal

1-2 tablespoons butter, room temperature

1 teaspoon dill weed

Garlic salt, to taste

Instructions:

Preheat oven to 400°. Spray a 9”x9” pan with nonstick oil. Set aside. Remove pizza dough from can to a lightly floured work space. Unroll dough. Spread with pizza sauce. Layer with provolone cheese, ham slices, and pepperoni slices. Sprinkle with mozzarella cheese and parmesan cheese. Beginning at the long end, roll up dough. Brush with olive oil. Sprinkle with cornmeal. Wrap in parchment paper, seam side down. Freeze for 20 minutes to chill. Remove dough roll from freezer. Slice into 1 1/2-inch ovals. Transfer to prepared pan, slice side up. Bake in oven for 25 minutes or until lightly browned. Brush with butter; sprinkle with dill weed and garlic salt.

Eating My Way Through the Alphabet: Letter N

What’s Cooking in Gail’s Kitchen? The Color of Food: Normandy Vegetable Soup! Take a stroll down a country lane where small-scale growers of local gardens nourish a family farm with adventurous dishes. Simple vegetable consumption combined with milk, butter, and cheese appeals to the taste buds. Perhaps it’s a throwback to our childhood where nothing went to waste. Or maybe it’s the fact that classic veggies are always a good idea. Normandy Vegetable Soup. Put a twist on your next meal-in-a-bowl.

NORMANDY VEGETABLE SOUP

Ingredients:

1 sweet onion, chopped

1 teaspoon Herbs de Provence

1 tablespoon olive oil

1/4 cup butter

1/4 cup flour

1/4 teaspoon sea salt

1/8 teaspoon black pepper

2 cups light cream

2 cups chicken broth

16-ounce bag Normandy vegetables, thawed*

4-6 ounces sharp cheddar cheese, shredded

Instructions:

In a skillet over medium-high heat, add chopped sweet onion, herbs de Provence, and olive oil. Sauté 5 minutes or until soft. Set aside. In a 2-quart pan over medium-low heat, melt butter. Do not scorch. Add flour, sea salt, and pepper. Stir for 2-3 minutes to make a roux. Slowly add light cream, stirring often to remove lumps. Bring to a slow boil. Carefully add chicken broth, onions, Normandy vegetables. Bring mixture back to a boil. Reduce to medium-low and cook for 20 minutes until vegetables are tender. Stir in sharp cheddar cheese until cheese is melted. Ladle into bowls. Serve hot.

*Normandy vegetables are broccoli and cauliflower florets, sliced carrots, zucchini, and yellow squash. Some varieties include a few red pepper bits, green beans, and lima beans.

Eating My Way Through the Alphabet: Letter M

What’s Cooking in Gail’s Kitchen? The Color of Food: Mustard Glazed Rainbow Carrots! Have you noticed carrots now come in rainbow colors? How exciting is that?! It’s not only the color that catches your attention, it’s the difference in flavor. Traditional orange carrots have a certain sweet earthiness we’re all familiar with, whether you eat them raw or cooked. Others colors may range from a slightly peppery taste to mildly subtle one. Either way, the combination offers a range of nutrients linking benefits to eye health, better digestion, and possibly even cancer prevention. Refine your taste buds. Give rainbow carrots a try. Organic, of course.

MUSTARD GLAZED RAINBOW CARROTS

Ingredients:

12 ounces organic rainbow baby-cut carrots, cut lengthwise or left whole

1 tablespoon olive oil

1 tablespoon natural honey

1 tablespoon Dijon mustard

1 tablespoon rosemary leaves

1/8 teaspoon garlic powder

1/4 teaspoon sea salt

1/4 teaspoon white pepper

Instructions:

Preheat oven to 425°. Place carrots in a shallow dish. Combine olive oil, natural honey, Dijon mustard, rosemary leaves, garlic powder, sea salt, and white pepper. Mix well. Pour over carrots to coat. Transfer mixture to a baking sheet lined with parchment paper. Bake 20-30 minutes, turning every 10 minutes for a roasted, golden glow. Serve immediately.