“Passover and Easter are the
only Jewish and Christian holidays
that move in sync, like the
ice skating pairs we saw during
the Winter Olympics.”
~ Marvin Olasky

“Passover and Easter are the
only Jewish and Christian holidays
that move in sync, like the
ice skating pairs we saw during
the Winter Olympics.”
~ Marvin Olasky

What’s Cooking in Gail’s Kitchen? Orange, Pineapple, Banana Ice Cream! And, before you ask…..No, you do not need an ice cream maker. What I love the most about this refreshing recipe is that any fresh fruit can be used for a mélange of flavor choices, depending on the season.
ORANGE-PINEAPPLE-BANANA ICE CREAM
Ingredients:
1/3 cup mandarin oranges, frozen
1/3 cup pineapple chunks, frozen
1 banana, frozen
1/4 cup powdered sugar
1/2 cup heavy cream, very icy cold
Directions:
Combine the frozen fruit and sugar in a food processor or blender. Process on “Pulse” until the fruit is roughly chopped. With the processor running, slowly add the heavy cream until fully mixed. Transfer fruit ice cream to a plastic storage container with lid. Place in the freezer for 2-3 hours or until firm. To serve, use a melon ball scoop to form bite-size portions. Garnish with dried fruit and shredded coconut.
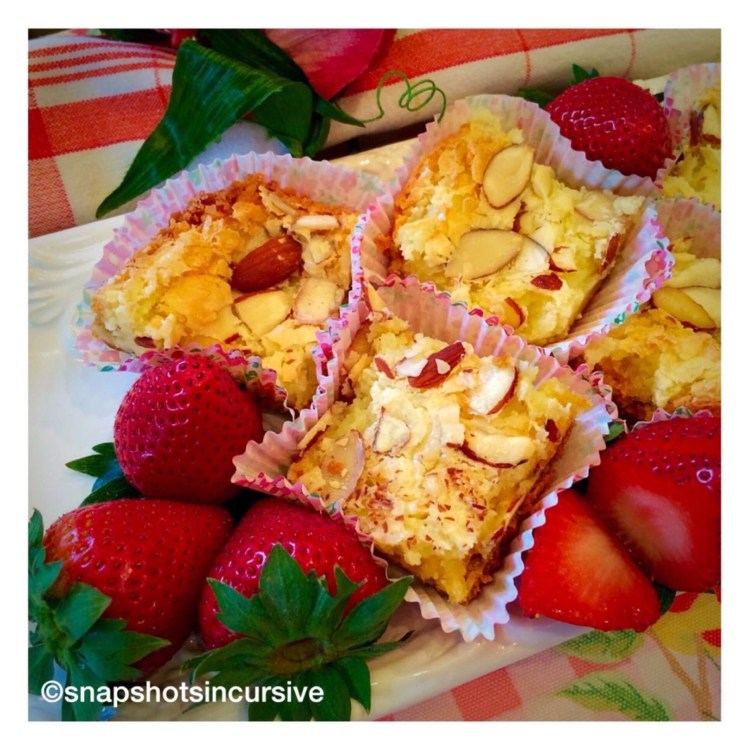
What’s Cooking in Gail’s Kitchen? Neiman Marcus Cake! Repeat after me, “Butter is my friend. Butter is my new best friend.” One bite of these sweet cream butter bars and you’ll swear they came from a French bakery. Look no further than the Neufchâtel cheese filling for confirmation. I always serve this cake with fresh fruit for the ultimate pâtisserie experience.
NEIMAN MARCUS CAKE
Ingredients:
1 lb. box of yellow cake mix
3 eggs
1/2 cup butter, melted
1 lb. powdered sugar
8 oz. bar of Neufchâtel cheese
1 teaspoon almond extract
3/4 cup sliced almonds
Directions:
Preheat oven to 325°. Stir cake mix, melted butter, and one egg. Press into the bottom of a greased and floured 9 x 13 glass dish. Mix powdered sugar, 2 eggs, almond extract, and softened Neufchâtel cheese until smooth. Pour over top of cake mix. Sprinkle sliced almonds on top. Bake 50-60 minutes. Cool. Cut into squares and serve with fresh strawberries.

What’s Cooking in Gail’s Kitchen? Mexican Spiced Brownies! Olé! If you’re as crazy about adding a “kick” to your palate, look no further. (And if you’re not, the recipe can be modified.) The wild ride adrenaline rush you get from chili peppers can be addictive. I like the fact that your immune system can get a boost. The color of red chili peppers signals its high content of beta-carotene or pro-vitamin A. Combine the chili with dark chocolate and there you have it…..permission to eat brownies!
MEXICAN SPICED BROWNIES
Ingredients:
1/2 cup flour
1/3 cup cocoa powder
1/3 cup butter, melted
1 cup granulated sugar
2 eggs
1 teaspoon Mexican vanilla extract
1/2 teaspoon crushed red pepper flakes (or a smidgen of cayenne pepper)
1/8 teaspoon cinnamon powder
Preheat oven to 350°. Melt the butter and add to the sugar. Stir until blended. Add the eggs, vanilla, red pepper flakes, and cinnamon powder to the sugar mixture. Mix well. Slowly add the flour and cocoa powder. Stir until smooth. Pour into a greased 9 x 9 pan. Bake for 20-25 minutes until toothpick comes out clean. Remove from oven and cool slightly.
***For regular brownies, omit crushed red pepper flakes, cayenne pepper, and cinnamon.
Chocolate Icing:
1 1/2 cups powdered sugar
1 heaping tablespoon cocoa powder
2 tablespoons butter, softened
1 teaspoon Mexican vanilla extract
2 tablespoons warm milk
Gently mix butter, powdered sugar, cocoa powder until smooth. Stir in vanilla extract and milk until frosting is of spreading consistency. Spread evenly on cooled brownies. Sprinkle top with semi-sweet mini chocolate morsels.
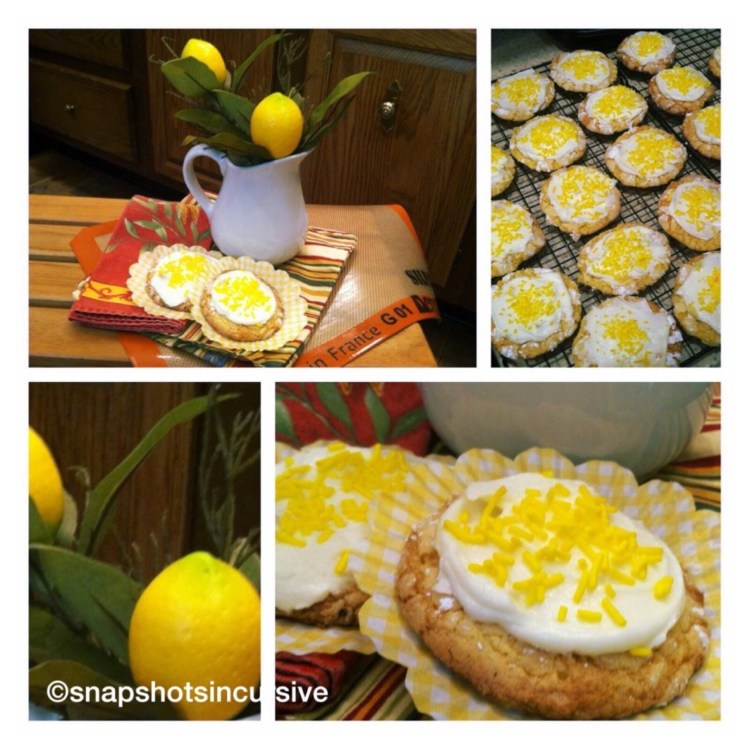
What’s Cooking in Gail’s Kitchen? Lemon Citrus Cookies. With the arrival of Springtime comes the refreshing citrus flavor of this season’s lemons. Even if you’re not a fan, think about the benefits to your immune system. And then have another cookie…..or two.
LEMON CITRUS COOKIES
Ingredients:
1 cup butter, softened
1 1/2 cups sugar
1 egg
1 teaspoon lemon juice
1 tablespoon lemon zest
1 teaspoon vanilla
1/2 teaspoon salt
1/2 teaspoon baking powder
2 1/4 cups flour
Directions:
Preheat oven to 350°. In a large bowl, cream butter and sugar together. Add egg and beat well. Add lemon juice, lemon zest, and vanilla extract. When blended, add salt, baking powder, and flour. Mix together into dough. Roll cookies into 1-inch balls and place 2 inches apart on greased cookie sheet. Bake for 8-10 minutes or until lightly golden on the edges of the cookies.
Lemon Icing:
3 cups sifted powdered sugar
1/3 cup butter, softened
1 1/2 teaspoons lemon extract
2 tablespoons milk
In a large bowl, beat butter and powdered sugar with electric mixer until light and fluffy. Stir in lemon extract and milk; beat until frosting is smooth and of spreading consistency. Stir in 1/2 teaspoon grated lemon peel.
Spread evenly on cooled cookies; top with yellow sprinkles.

What’s Cooking in Gail’s Kitchen? Kona Coffee Molten Cake! Gerald and I spend some time on the tropical island of Kauai. While there we sip on freshly brewed coffee uniquely grown in the Hawaiian Islands. The taste is so richly smooth and delicious, I had to blend its flavor with dark chocolate. Each recipe is one serving, unless you share a bite. “Friends are the spice God adds to the cake of life!”
KONA COFFEE MOLTEN CAKE
Ingredients:
1/4 cup all-purpose flour
2 tablespoons Dutch chocolate powder
1/4 teaspoon baking powder
2 tablespoons granulated sugar
1/8 teaspoon sea salt
1/4 cup plus 1 tablespoon milk
2 tablespoons vegetable oil
1 tablespoon Kona brewed coffee*
1 tablespoon creamy peanut butter**
Instructions:
Mix dry ingredients together in medium bowl. Add milk, oil, and coffee to the dry ingredients. Stir until smooth.
Pour batter into a tall microwave-safe mug. Make sure there is room at the top for the cake to rise. Drop the tablespoon of peanut butter in the center of the batter. Do not blend in. Bake in microwave on high for 1 minute. If it is not done, cook in additional 10-second intervals until done. Remove from microwave. BE CAREFUL. Enjoy the warm molten cake topped with a dollop of whipped cream.
*Any strong brewed coffee may be used. If you omit the coffee, substitute 1/4 teaspoon vanilla extract.
**The creamy peanut butter may be omitted or substituted with a hazelnut spread or marshmallow creme.
“Dream, struggle, create, prevail.
Be daring. Be brave. Be loving.
Be compassionate. Be strong.
Be brilliant. Be beautiful.”
~ Caterina Fake
“Through trial-and-error and
observable outcomes, our
ancestors narrowed the field
of edible mushroom candidates
to just a few with remarkable,
health-supporting properties.”
~ Paul Stamets

What’s Cooking in Gail’s Kitchen? Jalapeño Corn Stix. Cornbread is always the right accompaniment to dried bean dishes. Serve it hot, right out of the oven. Leftovers can be warmed in the microwave nicely. Go south of the border! Jalapeño peppers give these golden stix the right amount of gusto to compliment the creamy cheddar center.
JALAPEÑO CORN STIX
Ingredients:
1 1/2 cups yellow cornmeal
1 1/2 cups sifted flour
1 tablespoon baking powder
1/4 teaspoon salt
1/4 cup sugar
1/2 cup olive oil
2 eggs, beaten
1 1/4 cup skim milk
1/4 cup jalapeños, diced
1 cup sharp cheddar cheese, shredded
Instructions:
Sift dry ingredients into medium-size mixing bowl. Blend beaten eggs and oil; add milk. Add liquid ingredients to dry ingredients and stir until just blended. Gently fold in jalapeños and cheddar cheese. Pour into a molded corn stick pan or an 8 by 8-inch pan which has been sprayed with a non-stick spray. Bake in 400° oven for 25-30 minutes or until golden brown.
