Zucchini Meatball Bateaux

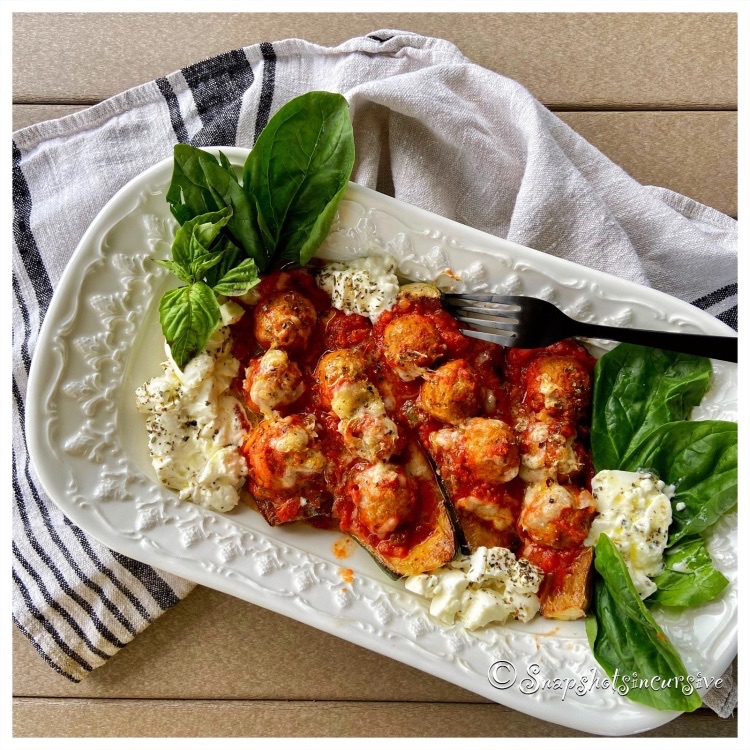
What’s Cooking in Gail’s Kitchen? Palatable Possibilities: Zucchini Meatball Bateaux! Call me “Fancy Shmancy” today since the title of this recipe makes it gourmet all-the-way. Bateaux means Boat. And in the world of food, nothing looks more like a boat than zucchini, especially when it’s sliced horizontally and scooped out. Amirite? Actually, I like this recipe because I always seem to have a bag of frozen Italian meatballs on hand in my freezer. Most days I make my own homemade marinara sauce because I like to stock my pantry with a variety of Italian Roma tomatoes that are imported from Italy. Obviously you can do the same. Recipes are designed to modify in ways that bring accolades to you for the extra effort. If time is of the essence, follow the instructions below. I promise you won’t be disappointed.

ZUCCHINI MEATBALL BATEAUX

Ingredients:

2 medium zucchini, sliced in half lengthwise

16 precooked frozen Italian meatballs, thawed

15-ounce jar prepared marinara sauce

1/2 cup mozzarella cheese, shredded

1/2 cup parmesan cheese, shredded

8 ounces fresh burrata cheese

1 tablespoon olive oil

1/4 teaspoon Italian herb blend

Fresh basil, for garnish

Instructions:

Preheat oven to 400°. Arrange sliced zucchini halves on a baking sheet that has been sprayed with nonstick oil. Scoop out the center of each zucchini, using a spoon, to remove seeds and create a well to hold the fillings. Spread a little marinara in each zucchini. Place 4 Italian meatballs in each. Divide the remaining marinara between them. Top with mozzarella and parmesan cheeses. Bake 20 minutes, or until cheese is melted and bubbly. Transfer zucchini boats to a platter. Place fresh basil leaves on each end. Divide the burrata into four sections and arrange dollops as desired. Drizzle each dollop with olive oil and sprinkle with Italian herbs. Serve immediately.

Yellow Squash Panko

What’s Cooking in Gail’s Kitchen? Palatable Possibilities: Yellow Squash Panko! Many of you already know this particular vegetable is a second cousin to zucchini. The skin is tender, glossy smooth, and edible which makes it a no-fuss dinner companion. Although its flavor is mild, when cooked it actually becomes buttery sweet with a slightly nutty nuance. Try to buy yellow squash that is 6”-8” in size. You’ll know because the larger it is, the more likely the skin will appear bumpy and less tender. You’ll also notice a lot of seeds, once you cut into it. By then you’ll need to rethink dinner and purée it for soup. Hindsight is 20/20 after all.

YELLOW SQUASH PANKO

Ingredients:

2 yellow squash

1-2 tablespoons olive oil, for sauté

Ingredients for Herbed Oil:

1 tablespoon lemon juice

1 tablespoon olive oil

1/8 teaspoon garlic powder

1 teaspoon dried parsley

1/4 teaspoon sea salt

1/8 teaspoon cracked black pepper

Ingredients for Crumb Topping:

1/4 cup panko bread crumbs

1/4 cup parmesan cheese, grated

1 teaspoon dried parsley

1/4 teaspoon sea salt

1/8 teaspoon red pepper flakes

Instructions:

Wash and pat dry yellow squash. Slice into 1/4” rounds; set aside. To make the herbed oil, whisk together lemon juice, olive oil, garlic powder, dried parsley, sea salt, and cracked black pepper. Set aside. To make the crumb topping, toss panko bread crumbs, grated parmesan cheese, dried parsley, sea salt, and red pepper flakes into a bowl. Mix well; set aside. To prepare yellow squash, warm olive oil in a large skillet over medium heat. Add the yellow squash and sauté for 8 minutes. Turn occasionally to cook both sides. Squash should be soft, but not mushy. Remove from heat. Drizzle herbed oil over yellow squash. Transfer to a platter. Top with panko crumb topping mixture. Garnish with fresh basil leaves, if desired. Serve immediately.

Xalapa Party Punch

What’s Cooking in Gail’s Kitchen? Palatable Possibilities: Xalapa Party Punch! Before you read further, I want you to know this is an adult beverage and not intended for those under the age of 21. It does contain alcohol, so drink responsibly. Big-batch cocktails, or party punch, are nice to have on hand for last minute gatherings or friends who drop by unannounced. I keep a pitcher in the refrigerator for just that reason. If you do the same, choose a container that has an airtight lid. There’s nothing worse than sipping on an icy cold cocktail that smells like garlic or grilled leftovers. With the subtle fruity notes of apple, orange, cherry, and apricot, Xalapa Party Punch will get everyone talking. Carry On.

XALAPA PARTY PUNCH

Ingredients:

1 cup hot black tea

1/2 cup Tupelo honey

1 orange rind, grated

2 cups dark rum

2 cups apple brandy

2 cups dry red wine

Crushed Ice

Basil or Mint, for garnish

Instructions:

In a saucepan over low heat, combine hot black tea, Tupelo honey, and grated orange rind. Heat for 5 minutes. Stir occasionally. Remove from heat; set aside to cool. Add dark rum, apple brandy, and dry red wine. Refrigerate until ready to serve. Pour into glasses filled with crushed ice. Garnish with fresh basil or mint.

Watercress Spinach Salad in a Jar

What’s Cooking in Gail’s Kitchen? Palatable Possibilities: Watercress Spinach Salad in a Jar! My heart beats a little faster whenever I come across a bunch of watercress at the fresh marketplace. I know immediately that I will pair it with baby spinach because they work well together. Its slightly peppery taste is an amazing balance to the mild sweetness of spinach leaves. By portioning salads in a jar, they keep a couple days in the refrigerator, as long as the dressing is added later, when served. Not only is the salad appealing, it comes across as pure genius. Mmm Mmm Good.

WATERCRESS SPINACH SALAD IN A JAR

Ingredients:

3/4 cup watercress leaves

1 1/2 cups baby spinach leaves

2 hard-boiled eggs, sliced

1/2 red onion, sliced

1 pint cherry tomatoes, sliced

1 cup fresh mushrooms, sliced

4 strips bacon, cooked and crumbled

4 pint-size jars, with lids

Caesar dressing, prepared

Instructions:

Layer each jar beginning with watercress and spinach leaves. Carefully place sliced eggs along the inside. Add layers of sliced red onions, cherry tomatoes, and mushrooms. Finish with crumbled bacon on top. Twist the lid to seal each jar. Refrigerate salads until ready to serve. To serve, empty contents of jar onto a plate or bowl. Add bottled Caesar dressing, per taste.

Vodka Sauce Shrimp Fettuccine

What’s Cooking in Gail’s Kitchen? Palatable Possibilities: Vodka Sauce Shrimp Fettuccine! Here’s something a little different for you to try instead of the usual fettuccine alfredo. Now, wait a sec to hear me out. Don’t get me wrong. I love alfredo sauce as much as the next one, but sometimes you gotta think about limiting calories and fat just to squeeze into that favorite outfit. Marinara sauces might be just the answer you’re looking for on “Pasta Night”. You won’t sacrifice taste because there’s still butter, light cream, and vodka. Some alcohol does evaporate as it is simmering, but only about 15%. (However, it will completely burn off if the sauce cooks for long periods of time.) Because vodka is somewhat tasteless, it basically enhances all the other flavors of the dish without overpowering it. Try it, you may like it.

VODKA SAUCE SHRIMP FETTUCCINE

Ingredients:

6 ounces fettuccine pasta

1 tablespoon sea salt

1 tablespoon butter

3/4 cup onion, finely chopped

2 cloves garlic, minced

1/8 teaspoon red pepper flakes

15-ounce Italian tomatoes, crushed

2 tablespoons vodka

3 tablespoons light cream

1/2 teaspoon lemon zest

1/2 pound precooked shrimp, peeled and deveined

Fresh basil, for garnish

Instructions:

In a large pan, add sea salt to 2 quarts boiling water. Cook pasta 10 minutes. Drain, cover, and set aside. For the vodka sauce, in a large skillet, melt butter over medium-high heat. Add onions; sauté for 5 minutes, or until lightly browned. Lower heat to medium. Add minced garlic and red pepper flakes. Cook one minute longer. Add the crushed tomatoes to the onions. Stir in vodka, light cream, and lemon zest. Simmer 5 minutes. Add the precooked shrimp, simmering 5 minutes longer. Gently fold the fettuccine noodles into the vodka sauce. Heat through. Divide portions into pasta bowls. Garnish with fresh basil. Serve immediately.

Unwrapped Burritos

What’s Cooking in Gail’s Kitchen? Palatable Possibilities: Unwrapped Burritos! Casual meals come in handy on those days that are filled with unlimited tasks, scheduled appointments, and day-to-day responsibilities. Or you just don’t feel like making a full-course meal. Presenting……burrito fixings! It has all the good stuff: seasoned meat, tasty jalapeños, shredded cheeses, fresh onions, tomatillos, and corn kernels. Always remember to add crunchy tortilla chips and chunky salsa. Think of it as sinfully wicked. Kinda like sneaking more pizza toppings, scooping out lasagna fillings, or gobbling up the creme “Stuf” in an Oreo® cookie. Guilty, as charged.

UNWRAPPED BURRITOS

Ingredients:

1 pound lean ground beef, browned and crumbled

1 teaspoon sea salt

1/8 teaspoon garlic powder

1/2 teaspoon ground cumin

Jalapeño slices, for garnish

2 cups frozen corn kernels, thawed

1 red onion, sliced

4 tomatillos, sliced and halved

1/2 cup cilantro, roughly chopped

1/4 cup cheddar cheese, shredded

1/4 cup Monterey Jack cheese, shredded

Salsa, for dressing

Corn Tortilla Chips, for serving

Instructions:

Combine cooked ground beef, sea salt, garlic powder, and ground cumin. Keep warm, top with jalapeño slices; set aside. For the salad, in a medium bowl combine corn kernels, red onion slices, tomatillos, cilantro, cheddar cheese, and Monterey Jack cheese. Toss gently. To serve, arrange burrito fixings on the table, along with chips and salsa. Enjoy.

Teriyaki Chicken Bowl

What’s Cooking in Gail’s Kitchen? Palatable Possibilities: Teriyaki Chicken Bowl! Do-ahead meals take a little bit of planning, but the “devil is in the details”, they say. In this case it means, make sure the chicken breasts are thawed AND marinated 24 hours before you plan on serving them. I realize that requires the cook to be somewhat organized. Pantries don’t stock themselves. There’s nothing worse than trying to make a dish without all the ingredients. Take sesame oil, for example. I find it absolutely delicious because it adds an earthy nuttiness to Asian food. Vegetable oil tastes meh, in my opinion. Not only does it alter the taste, the texture will be different. When I can find it, I buy toasted sesame seeds so I don’t have to worry about toasting them on the stove or in the oven. That’s 10 minutes I could be planning tomorrow’s meal. Idiosyncratic, but true.

TERIYAKI CHICKEN BOWL

Ingredients:

2 chicken breasts, boneless and skinless

1/2 cup teriyaki sauce

2 tablespoons lemon juice

1 teaspoon fresh garlic, minced

1 teaspoon sesame oil

Green onion snips, for garnish

Toasted sesame seeds, for garnish

Instructions:

Place chicken breasts, teriyaki sauce, lemon juice, minced garlic, and sesame oil in a shallow dish. Baste chicken completely. Cover dish with plastic wrap. Refrigerate for 24 hours. When ready to cook, preheat grill to 450°. Lightly oil grill grate. Remove chicken breasts from marinade, place directly on grill, close lid, and cook for 5 minutes. Discard marinade. After 5 minutes, open lid, flip over chicken breasts, close lid, and cook 5 minutes longer, or until cooked through and no longer pink. Remove teriyaki chicken from grill and allow to rest for 5 minutes before serving. Garnish with green onion snips and toasted sesame seeds. Serve with sticky rice and mixed vegetables.