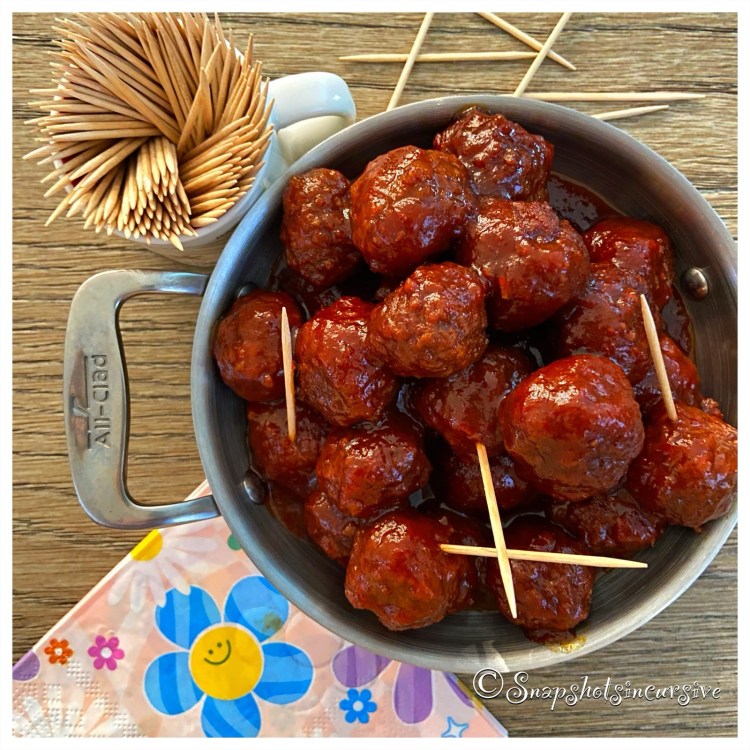
Olive Cheese Spread

What’s Cooking in Gail’s Kitchen? Graze or Gobble: Olive Cheese Spread! Olives aren’t just for martinis, you know. In fact, their slightly sea salt flavor seduces the tongue with the spicy sweetness of a pimento hidden inside. The buttery cream cheese embraces everything like a barefoot hug that sways to the music. Sounds a little bit like a party, doesn’t it? Permission granted.

OLIVE CHEESE SPREAD

Ingredients:

8-ounces cream cheese, softened

2 tablespoons butter, room temperature

1/2 cup finely chopped pimento-stuffed Spanish olives

1/2 cup pecans, chopped

1 tablespoon fresh chives, chopped

Instructions:

Combine softened cream cheese and butter. Mix well until smooth. Fold in finely chopped olives. On a sheet of waxed paper, form cream cheese mixture into a log. Twist ends to secure. Chill 30 minutes in the refrigerator. Roll cream cheese log in chopped pecans. Garnish with olive slices and fresh chives. Serve.

Wasabi Shrimp Cocktail

What’s Cooking in Gail’s Kitchen? Clean Eating: Wasabi Cocktail Shrimp! Everyone loves shrimp, we know that already. But does everyone like wasabi? You may have tasted it before in the snack form of wasabi peas. You’re probably thinking, “easily tolerable”. Wasabi, though, really can’t be compared to the heat of a jalapeño or habanero pepper. It’s a different kind of animal. Wasabi is from the horseradish family giving it a strong pungency that can be felt more in the nasal passages than on the tongue. You might take a swipe and then sit back thinking all is well…until, like a viper, it strikes with such intensity you find your eyes tearing up, followed by a cough or sneeze. Once the rush has passed, don’t be surprised if your brain says, “I’ve gotta have more of this stuff!”

WASABI SHRIMP COCKTAIL

Ingredients:

1 pound precooked shrimp, tail on and thawed

1/2 cup prepared cocktail sauce

1/8 teaspoon lemon juice

1/4 teaspoon wasabi paste

Instructions:

Rinse shrimp in cold water. Drain. Dab with a paper towel. Arrange the shrimp on a platter. In a small bowl, combine cocktail sauce, lemon juice, and wasabi paste. Stir well. Serve chilled.

Hot Sauce Tex-Mex Dip

What’s Cooking in Gail’s Kitchen? Clean Eating: Hot Sauce Tex-Mex Dip! Nothing screams “party” like a flavorful Mexican dip loaded with cheese, beans, chorizo, and chips. This do-ahead recipe is perfect for advance planners. Pull it all together and refrigerate overnight. When you’re ready, simply allow it to stand at room temperature half an hour before you need to bake it. Add 10 minutes to the time it is covered in the oven for melting the ooey gooey cheese. If you’re going to make this Tex-Mex Dip, may as well get lost in the tug-of-war between chili lime seasoning and garlicky hot sauce. It’s everything you love. Just add cocktails.

HOT SAUCE TEX-MEX DIP

Ingredients:

4-ounces cream cheese, room temperature

15-ounce can black-eyed peas, rinsed, drained, and divided

3/4 tablespoon fresh lime juice, divided

1/2 teaspoon hot sauce

1/4 teaspoon kosher salt, divided

1/2 cup chorizo, cooked and crumbled

2 tablespoons scallions, finely chopped

2 tablespoons red pepper, finely chopped

1 tablespoon taco seasoning mix

4 ounces Mexican Cheese Blend, shredded and divided

1/2 cup tomatoes, chopped

1 tablespoon cilantro, chopped

1/2 tablespoon olive oil

2 teaspoons pickled jalapeño, diced

Tortilla chips

Instructions:

Preheat oven to 375°. In a food processor, combine cream cheese, 1/2 cup black-eyed peas, 1 teaspoon lime juice, hot sauce, and 1/8 teaspoon sea salt. Pulse until smooth and creamy. Transfer mixture to a large bowl. Stir remaining black-eyed peas, chorizo, scallions, red pepper, taco seasoning mix, and 1/2 cup Mexican Cheese Blend into the cream cheese mixture. Mix thoroughly. Spread into the bottom of a lightly greased deep dish pie plate. Sprinkle with remaining Mexican Cheese Blend. Bake, covered with foil, for 20 minutes. Remove foil, and bake 15 minutes longer until hot and bubbly. Let stand 10 minutes. Stir together in a bowl chopped tomatoes, chopped cilantro, olive oil, diced jalapeño, remaining lime juice, and remaining sea salt. Using a slotted spoon, top dip with tomato mixture. Serve warm with tortilla chips.

X-tra Cheese, Please Appetizer

What’s Cooking in Gail’s Kitchen? Talking Points: X-Tra Cheese, Please Appetizer! Ever since I visited a popular Las Vegas restaurant, I’ve been looking for a cheese appetizer like this one. It’s not the traditional gooey soupy cheese dip you swipe tortilla chips through before gobbling down. The waiter set the iron skillet in front of us and said, “This is a cheese you need to use a knife and fork with. It’s not going to jump onto the chip.” Come to find out it was flambéed over an open fire in the kitchen. Wow! And they used tequila to ignite it. I wish I could tell you that’s what I did here, but sorry, “no comprendo”. Instead I baked it at a high temperature and dredged it through a spicy honey. Show compassion. I tried.

X-TRA CHEESE, PLEASE APPETIZER

Ingredients:

2 tablespoons butter, unsalted

1 yellow onion, diced

1 teaspoon kosher salt

1 1/2 cups Monterey Jack cheese, shredded

1 cup cheddar cheese, shredded

1 cup mozzarella cheese, shredded

1/4 cup raw Tupelo honey

1 teaspoon sriracha

1 teaspoon garlic habanero sauce

2 tablespoons ranch dressing

Chives, for garnish

Instructions:

Preheat oven to 475°. Using a 10” iron skillet, warm butter over medium heat. Add diced onion and kosher salt. Sauté for 5-8 minutes, or until onions are soft and golden brown. Add Monterey Jack cheese, shredded cheddar cheese, and shredded mozzarella cheese. Mix thoroughly with onions. To make the spicy honey, in a microwave-safe dish combine raw Tupelo honey, sriracha, and garlic habanero sauce. Stir well. Microwave on High for 30 seconds. Stir again. Set aside. Transfer cheese-filled iron skillet to the oven. Bake 10 minutes until cheese is bubbly. Turn oven setting to High on Broil. Allow dark spots to appear on the surface, about 1-2 minutes. Watch carefully as this happens very quickly. Remove skillet from oven. Drizzle with spicy honey and ranch dressing. Garnish with chopped chives. Serve with tortilla chips.

Pea and Radish Crostini

What’s Cooking in Gail’s Kitchen? Talking Points: Pea and Radish Crostini! There’s something decadent about bite-size grilled toast. It could be the olive oil that transports you to the central region of Tuscany where rows of timeless Italian vineyards parade alongside twisted trunks of enduring olive trees. Or perhaps it’s the exotic radish with a history dating back to pre-Roman times. Maybe you just like smaller bites. A smudge of this, a smidge of that. Whether you find food tantalizing, adventurous, or hopefully romantic, the appetizer is here to stay. You may as well make it healthy and visually appealing at the same time.

PEA AND RADISH CROSTINI

Ingredients:

1 baguette, sliced into 1/4” slices

1/4 cup olive oil

1/4 teaspoon Himalayan pink salt

1/8 teaspoon oregano

1/8 teaspoon marjoram

1/8 teaspoon garlic powder

1 large avocado, pitted and sliced

1 tablespoon lime juice

1/4 teaspoon garlic powder

1/2 teaspoon sea salt

1 cup frozen baby peas, thawed

4-5 radishes, sliced thin

2 mint sprigs, for garnish

Instructions:

Preheat oven to 400°. Brush each side of the baguette slices with olive oil and place in a single layer on a baking sheet. Sprinkle with Himalayan pink salt, oregano, marjoram, and garlic powder. Bake 5-7 minutes until slightly toasted. Let cool. Transfer to a platter. Drizzle the sliced avocado with lime juice. Sprinkle with garlic powder and sea salt. Mash a few slices of avocado to spread a thin layer of guacamole on each piece of baguette. Place 2-3 slices of avocado in the center of each toast. Lightly press the peas in place onto the mashed avocado on each end. Arrange sliced radishes on top. Garnish with mint leaves. Buon Appetito!

Mukimame Sea Salt Starter

What’s Cooking in Gail’s Kitchen? Talking Points: Mukimame Sea Salt Starter! This is going to sound a little weird, but those who aren’t aware might be interested to know that mukimame and edamame are the same vegetable. They are both soy beans, a legume used to make tofu, soy milk, miso, and soy flour. Mukimame is the soybean after it is shelled; consequently, edamame is the soy bean in its fuzzy pod. Often a restaurant menu will offer a bowl of steamed edamame as an appetizer. You place the pod in your mouth, slide the beans out with your teeth, and then discard the pods. It’s meant to be a finger food snack you nibble over cocktails. Not everyone likes the texture or cares to graze in public. Now you have an alternative. Taste a lil bit of nutty flavor the easy way.

MUKIMAME SEA SALT STARTER

Ingredients:

10-ounce Mukimame, frozen

1 tablespoon sea salt course crystals

Instructions:

In a 2-quart double boiler, fill the saucepan with 2 1/2 cups water. Bring to a boil over medium heat. Fill the basket insert with mukimame beans. Place insert into the double boiler. Cover. Boil mukimame for 5 minutes. Drain well. Transfer mukimame to a serving bowl. Sprinkle with sea salt course crystals. Refrigerate until ready to serve.

Smoked Mahi Fish Dip

What’s Cooking in Gail’s Kitchen? Food With Soul: Smoked Mahi Fish Dip! If you haven’t had the opportunity to taste Florida’s smoked fish dip, you must add it to your list of interesting foods. It has a creamy texture accented by a rich smoky flavor. Did you just wrinkle your nose at the word “Fish”? Hold on a sec, because we’re not talking about pungent canned tuna here. The fish that is used has white flesh, is pretty mild and actually sweet tasting, so it balances beautifully with a citrusy kick that will entice you to another mouthful. Try it in a restaurant or seafood diner first. Then come back for this recipe and make it yourself. Without reservations.

SMOKED MAHI FISH DIP

Ingredients:

2 8-ounce smoked fillets of mahi-mahi, skin removed

1/2 cup cream cheese, room temperature

1/4 cup mayonnaise

1 tablespoon olive oil

1/4 cup lemon juice

1/2 teaspoon cayenne pepper

1/2 teaspoon garlic powder

1/2 teaspoon onion powder

1/2 teaspoon kosher salt

1/4 teaspoon white pepper

1/2 cup scallions, thinly sliced

1/4 cup fresh dill, chopped

1 tablespoon capers, finely chopped

Instructions:

Flake smoked mahi-mahi fish into 1/2” chunks in a bowl. Set aside. In a larger bowl, combine cream cheese, mayonnaise, olive oil, lemon juice, cayenne pepper, garlic powder, onion powder, kosher salt, and white pepper. Mix until smooth. Add sliced scallions, chopped dill, and capers. Gently stir. Fold in smoked mahi-mahi until incorporated. Do not over mix. Small chunks will keep the dip from turn mushy. Chill slightly. Spread the smoked fish dip over crackers or toasted baguettes.

Jumbo Shrimp Over Avocado

What’s Cooking in Gail’s Kitchen? Food With Soul: Jumbo Shrimp Over Avocado! Grill marks on food are like a person’s signature tattoo. I don’t know about you, but when I see that food is slightly charred, visions of smoky goodness can cause me to drool. The creaminess of the warmed avocado filled with spicy salsa takes me down a country road to memorable experiences of Mexican favorites. The grilled shrimp is enhanced by the savory herbs, adding tangy flavors seductive to the tongue. Not only is this a quick meal or tempting appetizer, it transforms every cook into a gourmet chef. You should try it.

JUMBO SHRIMP OVER AVOCADO

Ingredients:

1 large ripe avocado, halved with pit removed

Fresh lime juice

6 frozen precooked jumbo shrimp, tail on and thawed

2 tablespoons olive oil

1 teaspoon Italian seasoning blend

1 teaspoon sea salt

1/4 teaspoon garlic powder

1/4 cup prepared salsa

Dill sprig, for garnish

Instructions:

Preheat grill to 400°. In a small dish, combine olive oil, Italian seasoning blend, sea salt, and garlic powder. Mix well; set aside. Squeeze lime juice onto both halves of avocado. Brush each avocado, as well as both sides of the shrimp, with the seasoned olive oil. Place directly onto the grill grates. Close lid. Cook the avocados for 4 minutes, or until slightly charred. Cook the jumbo shrimp for 2 minutes. Then flip the shrimp, close the lid, and cook 2 minutes longer. Transfer all to a platter. Spoon the salsa into the avocados. Arrange 3 jumbo shrimp over each portion. Garnish with a sprig of fresh dill. Serve immediately.

Blue Plate Fish Sliders

What’s Cooking in Gail’s Kitchen? Food With Soul: Blue Plate Fish Sliders! Switching from beef to fish has its rewards, especially when the fish is a fresh catch only hours ago. The fact that fish has less saturated fat is a bonus for me. I’m all about reducing the risk of cardiovascular disease. The delicate soft texture of fish practically melts in your mouth as it flakes off from one tasty bite to the next. The mini-version of a sandwich, in a world of super-size portions, makes sliders cute and fun as well. Whether you call it an appetizer or a meal, fish sliders are here to stay.

BLUE PLATE FISH SLIDERS

Ingredients:

4 4-ounce red grouper fillets

1 tablespoon olive oil

1 tablespoon Cajun seasoning

Slider buns

Prepared Coleslaw

Mixed Greens

Instructions:

Heat outdoor gas grill to medium heat, approximately 350°. Rinse and pat each fillet with a paper towel. Rub with olive oil and sprinkle with Cajun seasoning. Transfer to a platter. Oil the grill grates with a folded paper towel dipped in olive oil. Place each fillet directly on the grate. Close the grill cover. Cook 4 minutes. Using a flat spatula, slide under each fillet and carefully flip it over. Close the grill cover and cook 4 minutes longer. Transfer to a clean platter. Lightly toast slider buns, if desired. Assemble fish sliders with coleslaw, grilled fish, and mixed greens. Serve immediately.