Hungry Man Potato Skins

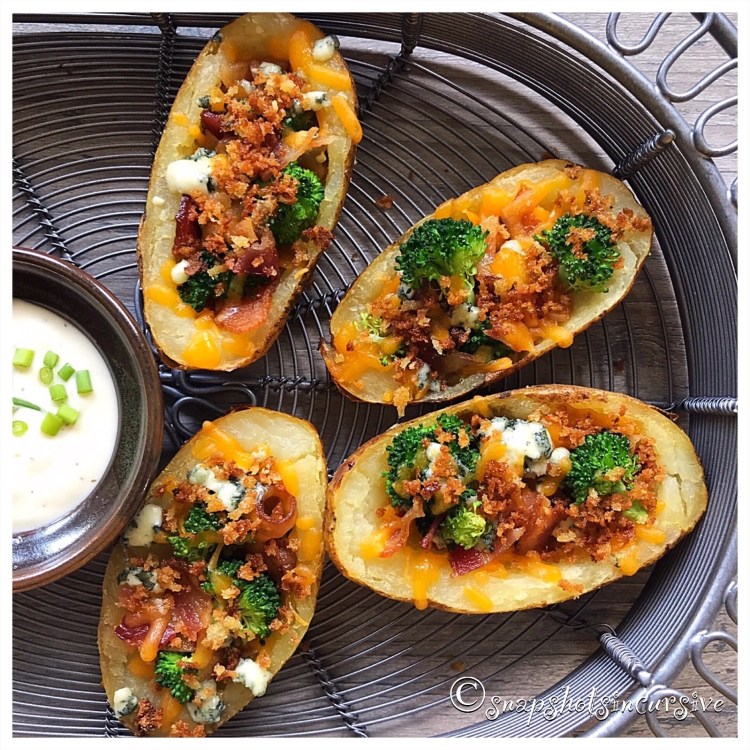
What’s Cooking in Gail’s Kitchen? The Next Step: Hungry Man Potato Skins! Shrug off that old myth about ditching potato skins because they’re high in carbohydrates and low in nutrition. My grandma used to say “if you’re gonna eat the skin, you may as well eat a handful of dirt!”. Thank goodness times have changed and we’ve learned that the skin of the potato is loaded with calcium, iron, and fiber. When baking instead of frying, the nutritional value gets kicked up a notch. Now that you’re on a roll, go ahead and add toppings like fresh broccoli, bacon, and cheese. Whaaat? Hear me out. By choosing small russet potatoes, the calories are drastically reduced. One piece of bacon is divided over four skins, just enough for flavor. And reduced-fat cheddar cheese is a good choice, one you’ll barely notice in taste. When it’s all said and done, two potato skins are about 200 calories. Not bad.

HUNGRY MAN POTATO SKINS

Ingredients:

2 small russet potatoes, washed and patted dry

1/2 cup broccoli florets

1 strip thick bacon, precooked

1/2 cup cheddar cheese, finely shredded

1 tablespoon olive oil

1/4 cup panko crumbs

Ranch dressing, for dipping sauce

Green onion, for garnish

Instructions:

Preheat oven to 350°. Pierce each potato for steam to escape during baking. Lightly spray potatoes with nonstick oil. Sprinkle lightly with sea salt. Place them directly on the oven rack. Bake until tender, about one hour. Remove potatoes from oven and allow to cool for 15 minutes. Place broccoli florets into a microwave-safe bowl, sprinkle with droplets of water, and microwave on High for one minute. Set aside. If you need to cook bacon, place one strip of bacon on a paper towel-lined plate. Cover with another paper towel. Microwave on High for two minutes. Remove and set aside. When cool enough to handle, crumble into small pieces. For potato skins, cut each potato in half lengthwise. Scoop out flesh leaving a shell 1/4” thick. Reserve potato flesh for another use. Brush around the rim of potato shells with olive oil. Place skins upright on a baking sheet. Broil in oven on High for one minute. Remove to fill. In a bowl, combine broccoli florets, cheddar cheese, and bacon crumbles. Divide broccoli mixture evenly between potato shells. In a small pan, warm olive oil over medium heat. Add panko crumbs, stirring often until golden brown, about 3 minutes. Sprinkle over loaded potato skins. Return to oven and bake at 400° until cheese is bubbly and topping is crisp, about 15 minutes. Serve with ranch dressing garnished with green onion snips.

Himalayan Salt Plate Shrimp Skewers

What’s Cooking in Gail’s Kitchen? Cheerful Choices: Himalayan Salt Plate Shrimp Skewers! How to cook with an Himalayan salt plate can be tricky. The key is patience. This can be done on an outdoor gas grill very easily. First make sure the salt block is completely dry. Always begin on a low heat setting. Allow the block to heat at that temperature for 15 minutes. Then switch the heat to medium and let the block warm for another 15 minutes. Finally, turn the heat to high for the last 15 minutes. Then sprinkle a few drops of water on the block. Once it sizzles and immediately evaporates, you may add the prepared food. Let’s do it!

HIMALAYAN SALT PLATE SHRIMP SKEWERS

Ingredients:

1 pound shrimp, peel and deveined, tails intact

1 pound smoked sausage, skinless, cut into 1” pieces

2 tablespoons bacon olive oil

2 teaspoons lemon juice

1 tablespoon dried Italian seasoning blend

Olive oil for brushing salt plate

Instructions:

Place one shrimp around a piece of smoked sausage. Thread combo onto a skewer and lay in a large baking dish. Repeat until all pieces are used. In a small bowl, whisk together bacon olive oil, lemon juice, and Italian seasoning blend. Brush onto shrimp skewers. Cover and refrigerate while Himalayan salt plate is warming up. Preheat the grill to medium-high heat. At this time slowly preheat the Himalayan salt plate over 45 minutes.* See above. The internal grill temperature should be no higher than 450°. When ready, lightly brush the preheated salt plate with regular olive oil. Working in batches, place the shrimp/sausage skewers on the salt plate and cook, turning once, until the shrimp are pink, 2 to 3 minutes per side. Pieces will appear slightly charred. Transfer skewers to a warmed platter to prevent food from becoming too salty. Brush the salt plate with more olive oil between batches. Repeat. Serve immediately.

Warm Potato Salad

What’s Cooking in Gail’s Kitchen? Country Casual Cravings: Warm Potato Salad! The debate continues. Which is better? Potato salad made with mayonnaise and served cold or potato salad made with vinegar and served warm? One is creamy with hard-boiled eggs, celery, and pickles while the other is tangy with bacon, mustard, and sugar. What a dilemma. I guess it depends on the craving that drives your appetite on any given day. Whatever you choose, in my opinion, potato salad is not just for summer anymore.

WARM POTATO SALAD

Ingredients:

2 pounds potatoes

1 teaspoon kosher salt

12 ounces applewood smoked bacon

1/3 cup apple cider vinegar

3 tablespoons sugar

1 tablespoon Dijon mustard

1 tablespoon onions, finely chopped

1/4 teaspoon celery seeds

Fresh parsley, for garnish

Instructions:

Scrub potatoes and cut into quarters. Place in a large pot. Cover potatoes with cold water and sprinkle with kosher salt. Bring to a boil; reduce heat to a simmer for 20 minutes, or until potatoes are fork tender. Drain the water. Allow potatoes to air dry for a few minutes. Cut potatoes into bite-size pieces. Set aside. In another skillet over medium heat, cut bacon into 1-inch pieces. Cook, stirring occasionally, until crispy. Transfer bacon, with a slotted spoon, to a paper towel-lined plate. Warm the reserve bacon drippings (about 1/4 cup) over Low heat. Slowly stir in apple cider vinegar, sugar, and Dijon mustard until combined. Add chopped onions and celery seeds. Cook for one minute longer. Remove the pan from heat and toss in the potatoes. Mix gently. Fold in the cooked bacon. Transfer the warm potato salad to a serving bowl. Garnish with chopped parsley.

Oven Spinach Frittata

What’s Cooking in Gail’s Kitchen? Country Casual Cravings: Oven Spinach Frittata! Frittata is a fancy word for an Italian omelet baked in the oven without a crust. It also cooks in half the time, making it less labor-intensive. Somehow that doesn’t sound near as exciting as a French quiche. Yet, it is because the filling ends up being light, fluffy, and savory. The feta cheese is a crowning point with its rich tangy flavor. And the next time you need something versatile for leftover lunch the next day, think frittata. Even at room temperature, it tastes amazing.

OVEN SPINACH FRITTATA

Ingredients:

4 eggs

1 tablespoon Greek yogurt

1/2 teaspoon kosher salt

1/8 teaspoon red pepper flakes

1 tablespoon olive oil

1 green onion, chopped

1 strip bacon, cooked and crumbled

1/2 cup cherrywood deli ham, sliced

1/4 cup baby spinach leaves

2 ounces feta cheese, crumbled

Italian dried herbs, for garnish

Instructions:

Preheat oven to 350°. In a bowl, whisk together eggs, Greek yogurt, kosher salt, and red pepper flakes until combined. In an iron skillet over medium heat, warm olive oil. Add the green onions; sauté for 2-3 minutes. Add the cooked bacon, cherrywood ham, and baby spinach. Cook one minute, stirring gently. Pour the egg mixture into the pan. Place cubed feta cheese on top. Transfer the iron skillet to the preheated oven. Bake 25 minutes or until the eggs are puffy and slightly browned. Remove pan from oven. Garnish with a pinch of dried Italian herbs. Serve immediately.

Wrapped-in-Bacon Roasted Turkey

What’s Cooking in Gail’s Kitchen? The Food Whisperer: Wrapped-in-Bacon Roast Turkey! Bacon-lovers unite. With the holidays looming on the horizon, this main dish is perfect for those who turn their nose up at Mr. Turkey. By wrapping applewood smoked bacon around the outside of the bird, the inside meat stays moist and a little bit salty while the outside gets crispy. No basting required. I was able to weave the bacon strips on a sheet of waxed paper therefore making it easier to cover the turkey breast. It sounds weird, but rub a little butter on the turkey skin first. It actually helps the bacon stay in place. As it bakes, the house begins to smell amazing. You know you want it.

WRAPPED-IN-BACON ROAST TURKEY

Ingredients:

7-8 pound turkey breast, thawed

1 pound thick-cut applewood smoked bacon, sliced

1 yellow onion, quartered

Butter for rubbing

Rosemary sprigs for garnish

Instructions:

Preheat oven to 350°. Place turkey breast, breast-side up, in a shallow roasting pan. Tuck the onions quarters in the cavity of the breast. Brush turkey with butter. Add one cup water to the bottom of the pan. This keeps the bacon from shrinking while creating steam for a crispier skin. Place the woven bacon onto the turkey breast by flipping the waxed paper over it. Peel back and tuck the bacon edges around the breast to cover it evenly. The butter will help move it into place. Bake 3-3 1/2 hours. If the bacon becomes too golden-brown before the turkey is fully cooked, cover it with a loose tent of aluminum foil. Turkey is done when a meat thermometer registers at least 165° in the deepest part of the breast. Remove from oven and allow the cooked breast to stand 20-30 minutes. This allows the juices to settle and makes carving easier. To keep the bacon intact, cut through the bacon first before carving the breast beneath. Transfer to a platter with onions and rosemary sprigs.

Open-Faced Sammies

What’s Cooking in Gail’s Kitchen? Equal Measures: Open-Faced Sammie! The popularity of open-faced sandwiches has been brewing since the 15th century, when it was typically eaten for breakfast, lunch, snack, or supper. Although the layers have changed, butter or cheese remain the favorites as spreads, plus any combination of meat and vegetables. This is where your personal palate comes in. Or, perhaps whatever you have on hand in the refrigerator. Gardens abound with peppers, tomatoes, cucumbers, and radishes. But don’t limit yourself there. I find avocados to be perfectly satisfying, especially with a crispy slab of applewood smoked bacon. Like I said, the choice is yours. One thing is for certain, it’s definitely easier to eat an open faced sandwich with a fork and knife.

OPEN-FACED SAMMIE

Ingredients:

2 slices pumpernickel rye bread, artisan-style

1 tablespoon sea salt butter

3 slices Swiss cheese, divided

3 slices bacon, cooked

1 ripe avocado, pitted and mashed

1 teaspoon lime juice

1/8 teaspoon garlic powder

1 tomatillo, chopped

1 tomato, sliced

1 egg, hard-boiled and chopped

1/8 teaspoon Everything But Bagel seasoning

Instructions:

Toast artisan pumpernickel rye bread. Butter with sea salt. Place 1 1/2 slices of Swiss cheese on each piece of toast. Microwave on High 15 seconds to melt cheese. Layer with 1 1/2 slices crisp bacon. In a small bowl, combine mashed avocado, lime juice, and garlic powder. Mix well. Fold in chopped tomatillo. Spread over each sandwich. Place two tomato slices over avocado mixture. Spoon chopped hard-boiled egg pieces over tomatoes. Sprinkle with Everything But Bagel seasoning. Makes two open-face sandwiches.

Devils on Horseback

What’s Cooking in Gail’s Kitchen? Equal Measures: Devils on Horseback! The name itself is a conversation starter. I know, right. The colors themselves resemble the “dark side” of our personalities. The small savory dish is made with pitted dates, smoked almonds, and crispy bacon or prosciutto. It’s pretty simple to prepare and is often served as an appetizer at social gatherings. Popular as a finger food, this hors d’oeuvre is perfect for small conversation at backyard parties. Watch yourself. Eating too many may find you a little mischievous.

DEVILS ON HORSEBACK

Ingredients:

1/4 cup soy sauce

1/2 teaspoon ground ginger

3/4 cup brown sugar

24 pitted dates, whole

24 smoked almonds, whole

3-ounce package prosciutto, deli sliced and cut in half lengthwise or 12 slices thin bacon, cut in half width wise

Instructions:

Preheat oven to 400°. Spray a baking dish with nonstick oil. Set aside. In a shallow bowl, combine soy sauce and ground ginger. Mix well. In a second dish, place brown sugar. Take a pitted date, open carefully, and stuff it with a smoked almond. Wrap the date with a half slice of prosciutto or half bacon slice. Dip it into the soy sauce mixture. Roll it in brown sugar and place seam side down into the prepared baking dish. Repeat until all dates are prepared. Bake in the preheated oven until the prosciutto or bacon is crisp, 15 to 25 minutes. Serve at room temperature.

White Cheddar Bacon Risotto

What’s Cooking in Gail’s Kitchen? The Clean Plate Club: White Cheddar Bacon Risotto! Risotto. Seeing it on the menu always makes my heart palpitate a little faster. I once asked a chef his secret to creamy risotto. He confessed he cooked it part way and froze it until a customer requested it that night. He said with a wink, “That way, I only have to stir it til half my arm falls off.” Thank goodness my rice cooker knows no difference. If you must know, I had more difficulty coughing up the cost for saffron threads, the most expensive spice in the world. Once I understood that it is grown around the Mediterranean, in the Middle East, and in India, I began to see why it was such a labor-intensive crop. Saffron comes from a Fall flower and it takes more than 80,000 crocus flowers to process one pound of saffron. Perhaps that is why the taste is worth the price.

WHITE CHEDDAR BACON RISOTTO

Ingredients:

2 tablespoons olive oil

1/4 cup shallot, diced

1 cup Arborio rice

2 cups chicken broth

1/4 cup dry white wine

1 teaspoon saffron threads

1/4 cup white cheddar cheese, shredded

3-4 strips bacon, cooked and crumbled

1 tablespoon fresh parsley

Instructions:

In a skillet over medium-high heat, warm olive oil. Add diced shallots. Sauté shallots and Arborio rice until translucent, about 5 minutes. In a rice cooker, add chicken broth, white wine, saffron threads, diced shallots, and Arborio rice. Close and lock the lid of the rice cooker. Turn the knob to “Pressure”. Set timer for 7 minutes. When done, release the pressure. Stir in white cheddar cheese, bacon, and parsley. Serve immediately.

Jalapeño Cheesy Cups

What’s Cooking in Gail’s Kitchen? The Clean Plate Club: Jalapeño Cheesy Cups! Fusion foods are the rage right now. Restaurant and Food Truck menus are the trendsetters that carry over into our home kitchens. Fusion foods blend a couple cultures into a balanced dish with copacetic results. Take this one, for instance. Asian wonton meets Mexican spice. You get the gooey cheese with spicy meat perfectly portable in a crispy cup. Pick one up and walk around. These handheld appetizers don’t last long. Forgot a napkin? No worries. Lick your fingers and meander back to the buffet line to snag another.

JALAPEÑO CHEESY CUPS

Ingredients:

24 wonton wrappers

8 ounces cream cheese, softened

1 1/2 cups Monterey Jack cheese, shredded

2 tablespoons pickled jalapeños, chopped

2 tablespoons bacon bits

2 tablespoons cooked chorizo, crumbled

2 green onions, chopped

1/2 cup cheddar cheese, shredded

Jalapeño slices, garnish

Cilantro, garnish

Instructions:

Preheat oven to 400°. Grease a 12-cup muffin tin. Place 2 wonton wrappers in each cup. Bake 4 minutes. Remove muffin tin from oven. Set aside. In a large bowl, combine cream cheese, Monterey Jack cheese, chopped jalapeños, bacon bits, crumbled chorizo, and green onions. Mix well. Divide cheese mixture into cups. Top with cheddar cheese. Finish with jalapeño slices. Bake 10 minutes until cheese is bubbly. Wontons should appear golden brown and slightly crispy. Garnish with fresh cilantro. Serve warm.