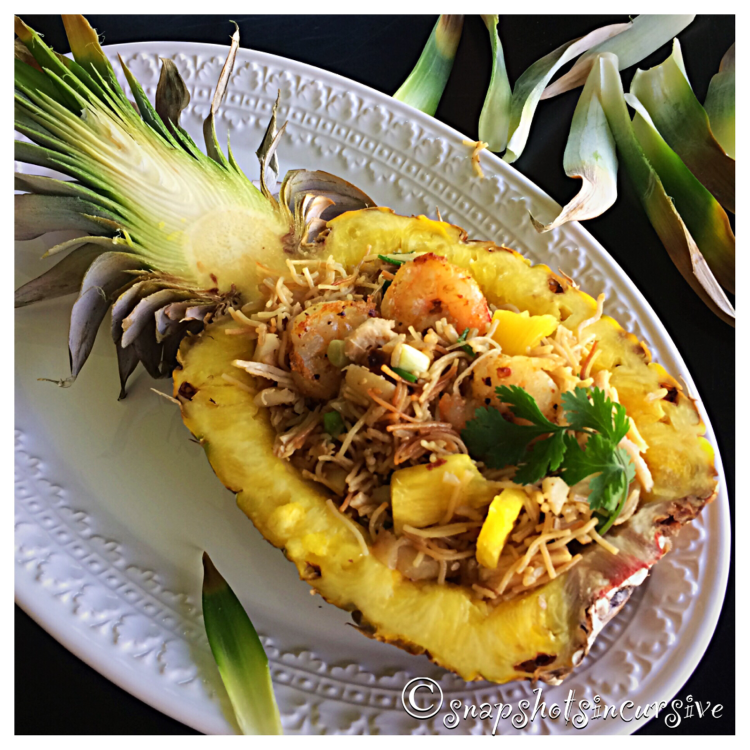
School Cafeteria Peanut Butter Bars

What’s Cooking in Gail’s Kitchen? Splurge-Worthy Goodness: School Cafeteria Peanut Butter Bars! Remember the good old days when the grade school menu would come out and we’d peruse it like the Sears and Roebuck Christmas Catalog? We’d jump for joy when we saw Fish Sticks, Baked Meatloaf, Apple Crisp, Chocolate Cake, and Pizza Squares. On the other hand, Creamed Spinach made us wince and turn up our noses. Back then you had two options, buy a hot lunch ticket or bring a sack lunch from home. No in-betweens. As a general rule, the good canceled out the bad, especially in the category of scrumptious desserts. The “Lunchroom Ladies” really knew their business when it came down to sweets. Nobody could layer on the frosting like they could. And it was always homemade right there. I wonder who got to lick the spoon.

SCHOOL CAFETERIA PEANUT BUTTER BARS

Ingredients:

1/2 cup butter

3/4 cup peanut butter, creamy

3/4 cup sugar

1/4 cup brown sugar

3/4 teaspoon kosher salt

2 eggs, room temperature

1 1/2 teaspoons vanilla extract

1 cup flour

Ingredients for Icing:

1/2 cup powdered sugar

2 tablespoons creamy peanut butter, melted

2 tablespoons hot water

Instructions:

Preheat oven to 350°. Line a 9”x9” square baking pan with parchment paper. Set aside. Melt butter and peanut butter in a microwave-safe bowl on 50% for 30 seconds. Stir and repeat, if necessary. Set aside to cool to room temperature. In a large bowl, sift together sugar, brown sugar, and kosher salt. Whisk in one egg at a time until combined. Add vanilla extract. Whisk in peanut butter mixture until combined. Sift in flour; mix until flour disappears. Do not over mix. Pour into prepared pan. Bake for 35-40 minutes, or until cake tester comes out with tiny moist crumbs. Cool pan on a wire rack. Once the pan has cooled, remove the cake from pan and transfer on the parchment paper to a rimmed baking sheet. Combine powdered sugar, creamy peanut butter, and hot water. Stir until frosting has a smooth consistency. Drizzle over dessert. Allow icing to set up before cutting into individual bars.

Raw Honey Peanut Butter Cookies

What’s Cooking in Gail’s Kitchen? Splurge-Worthy Goodness: Raw Honey Peanut Butter Cookies! No baking required. Wait, whaaat? These bite-size morsels are not only healthy as an energy snack, they can be made in a matter of minutes with ingredients you probably already have on hand in your pantry. So, what exactly is raw honey, you wonder. Most beekeepers will tell you it simply means the honey is strained right before it is bottled. That translates to nature’s sweetness with all its beneficial nutrients and antioxidants. By eliminating the intense processing stage of heat filtration, what you get instead is honey that comes from the bee hive to your home. No extra sugar is added either. To make sure you are getting raw honey, always check the label.

RAW HONEY PEANUT BUTTER COOKIES

Ingredients:

1/3 cup raw honey

1/2 cup plus 2 tablespoons natural peanut butter, creamy

1 tablespoon vegetable oil

2 teaspoons vanilla extract

2 1/2 cups whole grain oats

Sprinkles, for garnish

Instructions:

Line a baking sheet with waxed paper. Pour sprinkles into a dish. Set aside. In a microwave-safe bowl, combine raw honey, creamy peanut butter, and vegetable oil. Microwave on High for 30 seconds. Stir. Repeat. Add vanilla extract. Mix well. Add whole grain oats. Stir to incorporate until cookie dough forms a large ball. Using a cookie scoop, press dough to make bite-size uniform cookies. Dip into sprinkles. Place on prepared baking sheet. Cookies will “set up” on their own. Transfer to a covered container for storage.

Quesadilla Chile Relleno

What’s Cooking in Gail’s Kitchen? Splurge-Worthy Goodness: Quesadilla Chile Relleno! Before you shake your head and walk away, hear me out. Green poblano peppers are a pretty mild distant cousin to the jalapeño and habanero. You could almost say they’re from the “other side of the tracks”, so to speak. Personally, I think they’re underrated. If you look up their classification, they might even be referred to as sweet. Now, I don’t know about that. What I do know is they smell somewhat earthy, tend to hold their shape, and are absolutely scrumptious when bathed in Mexican cheeses. In my opinion, they definitely deserve a second chance. What have you got to lose?

QUESADILLA CHILE RELLENO

Ingredients:

2 large flour tortillas

2 tablespoons butter

1 cup Mexican-style four cheeses, shredded

2 poblano peppers, roasted, peeled, and sliced in strips

1/4 cup yellow onion, chopped

1/4 cup ranch dressing, prepared

1/4 teaspoon cayenne pepper

1/4 teaspoon sriracha sauce

Instructions:

Butter one side of each flour tortilla. Set aside. Warm an iron skillet or nonstick pan over medium heat. Place one tortilla in the skillet, butter side down. Add half the Mexican cheeses. Arrange the poblano peppers in a single layer over cheese. Scatter chopped onion over all. Add remaining Mexican cheese blend. Place the remaining tortilla on top, butter side up. Press down lightly. Cover the pan with a lid. Cook 3-4 minutes until tortilla is lightly browned and cheese is melted. Using a spatula, flip over the quesadilla. Cover with lid. Cook 2-3 minutes longer until golden brown. Do not burn. Transfer quesadilla to a cutting board. Let rest for 2 minutes to avoid a flood of gooey cheese. In a small bowl, combine prepared ranch dressing, cayenne pepper, and sriracha sauce. Mix well. Cut the quesadilla into 6 triangles. Serve with sriracha ranch dipping sauce.

Pan-Seared Tilapia

What’s Cooking in Gail’s Kitchen? Splurge-Worthy Goodness: Pan-Seared Tilapia! I don’t often “fry” foods, but once in awhile nothing else will do. The secret to pan-searing fish involves five key steps. First, make sure the skillet is nonstick or a trustworthy cast iron skillet. Secondly, choose a neutral-flavored oil which has a higher smoke point. You won’t need much, so it’s crucial to make sure the oil is not going to turn black from high heat. The third point, and this is just as important, make sure moisture is removed from the fish. If not, there is guaranteed to be steam-created soggy fish or dangerous grease splatters. Step Four: When the fish is placed in the pan, do not overcrowd it. The pieces should not touch each other at all. Finally, allow the fish to sear without moving it. This is how you get that beautiful crispy surface. Use a timer. Once the fillets are carefully flipped over, you’re almost done. By this time everyone in the house will be heading to the kitchen to discover what smells so incredibly good. Well Done, Grasshopper.

PAN-SEARED TILAPIA

Ingredients:

2 frozen tilapia fillets, thawed

1/2 tablespoon brown sugar

1/2 tablespoon chili powder

1/2 teaspoon kosher salt

1/4 teaspoon garlic powder

1/2 lime, juice and zest

2 tablespoons vegetable oil

1 pat butter, divided

Fresh dill, for garnish

Instructions:

Defrost fish fillets overnight in the refrigerator. Remove from package, pat dry with paper towels. Set aside. In a shallow dish, combine brown sugar, chili powder, kosher salt, garlic powder, and lime zest. Mix well. Warm vegetable oil in a cast iron skillet over medium-high heat. Rub both sides of each fillet with the spice mixture. Cook tilapia fillets for 4 minutes. Carefully flip them over. Squeeze lime juice over fish in pan. Divide a pat of butter over the top of each fillet. Cook 3 minutes longer, or until opaque and flaky. Transfer pan-seared tilapia fillets to a platter. Allow to rest for 5 minutes. Garnish with fresh dill. Serve immediately.

Original Pistachio Party Ball

What’s Cooking in Gail’s Kitchen? Splurge-Worthy Goodness: Original Pistachio Party Ball! Nothing says par-tay like a holiday cheese ball. Instead of picking one up at the grocery store this year, why not surprise the family and make something a little different. Pistachios tend to be shoved aside in favor of walnuts and pecans, mostly due to their cost. But I guarantee you, people will sit up and take notice of them embedded in this party cheese ball. A little goes a long way, especially when rolled on the outside of the cheese ball. For those who enjoy the experience of cracking the shell to pluck out the pistachio, you not only get to nibble as you crack, you also justify the savings involved over the cost of pistachios without shells. Now there’s a thought worth considering.

ORIGINAL PISTACHIO PARTY BALL

Ingredients:

8 ounces Neufchâtel cheese, room temperature

4 tablespoons unsalted butter, softened

1 teaspoon zesty Italian salad dressing dry mix

1 teaspoon Worcestershire sauce

1/2 teaspoon red pepper flakes

1 cup extra sharp cheddar cheese, shredded

1 cup pistachios, roughly chopped

Instructions:

In a bowl, cream together Neufchâtel cheese and unsalted butter until smooth. Sprinkle in zesty Italian dry mix. Mix well. Add Worcestershire sauce and red pepper flakes. Fold in sharp cheddar cheese. Stir until well combined. Place a sheet of plastic wrap on the counter. Layer with chopped pistachio nuts. Transfer cheese mixture onto the nuts. Wearing disposable gloves, form the cheese mixture into a ball, turning to cover each side with chopped nuts. When completely covered, wrap the pistachio cheese ball in a clean piece of plastic wrap. Refrigerate at least one hour to intensify flavors. Serve with assorted crackers.

Yeast Artisan Bread

What’s Cooking in Gail’s Kitchen? Elevated Edibles: Yeast Artisan Bread! There’s no doubt bread can be a family’s comfort food, even if you seldom bake it yourself. With more people setting up a home office or home schooling, suddenly bread-baking has turned into a thing. And if you own a bread machine, better yet. Dust it off and give it center stage on the quartz countertop in your gourmet kitchen. Baking bread is like therapy for the soul. We combine ingredients, knead dough, make decorative slits on top, and bake it to a rich golden color. From start to finish, it becomes a focused project. When the house begins to smell like the neighborhood corner bakery, everyone notices. It’s time to slice it up and slather on the butter.

YEAST ARTISAN BREAD

Ingredients:

1 cup water

2 tablespoons olive oil

1 teaspoon sea salt

3 cups flour

1/4 cup sugar

1 packet active yeast

Instructions:

Using a bread machine, add ingredients in the order listed. Always add the yeast last, creating a small indentation on the top of the dry ingredients. Pour yeast into indentation. Select the “Dough” setting. At the end of the cycle, turn the dough onto a lightly floured surface. Knead for one minute. Grease a bowl with olive oil. Transfer the dough to the bowl. Cover with plastic wrap and let rise in a warm place until doubled in size, about one hour. Cover bowl with a damp cloth. Turn the dough onto a lightly floured surface. Punch the dough down and knead for a few seconds. Form the dough into a ball and return to the bowl. Cover again and allow it to rise in a warm place 30 minutes longer. To bake in an iron skillet, preheat oven to 400°. Put the iron skillet in the oven while it is preheating. Place a roasting pan on the bottom shelf of the oven. Fill it with one inch of hot water. Using oven mitts, remove the hot skillet from the oven. Grease the inside of the skillet with olive oil. Sprinkle with one tablespoon cornmeal. Carefully transfer the puffed bread dough to the iron skillet. Dip a kitchen shears in hot water. Cut slits in the top of the dough. Sprinkle generously with water. Bake for 30-35 minutes until the loaf is a deep golden brown. When a cake tester is inserted in the center, it comes out clean. Remove the iron skillet from the oven. Immediately remove artisan bread to prevent over baking. Allow it to cool on a wire rack for 10 minutes before cutting.

Velvety Seafood Chowder

What’s Cooking in Gail’s Kitchen? Elevated Edibles: Velvety Seafood Chowder! Everyone who has enrolled a child or grandchild in preschool is probably familiar with the folk tale known as “Stone Soup”. The story goes, a bunch of starving strangers enter a small village to convince the townspeople to share one ingredient from their root cellars to make a fantastic meal. The strangers produce a magic “stone”, which they place into a large cauldron filled with water. As the pot is cooking over a wood fire, one by one, the curious residents walk by. They are told the soup is almost ready but needs a “little of this or a pinch of that”. The villagers happily agree to throw in everything from carrots and onions to meat and potatoes to enhance the flavor. By the time the medley is fully cooked, the stone is removed and the hearty soup is shared among them. What a wonderful tradition.

VELVETY SEAFOOD CHOWDER

Ingredients:

2 tablespoons butter

1/2 sweet onion, diced

1/2 teaspoon Old Bay seasoning*

1/8 teaspoon thyme

2 tablespoons flour

1/2 stalk celery, sliced

1/2 carrot, chopped

1/2 pound potatoes, peeled and cubed

1/4 cup corn

5 cups chicken broth

1/4 cup white wine

1/2 cup crabmeat, flaked

6 ounces shrimp, peeled and deveined

6.5-ounce can clams, drained and chopped

1 cup heavy cream

1/2 tablespoon fresh parsley

Instructions:

In a heavy pan over medium heat, warm butter. Add diced onion. Sauté until tender, about 5 minutes. Add Old Bay seasoning, thyme, and flour. Cook 2-3 minutes, stirring occasionally. Add sliced celery, chopped carrots, cubed potatoes, corn, chicken broth, and white wine. Bring to a boil. Reduce heat and simmer 10 minutes, stirring occasionally. Add flaked crabmeat, peeled shrimp, chopped clams, and heavy cream. Cook until seafood is fully cooked, heated through, and potatoes are tender, approximately 8-10 minutes. Ladle into bowls; garnish with fresh parsley.

*I receive no recompense for mentioning this product.

Jacksonville Shrimp Boil

What’s Cooking in Gail’s Kitchen? Elevated Edibles: Jacksonville Shrimp Boil! Whoever came up with a one-pot feast of seafood heaven is pure genius. Succulent shrimp, baby red potatoes, sweet corn on the cob, and smoky sausage. Throw everything into the biggest pot you have and let the flavors intermingle with fresh herbs and aromatic spices. The secret is to stagger the cooking process of the ingredients. After all, potatoes take longer to cook fork-tender than shrimp does. Don’t get impatient or you’ll end up with a bowl of slush. Whatever you do, don’t discard the broth. By adding butter, and serving it in small ramekins, it instantly becomes a great dipping sauce for drizzling over everything or sopping up with a crusty bread.

JACKSONVILLE SHRIMP BOIL

Ingredients:

2 lemons, halved plus wedges for serving

1/2 cup Old Bay Seasoning*

8 cloves garlic, smashed

1 red onion, quartered

6 sprigs lemon thyme

1 pound baby red potatoes, halved

4 ears corn, husked and snapped in half

1 pound smoked sausage, cut into chunks

1 1/4 pounds large shrimp, unpeeled

2 tablespoons butter

Hot sauce, for serving

Instructions:

Fill a large pot with 4 quarts water. Squeeze lemon juice into the water. Drop lemons into the pot. Add Old Bay Seasoning, smashed garlic, and red onion. Tie the lemon thyme sprigs with kitchen twine and drop into the pot. Cover and bring to a boil. Reduce to a simmer and cook for 5 minutes. Add red potatoes to the pot; cook just until tender, about 10 minutes. Add the corn and smoked sausage; cook 5 minutes. Finally, add the shrimp to the pot. Cover and cook until the shrimp curl and turn opaque in color, about 2-3 minutes, tops. Transfer the shrimp, sausage, and vegetables to a deep platter using a slotted spoon. Arrange lemon wedges. Ladle 1 cup broth into a serving bowl and add butter. Stir until well blended. Place in the center of the platter. Serve immediately with hot sauce, if desired.

*I receive no recompense for mentioning this product.

Bacon and Egg Mac ‘n Cheese

What’s Cooking in Gail’s Kitchen? Elevated Edibles: Bacon and Egg Mac’n Cheese! Grab onto your seat because this dish is going to leave you shouting to the rooftops like a kid on a tire swing. Remember how everyone in the neighborhood would congregate around the sturdy oak, count to three, and then pile on the tire like a bunch of monkeys? The biggest guy was always left behind to spin it around like a giant top before grabbing the rope and jumping aboard. The peals of laughter echoed around the block and seemed to go on forever. It’s a wonder the branch didn’t break, or worse.

BACON AND EGG MAC ‘N CHEESE

Ingredients:

1 cup bow tie pasta

1 teaspoon sea salt

2 tablespoons butter

1/3 cup skim milk

1/3 cup cheddar cheese, shredded

3 slices American cheese

1/4 cup feta cheese

2 tablespoons parmesan cheese, grated

4 strips precooked bacon, crumbled

2 tablespoons red peppers, chopped

2 tablespoons panko bread crumbs

1 tablespoon olive oil

2 eggs, fried according to preference

2 green onions, snipped

Instructions:

Preheat oven to 350°. Spray 2 individual casserole pans with nonstick oil. Set aside. Cook pasta in salted water, according to package directions. Drain and set aside. In a medium saucepan, warm the butter over medium-low heat. Add the drained pasta and skim milk. Stir. Add cheddar cheese, American cheese, feta cheese, and parmesan cheese. Stir occasionally until completely melted. Fold in crumbled bacon and chopped red peppers. Divide between the two casserole pans. In a small dish, combine panko seasoned bread crumbs and olive oil. Stir to moisten. Sprinkle over top. Bake for 10 minutes. Meanwhile, fry the eggs, according to preference. Remove the casserole pans from the oven. Place one fried egg on top of each. Garnish with chopped green onions. Serve immediately.