Eating My Way Through the Alphabet: Letter L

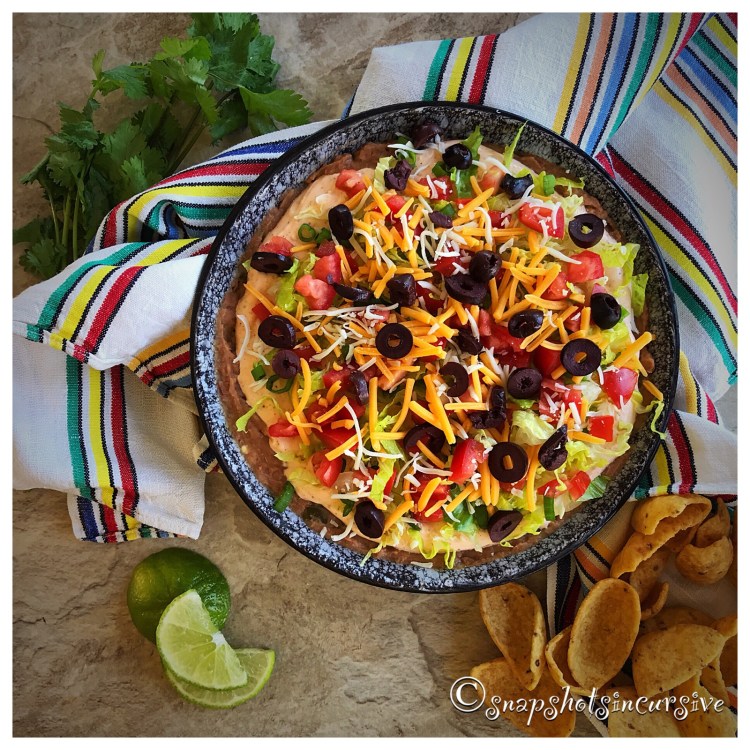
What’s Cooking in Gail’s Kitchen? The Color of Food: Layered Taco Dip! Wait no longer for a great appetizer. Set the tone for a social gathering with foods that say, “Let’s get this party started!”. A creamy dense layer of Mexican spices over a base of refried beans make the perfect foundation to hold the remaining ingredients. Not a fan of black olives? Simply choose green peppers or mushrooms instead. After all it’s your kitchen, so own it!

LAYERED TACO DIP

16-ounce can refried beans, traditional

16-ounce carton sour cream

8-ounce block cream cheese, room temperature

1 taco seasoning packet

1 cup romaine lettuce, chopped

1 large tomato, diced

3 green onions, chopped

1 1/2 cups extra sharp cheddar cheese, shredded

1/2 cup Monterey Jack cheese, shredded

2.25-ounce can sliced black olives, drained

Tortilla chips or corn chips

Instructions:

Spread refried beans on the bottom layer of a serving platter. Combine sour cream, cream cheese, and taco seasoning packet in a bowl. Mix until smooth. Spread over refried beans. Divide romaine lettuce evenly over cream cheese layer. Top with diced tomatoes and green onion snips. Sprinkle shredded cheddar cheese followed by Monterey Jack cheese over all. Finish with black olive slices. Cover with plastic wrap and refrigerate dip for at least one hour. Serve with tortilla chips or corn chips.

Eating My Way Through the Alphabet: Letter F

What’s Cooking in Gail’s Kitchen? The Color of Food: Frozen Whipped Cream! Now here’s an indulgence anyone can afford. Frozen whipped cream. Simply spread the prepared mixture into a loaf pan, freeze overnight, and cut into chunks. Store in ready-to-use ziplock freezer bags. Then let the fun begin. Replace the creamer in your morning cuppa joe with a block or two, swirl, and watch the magic happen. You can also substitute those stale hardened marshmallows with whipped cream cubes in your favorite hot cocoa beverage. What about fruit smoothies? Throw a few chunks of frozen whipped cream into the blender with fresh fruit for a satisfying snack. Mmmm. Whipped cream isn’t just for dessert any more.

FROZEN WHIPPED CREAM

1 cup heavy cream

4 tablespoons powdered sugar, sifted

1 teaspoon vanilla extract

Instructions:

Chill the mixer bowl and whisk attachment 15 minutes before using. Pour the heavy whipping cream into the mixing bowl of a stand mixer. Set speed to medium for 5 minutes. Add powdered sugar and vanilla extract. Beat 3-4 minutes longer or until the cream takes on volume and forms stiff peaks. The cream will have doubled in size. Do not over-beat or the cream will turn buttery. Spread whipped cream into a parchment paper-lined loaf pan and freeze overnight. When mixture is frozen, remove from pan and cut into chunks or cubes. Store in a freezer bag and keep frozen until ready to use.

Eating My Way Through the Alphabet: Letter V

What’s Cooking in Gail’s Kitchen? The Daily Special: Very Berry Icy Sorbet! ‘Tis the season for an abundance of fresh fruit! This is the time to stock up on featured berries at the market. Pop them into freezer bags for easy storage. Later on, when looking for a refreshing dessert idea, combine the flavors of strawberries, blackberries, and raspberries! The presentation is elegant as well as delicious. Because I prefer the difference in shades of red, I prepare each berry recipe individually.

VERY BERRY ICY SORBET

Ingredients:

1 1/2 cups frozen blackberries, slightly defrosted

1 teaspoon frozen orange juice concentrate

2 teaspoons water

1 teaspoon blackberry wine (optional)

Garnish: Whipped Cream

Instructions:

Using a food processor fitted with the metal blade, blend sorbet ingredients until smooth. Scrape sides as needed. Pour into a covered container and place in the freezer for at least 15 minutes. Using a melon ball scoop, form bite size balls of assorted fruit flavors. Top with more fresh fruit and a dollop of whipped cream.

Eating My Way Through the Alphabet: Letter B

What’s Cooking in Gail’s Kitchen? The Daily Special: Banana Bottom Parfaits! Three cheers for a dessert that is will make everyone smile. It’s light and creamy with a touch of sweetness, and a fruit finish that has you pushing back from the table and saying, “Ahhhhh!” Whether you choose a mini shot-glass portion or a stemmed goblet, the presentation on this dessert is rated 5-star, according to my husband.

BANANA BOTTOM PARFAITS

Ingredients:

Shortbread cookies, broken into pieces*

1 box 3.4 ounce Banana Cream Instant Pudding

2 cups cold milk

3/4 cup Cool Whip Whipped topping

2 bananas, peeled and sliced

Carmel Pecan Topping (see recipe below)

Toasted Coconut for Garnish

French Vanilla Cookie Straws

* I used Kauai Kookie Banzai bite-sized cookies.

Instructions:

Crush shortbread cookies into coarse crumbs. Using a hand mixer, beat pudding mix and milk in medium bowl for 2 minutes. Fold in whipped topping. Reserve 4 banana slices for garnish. Between the dessert dishes, layer a few banana slices in the bottom of each parfait glass. Add a spoonful of caramel sauce. Next layer the shortbread pieces. Carefully spoon in the banana pudding, making sure the layers remain separated. Repeat layers ending with pudding on top. Refrigerate 15 minutes or longer. Before serving, sprinkle with toasted coconut, garnish with one banana slice, and a cookie straw.

Hint: To prevent sliced bananas from turning brown, toss them with lemon juice. Pat bananas dry with paper towel before using.

Pecan Caramel Sauce

Ingredients:

1 cup brown sugar

1/4 cup butter

1/2 cup half and half

1 teaspoon vanilla

3 teaspoons Crown Royal

Pinch of sea salt

1/4 cup pecans, chopped

Instructions:

Mix all ingredients except pecans, in a 2-quart sauce pan over medium-low heat. Cook while gently stirring 5-7 minutes, or until thicker. Turn off heat. Add pecans. Pour into jar. Store in refrigerator.

Eating My Way Through the Holidays! Yuletide Favs: Quiche Fromage!

Eating My Way Through the Holidays! Yuletide Favs: Quiche Fromage! If you’ve ever been to Paris, you can’t help but be charmed by the street vendors near Norte Dame along the Seine River. One in particular featured homemade quiche specialties for picnicking tourists. There’s nothing more charming than grabbing a spot on the nearest bench for a lunchtime picnic in the midst of people-watching, that’s for sure. You can relive the moment with today’s version of cheese quiche made with a puff pastry crust. Ooh là là!

QUICHE FROMAGE

Ingredients:

One puff pastry sheet

5 eggs

1/3 cup crème fraîche or Greek yogurt

1/2 cup light cream

1 teaspoon Herbes de Provence

1/4 teaspoon seasoned salt

1/8 teaspoon cracked black pepper

6-7 ounces Sartori Montamoré cheese, crumbled

Instructions:

Thaw the puff pastry for 40 minutes. Roll out to fit a 10 1/2″ pie plate. Crimp the edges and pierce the bottom with a fork. Place pie plate in the freezer for 30 minutes. Preheat the oven to 425°. Line the pastry with foil and place pastry weights in the bottom. Bake 15 minutes. Remove from oven. Remove the foil and pastry weights, pierce dough again if needed, and bake 5 minutes longer until bottom is golden. Set aside. In a bowl, whisk together eggs, crème fraîche, light cream, Herbes de Provence, seasoned salt, and black pepper. Fold in cheese crumbles. Spoon mixture into the pastry crust. Bake 30 minutes until the filling is golden and the crust is puffed. To test for doneness, insert cake tester. If pick comes out clean, the quiche is baked through. Serve immediately. Enjoy with a glass of Pinot Noir.

Eating My Way Through the Holidays! Yuletide Favs: Golden Oyster Stew!

Eating My Way Through the Holidays! Yuletide Favs: Golden Oyster Stew! I knew it was something special when my father requested this savory stew once a year. Although he was the only one who indulged in its aromatic creaminess, I managed to sneak one spoonful each time. I guess you could say eventually I acquired a taste for this seafood delicacy. Now I’m sharing it with you. Carry on the tradition.

GOLDEN OYSTER STEW

Ingredients:

1 medium potato, peeled and diced

1 tablespoon onion, chopped

4 tablespoons butter

1/2 teaspoon sea salt

1/8 teaspoon black pepper

1/2 teaspoon crushed red pepper flakes

8 ounces of fancy whole oysters, with oyster liquor

1 cup light cream

1/2 cup of cheddar cheese, finely shredded

Oyster crackers

Instructions:

In a 2-quart pan over medium high heat, combine potatoes, onion, butter, sea salt, black pepper, and red pepper flakes. Add just enough water to cover. Cook until tender, about 20 minutes. Reduce heat to simmer and add oysters with liquor, cream, and cheese. Stir occasionally for cheese to melt. Gently bubble until the edges of the oysters begin to curl. Do not boil over. Serve the golden oyster stew immediately with oyster crackers.

Eating My Way Through the Holidays! Yuletide Favs: Fabulous Fruit Dip!

Eating My Way Through the Holidays! Yuletide Favs: Fabulous Fruit Dip! Recently I served a delightful fruit cup for breakfast when family came to visit. Because it is made with Greek yogurt and nutmeg, it’s an impressive alternative to ordinary yogurt. Think of it as Fabulous-in-a-Cup. Whether you decide to arrange a generous fruit platter for a crowd or scale it down to individual portions, the results are the same: heavenly delicious!

FABULOUS FRUIT DIP

Ingredients:

1 large orange*

8 ounces of Neufchâtel cheese, room temperature

4 ounces marshmallow Creme

1/4 cup Greek yogurt

1 teaspoon orange extract

1/8 teaspoon orange zest

Smidgen nutmeg

Assorted fresh fruits

Mint Sprig for Garnish

Instructions:

Cut 1/3 off the top of the orange to create a “bowl”. Carefully run a sharp knife around the inside. Do not cut through the peel. Gently scoop out the fruit. Set aside. In a medium bowl, mix together Neufchâtel cheese and marshmallow creme. Beat until smooth. Fold in Greek yogurt. Make the zest by using the top portion of the orange peel. Add orange extract, zest, and nutmeg. Blend thoroughly. Chill one hour. Scoop into the orange “bowl” before serving. Garnish with fresh mint sprig. Place on a serving platter surrounded by fresh fruit.

* For individual servings, choose four small navel oranges.

Eating My Way Through the Holidays! Yuletide Favs: Pumpkin Spice Pie

Eating My Way Through the Holidays! Yuletide Favs: Pumpkin Spice Pie! It wouldn’t be the a feast without family traditions, whether it’s a circle of loved ones, heirloom tableware, aromatic side dishes, or pumpkin spice pie. No matter how stuffed we are from the bountiful spread, there’s always room for dessert. Am I right? Indeed! Besides, who can resist a touch of creamy custard sweetness surrounded by a golden, buttery crust, even if it is prepared by someone else.

PUMPKIN SPICE PIE

Ingredients:

1 prepared 9” pie crust

15-ounce can puréed pumpkin

2 eggs

15-ounce can sweetened condensed milk

1/2 teaspoon cinnamon

1/2 teaspoon ginger

1/2 teaspoon nutmeg

1/2 teaspoon sea salt

Whipped Cream for garnish

Instructions:

Preheat oven to 425°. Place prepared pie dough in an ungreased pie plate. Crimp edges as desired. Set aside. Combine puréed pumpkin, eggs, sweetened condensed milk, cinnamon, ginger, nutmeg, and sea salt. Beat until smooth. Pour into prepared pie crust. Bake 15 minutes. Reduce oven temperature to 350° and continue baking 40-50 minutes until center is firm. If necessary, cover the edges of the pie crust with aluminum foil to avoid over browning. A knife inserted will come out clean. Remove from oven. Cool. Garnish with whipped cream, as desired.

Eating My Way Through the Alphabet: Letter E

What’s Cooking in Gail’s Kitchen? Front-Runner Favs: Earl Gray Tea Ice Cream! Before I begin, let me assure you this recipe does not require any special equipment other than a stand mixer. Truth. No ice cream maker is needed. It’s also done in stages. That means you can steep the tea and refrigerate it overnight before combining all the ingredients to store in the freezer. And the taste, you wonder? Bold, creamy, sweet, and melt-in-your-mouth smooth. Now let’s get started. You’re going to love this. 
EARL GRAY TEA ICE CREAM
Ingredients:

2 cups heavy cream

2 Earl Grey Tea bags

14-ounce can sweetened condensed milk*

1 tablespoon vanilla extract

2 tablespoons natural honey
Instructions:

Be sure the mixing bowl, whisk, and loaf pan are chilled before using. (I placed mine in the freezer overnight.) Measure heavy cream into a microwave-safe bowl. Microwave for 3 minutes on HIGH; just until little bubbles form around the edge of the bowl. Watch carefully. Do not allow the cream to boil or froth up. Remove from microwave. Immediately add tea bags to cream and cover. Steep the tea bags for 30 minutes. Remove tea bags and discard. Place the covered bowl in the refrigerator until chilled or overnight. In the chilled bowl of the stand mixer, combine heavy cream, sweetened condensed milk, vanilla extract, and natural honey. Whip on medium-high speed until soft peaks form, about 4-5 minutes. Transfer to the chilled loaf pan. Freeze 6 hours or overnight before serving. 
*If the ingredients are warm, the mixture won’t thicken to desired texture. I put the can of sweetened condensed milk in the refrigerator beforehand.