Flaming Cherries Jubilee

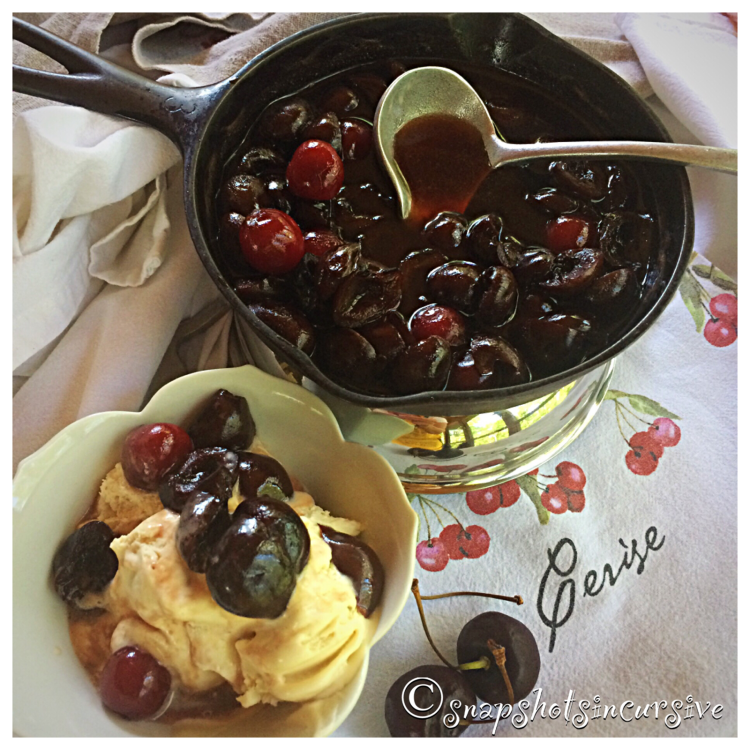
What’s Cooking in Gail’s Kitchen? Front-Runner Favs: Flaming Cherries Jubilee! Here’s a dessert that always leaves a nice impression. And why wouldn’t it? After all, it was specially prepared for Queen Victoria’s Jubilee celebration in the late 1800’s. Hence the name. Begin with the season’s plump and juicy cherries found at the local Farmer’s Market or neighborhood grocery. Gently warm them in a sweet simple syrup. Add brandy and ignite for an amazing presentation. Then serve over bowls of ice cream. Super-simple yet super-delish!

FLAMING CHERRIES JUBILEE

Ingredients:

1/2 cup water

1/2 cup sugar

2 cinnamon sticks

Lemon rind

1 cup cherries, stems and stones removed; halved

2 tablespoons brandy

Vanilla Ice Cream

Instructions:

In a saucepan over medium heat, combine water, sugar, cinnamon sticks, and lemon rind. Stir to dissolve sugar. Boil for 3-5 minutes until mixture thickens. Reduce heat to simmer, add cherries. Cook over low heat until fruit is softened. The syrup will turn color to match the cherries. Remove the lemon rind; discard. Add the brandy, but do not boil. Turn off stove. Flame the cherries with a kitchen torch. Using a spoon, baste cherries with liqueur and juices until the flames extinguish. Spoon over bowls of vanilla ice cream. Serve warm.

Earl Grey Tea Ice Cream

What’s Cooking in Gail’s Kitchen? Front-Runner Favs: Earl Grey Tea Ice Cream! Before I begin, let me assure you this recipe does not require any special equipment other than a stand mixer. Truth. No ice cream maker is needed. It’s also done in stages. That means you can steep the tea and refrigerate it overnight before combining all the ingredients to store in the freezer. And the taste, you wonder? Bold, creamy, sweet, and melt-in-your-mouth smooth. Now let’s get started. You’re going to love this.

EARL GREY TEA ICE CREAM

Ingredients:

2 cups heavy cream

2 Earl Grey Tea bags

14-ounce can sweetened condensed milk*

1 tablespoon vanilla extract

2 tablespoons natural honey

Instructions:

Be sure the mixing bowl, whisk, and loaf pan are chilled before using. (I placed mine in the freezer overnight.) Measure heavy cream into a microwave-safe bowl. Microwave for 3 minutes on HIGH; just until little bubbles form around the edge of the bowl. Watch carefully. Do not allow the cream to boil or froth up. Remove from microwave. Immediately add tea bags to cream and cover. Steep the tea bags for 30 minutes. Remove tea bags and discard. Place the covered bowl in the refrigerator until chilled or overnight. In the chilled bowl of the stand mixer, combine heavy cream, sweetened condensed milk, vanilla extract, and natural honey. Whip on medium-high speed until soft peaks form, about 4-5 minutes. Transfer to the chilled loaf pan. Freeze 6 hours or overnight before serving.

*If the ingredients are warm, the mixture won’t thicken to desired texture. I put the can of sweetened condensed milk in the refrigerator beforehand.

Banana Toffee Pops

What’s Cooking in Gail’s Kitchen? Front-Runner Favs: Banana Toffee Pops! It’s no secret kids love bananas. Adults do, too. With the dog days of summer upon us, make a treat with frozen bananas. Turn them into tasty pops covered in sprinkles or throw them in the blender for a refreshing smoothie. Can’t make up your mind? Do both! 🐵Question: How do you get a monkey down the stairs? 🐒Answer: Have it slide down the banana-ster! 🍌🍌🍌Have a great day!

BANANA TOFFEE POPS

Ingredients:

3 firm bananas, peeled and cut in half

6 popsicle sticks

8 ounces Greek yogurt

1/3 cup toffee pieces, slightly crushed

1/3 cup mini chocolate chips

Instructions:

Place a sheet of wax paper on a baking sheet. Set aside. Combine toffee pieces and mini chocolate chips. Sprinkle onto a sheet of wax paper. Once the banana is coated in yogurt, you will roll the banana in the toppings before placing on the wax paper-lined baking sheet. Peel bananas. Slice each banana in half. Insert one stick into the bottom end of a banana segment. Working one at a time, spread yogurt all over the banana until it is completely covered. Coat in candy pieces. Place on the baking sheet. Repeat. When all six are complete, place baking sheet in the freezer. Freeze 4 hours or overnight. Keep treats frozen in storage bags until ready to serve.*

*Serving Suggestion: For smaller portions, slice bananas into 2″ chunks.

Vodka Jello Shots

What’s Cooking in Gail’s Kitchen? Foodstuff Redefined: Vodka Jello Shots! As a child of the ’60s, one of my favorite desserts was fruit-flavored gelatin. Sometimes it would have sliced bananas, strawberries, carrots, or fruit cocktail mixed in. The recipe was pretty simple. Add water and stir. Nowadays, substituting part of the water for a popular distilled spirit turns a childhood dessert into a slurpable cocktail. Drink responsibly.

VODKA JELLO SHOTS

Ingredients:

3-ounce package orange gelatin

1 cup boiling water

1/2 cup iced water

1/2 cup vodka

Fresh mint leaves

Instructions:

Empty contents of orange gelatin packet into a large bowl. Add boiling water. Stir until completely dissolved, approximately 2-3 minutes. Add iced water and vodka. Stir well. Pour into shot glasses. Refrigerate four hours or until set. Garnish with fresh mint before serving.

Kabob Brownie Bites

What’s Cooking in Gail’s Kitchen? Foodstuff Redefined: Kabob Brownie Bites! This recipe seems like a no-brainer. It’s that simple. Strawberries + Marshmallow + Brownie Bites = Dessert Kabobs! Talk about a foodie’s favorite. This no-fuss festive platter will make a melody in your heart. If you like continuous joy, and a dessert that will draw raves, treat everyone to this explosion of sweetness. (As a time-saver, you may substitute package brownie bites instead of homemade.)

KABOB BROWNIE BITES

Ingredients:

1 Fudge Brownie Mix

1 pound fresh strawberries

8 ounces large marshmallows

1/2 cup semi sweet chocolate chips

Skewers

Instructions;

Using a mini-muffin tin, prepare Fudge Brownie mix according to package directions. Bake. Cool on a wire rack. Clean and dry strawberries. Cut them in half to have a flat end. Beginning with a strawberry cap, skewer it so the greens are on the top. Add a marshmallow, one brownie, and the other half of the strawberry so the point is on the bottom of the kabob. Place on a foil-lined baking sheet. For toasted marshmallows, use a kitchen torch. One at a time, carefully “roast the marshmallow” over a low flame. Do not burn. Return kabob to baking sheet. Repeat until all are toasted. Melt the chocolate chips in a microwave-safe bowl for 30 seconds on High. Stir and repeat until chocolate is completely melted. Transfer melted chocolate to a squeeze bottle or ziplock bag with the corner snipped off. Drizzle chocolate over the kabobs. Refrigerate until chocolate ready to serve.

Insanely Delish Chocolate PB Truffles

What’s Cooking in Gail’s Kitchen? Foodstuff Redefined: Insanely Delish Chocolate PB Truffles! Now here is a dessert that will bring raves from friends and family. Some swear these truffles are filled with crunchy toffee. Others insist it contains chunks of Butterfingers. This is when you just smile demurely and ask, “Do you like it?”. (Don’t worry, you can tell by the way they lick their fingers.) This is one time I wish I could magically snap my fingers and send each one of my readers an insanely delicious sample!

INSANELY DELISH CHOCOLATE PB TRUFFLES

Ingredients:

2 cups natural peanut butter, crunchy

6 tablespoons unsalted butter, softened

1 teaspoon pure vanilla extract

2 cups powdered sugar

1 1/2 gluten-free pretzels, crushed with broken bits

1/2 cup mini chocolate chips

2 12-ounce bags semi-sweet chocolate chips

1 tablespoon vegetable oil

Crushed pretzels for garnish

Instructions:

Combine peanut butter, butter, and vanilla extract in a food processor. Pulse until mixed and creamy. Gradually add powdered sugar until well combined. Transfer dough to a large bowl. Fold in crushed pretzel bits and mini morsels of chocolate to make a cookie dough consistency. Chill 10 minutes. Using a melon ball scoop, take dough and form into a ball. Place on a baking sheet lined with wax paper. Repeat until all dough is used. Caution: Do not taste the dough. You may find yourself nibbling on it too often. lol. Refrigerate dough balls for 30 minutes. As they are being chilled, combine semi-sweet chocolate chips and vegetable oil in a microwave-safe bowl. Heat on High one minute. Stir and repeat until microwaved chocolate is smooth. Do not overcook in microwave. Using a spoon, dip one ball at a time in the melted chocolate. Coat entirely. Place the truffle back on the baking sheet. Repeat. Dust with crushed pretzels. Refrigerate the truffles for 30 minutes, or until chocolate is firm. Share and Enjoy!

Frozen Strawberry Yogurt Bark

What’s Cooking in Gail’s Kitchen? Foodstuff Redefined: Frozen Strawberry Yogurt Bark! When my stepdaughter, Brandi, passed along this healthy summer frozen yogurt idea, I just had to give it a try. One bite and my mouth did a “Happy Dance”!With a plain non-fat yogurt base, practically any fruit can be used. Think about it: raspberries, peaches, blueberries, or bananas. Choose sprinkles or nuts for added crunch, like I have here. The possibilities are endless. Frozen Strawberry Yogurt Bark is cold, it’s refreshing, and it disappears before you know it. Just beware of the eager-eater. You may be witness to a brain-freeze!

FROZEN STRAWBERRY YOGURT BARK

Ingredients:

2 cups Greek yogurt

2 tablespoons natural honey

1/4 teaspoon almond extract

1/4 cup white chocolate chips

2 tablespoons crushed pistachios, separated

5 fresh strawberries, stems removed and sliced

2-3 tablespoons mini chocolate chips

1 teaspoon toasted coconut

Instructions:

In a large bowl, combine Greek yogurt, natural honey, and almond extract. Mix well. Fold in white chocolate chips and 1 tablespoon crushed pistachios. Line a baking sheet with foil. Spread the yogurt mixture evenly to keep the bark 1/2″ thick. Arrange the strawberry slices on top. Sprinkle with mini chocolate chips, the toasted coconut, and remaining crushed pistachios. Place baking sheet in the freezer 4 hours or overnight. Remove frozen strawberry bark and break into pieces. Store in a covered container in the freezer.

Coconut Flour Brownies

What’s Cooking in Gail’s Kitchen? Foodstuff Redefined: Coconut Flour Brownies! Every once in awhile I need a gluten-free recipe for sharing. The bonus is a healthy alternative to sugary sweets with high caloric count. Coconut flour is high in fiber and lower in carbs, yet free from wheat and grains. I like its hint of coconut with a mild, slightly toasty flavor. Don’t be discouraged by the cost. A little goes a long way.

COCONUT FLOUR BROWNIES

Ingredients:

1/2 cup butter, unsalted, melted

2 tablespoons vegetable oil

1/4 cup cocoa powder, unsweetened

3 large eggs

1/2 cup natural honey

2 tablespoons agave nectar

1 teaspoon pure vanilla extract

1/2 teaspoon baking soda

1/2 cup minus 1 tablespoon coconut flour

1/2 teaspoon kosher salt

1/3 cup mini chocolate chips

1/3 cup toasted coconut

1/3 cup candied pecans, chopped

1 Toblerone chocolate bar, chopped

Instructions:

Preheat oven to 300°. Line an 10″ glass baking pan with parchment paper. Spray lightly with nonstick oil. In a large bowl, combine butter, vegetable oil, cocoa powder, and eggs. Mix well. Add honey, agave nectar, and vanilla extract. Mix until combined. Add baking soda, coconut flour, and kosher salt. Mix until batter is thoroughly combined. Fold in mini chocolate chips. Spread evenly into prepare baking pan. Top with toasted coconut, candied pecans, and chopped Toblerone pieces. Bake 30-40 minutes or until a toothpick comes out clean. Cool on wire rack. Once room temperature, remove from pan and cut into serving portions. Keep in airtight container.

Whoopie Pies

What’s Cooking in Gail’s Kitchen? Sunshine Eats: Whoopie Pies! Dip into your past for a childhood favorite that has been around since your parents and grandparents were kids. Some say it’s a cookie, others refer to it as a cake, but the name that seemed to stick more than any other is “Whoopie Pie”. No worries, one bite and it simply won’t matter. You’re hooked. Picture this: Sweet, creamy marshmallow fluff sandwiched between two chewy dark chocolate mounds. I know, right?!

WHOOPIE PIES

Ingredients:

8 tablespoons butter, softened

2 tablespoons vegetable oil

1 tablespoon molasses

1 cup sugar

1 egg

1 teaspoon vanilla extract

1 cup flour

1/2 teaspoon baking soda

1/8 teaspoon sea salt

6 tablespoons unsweetened cocoa powder

7-ounce jar marshmallow creme

Instructions:

Preheat oven to 350°. In a large bowl, cream together butter, vegetable oil, molasses, and sugar until smooth. Beat in egg. Add vanilla extract. Combine flour, baking soda, sea salt, and cocoa powder. Gradually add to creamed mixture. Stir until blended. Drop by spoonfuls onto ungreased cookie sheets. (I baked 6 cookies per sheet to allow room for them to form a perfect circle.) Bake 8-10 minutes. Watch carefully. Cool for 2 minutes before transferring to a wire rack to cool completely. To fill, spread a generous dollop on the bottom half of the cookies. Top with remaining cookies. Wrap and chill 2 hours before serving.