Juicy Roast Turkey

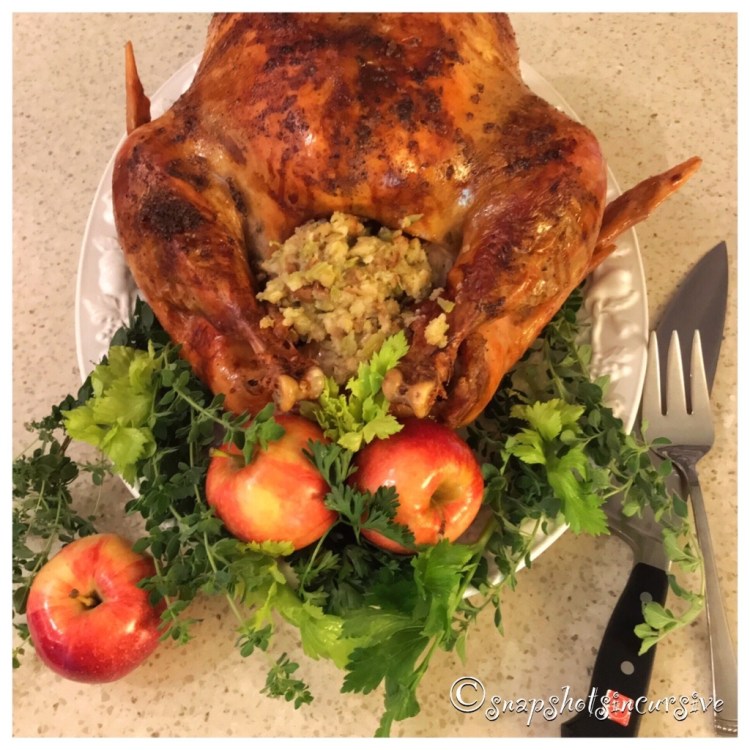
What’s Cooking in Gail’s Kitchen? Start Smart: Juicy Roast Turkey! There’s nothing worse than dry-as-dust turkey, around the holidays. Watch your guests if they keep asking you to pass the gravy. Today I’m going to give you a few tips to keep that from happening. You can thank me when it’s your turn to host the holiday meal. Number one: Truss loosely, or not at all. The secret is to allow heat to get to all sides of the legs. Cooking the turkey until the legs are done may result in overcooking the breast meat. Number two: Don’t overcook. The timetable on the package is an estimate. Always use a meat thermometer, even if the turkey comes with a pop-up version. Always. Number three: (and this one is the hardest for me) Let the turkey “rest” before carving. I’m talking 20-30 minutes. Evidently, during the roasting process, the oven heat forces all the juices to the center of the turkey. When you allow it to “rest”, after it’s done, the juices seep back into the cavities and make the turkey moist. It’s definitely worth the wait.

JUICY ROAST TURKEY

Ingredients:

10-15 pound turkey, thawed

1/2 cup butter

1 lemon, juiced and zested

1 teaspoon thyme

Instructions:

Preheat the oven to 350°. Wash the turkey, pat dry, and transfer to a roasting pan with a roasting rack. Stuff the turkey as desired. Otherwise, salt and pepper the inside of the cavity. In a small saucepan, warm the butter over low heat. Add the lemon juice, zest, and thyme. Brush the outside of the turkey with the butter mixture. Insert a meat thermometer into the thickest part of the thigh, avoiding the bone. Cover the roaster with the lid. Transfer pan to oven. Bake for two hours, basting the turkey every half hour. This insures even browning of the skin. Remove lid and roast turkey an additional 1 1/2 hours, continuing to baste at half hour intervals. When the meat thermometer reads 185°, remove the turkey from the oven. Transfer it to a cutting board; cover with foil. Let it rest for half an hour. This makes carving easier and produces a juicy roast turkey.

Deep Lagoon Seafood in Naples, Florida

Dining Outside the Home: Deep Lagoon Seafood in Naples, Florida! What is “Real Florida”, you wonder. Ummm, good seafood. Whenever a restaurant is crowded, we default to a seat at the bar. Rule Number #1, the drinks come faster and Rule Number # 2, you can order food from the menu. Here’s another secret, bar space at most restaurants has become de facto dining. Singles love it, couples are intrigued, and bartenders become your new best friend. That was our first experience at Deep Lagoon. No matter how rushed and harried a bartender may appear, grabbing a drink is easy, ordering a snack is fun, but eating a full dinner is elation. The guy on the stool next to you attests that the Chilean Sea Bass is phenomenal. “You should get it.”, he says. Decision made. Grilled asparagus comes with it; like icing on a cake. Be friendly, but not over eager and you’ll create memories that are worth writing about.

Bistro La Baguette in Naples, Florida

Dining Outside the Home: Bistro La Baguette in Naples, Florida! When craving traditional French food without the cost of a plane ticket, look for a place that is tied to its roots. Bistro La Baguette offers classic French fare. The kitchen is a bounty of fresh ingredients for traditional dishes as well as decadent pastries, which are featured in a glass showcase at the counter. A shaded porch, surrounded by hanging draperies and green plants, offers open-air seating steps away from the dining room and wine cellar. The velvety green salads are overflowing with garden produce and topped with a heavenly house made dressing. Whether you’re nibbling over lunch or in for a gourmet experience, taking time is the secret to living like a Francophile.

Desperado Dinner Nachos

What’s Cooking in Gail’s Kitchen? Fab Foodstuff: Desperado Dinner Nachos! The title says it all. I had been running all day long from this to that when I finally returned home to realize I had made no plans for supper. Going back out was not an option. So things got a little desperate. Thank goodness I had some leftover roasted turkey (chicken would work just fine) plus a half a bag of tortilla chips. The rest of the toppings were a given. So you see, sometimes making mediocre effort will suffice, especially if you make it look downright delicious!

DESPERADO DINNER NACHOS

Ingredients:

1/2 bag corn tortilla chips

2 cups roasted turkey or rotisserie chicken, shredded

2 cups Mexican-blend cheese, shredded

1 tomato, chopped

1/3 cup pickled jalapeños, sliced

2-3 green onions, snipped

Greek yogurt or Sour cream

Salsa

Instructions:

Preheat the oven to 400°. Coat a baking sheet with nonstick oil. Sprinkle lightly with sea salt. In a single layer, line the baking sheet with tortilla chips, covering every space. Sprinkle on shredded cheese, reserving a little as a final sprinkling. Arrange roasted meat over cheese layer. Top with chopped tomatoes, sliced jalapeños, and green onion snips. Toss on the remaining cheese. Bake for 15 minutes until the cheese is melted and bubbly. Serve nachos with yogurt and salsa to taste.

Orzo Chicken Soup

What’s Cooking in Gail’s Kitchen? Cheerful Choices: Orzo Chicken Soup! If you like thick soup, this recipe is for you. Every spoonful is filled with veggies, chicken, and pasta. If you prefer to slurp the soup or add crumbled saltines, simply increase the liquid by adding two cups of water or more broth. The soup will thicken as the orzo continues to absorb the liquid. In the event there are leftovers for another meal, feel free to add more liquid until you have the desired consistency. Whichever way you like your soup, get ready to enjoy a flavorful bowl of YUM.

ORZO CHICKEN SOUP

Ingredients:

1 tablespoon olive oil

1/2 cup yellow onion, chopped

1/2 cup carrots, sliced

1/2 cup celery, chopped

1 tablespoon Herbes de Provence

4 cups chicken broth

3/4 cup uncooked orzo

2 cups cooked chicken, shredded

3 Bay leaves, dried

Instructions:

In a Dutch oven, warm olive oil over medium heat. Add chopped onions, sliced carrots, and chopped celery. Cook until tender, stirring occasionally. Sprinkle in Herbes de Provence. Add chicken broth and orzo pasta. Stir. Heat to boiling; reduce heat. Simmer uncovered for 10 minutes until pasta is tender. Fold in shredded chicken. Tuck bay leaves into soup. Heat until soup is hot and bay leaves are soft, stirring gently. Ladle soup into bowls. Remove bay leaves before serving.

Italian Meatball Manicotti

What’s Cooking in Gail’s Kitchen? Cheerful Choices: Italian Meatball Manicotti! Pasta tubes, known as manicotti, are mere vessels for holding melted cheese, savory meat, Italian herbs, and certain vegetables like spinach or mushrooms. The marinara sauce is spread on the bottom of the dish to prevent the pasta from sticking, or tearing, which would ruin the whole idea of creating the perfect pocket of delicious fillings. With a crowning layer of marinara sauce on top, it deserves a round of applause for the extra cheese sprinkled there for good measure. Cray, Cray!

ITALIAN MEATBALL MANICOTTI

Ingredients:

6 dried manicotti shells

1 tablespoon olive oil

1 clove garlic

12 Italian meatballs, cut in quarters

1/2 teaspoon sea salt

1/8 teaspoon cracked black pepper

1/2 teaspoon dried Italian herb blend

8 ounces marinara sauce, prepared

1/2 cup ricotta cheese

1/2 cup parmesan cheese, shredded

2 tablespoons parmesan cheese, shredded

Instructions:

Preheat oven to 400°. Spray an 8.5”x5.5” baking dish with nonstick oil. Set aside. Cook manicotti shells in boiling water for 9 minutes. Drain and cool on a baking sheet pan. Set aside. In a skillet, warm olive oil over medium heat. Add garlic clove, meatballs, sea salt, cracked black pepper, and Italian herb blend. Cook until heated through, stirring occasionally. Remove and set aside to cool slightly for 5 minutes. Meanwhile, spread half the marinara sauce in the bottom of the prepared baking dish. In a bowl, mix ricotta cheese and 1/2 cup parmesan cheese. Gently fold in meatball mixture. Fill each manicotti shell with meat and cheese mixture; place in the prepared baking dish over the marinara layer. Top with remaining marinara sauce. Cover dish with foil. Bake 30 minutes. Serve immediately.

Xavier Dumpling Soup

What’s Cooking in Gail’s Kitchen? Country Casual Cravings: Xavier Dumpling Soup! Everyone loves dumplings, those little flavorful puffs of dough soaked in chicken broth, surrounded by fresh vegetables. Xavier soup got its name in honor of the patron saint of missionaries and may be served on the feast day celebration in December. I like the soup so much I can’t wait all year before making it again. Taste it once and you’ll see what I mean.

XAVIER DUMPLING SOUP

Ingredients:

1 tablespoon butter

1/2 yellow onion, diced

2 stalks celery, sliced

1/4 cup matchstick carrots

1 clove garlic, minced

2 cups chicken, cooked and shredded

4 ounces evaporated milk

10.5-ounce can cream of chicken soup, concentrated

20 ounces chicken broth

1/2 teaspoon sea salt

1/8 teaspoon black pepper

1 tube buttermilk biscuits

2 tablespoons flour

Parsley, for garnish

Instructions:

In a Dutch oven, warm butter over medium-high heat. Do not scorch. Add diced onions, sliced celery, matchstick carrots, and minced garlic. Sauté until tender, 6-8 minutes. Add shredded chicken, evaporated milk, condensed cream of chicken soup, and chicken broth. Bring to a simmer, stirring occasionally. Season with sea salt and black pepper. Cut the biscuits into quarter pieces; lightly toss in flour. Add the biscuit chunks to the pot; Cook 8-9 minutes. Once the biscuits are cooked through, ladle into bowls, garnish with parsley, and serve immediately.

Hoosier Hot Dish

What’s Cooking in Gail’s Kitchen? Country Casual Cravings: Hoosier Hot Dish! When I moved to Indiana over 30 years ago, it didn’t take me long to hear the term “Hoosier”. I knew it was a nickname for the State’s residents. But, honestly, I wondered how it originated. I had no idea it came into popularity over 200 years ago. The story that was told to me went something like this. Along the Ohio River, in the hills of southern Indiana, settlers lived and worked around the riverfront. As boatmen passed by on barges taking corn to New Orleans, the countrymen would call out, “Who’s Yere?” to assure they were friend, not foe. It happened so often, in time those workers became known as people of the “Hooshier” State. My experience in hearing about this one-pot meal for the first time was just as funny. A coworker said she was making Hoosier Hot Dish for supper. When I asked her for the recipe, she laughed and told me there wasn’t one. She said you just throw everything in a pot on the stove and eat it when it’s done. I narrowed it down a little bit more for you. Go figure.

HOOSIER HOT DISH

Ingredients:

1/2 yellow onion, thinly sliced

1 tablespoon olive oil

1/4 teaspoon seasoned salt

1/8 teaspoon garlic and herb seasoning

15-ounce can cut green beans, with liquid

1 pound potatoes, quartered, skin on

1 pound smoked sausage, cut into 1/2” chunks

Instructions:

Warm olive oil on medium-low setting in the bottom of a stock pot. Add sliced onions, seasoned salt, garlic and herbed seasoning. Sauté 20 minutes until onions are a light brown. Add green beans with liquid, quartered potatoes, and smoked sausage chunks. Cover and Cook 30-40 minutes over medium heat or until potatoes are fork tender. Hot Dish will thicken. Add 1/2 cup water, if necessary, to keep things from boiling dry or scorching. Serve with cornbread.

Yeast Dinner Rolls

What’s Cooking in Gail’s Kitchen? The Food Whisperer: Yeast Dinner Rolls! There’s nothing better than the smell of freshly-baked bread wafting out the oven door, in my opinion. It seems as the yeast magically leavens with flour, it produces an aroma that is not only warm heartwarming, but nostalgic. Perhaps it brings back childhood memories for you as well. For instance, the Wonder Bread Years were a simpler time where I played outside til after dark, giggled with my girlfriend, dated a boy on the weekend, and took a sack lunch to school. Crisp autumn days with damp earthy leaves and woodsmoke aromas smell nice as well. Maybe it’s time for you to bake some bread, too.

YEAST DINNER ROLLS

Ingredients:

1 cup warm milk

1/2 cup butter, room temperature

2 eggs

1/4 cup sugar

1 1/2 teaspoons sea salt

4 cups bread flour

2 1/4 teaspoons active dry yeast

Instructions:

Using a bread machine, layer warm milk, butter, and eggs in the bottom of the pan. Next add sugar, sea salt, and bread flour. Form a slight well in the flour layer. Pour the dry yeast into the well. Close the lid. Select Dough setting and press the Start button. When cycle is complete, turn dough onto a lightly floured surface. Divide dough into 24 sections. Shape dough into balls. Place in a greased 9”x13” baking pan. Cover and let rise in a warm place for 40-45 minutes. Preheat oven to 350°. Bake for 15 minutes or until golden brown.