DIY Outdoor Kitchen Meal

What’s Cooking in Gail’s Kitchen? Fabulous Fixings: DIY Outdoor Kitchen Meal! Leftovers make great meals, simply by preparing them another way. Using the outdoor kitchen makes that possible, no matter the weather. Imagine the incredible aromas filling the air with smoky curlicues. Try not to drool. The vegetables will be done shortly, retaining moisture and nutritional value, if that’s important to you. I’m all about the taste. Sometimes there’s a slight caramelization, which is actually a bonus. Are we good? Then let’s get started. 

DIY OUTDOOR KITCHEN MEAL

Ingredients: 

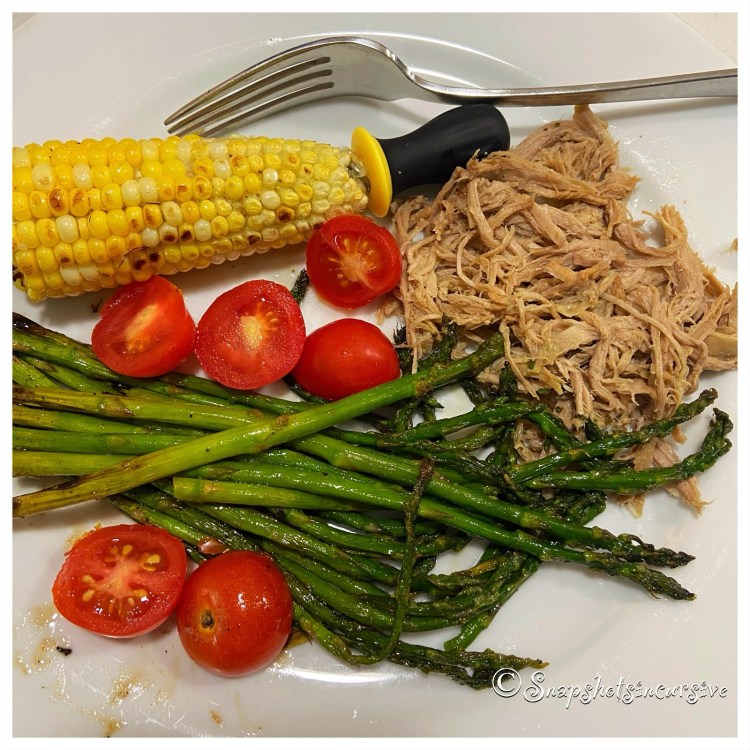
2 ears corn on the cob, cut in half

1 bunch asparagus spears, stalk ends snipped

1/2 pint cherry tomatoes, halved 

1 cup cooked pork tenderloin, shredded

1 tablespoon olive oil

1 tablespoon butter, room temperature 

1 teaspoon seasoning salt

Instructions:

Preheat gas grill to 400°. Drizzle olive oil over fresh asparagus spears. Place in a grill pan; sprinkle with half the seasoning salt; set aside. Rub softened butter over the corn on the cob. Sprinkle with remaining seasoning salt. Place corn on preheated grill grates. Close lid. Allow corn to char; using tongs, turning every 4 minutes to char. Kernels will be tender and juicy when pierced with a paring knife. Warm shredded pork in foil on the grill while cooking the asparagus spears in the grill pan for 5 minutes. Turn as necessary to prevent burning. Transfer all food to a platter. Serve immediately with halved cherry tomatoes. 

The Next Step

Say goodbye to ho-hum eating. If you didn’t know it’s okay to think outside the box, I’m here to say, “Permission granted.” The key to chowing down at home is compromising tradition with newfound tastings. After all, we have a versatile palate that likes to explore rustic, organic, and enhanced foods with today’s kitchen technology. Begin by taking a look in the fridge, freezer, or pantry. Then let your tummy be the judge. Turn cheese into crunchies, spread pickles onto veggies, fold seafood into bread dough. And that’s just the beginning. Sound interesting? Time flies on this journey of the palate. Thanks very much to all of my followers on http://snapshotsincursive.com for the uplifting support, award nominations, and moving words of encouragement. Follow me on Facebook at Gail Dorna, on Instagram @gail_dorna and Twitter @ Snapshotsincursive. What’s cooking in Gail’s Kitchen? It’s as simple as A-B-C. One of my passions is being at home in my own country kitchen. No matter how much we travel, I relish the thought of returning there to create something delicious. I adore time-honored traditions using tried-and-true recipes. Yet, I often never think twice about tweaking old favorites or modifying others to suit the inner craving of the moment. Most of the recipes serve 2-4 people, but can be altered in any direction. The leftovers are golden morsels to be eaten again later or shared with others. And I love to share. To me, seeing a smile in gratitude is thanks enough. The recipes you will find here in the next several weeks can be prepared very easily. Feel free to contact me with questions. Now take a deep breath, inhale the aromas, and join me on a tasteful journey entitled, “EATING MY WAY THROUGH THE ALPHABET: THE NEXT STEP!”

Alfalfa Sprouts at Home

What’s Cooking in Gail’s Kitchen? Fab Foodstuff: Alfalfa Sprouts at Home! Remember the time you stopped at the corner bistro for a super-healthy bite to eat? You know the sammie. It’s made with the crusty artisan bread, hearty summer veggies, creamy herbed cheese, and stacked high with alfalfa sprouts instead of lettuce. Afterwards you thought, “Hey, I can make this at home.” So you went to the grocery and found everything you needed…except alfalfa sprouts. What’s up with that? Unfortunately, alfalfa sprouts are extremely vulnerable to contamination for one reason or another. A lot can go awry from harvesting to produce aisle. Problem solved. DIY kits are available, along with certified organic seeds. Now you, too, can enjoy one of the most nutritious greens around. Supplies include a quart jar, screening lids, and seeds. You’re welcome.

ALFALFA SPROUTS AT HOME

Ingredients:

1 tablespoon organic alfalfa seeds

Water

Instructions:

Measure dry seeds and place in a quart canning jar. Add warm water. Soak overnight. The next morning, use a fine screen top to drain all the water. Do not soak again. Rinse the seeds under a faucet using tepid water. Gently swirl and drain. For faster growth, repeat this process again in the evening. Place the jar at an angle with the screened lid facing down. This allows proper drainage and ventilation. Repeat on Day 2. As the sprouts grow, change to a larger screened lid. You will notice the seed hulls wash away during rinsing. By swirling under running water, most hulls are flushed out through the lid. This may take two or more rinsings. Drain well. Continue to rinse and drain every 8-12 hours. Harvest on Day 6 when the leaves are open and have mostly turned green. Store finished sprouts in the refrigerator until ready to eat.