Jam Pockets

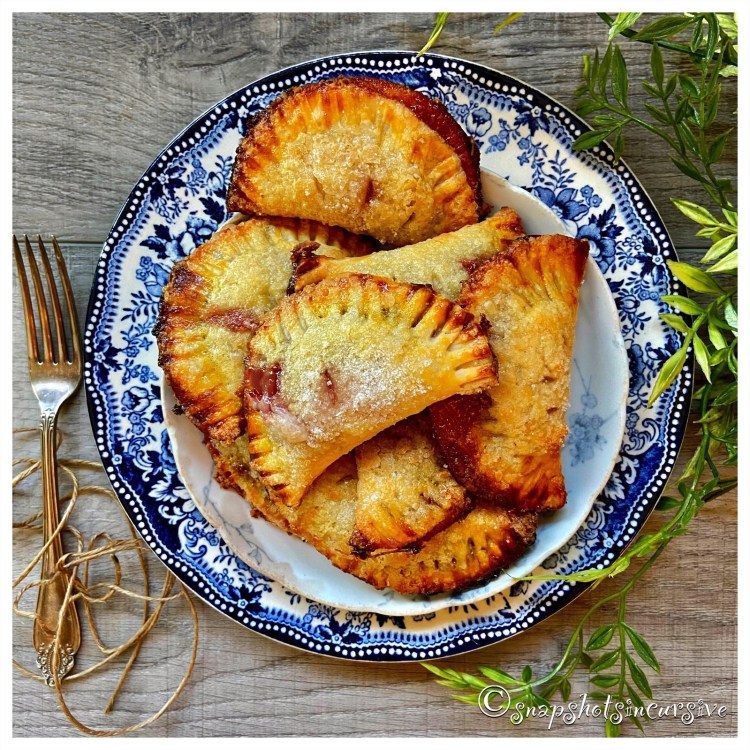
What’s Cooking in Gail’s Kitchen? Country Casual Cravings: Jam Pockets! Here’s a versatile quick recipe that makes a wonderful dessert, breakfast pastry, or afternoon snack. Prepared pie crusts or pizza dough from the dairy case in the supermarket can be used. Plus, any flavor of fruit jam will complement the smooth creamy filing inside. Although I didn’t add them here, I think sliced almonds would make a nice addition as well. The buttery crust serves as a nice “pocket” for the burst of fruity sweetness inside. Try as I might, it’s a challenge to stop at just one. Perhaps I won’t.

JAM POCKETS

Ingredients:

1 refrigerated pie crust, softened as directed on package

4 ounces Neufchâtel cheese, softened

1/8 teaspoon almond extract

1/3 cup powdered sugar

1/4 cup four-fruit jam

1 egg, beaten

1/4 cup sugar

Instructions:

Preheat oven to 400°. Line a baking sheet with parchment paper. Set aside. On a lightly floured surface, roll out refrigerated pie crust to 1/4-inch. Cut into twelve 3-inch rounds. Set aside. In a bowl, combine Neufchâtel cheese, almond extract, and powdered sugar. Stir until smooth. Drop a teaspoon of cheese mixture into the center of each round. Top with a dollop of fruit jam. Brush the inside edges with beaten egg; fold in half. Crimp edges with a fork to seal. Brush top and bottom with more egg wash; dust both sides with sugar. Pierce the top of each pocket. Transfer to prepared baking sheet. Repeat steps for remaining jam pockets. Bake 12-15 minutes, or until golden brown. Remove from baking sheet. Cool slightly. Serve the reserve creamed cheese mixture as a dipping sauce.

Old-Fashioned Strawberry Milkshake

What’s Cooking in Gail’s Kitchen? Uplifting Aromas: Old-Fashioned Strawberry Milkshake! We’ve all been there. Trying to remove the leaves and stems from a luscious strawberry without wasting half the berry. If you’re impatient, or in a hurry, you may grab a paring knife and start hacking, or at the very least completely cut off the entire crown. Been there, done that. If your kitchen drawer is full of gadgets, you may already own a neat little tool known as a Strawberry Stem Remover. Its pincher-like claws dig in, twist, and pull the stem completely out. One and Done. (My husband prefers that method.) Or you could be a little more refined and use the Plastic Straw Method. It requires cradling the juicy red gems and inserting the plastic straw in the bottom of the strawberry, while pushing upward until the leaves pop off. Maybe you have a method that works for you. If so, leave it in the comments below. Don’t mind me, I’ll be here slurping on the decadent treat while I wait.

OLD-FASHIONED STRAWBERRY MILKSHAKE

Ingredients:

16 ounces fresh strawberries, tops removed

2 cups vanilla ice cream

1-2 tablespoons sugar

3/4 cup whole milk

1/2 teaspoon vanilla extract

Whipped Cream & Strawberry slices, for garnish

Instructions:

In a blender, add fresh strawberries, reserving a couple for garnish, if desired. Next add vanilla ice cream, sugar, whole milk, and vanilla extract. Pulse to combine. Leave small chunks for appealing texture and thickness. Do not over blend. When milkshake is “pourable”, divide the contents into tall glasses. Top with whipped cream and strawberry slice, for garnish. Serve immediately with a paper straw and parfait spoon.

Granola Banana Bread

What’s Cooking in Gail’s Kitchen? Uplifting Aromas: Granola Banana Bread! Ever wonder why banana bread is so popular? First of all, it conjures up pleasant childhood memories. Remember playing outside all day with the neighborhood kids and returning home as hungry as a wolf? One foot in the door told you mother had baked a wonderful surprise. The pleasant aroma of bananas wafted through the house, intermingled with cinnamon spice sweet bread. You knew it had her stamp of approval because permission was granted to have a slice even before dinner was served. Which brings me to reason number two. Banana bread is one of Life’s comfort foods. And that’s all I’m going to say about that.

GRANOLA BANANA BREAD

Ingredients:

1/3 cup butter, softened

1/2 cup sugar

2 ripe bananas, plus 1 banana sliced horizontally

2 cups flour

1 1/2 teaspoon baking powder

1/2 teaspoon baking soda

1/2 cup milk

1 teaspoon vanilla extract

1/2 cup cinnamon almond granola

1 tablespoon turbinado sugar

Instructions:

Preheat oven to 350°. Line a loaf pan with parchment paper, overlapping on the sides. Set aside. In a food processor, cream together butter and sugar. Add 2 bananas; mix until bananas are mashed. Stir in flour, baking powder, and baking soda. Pulse, alternating with milk, until mixed. Add vanilla extract. Pour batter into prepared loaf pan. Press both halves of the remaining banana onto the top of the batter. Lightly press the cinnamon almond granola over all. Sprinkle with turbinado sugar. Bake 50 minutes, or until a tester comes out clean. Remove loaf from the pan and allow bread to cool on a wire rack for 30 minutes before slicing.

Lavender Lemon Meltaways

What’s Cooking in Gail’s Kitchen? Elevated Edibles: Lavender Lemon Meltaways! Are you still on the fence about tasting the flavor of lavender? Is it possible you believe it’s way too close to air freshener or bath soap? Think about this a moment…one of the most popular cooking staples in France is dried herbes de Provence. Lavender is in there. It’s a distant cousin to rosemary, which is one reason the leaves can appear similar in young plants. The taste of lavender has a slight undertone of fresh mint, making it a perfect partner for lemon in homemade cakes, creamy frostings, and sprinkled on ice cream. Now I see I have your full attention.

LAVENDER LEMON MELTAWAYS

Ingredients:

3/4 cup flour

1/2 teaspoon baking powder

1/2 cup butter, softened

3/4 cup sugar

1 teaspoon lemon citrus peel

1 tablespoon lemon juice

2 eggs

Lavender Glaze Ingredients:

3/4 cup powdered sugar

1 tablespoon lemon juice

1/8 teaspoon lavender extract

2 tablespoons lemon zest

Lavender buds, for garnish

Instructions:

Preheat oven to 350°. Line a 9”x9” square baking pan with parchment paper. Set aside. Combine flour and baking powder in a bowl. Set aside. Using a hand mixer, beat together the butter, sugar, lemon citrus peel, and lemon juice until light and fluffy. One at a time, beat in eggs. Gradually add the dry ingredients; mix until combined. Pour batter into the prepared baking pan. Bake 25 minutes, or until a cake tester comes out with moist crumbs. Do not over bake. Allow cake to cool completely on a wire rack. To make the lavender glaze, whisk together the powdered sugar and lemon juice. Add lavender extract and lemon zest. Stir until smooth. Pour the glaze over the lemon cake and spread evenly. Sprinkle with lavender buds. Allow glaze to harden before cutting into bars.

Yo-Yo Strawberry Froyo

What’s Cooking in Gail’s Kitchen? Graze or Gobble: Yo-Yo Strawberry Froyo! During strawberry season, there are so many ways to serve this jubilant fruit without getting bored. Once one has made a couple jars of jam, a strawberry rhubarb pie, bakery-style muffins, and angel food shortcake, the list goes on. Strawberries are a nice addition to a spinach salad. They also present a festive twist on the classic margarita to offset a platter of tortilla chips and salsa. If you’ve had your fill of strawberries before the season ends, no worries. Wash them, remove the leaves and stems, halve them, then pop them in the freezer for using later on. I like to place them in a single layer on a baking sheet in the freezer for 24 hours before storing them in ziplock bags. That way they don’t end up as a giant blob of frozen strawberries.

YO-YO STRAWBERRY FROYO

Ingredients:

2 bananas, peeled, sliced, and frozen

1 cup frozen strawberries, halved

2 tablespoons sweetened condensed milk

1/4 cup Greek yogurt

1/4 teaspoon coconut extract

1/4 cup frozen strawberry chunks, optional for texture

Fresh mint, for garnish

Instructions:

Using a food processor, combine frozen sliced bananas, frozen strawberry halves, sweetened condensed milk, Greek yogurt, and coconut extract. Blend until smooth and creamy. It will look like softened ice cream. Gently fold in strawberry chunks for color and texture. Transfer mixture to a loaf pan. Cover with aluminum foil. Freeze overnight. To serve, scoop frozen yogurt into dessert bowls. Garnish with fresh mint. Serve immediately.

Frozen Whipped Cream

What’s Cooking in Gail’s Kitchen? Delicious Holiday Foods: Frozen Whipped Cream! Now here’s an indulgence anyone can afford. Frozen whipped cream. Simply spread the prepared mixture into a loaf pan, freeze overnight, and cut into chunks. Store in ready-to-use ziplock freezer bags. Then let the fun begin. Replace the creamer in your morning cuppa joe with a block or two, swirl, and watch the magic happen. You can also substitute those stale hardened marshmallows with whipped cream cubes in your favorite hot cocoa beverage. What about fruit smoothies? Throw a few chunks of frozen whipped cream into the blender with fresh fruit for a satisfying snack. Mmmm. Whipped cream isn’t just for dessert any more.

FROZEN WHIPPED CREAM

Ingredients:

1 cup heavy cream

4 tablespoons powdered sugar, sifted

1 teaspoon vanilla extract

Instructions:

Chill the mixer bowl and whisk attachment 15 minutes before using. Pour the heavy whipping cream into the mixing bowl of a stand mixer. Set speed to medium for 5 minutes. Add powdered sugar and vanilla extract. Beat 3-4 minutes longer or until the cream takes on volume and forms stiff peaks. The cream will have doubled in size. Do not over-beat or the cream will turn buttery. Spread whipped cream into a parchment paper-lined loaf pan and freeze overnight. When mixture is frozen, remove from pan and cut into chunks or cubes. Store in a freezer bag and keep frozen until ready to use.

Almond-Vanilla Popovers

What’s Cooking in Gail’s Kitchen? Delicious Holiday Foods: Almond-Vanilla Popovers! What if I told you it was possible to eat a serving of bread, but without all the preservatives? It is. And then, what would you say if I told you the outside was golden brown and the inside was hollow? That’s right. Hollow. These light and airy popovers of pancake-like batter puff up into delectable buttery crowns that leave you singing their praises and clapping your hands. It’s like you just witnessed a bit of magic in your very own kitchen.

ALMOND-VANILLA POPOVERS

Ingredients:

6 large eggs

2 cups light cream

1/4 cup unsalted butter, melted

2 teaspoons almond extract

2 teaspoons vanilla extract

1 teaspoon sea salt

3 tablespoons sugar

2 cups flour

Instructions:

Preheat oven to 400°. Move the oven rack one setting below the middle row. Grease a 12-count bouchon pan. In a food processor, combine eggs, light cream, butter, almond extract, vanilla extract, sea salt, sugar, and flour. Blend until no lumps remain and batter is light yellow and frothy, approximately one minute. Fill each bouchon cup 2/3 full. Do not overfill. (Refrigerate leftover batter until ready to make the next batch. At that time, use a whisk to vigorously stir the batter.) Place bouchon pan in the oven; bake for 30 minutes or until golden brown. Do not open the oven door during baking or the popovers will deflate. When golden brown, remove from the oven. After 2 minutes in the pan, remove and transfer popovers to a wire rack. Do not allow them to cool in the pan or they may turn soggy. Serve warm as is or with a dollop of honey, jam, or butter.

Hibiscus Passion Tea Icing

What’s Cooking in Gail’s Kitchen? Start Smart: Hibiscus Passion Tea Icing! If you ever get bored, take a stroll down the Tea Aisle at your nearby grocers. Choose from any assortment of gourmet blends; especially one containing full-leaf sachets. Read the label. In a few seconds, you will feel as though you have been transported to a magical land “bursting with life and tinged with the color of true love to make sure you never have to live a day without passion”.* And that’s only the beginning. Turn to the side panel for an invigorating adventure that awakens the senses as well as the imagination. After that when I decided to steep this delicacy to flavor buttercream icing, I knew it would be nothing short of fabulous. Perhaps you may think so, too.

HIBISCUS PASSION TEA ICING

Ingredients:

2 1/2 tablespoons brewed hibiscus passion tea

1/4 cup butter, room temperature

2 cups powdered sugar

1/2 teaspoon almond extract

Garnish with loose tea leaves

Instructions:

Brew a cup of hibiscus passion tea, according to package directions. (Since you won’t need all of it, the reserve tea can be sipped over ice.) Refrigerate until slightly cool. In a medium bowl, cream together softened butter and powdered sugar. Add the hibiscus passion tea and almond extract. Stir until smooth. Spread a thin layer of icing over your favorite cake. I made a gluten-free chocolate cake.** Open a dry tea sachet and sprinkle the tea leaves over one side. When serving, place a dollop of extra icing on the side of the plate or on top of the cake. Either way, it will disappear, I promise you that.

*TAZO Passion Tea.

**For Gluten-Free Chocolate Cake, follow the link.

http://Snapshotsincursive.com/2017/12/18

Mandarin Orange Cake

What’s Cooking in Gail’s Kitchen? The Next Step: Mandarin Orange Cake! For all those gloomy days out there, a taste of sunshine comes to greet you in a naturally sweet cake. Did you realize mandarin oranges don’t only come in a can? Actually, you know them by other names in the produce department: “Halos” and “Cuties”. Sometimes people refer to mandarin oranges as clementines or tangerines. Small world, huh? Whatever you choose to call them, their pretty color and ease in peeling make them a popular choice. This cake recipe is versatile enough to be baked in a muffin tin, miniature bundt molds, or as a single-layer coffeecake. Something else to think about. The sugary glaze tops it all.

MANDARIN ORANGE CAKE

Ingredients:

1 1/4 cup flour

2 teaspoons baking powder

3/4 cup sugar

1/3 cup butter, melted

1 large egg

1/2 teaspoon orange extract

1/2 teaspoon vanilla extract

zest of one orange

1/2 cup milk

Ingredients for Orange Glaze:

1 cup powdered sugar

2 tablespoons orange juice

Orange peel zest, for garnish

Instructions:

Preheat oven to 350°. Spray miniature bundt molds with nonstick oil with added flour. Sift together flour and baking powder in a bowl. Set aside. Cream together sugar and butter in a medium bowl. Add egg; mixing well before adding orange extract, vanilla extract, and zest of one orange. Gently fold in flour mixture, alternating with milk. Stir until combined. Divide mixture into miniature bundt molds, filling 2/3 full. Bake 30 minutes or until a cake tester comes out clean. Prepare orange glaze by combining powdered sugar and orange juice. Stir until smooth. When cakes are golden brown, remove from oven. Cool slightly before inverting molds onto a wire rack. Remove molds. Transfer cakes to a platter to finish cooling. Drizzle with orange glaze and garnish with orange zest. Serve warm.