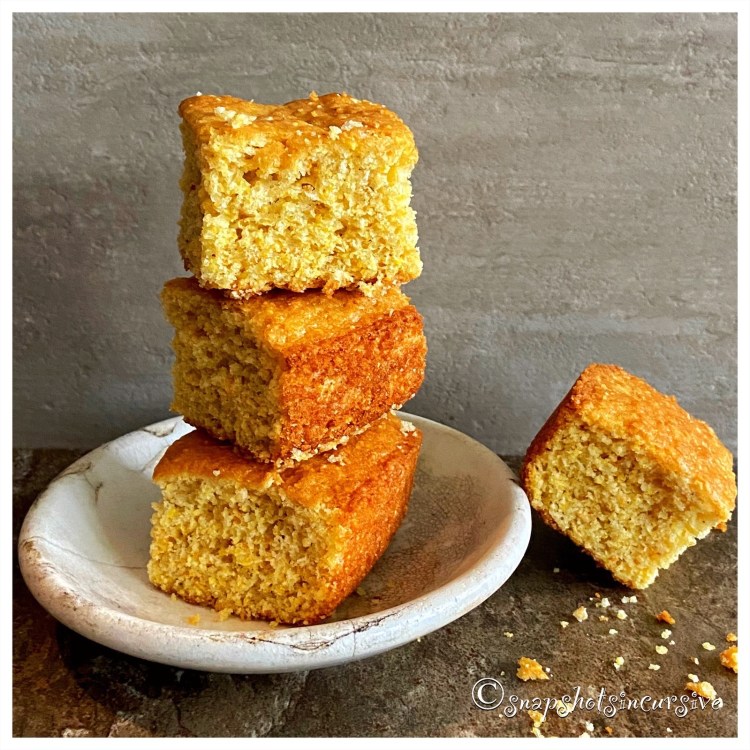
Zucchini ‘Nana Bread

What’s Cooking in Gail’s Kitchen? Splurge-Worthy Goodness: Zucchini ‘Nana Bread! This isn’t your usual old-fashioned banana bread. And if you’ve been hesitant to try zucchini bread, well…just because, then I implore you to give it one more chance. You honestly cannot taste the zucchini. What you will notice, though, is that the bread is incredibly moist, not gummy. And the cinnamon streusel topping is a winning combination worth shouting about. Remember to only stir the batter until it is mixed. The more you stir, the more gluten comes into play. While gluten is crucial in bread-baking, it is not your friend in quick breads. The results could be dense and rubbery. After all, the purpose of baking is to share with others. Slather on the butter or cream cheese…and Enjoy!

ZUCCHINI ‘NANA BREAD

Ingredients:

1 medium zucchini, shredded

1 ripe banana, mashed

2 eggs, room temperature

1/2 cup vegetable oil

3/4 cup sugar

1 cup flour

1/8 teaspoon baking powder

1/2 teaspoon baking soda

1 teaspoon cinnamon

1 teaspoon sea salt

1 teaspoon vanilla extract

Ingredients for Cinnamon Topping:

1/4 cup sugar

1 teaspoon cinnamon

Instructions:

Preheat oven to 350°. Line a loaf pan with parchment paper. Set aside. Peel zucchini. If there are seeds, remove them with a spoon; discard. Shred zucchini and set aside. Mash banana and set aside. In a mixing bowl, beat eggs, sugar, and vegetable oil until combined. Add flour, baking powder, baking soda, cinnamon, sea salt, and vanilla extract. Stir only until incorporated. Fold in shredded zucchini and mashed bananas. Stir slightly until blended. Pour into prepared loaf pan. Whisk together sugar and cinnamon in a small bowl. Sprinkle evenly over the top of the batter. Bake 45-55 minutes, or until cake tester comes out clean. Remove from oven and allow bread to cool 10 minutes before removing from pan. Cool Zucchini ‘Nana Bread on a wire rack before slicing.

Underground Chile Chocolate Bread

What’s Cooking in Gail’s Kitchen? Splurge-Worthy Goodness: Underground Chile Chocolate Bread! Don’t you hate it when you’re in the mood to bake something delicious and then find yourself short one key ingredient? That happens to me whenever I find “buttermilk” listed on a recipe. Truth-be-told, I seldom buy it. Thankfully there are two ways to transform ordinary milk into buttermilk. You can use white vinegar, or you can use lemon juice. It’s the acidity that works like magic. Now you’re probably wondering why we want buttermilk in the first place. Well, other than the rich creamy taste, buttermilk helps breads to rise with more body and a softer texture. Is it any wonder pancakes, mashed potatoes, and even fried chicken taste better bathed in buttermilk. Keep that under your hat.

UNDERGROUND CHILE CHOCOLATE BREAD

Ingredients:

3/4 cup milk, mixed with 2 teaspoons vinegar

1 tablespoon chili powder

1 2/3 cups flour

1/4 cup cocoa powder

2 teaspoons baking powder

1/2 teaspoon baking soda

1/2 cup vegetable oil

1 2/3 cups sugar

2 large eggs, room temperature

Instructions:

Preheat oven to 350°. Line a loaf pan with parchment paper. Set aside. Pour vinegar into a measuring cup, then fill with milk until you reach the 3/4 mark. Let sit for five minutes to thicken, then whisk. This is a substitute for buttermilk. In a large bowl, combine chili powder, flour, cocoa powder, baking powder, baking soda, vegetable oil, sugar, eggs, and “buttermilk”. Mix until just evenly combined. Do not over stir. Pour batter into the prepared loaf pan. Bake for one hour, or until a cake tester inserted in the center comes out clean. Cool bread on a wire rack before removing from loaf pan. Slice and serve.

School Cafeteria Peanut Butter Bars

What’s Cooking in Gail’s Kitchen? Splurge-Worthy Goodness: School Cafeteria Peanut Butter Bars! Remember the good old days when the grade school menu would come out and we’d peruse it like the Sears and Roebuck Christmas Catalog? We’d jump for joy when we saw Fish Sticks, Baked Meatloaf, Apple Crisp, Chocolate Cake, and Pizza Squares. On the other hand, Creamed Spinach made us wince and turn up our noses. Back then you had two options, buy a hot lunch ticket or bring a sack lunch from home. No in-betweens. As a general rule, the good canceled out the bad, especially in the category of scrumptious desserts. The “Lunchroom Ladies” really knew their business when it came down to sweets. Nobody could layer on the frosting like they could. And it was always homemade right there. I wonder who got to lick the spoon.

SCHOOL CAFETERIA PEANUT BUTTER BARS

Ingredients:

1/2 cup butter

3/4 cup peanut butter, creamy

3/4 cup sugar

1/4 cup brown sugar

3/4 teaspoon kosher salt

2 eggs, room temperature

1 1/2 teaspoons vanilla extract

1 cup flour

Ingredients for Icing:

1/2 cup powdered sugar

2 tablespoons creamy peanut butter, melted

2 tablespoons hot water

Instructions:

Preheat oven to 350°. Line a 9”x9” square baking pan with parchment paper. Set aside. Melt butter and peanut butter in a microwave-safe bowl on 50% for 30 seconds. Stir and repeat, if necessary. Set aside to cool to room temperature. In a large bowl, sift together sugar, brown sugar, and kosher salt. Whisk in one egg at a time until combined. Add vanilla extract. Whisk in peanut butter mixture until combined. Sift in flour; mix until flour disappears. Do not over mix. Pour into prepared pan. Bake for 35-40 minutes, or until cake tester comes out with tiny moist crumbs. Cool pan on a wire rack. Once the pan has cooled, remove the cake from pan and transfer on the parchment paper to a rimmed baking sheet. Combine powdered sugar, creamy peanut butter, and hot water. Stir until frosting has a smooth consistency. Drizzle over dessert. Allow icing to set up before cutting into individual bars.

Quesadilla Chile Relleno

What’s Cooking in Gail’s Kitchen? Splurge-Worthy Goodness: Quesadilla Chile Relleno! Before you shake your head and walk away, hear me out. Green poblano peppers are a pretty mild distant cousin to the jalapeño and habanero. You could almost say they’re from the “other side of the tracks”, so to speak. Personally, I think they’re underrated. If you look up their classification, they might even be referred to as sweet. Now, I don’t know about that. What I do know is they smell somewhat earthy, tend to hold their shape, and are absolutely scrumptious when bathed in Mexican cheeses. In my opinion, they definitely deserve a second chance. What have you got to lose?

QUESADILLA CHILE RELLENO

Ingredients:

2 large flour tortillas

2 tablespoons butter

1 cup Mexican-style four cheeses, shredded

2 poblano peppers, roasted, peeled, and sliced in strips

1/4 cup yellow onion, chopped

1/4 cup ranch dressing, prepared

1/4 teaspoon cayenne pepper

1/4 teaspoon sriracha sauce

Instructions:

Butter one side of each flour tortilla. Set aside. Warm an iron skillet or nonstick pan over medium heat. Place one tortilla in the skillet, butter side down. Add half the Mexican cheeses. Arrange the poblano peppers in a single layer over cheese. Scatter chopped onion over all. Add remaining Mexican cheese blend. Place the remaining tortilla on top, butter side up. Press down lightly. Cover the pan with a lid. Cook 3-4 minutes until tortilla is lightly browned and cheese is melted. Using a spatula, flip over the quesadilla. Cover with lid. Cook 2-3 minutes longer until golden brown. Do not burn. Transfer quesadilla to a cutting board. Let rest for 2 minutes to avoid a flood of gooey cheese. In a small bowl, combine prepared ranch dressing, cayenne pepper, and sriracha sauce. Mix well. Cut the quesadilla into 6 triangles. Serve with sriracha ranch dipping sauce.

Mincemeat Quick Bread

What’s Cooking in Gail’s Kitchen? Splurge-Worthy Goodness: Mincemeat Quick Bread! Don’t look at me that way. I know what you’re thinking. “If this recipe has mincemeat in it, I’m not eating it.” But hold on a sec. There are plenty of foods with names that sound downright gross. Think about it: head cheese, tripe, mung beans, and blood sausage to name a few. I’m here to tell you mincemeat is a sweet and savory filling that basically contains dried fruits, citrus, spices, and brandy. Ahhh. Now I have your attention. This particular recipe has about 1/4 cup apricot brandy in it. Just know if you do choose to add brandy or rum to a jar of prepared mincemeat, be sure to allow it to marinate in the refrigerator at least 8 hours before using. Now you can understand why some people eat it straight out of the jar.

MINCEMEAT QUICK BREAD

Ingredients:

1 egg, room temperature

1/4 cup vegetable oil

1 tablespoon orange zest

2 tablespoons orange juice

2 cups prepared mincemeat pie filling (with 1/4 cup apricot brandy, optional)

2 cups flour

1/2 cup sugar

1 1/2 teaspoons baking powder

1/2 teaspoon baking soda

1/2 teaspoon sea salt

Instructions:

Preheat oven to 350°. Grease and flour a 9”x5” loaf pan. Set aside. Combine egg, vegetable oil, orange zest, orange juice, and mincemeat pie filling. Stir until well blended. Set aside. In another bowl, whisk together flour, sugar, baking powder, baking soda, and sea salt. Gradually add flour mixture to egg mixture, stirring just until combined. Pour into prepared loaf pan. Bake for 50-60 minutes. Check loaf with a cake tester to make sure center is done. Remove from oven. Cool on a wire rack. Slice and serve.

Granola Banana Bread

What’s Cooking in Gail’s Kitchen? Uplifting Aromas: Granola Banana Bread! Ever wonder why banana bread is so popular? First of all, it conjures up pleasant childhood memories. Remember playing outside all day with the neighborhood kids and returning home as hungry as a wolf? One foot in the door told you mother had baked a wonderful surprise. The pleasant aroma of bananas wafted through the house, intermingled with cinnamon spice sweet bread. You knew it had her stamp of approval because permission was granted to have a slice even before dinner was served. Which brings me to reason number two. Banana bread is one of Life’s comfort foods. And that’s all I’m going to say about that.

GRANOLA BANANA BREAD

Ingredients:

1/3 cup butter, softened

1/2 cup sugar

2 ripe bananas, plus 1 banana sliced horizontally

2 cups flour

1 1/2 teaspoon baking powder

1/2 teaspoon baking soda

1/2 cup milk

1 teaspoon vanilla extract

1/2 cup cinnamon almond granola

1 tablespoon turbinado sugar

Instructions:

Preheat oven to 350°. Line a loaf pan with parchment paper, overlapping on the sides. Set aside. In a food processor, cream together butter and sugar. Add 2 bananas; mix until bananas are mashed. Stir in flour, baking powder, and baking soda. Pulse, alternating with milk, until mixed. Add vanilla extract. Pour batter into prepared loaf pan. Press both halves of the remaining banana onto the top of the batter. Lightly press the cinnamon almond granola over all. Sprinkle with turbinado sugar. Bake 50 minutes, or until a tester comes out clean. Remove loaf from the pan and allow bread to cool on a wire rack for 30 minutes before slicing.

Yeast Artisan Bread

What’s Cooking in Gail’s Kitchen? Elevated Edibles: Yeast Artisan Bread! There’s no doubt bread can be a family’s comfort food, even if you seldom bake it yourself. With more people setting up a home office or home schooling, suddenly bread-baking has turned into a thing. And if you own a bread machine, better yet. Dust it off and give it center stage on the quartz countertop in your gourmet kitchen. Baking bread is like therapy for the soul. We combine ingredients, knead dough, make decorative slits on top, and bake it to a rich golden color. From start to finish, it becomes a focused project. When the house begins to smell like the neighborhood corner bakery, everyone notices. It’s time to slice it up and slather on the butter.

YEAST ARTISAN BREAD

Ingredients:

1 cup water

2 tablespoons olive oil

1 teaspoon sea salt

3 cups flour

1/4 cup sugar

1 packet active yeast

Instructions:

Using a bread machine, add ingredients in the order listed. Always add the yeast last, creating a small indentation on the top of the dry ingredients. Pour yeast into indentation. Select the “Dough” setting. At the end of the cycle, turn the dough onto a lightly floured surface. Knead for one minute. Grease a bowl with olive oil. Transfer the dough to the bowl. Cover with plastic wrap and let rise in a warm place until doubled in size, about one hour. Cover bowl with a damp cloth. Turn the dough onto a lightly floured surface. Punch the dough down and knead for a few seconds. Form the dough into a ball and return to the bowl. Cover again and allow it to rise in a warm place 30 minutes longer. To bake in an iron skillet, preheat oven to 400°. Put the iron skillet in the oven while it is preheating. Place a roasting pan on the bottom shelf of the oven. Fill it with one inch of hot water. Using oven mitts, remove the hot skillet from the oven. Grease the inside of the skillet with olive oil. Sprinkle with one tablespoon cornmeal. Carefully transfer the puffed bread dough to the iron skillet. Dip a kitchen shears in hot water. Cut slits in the top of the dough. Sprinkle generously with water. Bake for 30-35 minutes until the loaf is a deep golden brown. When a cake tester is inserted in the center, it comes out clean. Remove the iron skillet from the oven. Immediately remove artisan bread to prevent over baking. Allow it to cool on a wire rack for 10 minutes before cutting.

Queso Chicken Flautas

What’s Cooking in Gail’s Kitchen? Elevated Edibles: Queso Chicken Flautas! Are you as torn between corn tortillas and flour tortillas as I am? There are days, and certain dishes, where nothing but corn will do: tamales, taquitos, enchiladas, tacos, and chips. Corn tortillas, generally, are much smaller and easier to hold. When they are soaked in sauce, they are more pliable and suitable for baking. If you like the taste of toasted corn as well as the chewy texture, corn tortillas are for you. The same applies to flour tortillas: quesadillas, flautas, fajitas, chimichangas, and burritos. Flour tortillas are bigger, not to mention softer for folding. You already know this if you’ve ever eaten a monster burrito or ginormous chimichanga. One is baked, the latter is fried. Today’s recipe features the sturdiness of a flour tortilla to hold the juicy chicken and melted cheese filling without turning soggy or falling apart. What a delicious dilemma.

QUESO CHICKEN FLAUTAS

Ingredients for Herbed Sour Cream:

8 ounces sour cream

1 tablespoon honey

1 tablespoon lime juice

1/4 teaspoon sea salt

1/4 cup cilantro leaves, chopped

2 tablespoons green onions, chopped

Ingredients:

1 cup cooked chicken, shredded

1 cup Mexican cheese blend, shredded

4 ounces cream cheese, softened

4.5 ounce can green chiles, drained and diced

1 envelope taco seasoning mix, less 1 tablespoon for remaining recipe

12-count flour tortillas

2 tablespoons vegetable oil

15-ounce jar queso cheese dip, warmed

Instructions:

To make the herbed sour cream, combine sour cream, honey, lime juice, and sea salt in a bowl. Stir until smooth. Gently fold in chopped cilantro leaves and green onions. Cover and refrigerate until ready to serve. In a medium bowl, combine shredded chicken, Mexican cheese blend, cream cheese, and diced green chilies. Sprinkle with taco seasoning mix (less 1 tablespoon of mix). Stir thoroughly. Set aside. In a small dish, whisk vegetable oil with reserved taco seasoning mix. Set aside. Preheat oven to 425°. Spray a baking sheet with nonstick oil. To assemble flautas, place 1/4 cup chicken mixture on bottom third of each flour tortilla. Roll up tightly, leaving ends open. Place seam-side down on prepared baking sheet. Brush filled chicken flautas with seasoned oil mixture. Repeat until all tortillas are filled. Bake 10-12 minutes, or until flautas are crispy. Serve with warmed queso cheese dip, herbed sour cream, and chunky salsa.

One-Bite Cookie Morsels

What’s Cooking in Gail’s Kitchen? Elevated Edibles: One-Bite Cookie Morsels! Years ago while traveling with my husband on a business trip, we had dinner at a popular local restaurant that extended a warm welcome to all who crossed its threshold. Before approaching the hostess stand, we were immediately greeted by the bakery-fresh aromas of homemade cookies. How delightful! On the dessert showcase, to our right, sat a plate of one-bite chocolate chip cookies with a table tent that said, “Please Take One”. I assure you, we didn’t hesitate as we munched away following the hostess to a nice, secluded corner booth. Talk about a memorable experience.

ONE-BITE COOKIE MORSELS

Ingredients:

1 1/3 cups flour

1 teaspoon cornstarch

1/4 + 1/8 teaspoon baking soda

1/4 teaspoon sea salt

1/2 cup butter, softened

1/2 cup brown sugar

1/4 cup sugar

1 egg, room temperature

1 1/2 teaspoon vanilla extract

1 cup mini chocolate chips, plus more for topping

Instructions:

Preheat oven to 350°. In a bowl, whisk together flour, cornstarch, baking soda, and sea salt. Line two baking sheets with parchment paper. Set aside. Using a mixer, beat softened butter, brown sugar, and sugar on medium speed until well combined. Mix in egg and vanilla extract. Reduce speed to Low and slowly add dry ingredients. Mix until combined. Fold in mini chocolate chips. Scoop 1/2 tablespoon-sized mounds of cookie dough, form into a ball, press 2-3 mini chocolate chips into top, and place onto prepared baking sheet. Bake 5-6 minutes; remove from oven. Allow to cool for 2 minutes, then transfer cookies to a wire rack.