Quick Cherry Nut Bread

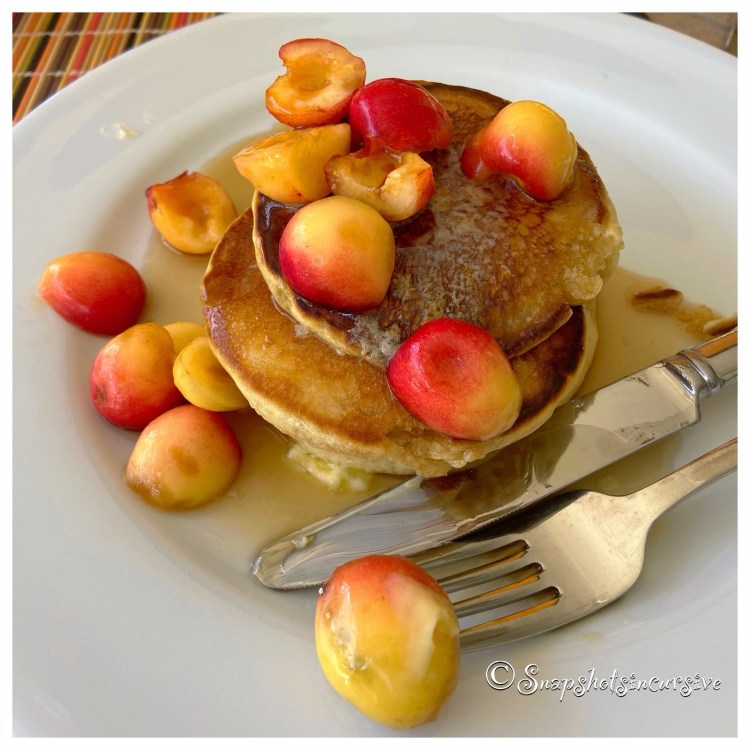
What’s Cooking in Gail’s Kitchen? Time To Eat: Quick Cherry Nut Bread! The nice thing about “quick breads” is they require no extra time needed for allowing yeast to rise. The secret ingredients become the baking powder and eggs, which act as leavening agents. No kneading required. By adding fruit and nuts, the quick bread transforms itself into a breakfast delight along with muffins, scones, and biscuits. Keep the texture light by barely mixing the ingredients before baking. Small lumps are completely acceptable. As long as the oven temperature remains constant, the quick bread will rise just fine.

QUICK CHERRY NUT BREAD

Ingredients:

1 cup butter, room temperature

2 cups sugar

4 eggs

1 teaspoon vanilla extract

3 cups flour

1 teaspoon baking powder

1/2 cup milk

1/2 cup almonds, chopped

1 cup chopped maraschino cherries

Instructions:

Preheat oven to 325°. Grease and flour two loaf pans. Set aside. Cream together butter and sugar. Add eggs and vanilla extract. Mix flour and baking powder. Alternate adding flour mixture and milk with the butter mixture until all ingredients are added. Do not over beat. Fold in chopped almonds and maraschino cherries. Spoon batter into prepared loaf pans. Bake for one hour or until done. Cool 10 minutes before slicing.

Zucchini Onion Chips

What’s Cooking in Gail’s Kitchen? Country Casual Cravings: Zucchini Onion Chips! We all know how versatile a meal can be once you add zucchini to the menu. But have you ever thought about an appetizer using a can of those classic crispy fried onions? It’s definitely a game-changer. Hear me out. Forget the holiday green bean casserole for a minute as you dip a fork into the can to nibble on these crunchies before tossing them onto a garden salad. Who can resist a sampling of that unique onion flavor? Not me. Now send everyone out of the house so you can work your magic. When they return, their mouths will begin to drool at the aromas from the kitchen. I’m guessing no one will suspect you disguised heart-healthy zucchini wrapped up in a delicious onion crust.

ZUCCHINI ONION CHIPS

Ingredients:

1 medium zucchini, sliced into rounds

Coarse salt

Vegetable oil, for frying

1 large egg, beaten

1 tablespoon flour

1/2 cup Italian breadcrumbs

1/2 cup crispy fried onion rings, crumbled

Ranch dressing, for dipping

Instructions:

Line a baking sheet with paper towels. Place a single layer of zucchini rounds on top. Sprinkle with coarse salt. Cover with another layer of paper towels. Press down. Allow to sit for 10 minutes to draw out excess moisture. In a wide skillet, add vegetable oil to be 1/4” deep. Warm oil over medium-high heat. In a shallow dish, combine flour, breadcrumbs, and crumbled onion rings. Mix well. Dredge one zucchini round in beaten egg and then breadcrumb mixture, coating completely. Place in the skillet; repeat until skillet is full. Do not allow zucchini rounds to touch each other. Cook 2 minutes per side until crispy and golden brown. Transfer zucchini chips to a paper towel-lined plate. Sprinkle with coarse salt. Repeat with remaining zucchini. Serve immediately with ranch dressing for dipping.

Copycat Jiffy Cornbread

What’s Cooking in Gail’s Kitchen? Country Casual Cravings: Copycat Jiffy Cornbread! If you’re wondering why anyone would make a homemade version of a boxed mix, read on. Could it be I’m a control freak? Maybe I want a healthier version? Or is it because my adult son says he recalls fond memories of the blue and yellow box from his childhood? Truth be told, I was too lazy to drive into town to buy the store-bought variety. Good thing I keep a well-stocked pantry.

COPYCAT JIFFY CORNBREAD

Ingredients:

2/3 cup flour

1/2 cup organic cornmeal

1/3 cup sugar

1 tablespoon baking powder

1/2 teaspoon sea salt

2 tablespoons vegetable oil

1 egg

1/3 cup milk

Instructions:

Preheat oven to 400°. Spray a square pan with non-stick oil. Set aside. In a bowl, combine flour, organic cornmeal, sugar, baking powder, and sea salt. Mix well. Whisk in vegetable oil until smooth. Add egg and milk. Stir only until lumps no longer remain. Do not over-beat. Transfer batter to prepared pan. Bake 15-20 minutes, or until a cake tester comes out clean. Serve warm.

Plum Coffee Cake

What’s Cooking in Gail’s Kitchen? Here Come the Holidays: Plum Coffee Cake! Plums have a way of making a person feel special. They’re not as plentiful as apples, but when they’re available I can’t wait to snag a few to plunk into a homemade coffee cake. The sweet flavor reminds me of stepping into a pastry shop where fruit-filled delicacies are placed front and center in the glass-domed showcase. From mini fruit tarts overflowing with ripe, juicy berries to cheesecakes smothered in exotic options. Turnovers become too tempting when a smidgen of filling seeps out. And just look at the succulent strudels and rustic galettes. But I digress. Today’s feature is all about the mouthwatering palatable pleasure of the plum.

PLUM COFFEE CAKE

Ingredients:

1 1/4 cup flour

1 teaspoon cinnamon

1/4 teaspoon nutmeg

1/8 teaspoon cardamom

2 teaspoons baking powder

1/2 teaspoon sea salt

1/3 cup butter, softened

3/4 cup sugar

1 teaspoon vanilla extract

1 egg, room temperature

1/2 cup buttermilk

1/2 pound plums, pitted and sliced

Powdered sugar, for dusting

Instructions:

Preheat oven to 350°. Spray a 9” cake pan with nonstick oil. Set aside. In a bowl, whisk together flour, cinnamon, nutmeg, cardamom, baking powder, and sea salt. Set aside. In another bowl cream together butter and sugar, using an electric mixer, for 3 minutes. Add vanilla extract and egg. Beat on Low speed until well mixed. Gradually add the flour mixture, alternating with buttermilk. Beat on Low speed until smooth. Transfer the batter to the prepared pan. Arrange sliced plums on top in a circular pattern. Bake for one hour until golden brown. Center is set when a cake tester comes out clean. Cool cake on a wire rack. Dust with powdered sugar before serving.

Zucchini ‘Nana Bread

What’s Cooking in Gail’s Kitchen? Splurge-Worthy Goodness: Zucchini ‘Nana Bread! This isn’t your usual old-fashioned banana bread. And if you’ve been hesitant to try zucchini bread, well…just because, then I implore you to give it one more chance. You honestly cannot taste the zucchini. What you will notice, though, is that the bread is incredibly moist, not gummy. And the cinnamon streusel topping is a winning combination worth shouting about. Remember to only stir the batter until it is mixed. The more you stir, the more gluten comes into play. While gluten is crucial in bread-baking, it is not your friend in quick breads. The results could be dense and rubbery. After all, the purpose of baking is to share with others. Slather on the butter or cream cheese…and Enjoy!

ZUCCHINI ‘NANA BREAD

Ingredients:

1 medium zucchini, shredded

1 ripe banana, mashed

2 eggs, room temperature

1/2 cup vegetable oil

3/4 cup sugar

1 cup flour

1/8 teaspoon baking powder

1/2 teaspoon baking soda

1 teaspoon cinnamon

1 teaspoon sea salt

1 teaspoon vanilla extract

Ingredients for Cinnamon Topping:

1/4 cup sugar

1 teaspoon cinnamon

Instructions:

Preheat oven to 350°. Line a loaf pan with parchment paper. Set aside. Peel zucchini. If there are seeds, remove them with a spoon; discard. Shred zucchini and set aside. Mash banana and set aside. In a mixing bowl, beat eggs, sugar, and vegetable oil until combined. Add flour, baking powder, baking soda, cinnamon, sea salt, and vanilla extract. Stir only until incorporated. Fold in shredded zucchini and mashed bananas. Stir slightly until blended. Pour into prepared loaf pan. Whisk together sugar and cinnamon in a small bowl. Sprinkle evenly over the top of the batter. Bake 45-55 minutes, or until cake tester comes out clean. Remove from oven and allow bread to cool 10 minutes before removing from pan. Cool Zucchini ‘Nana Bread on a wire rack before slicing.

Underground Chile Chocolate Bread

What’s Cooking in Gail’s Kitchen? Splurge-Worthy Goodness: Underground Chile Chocolate Bread! Don’t you hate it when you’re in the mood to bake something delicious and then find yourself short one key ingredient? That happens to me whenever I find “buttermilk” listed on a recipe. Truth-be-told, I seldom buy it. Thankfully there are two ways to transform ordinary milk into buttermilk. You can use white vinegar, or you can use lemon juice. It’s the acidity that works like magic. Now you’re probably wondering why we want buttermilk in the first place. Well, other than the rich creamy taste, buttermilk helps breads to rise with more body and a softer texture. Is it any wonder pancakes, mashed potatoes, and even fried chicken taste better bathed in buttermilk. Keep that under your hat.

UNDERGROUND CHILE CHOCOLATE BREAD

Ingredients:

3/4 cup milk, mixed with 2 teaspoons vinegar

1 tablespoon chili powder

1 2/3 cups flour

1/4 cup cocoa powder

2 teaspoons baking powder

1/2 teaspoon baking soda

1/2 cup vegetable oil

1 2/3 cups sugar

2 large eggs, room temperature

Instructions:

Preheat oven to 350°. Line a loaf pan with parchment paper. Set aside. Pour vinegar into a measuring cup, then fill with milk until you reach the 3/4 mark. Let sit for five minutes to thicken, then whisk. This is a substitute for buttermilk. In a large bowl, combine chili powder, flour, cocoa powder, baking powder, baking soda, vegetable oil, sugar, eggs, and “buttermilk”. Mix until just evenly combined. Do not over stir. Pour batter into the prepared loaf pan. Bake for one hour, or until a cake tester inserted in the center comes out clean. Cool bread on a wire rack before removing from loaf pan. Slice and serve.

School Cafeteria Peanut Butter Bars

What’s Cooking in Gail’s Kitchen? Splurge-Worthy Goodness: School Cafeteria Peanut Butter Bars! Remember the good old days when the grade school menu would come out and we’d peruse it like the Sears and Roebuck Christmas Catalog? We’d jump for joy when we saw Fish Sticks, Baked Meatloaf, Apple Crisp, Chocolate Cake, and Pizza Squares. On the other hand, Creamed Spinach made us wince and turn up our noses. Back then you had two options, buy a hot lunch ticket or bring a sack lunch from home. No in-betweens. As a general rule, the good canceled out the bad, especially in the category of scrumptious desserts. The “Lunchroom Ladies” really knew their business when it came down to sweets. Nobody could layer on the frosting like they could. And it was always homemade right there. I wonder who got to lick the spoon.

SCHOOL CAFETERIA PEANUT BUTTER BARS

Ingredients:

1/2 cup butter

3/4 cup peanut butter, creamy

3/4 cup sugar

1/4 cup brown sugar

3/4 teaspoon kosher salt

2 eggs, room temperature

1 1/2 teaspoons vanilla extract

1 cup flour

Ingredients for Icing:

1/2 cup powdered sugar

2 tablespoons creamy peanut butter, melted

2 tablespoons hot water

Instructions:

Preheat oven to 350°. Line a 9”x9” square baking pan with parchment paper. Set aside. Melt butter and peanut butter in a microwave-safe bowl on 50% for 30 seconds. Stir and repeat, if necessary. Set aside to cool to room temperature. In a large bowl, sift together sugar, brown sugar, and kosher salt. Whisk in one egg at a time until combined. Add vanilla extract. Whisk in peanut butter mixture until combined. Sift in flour; mix until flour disappears. Do not over mix. Pour into prepared pan. Bake for 35-40 minutes, or until cake tester comes out with tiny moist crumbs. Cool pan on a wire rack. Once the pan has cooled, remove the cake from pan and transfer on the parchment paper to a rimmed baking sheet. Combine powdered sugar, creamy peanut butter, and hot water. Stir until frosting has a smooth consistency. Drizzle over dessert. Allow icing to set up before cutting into individual bars.

Quesadilla Chile Relleno

What’s Cooking in Gail’s Kitchen? Splurge-Worthy Goodness: Quesadilla Chile Relleno! Before you shake your head and walk away, hear me out. Green poblano peppers are a pretty mild distant cousin to the jalapeño and habanero. You could almost say they’re from the “other side of the tracks”, so to speak. Personally, I think they’re underrated. If you look up their classification, they might even be referred to as sweet. Now, I don’t know about that. What I do know is they smell somewhat earthy, tend to hold their shape, and are absolutely scrumptious when bathed in Mexican cheeses. In my opinion, they definitely deserve a second chance. What have you got to lose?

QUESADILLA CHILE RELLENO

Ingredients:

2 large flour tortillas

2 tablespoons butter

1 cup Mexican-style four cheeses, shredded

2 poblano peppers, roasted, peeled, and sliced in strips

1/4 cup yellow onion, chopped

1/4 cup ranch dressing, prepared

1/4 teaspoon cayenne pepper

1/4 teaspoon sriracha sauce

Instructions:

Butter one side of each flour tortilla. Set aside. Warm an iron skillet or nonstick pan over medium heat. Place one tortilla in the skillet, butter side down. Add half the Mexican cheeses. Arrange the poblano peppers in a single layer over cheese. Scatter chopped onion over all. Add remaining Mexican cheese blend. Place the remaining tortilla on top, butter side up. Press down lightly. Cover the pan with a lid. Cook 3-4 minutes until tortilla is lightly browned and cheese is melted. Using a spatula, flip over the quesadilla. Cover with lid. Cook 2-3 minutes longer until golden brown. Do not burn. Transfer quesadilla to a cutting board. Let rest for 2 minutes to avoid a flood of gooey cheese. In a small bowl, combine prepared ranch dressing, cayenne pepper, and sriracha sauce. Mix well. Cut the quesadilla into 6 triangles. Serve with sriracha ranch dipping sauce.

Mincemeat Quick Bread

What’s Cooking in Gail’s Kitchen? Splurge-Worthy Goodness: Mincemeat Quick Bread! Don’t look at me that way. I know what you’re thinking. “If this recipe has mincemeat in it, I’m not eating it.” But hold on a sec. There are plenty of foods with names that sound downright gross. Think about it: head cheese, tripe, mung beans, and blood sausage to name a few. I’m here to tell you mincemeat is a sweet and savory filling that basically contains dried fruits, citrus, spices, and brandy. Ahhh. Now I have your attention. This particular recipe has about 1/4 cup apricot brandy in it. Just know if you do choose to add brandy or rum to a jar of prepared mincemeat, be sure to allow it to marinate in the refrigerator at least 8 hours before using. Now you can understand why some people eat it straight out of the jar.

MINCEMEAT QUICK BREAD

Ingredients:

1 egg, room temperature

1/4 cup vegetable oil

1 tablespoon orange zest

2 tablespoons orange juice

2 cups prepared mincemeat pie filling (with 1/4 cup apricot brandy, optional)

2 cups flour

1/2 cup sugar

1 1/2 teaspoons baking powder

1/2 teaspoon baking soda

1/2 teaspoon sea salt

Instructions:

Preheat oven to 350°. Grease and flour a 9”x5” loaf pan. Set aside. Combine egg, vegetable oil, orange zest, orange juice, and mincemeat pie filling. Stir until well blended. Set aside. In another bowl, whisk together flour, sugar, baking powder, baking soda, and sea salt. Gradually add flour mixture to egg mixture, stirring just until combined. Pour into prepared loaf pan. Bake for 50-60 minutes. Check loaf with a cake tester to make sure center is done. Remove from oven. Cool on a wire rack. Slice and serve.