Lovely Lace Cookies

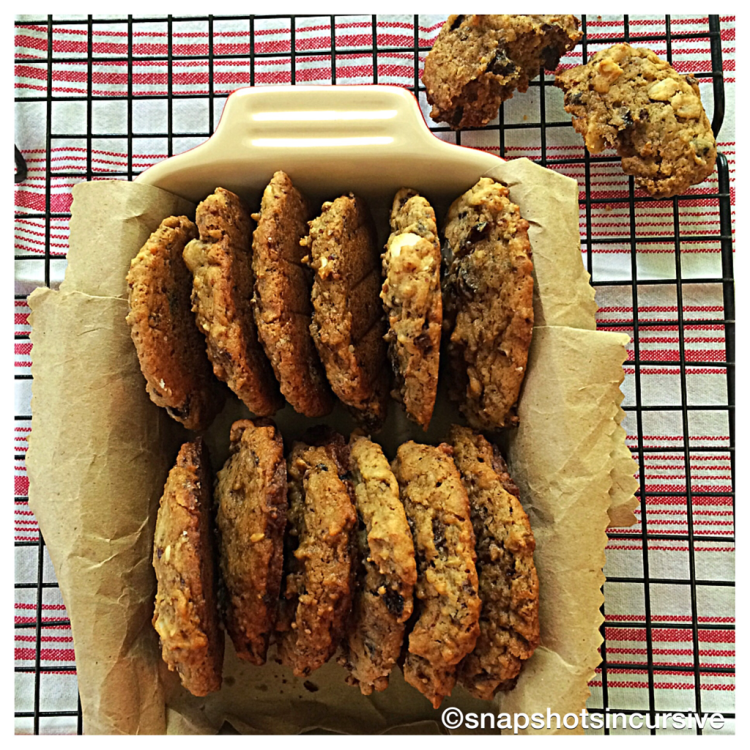
What’s Cooking in Gail’s Kitchen? Something to Savor: Lovely Lace Cookies! For the keen observer, you may notice this is the same recipe I used for Edible Chocolate Chip Cookie Dough*. There is a simple explanation. For those who are unable to eat an entire batch of raw cookie dough, there is an alternative. Simply split the portion and bake a batch of Lovely Lace Cookies. But be forewarned. Once you drizzle them with chocolate, you may eat them faster than ever. I did. No shame!

LOVELY LACE COOKIES

Ingredients:

1/2 cup unsalted butter, softened

3/4 cup brown sugar, firmly packed

2 teaspoons vanilla extract

1/2 teaspoon sea salt

1 cup flour

2 tablespoons light cream

1 cup semi-sweet mini chocolate chips

Chocolate Syrup for drizzling

Instructions:

Preheat oven to 375°. In a food processor, combine butter and brown sugar. Cream together. Add vanilla extract and sea salt. Pulse to blend. Gradually add flour. Dough will be slightly crumbly. Add light cream. Pulse to mix well. By hand gentle fold in semi-sweet mini chocolate chips. Drop by level teaspoons onto nonstick baking sheets. Bake until golden brown, 6-8 minutes. Watch carefully. Do not burn. Cool on baking sheet until firm, about 10 minutes. Transfer to wire rack to cool completely. Drizzle with chocolate syrup before serving.

*Edible Chocolate Chip Cookie Dough can be referenced under Letter E at https://snapshotsincursive.com/2017/03/23

Homemade Tortilla Chips

What’s Cooking in Gail’s Kitchen? Be Our Guest: Homemade Tortilla Chips! Ever wonder why your favorite Mexican restaurant has such incredible tortilla chips? Well now you can make your own café-style chips at home. Begin with flour and corn tortillas the day before. Just open the packages and let them breathe overnight on the kitchen counter. This simple step removes any excess moisture and allows them to fry up crispier. Sprinkled with sea salt and dipped in chunky salsa is practically a dream come true.

HOMEMADE TORTILLA CHIPS

Ingredients:

2 cups vegetable oil

1 package yellow corn tortillas, extra thin

1 package flour tortillas, soft taco size

Sea salt to taste

Instructions:

Cut each corn tortilla into 8 wedges. Use entire package. Set aside. Cut each flour tortilla in half and then into strips. Use entire package. Set aside. Beginning with one cup vegetable oil in a large skillet, heat the oil on medium setting until a tortilla sizzles. Avoid smoke. That means the oil is too hot. Place a handful of corn tortilla wedges into the hot oil. Do not overlap. Fry for 1-2 minutes until the chips are golden and crisp. Use tongs to flip over half way through, if necessary. As the oil is used, reduce heat to avoid smoking. Use tongs to remove chips from oil; drain on paper towel-lined plate. Sprinkle with sea salt. Repeat in batches until all corn chips are fried. Add remaining cup of oil to skillet. Repeat with flour tortilla strips. Store in airtight container at room temperature. Enjoy!

Rum Raisin Cookies

What’s Cooking in Gail’s Kitchen? Eat More: Rum Raisin Cookies! Before you turn the page, let me clarify…you can choose to omit the rum in this recipe and substitute with water and opt for rum extract instead. Either way, if you’re a raisin-lover, this version puts the “plump” in raisin to make them moist and chewy. In the time it takes to preheat the oven and assemble the remaining ingredients, the raisins are ready to use. Trust me, everyone will thank you!

RUM RAISIN COOKIES

Ingredients:

2 cups raisins

1 cup dark rum

3 1/2 cups flour

1 teaspoon baking powder

1 teaspoon baking soda

1 teaspoon sea salt

1/2 teaspoon cinnamon

1/2 teaspoon nutmeg

1 cup butter, softened

1 3/4 cup sugar

2 eggs, slightly beaten

1 teaspoon vanilla extract

1 teaspoon almond extract

1/2 cup almonds, chopped

Instructions:

Preheat oven to 350°. In a medium saucepan, combine raisins and rum. Bring to a boil; boil for 3 minutes. Reduce heat and simmer uncovered for 15-20 minutes until the liquid is absorbed and the alcohol has evaporated. Set aside; do not drain. In a medium bowl, combine flour, baking powder, baking soda, sea salt, cinnamon, and nutmeg. Set aside. Cream butter. Gradually add sugar, mixing until creamy. Add the slightly beaten eggs, vanilla extract, and almond extract. Gradually add the flour mixture, stopping occasionally to scrape the sides of the bowl. Mix thoroughly before folding in the raisins and chopped almonds. Drop with a tablespoon 2″ apart on greased cookie sheets. Bake 12-13 minutes. Cool on wired rack.

Flour & Barley Brick Oven Pizza in Las Vegas, Nevada

Dining Outside the Home: Flour & Barley Brick Oven Pizza in Las Vegas, Nevada. Everyone has that craving for pizza at one time or another. Flour & Barley, on The Linq Promenade, designed an Italian-American eatery for just that reason. Don’t expect the ordinary choices, though. Flour & Barley focuses on uniquely fresh ingredients, gluten-free options, specialty Italian sauces, and even a vegan cheese if needed. Pizza not your thing? No worries. Go with a meal salad, pasta dish, or seafood entree. It’s all good. Hip patio dining offers the perfect vantage point for people-watching plus a nice view of the High Roller.

Yeast Dinner Rolls

What’s Cooking in Gail’s Kitchen? The Food Whisperer: Yeast Dinner Rolls! There’s nothing better than the smell of freshly-baked bread wafting out the oven door, in my opinion. It seems as the yeast magically leavens with flour, it produces an aroma that is not only warm heartwarming, but nostalgic. Perhaps it brings back childhood memories for you as well. For instance, the Wonder Bread Years were a simpler time where I played outside til after dark, giggled with my girlfriend, dated a boy on the weekend, and took a sack lunch to school. Crisp autumn days with damp earthy leaves and woodsmoke aromas smell nice as well. Maybe it’s time for you to bake some bread, too.

YEAST DINNER ROLLS

Ingredients:

1 cup warm milk

1/2 cup butter, room temperature

2 eggs

1/4 cup sugar

1 1/2 teaspoons sea salt

4 cups bread flour

2 1/4 teaspoons active dry yeast

Instructions:

Using a bread machine, layer warm milk, butter, and eggs in the bottom of the pan. Next add sugar, sea salt, and bread flour. Form a slight well in the flour layer. Pour the dry yeast into the well. Close the lid. Select Dough setting and press the Start button. When cycle is complete, turn dough onto a lightly floured surface. Divide dough into 24 sections. Shape dough into balls. Place in a greased 9”x13” baking pan. Cover and let rise in a warm place for 40-45 minutes. Preheat oven to 350°. Bake for 15 minutes or until golden brown.

Strawberry Shortcake

What’s Cooking in Gail’s Kitchen? The Clean Plate Club: Strawberry Shortcake! Nix the store-bought angel food dessert cups for a sweet lighter-than-air shortcake made in your own kitchen. It’s quick. It’s simple. And it makes everyone smile. Bake in a square cake pan or muffin tin. I like the option of using ramekins for pillowy results. Simply invert them upside down before drizzling with juicy sliced strawberries that practically melt in your mouth. How’s that for an all-American favorite dessert? I find it Strawberrylicious!

STRAWBERRY SHORTCAKE

Ingredients:

1/2 cup butter, room temperature

1 cup sugar

1/2 cup buttermilk

2 eggs

1 teaspoon vanilla extract

1 1/2 cups flour

1/2 teaspoon sea salt

2 teaspoons baking powder

1 pint strawberries, sliced

Whipped cream

Fresh mint leaves for garnish

Instructions:

Preheat oven to 350°. Lightly grease 6 ramekins. Set aside. Cream butter and sugar until mixture is light and fluffy. Add buttermilk, eggs, and vanilla extract. Stir well. Sift together flour, sea salt, and baking powder. Gradually add dry ingredients to wet ingredients. Mix to combine until batter is smooth and no lumps remain. Pour into prepared ramekins. Transfer to oven on a baking sheet. Bake 25-30 minutes until cake springs back and cake tester comes out clean. Invert ramekins on a wire rack to cool for 10 minutes. Wash, hull, and slice strawberries. Arrange berries on each shortcake. Serve with a dollop of whipped cream and mint leaf garnish.

Eating My Way Through the Alphabet: Letter X

What’s Cooking in Gail’s Kitchen? The Color of Food: Xiangjiao Banana Bread! How’s this for a fancy word? For those who haven’t a clue, “xiangjiao” is actually Chinese for banana. And who doesn’t love bananas? A few years ago my grandson came to my house for a sleepover. I had been to the grocery store to get some of his favorite foods, in addition to a couple of new choices. Imagine my surprise when I presented him with a half-peeled yellow banana. He got a puzzled look on his face as he eagerly grabbed it and said, “Nana. Ba-Nana?” I smiled and gave him a giant hug before the air exploded into peals of laughter. There’s nothing sweeter than a toddler’s giggle.

XIANGJIAO BANANA BREAD

Ingredients:

1/2 cup butter, room temperature

1 cup sugar

2 eggs

1/4 cup Greek yogurt

1 teaspoon vanilla extract

3 ripe bananas, peeled and crushed

2 cups flour

1/2 teaspoon baking powder

1 teaspoon baking soda

1/8 teaspoon sea salt

1/4 cup pecans, chopped

Topping: (optional)

1 ripe banana, sliced lengthwise

1 tablespoon chopped pecans

Instructions:

Preheat oven to 350°. Spray a loaf pan with a nonstick oil containing flour. Set aside. Cream together butter and sugar. Add eggs, Greek yogurt, vanilla extract, and crushed bananas. Mix well. Combine flour, baking powder, baking soda, and sea salt. Add to the creamed mixture. Stir just until batter is combined. Do not over mix. Fold in chopped pecans. Pour into prepared pan. For topping, place the two halves of a ripe banana on top of the batter. Sprinkle with remaining chopped pecans. Bake one hour or until tester comes out clean. Cool 5 minutes and then remove banana bread from loaf pan. Cool longer on a wire rack.

Eating My Way Through the Alphabet: Letter U

What’s Cooking in Gail’s Kitchen? The Color of Food: Unleavened Bread! Nothing is more appetizing than the aroma of fresh bread baking in the oven, in my opinion. Unleavened Bread is a quick and easy flatbread made with flour, salt, olive oil, and water. No yeast needed. Choose between a crispy texture, like I have here for that luscious golden color, or shorten the baking time for softer, more chewy results. Eat it plain, slather it with French butter, or turn it into a personal-size pizza flatbread. You can thank me later.

UNLEAVENED BREAD

Ingredients:

1 1/3 cup flour

1/4 teaspoon sea salt

1/4 cup olive oil

1/4 cup water

Dill weed for garnish (optional)

Instructions:

Preheat oven to 400°. Brush a baking sheet with olive oil. Set aside. Combine flour and salt in a food processor. Pulse to mix. Gradually drizzle in the oil on Low speed. Dough will resemble crumbs. Continuing on Low speed, gradually add water until dough forms a ball. Turn dough onto a lightly floured surface. Knead until dough is elastic and smooth, but not sticky. Divide into 6 equal balls. Pat each ball into a circle, using a rolling pin or your hands. Transfer flattened dough onto prepared baking sheet. Do not crowd. Bake in two steps, if necessary. Use a fork to lightly prick the dough. Brush each flatbread round with olive oil and sprinkle with dill weed. Bake 15 minutes until golden brown. Cool on wire rack.

Eating My Way Through the Alphabet: Letter I

What’s Cooking in Gail’s Kitchen? The Daily Special: Impressive Pizza Crust! When it comes to making homemade pizza, two factors are critical to taste: Crust and Sauce. (We’ll address pizza sauce another day.) It becomes personal whether you prefer a thin and crispy crust or a deep dish pizza pie. Fortunately, my husband and I are partial to a thin crust. Choosing your “method of madness” takes practice as well. Experts recommend kneading the dough and getting pretty rough to develop the gluten. Others use a bread machine for maximum results. I found my food processor passed the test with this impressive crust. Later on, I may try another.

IMPRESSIVE PIZZA CRUST

Ingredients:

2 cups bread flour, plus more for work surface

1 tablespoon sugar

1 1/2 teaspoons active dry yeast

1 cup warm water

1 tablespoon olive oil, plus more for work surface

1/3 teaspoon sea salt

Cornmeal for pizza pan

Instructions:

In food processor fitted with metal blade, process flour, sugar, and yeast until combined, about 2 seconds. With machine running, slowly add water through feed tube. Process until dough is just combined and no dry flour remains, about 10 seconds. Let dough rest for 10 minutes. Then add olive oil and salt to dough. Process until dough forms a satiny, sticky ball that clears the sides of the bowl, 30-60 seconds. Remove dough from bowl and knead briefly on a lightly oiled countertop until smooth, about 1 minute. Shape dough into a tight ball and place in a large, lightly oiled bowl. Cover tightly with plastic wrap and refrigerate for at least 24 hours and up to 3 days.

After 24 hours divide the dough into 2 equal portions. (Wrap one tightly with plastic wrap and return to the refrigerator for later use if you are only making one pizza pie at this time.) Shape dough on lightly oiled baking sheet; cover loosely with plastic wrap coated with nonstick cooking spray. Let stand one hour. Preheat the oven to 425°. Then coat the ball of dough with flour and place on a well-floured countertop. Knead and stretch the dough without breaking. Spread olive oil lightly to grease pizza pan. Sprinkle corn meal over the olive oil forming a thin even layer. This keeps the crust from getting soggy and adds a nice crunch to the texture of the crust. Transfer dough to pizza pan. Using fingertips, gently flatten and stretch as you go, until it reaches the edges. Press down around the edges of the pan to create a border, which will keep the sauce and toppings from seeping while baking. Place in oven and bake crust for 10 minutes without toppings. Remove and add pizza sauce plus desired ingredients. Reduce oven heat to 400° and bake an additional 20 minutes until crust is crispy and toppings bubbly.