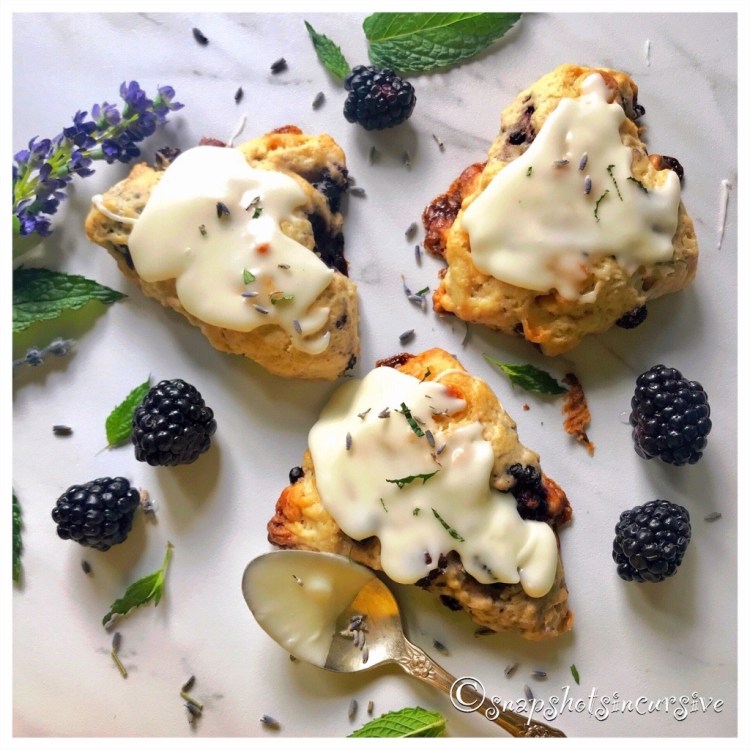
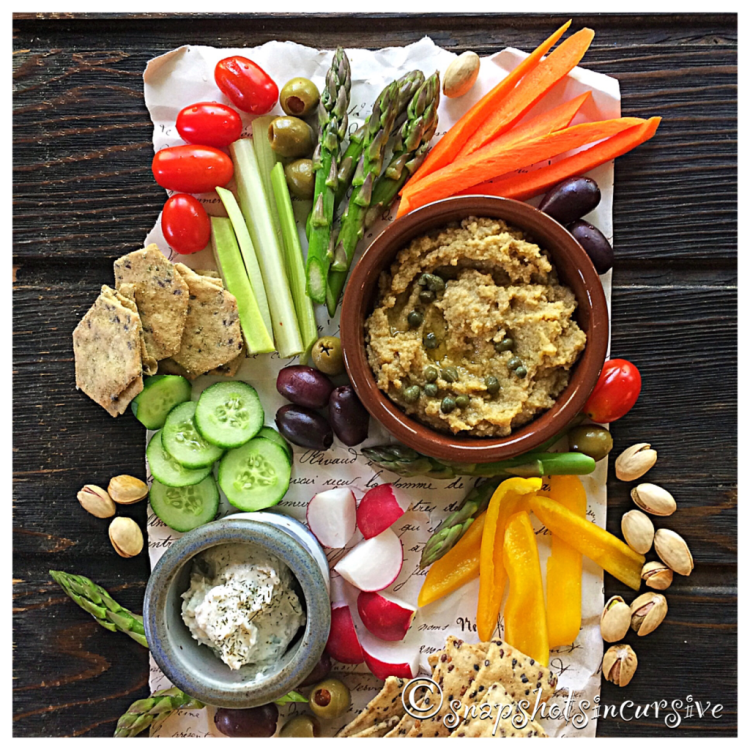
Traditional English Toffee

What’s Cooking in Gail’s Kitchen? Enjoyable Eats: Traditional English Toffee! So often we have those cherished childhood memories of homemade candy and cookies that accompanied holiday celebrations. They stick with us for life. I can remember being in eighth grade and determined to replicate a batch of my mother’s English Toffee. I waited for her to go into town and then pulled out her secret recipe. You know, the ones scratched on a 3.5”x5” card. More often than not, they showed a list of ingredients with instructions that simply said, “Bake at 350° for 30 minutes”. Let’s face it, that’s pretty vague compared to what we explain nowadays. As you can imagine, I melted the butter along with the brown sugar and stirred. And stirred. And stirred. So how come it wasn’t turning into this crisp crunchy texture of rich golden butter that fueled my addiction? What could I possibly be doing wrong? There was nothing written on the card to correct this runny, gooey mess. Alas, I scraped it all into the trash, washed the pan, and plopped myself at the kitchen table with my Algebra book. She walked in, smiled, and never said a word.

TRADITIONAL ENGLISH TOFFEE

Ingredients:

1 cup pecans, chopped

3/4 cup brown sugar, packed

1/2 cup butter

1/2 cup semisweet chocolate chips

Instructions:

Butter a baking sheet. Spread pecans in a single layer in the center. Heat butter and brown sugar to boiling in a heavy saucepan, stirring constantly. Boil over Medium heat, stirring constantly, for 7 minutes. Immediately spread mixture over pecans on baking sheet. Sprinkle chocolate chips over hot mixture. Place a cookie sheet over pan until chocolate chips are melted. Spread melted chocolate over candy. Refrigerate until firm. Break toffee into pieces.

Juicy Roast Turkey

What’s Cooking in Gail’s Kitchen? Start Smart: Juicy Roast Turkey! There’s nothing worse than dry-as-dust turkey, around the holidays. Watch your guests if they keep asking you to pass the gravy. Today I’m going to give you a few tips to keep that from happening. You can thank me when it’s your turn to host the holiday meal. Number one: Truss loosely, or not at all. The secret is to allow heat to get to all sides of the legs. Cooking the turkey until the legs are done may result in overcooking the breast meat. Number two: Don’t overcook. The timetable on the package is an estimate. Always use a meat thermometer, even if the turkey comes with a pop-up version. Always. Number three: (and this one is the hardest for me) Let the turkey “rest” before carving. I’m talking 20-30 minutes. Evidently, during the roasting process, the oven heat forces all the juices to the center of the turkey. When you allow it to “rest”, after it’s done, the juices seep back into the cavities and make the turkey moist. It’s definitely worth the wait.

JUICY ROAST TURKEY

Ingredients:

10-15 pound turkey, thawed

1/2 cup butter

1 lemon, juiced and zested

1 teaspoon thyme

Instructions:

Preheat the oven to 350°. Wash the turkey, pat dry, and transfer to a roasting pan with a roasting rack. Stuff the turkey as desired. Otherwise, salt and pepper the inside of the cavity. In a small saucepan, warm the butter over low heat. Add the lemon juice, zest, and thyme. Brush the outside of the turkey with the butter mixture. Insert a meat thermometer into the thickest part of the thigh, avoiding the bone. Cover the roaster with the lid. Transfer pan to oven. Bake for two hours, basting the turkey every half hour. This insures even browning of the skin. Remove lid and roast turkey an additional 1 1/2 hours, continuing to baste at half hour intervals. When the meat thermometer reads 185°, remove the turkey from the oven. Transfer it to a cutting board; cover with foil. Let it rest for half an hour. This makes carving easier and produces a juicy roast turkey.

Festive Food Gifts

What’s Cooking in Gail’s Kitchen? There’s nothing better than sharing homemade foods with cherished friends, family members, and those very special people who make our lives easier. Think about all those who impact your life on a daily, weekly, or monthly basis: Mail Carrier, Hairdresser, Physical Therapist, Dog Groomer, Nail Technician, Bartender, Delivery Driver, Babysitter, Housekeeper, Lawn Service, Teacher, Coach, Clergy Staff, Neighbor, Secret Santa, and more. The holidays are perfect for saying, “I made this especially for you!” Gifts of food are great ways to show thoughtfulness and appreciation. Many recipes can be divided creatively to make several gifts. Decorative boxes, ribbons, picks, and tags personalize each package. The recipes forthcoming in the days to come range from sweet and salty to healthy and heartwarming. So, turn up the music, slip on your apron, and get busy. Celebrate the season by giving something that is simply delicious: Festive Food Gifts!

Mexican Shrimp Cocktail

Experience the Holidays: Mexican Shrimp Cocktail! One bite, one little taste, will leave you wondering how you didn’t know about this version of an old classic. So what’s the difference, you ask. Actually, quite a bit. But I’m not gonna lie to you. If you’ve been following my blog, you can often see there’s a method to my madness. One recipe can be a critical ingredient to another dish. Like today. Recently I featured Jalisco Pico de Gallo. I’m gonna tell you it is a key ingredient in my Mexican Shrimp Cocktail, slightly tweaked. On the upside, it makes preparation a snap. Read on and you’ll see what I mean.

MEXICAN SHRIMP COCKTAIL

1 1/2 cups Jalisco Pico de Gallo*

1/2 cup Clamato Tomato Cocktail**

1/2 cup ketchup

1 pound jumbo shrimp, precooked but chilled

1 avocado, cut into medium chunks

Fresh cilantro, for garnish

Instructions:

In a bowl, combine Jalisco Pico de Gallo, Clamato Tomato Cocktail, and ketchup. Mix well. Take at least half the shrimp, discard tails, and cut into chunks. Add the shrimp chunks to the sauce mixture. The remaining whole shrimp will be used for dipping. Gently fold in avocado chunks. To serve, divide shrimp cocktail into parfait glasses. Arrange whole shrimp on the edge of the glass. Garnish with fresh cilantro.

*Follow the link for recipe.

http://Snapshotsincursive.com/2019/11/15

**I receive no recompense for mentioning this product.

Pretzel Nuggets

Experience the Holidays: Pretzel Nuggets! Anyone who has been to an outlet mall, movie theater complex, or shopping center may have been seduced by the tantalizing aroma of freshly baked pretzels. How about those wonderful travel cups of soft buttery nuggets speared with a wooden pick? Who can resist? Especially with a side of gooey molten cheese? Here’s a shortcut to making a batch at home in your own kitchen. It’s all about portion control to keep it real. The next time you’re at the grocery, pick up a tube of refrigerated biscuit dough. You can thank me later.

PRETZEL NUGGETS

Ingredients:

1 tube refrigerated biscuit dough, 8-count

1/4 cup baking soda

1 egg, beaten

1-2 teaspoons Everything But Bagel Seasoning*

1 tablespoon coarse sea salt

Instructions:

Preheat the oven to 425°. Line a baking sheet with parchment paper. Cut each biscuit slice into quarters. Roll each quarter into a ball. Bring 4 cups of water to a boil in a 2 1/2 quart pan. Slowly stir in baking soda. Reduce the heat to a simmer. Drop the biscuit dough rounds into the water. Avoid overcrowding by working in batches. Cook dough for one minute. Remove with a slotted spoon and place on parchment paper-lined baking sheet. Brush with beaten egg to assist browning. Sprinkle with Everything But Bagel seasoning. Finish with coarse sea salt. Bake 15-20 minutes until pretzel nuggets are golden brown. Repeat with remaining dough. Cool pretzel nuggets on a wire rack. Serve with cheese dip.

*To make your own Everything But Bagel Seasoning, click the link below.

https://snapshotsincursive.com/2018/07/17

Fabulous Fruit Dip

Experience the Holidays: Fabulous Fruit Dip! Recently I served a delightful fruit cup for breakfast when family came to visit. Because it is made with Greek yogurt and nutmeg, it’s an impressive alternative to ordinary yogurt. Think of it as Summer-in-a-Cup. Whether you decide to arrange a generous fruit platter for a crowd or scale it down to individual portions, the results are the same: heavenly delicious!

FABULOUS FRUIT DIP

Ingredients:

1 large orange*

8 ounces of Neufchâtel cheese, room temperature

4 ounces marshmallow Creme

1/4 cup Greek yogurt

1 teaspoon orange extract

1/8 teaspoon orange zest

Smidgen nutmeg

Assorted fresh fruits

Mint Sprig for Garnish

Instructions:

Cut 1/3 off the top of the orange to create a “bowl”. Carefully run a sharp knife around the inside. Do not cut through the peel. Gently scoop out the fruit. Set aside. In a medium bowl, mix together Neufchâtel cheese and marshmallow creme. Beat until smooth. Fold in Greek yogurt. Make the zest by using the top portion of the orange peel. Add orange extract, zest, and nutmeg. Blend thoroughly. Chill one hour. Scoop into the orange “bowl” before serving. Garnish with fresh mint sprig. Place on a serving platter surrounded by fresh fruit.

* For individual servings, choose four small navel oranges.

Incredibly Delish Chocolate Bliss

Experience the Holidays: Incredibly Delish Chocolate Bliss! Is it a cake? Is it a confection? Who cares? It’s smooth, creamy dreamy chocolate and it is incredible. The fact that it is flourless is a plus for those who avoid desserts for that particular reason. The dark chocolate and butter combination is divinely rich, which is why a little bit goes a long way. I find a nice cuppa joe or herbal tea creates a balance that works. As always, share a little bliss with those around you. They’ll thank you for it.

INCREDIBLY DELISH CHOCOLATE BLISS

Ingredients:

4 ounces bittersweet chocolate, chopped

6 tablespoons butter, cubed

2 eggs

1/4 cup sugar

1 teaspoon espresso powder

1/4 teaspoon almond extract

6 teaspoons chocolate hazelnut spread

Crushed pistachios for garnish

Instructions:

Preheat oven to 375°. Use paper muffin cups or buttered ramekins. Set aside. Combine bittersweet chocolate and butter in a microwave-proof bowl. Melt in microwave on high setting at 30-second intervals until melted and smooth. Stir occasionally. In a mixer bowl, combine eggs, sugar, espresso powder, and almond extract. Beat on medium-high speed for 5 minutes or until mixture is lightened. Reduce speed to low setting. Add melted chocolate/butter mixture until combined. Spoon into muffin cups or buttered ramekins. Add one half teaspoon of hazelnut spread in the center of each muffin cup batter. Bake 10 minutes until edges are set, but center is still soft. Do not over bake. Garnish with crushed pistachios. Cool 5 minutes before serving.

Glorious Glazed Pecans

Experience the Holidays: Glorious Glazed Pecans! Go to any big city or farmers market and you’ll find street vendors roasting sweet and savory candied nuts. The bakery aroma practically has you walking on air. Now you can bring this enticing smell and sugary sweetness right into your very own kitchen. I’ve made it a tradition to bake a couple batches for holiday gift-giving. When mixed with an assortment of smoked almonds, wasabi peas, salty cashews, and honey roasted peanuts, these glazed pecans become a gourmet choice for absolutely anyone on your list. In fact, anticipation creates excitement followed by open delight and thanksgiving.

GLORIOUS GLAZED PECANS

Ingredients:

1 pound pecan halves

1 cup sugar

1 teaspoon sea salt

1 teaspoon cinnamon

1 egg white, room temperature

1 tablespoon water

Instructions:

Preheat oven to 300°. Spray a baking sheet with nonstick oil. In a small bowl mix sugar, salt, and cinnamon. Stir well and set aside. In a large bowl beat egg white and water until frothy. Add one pound of pecans and coat well to cover. Pour sugar mixture over nuts. Stir completely to form a coating over pecans. Transfer nuts to the baking sheet. Form a single layer. Bake 30 minutes, turning every 10 minutes to form a crystallized finish. Remove from oven. Let cool and then store in an airtight container.

Unbelievable Cheesy Pimento Spread

Experience the Holidays: Unbelievable Cheesy Pimiento Spread! If you’re a cheese lover, this is a “must-do” appetizer. It is guaranteed to bring big raves at the next holiday gathering. The smokey-peppery version is sure to test your willpower. Should it just be slathered on crackers or bagel chips? What about apple slices? Or will you take it one step further and build a grilled cheese sandwich on sourdough bread? Whatever you choose, create all sorts of ideas for enhancing this nostalgic Southern favorite.

UNBELIEVABLE CHEESY PIMENTO SPREAD

Ingredients:

1/2 cup mayonnaise

2 teaspoons French Dijon mustard

1 teaspoon Worcestershire sauce

1/4 teaspoon crushed red pepper flakes

1/4 teaspoon seasoned salt

1/8 teaspoon white pepper

4-ounce jar of diced pimientos, drained

2 green onions, snipped

8 ounces extra sharp yellow cheddar cheese, finely shredded

10 ounces sharp white cheddar cheese, medium shredded

1 teaspoon sriracha hot chili sauce (optional)

Instructions:

In a large bowl, stir together mayonnaise, mustard, Worcestershire sauce, red pepper flakes, seasoned salt, and pepper. Mix well. Fold in pimientos and onions. Stir in both cheeses until blended. Add sriracha for a kick of heat. Chill one hour or overnight.

Serving Suggestion: Serve as an Appetizer with crackers or assorted vegetables. Also excellent as finger sandwiches.

*For block cheeses, grate one kind with small holes and the other with medium holes on a box grater or using food processor blades.