Tails of Maine Lobster

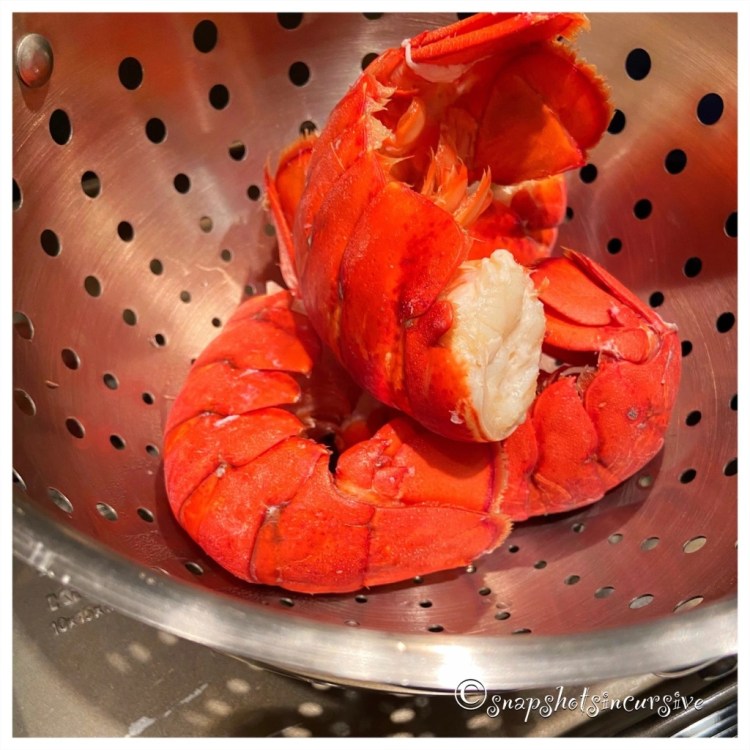
What’s Cooking in Gail’s Kitchen? Here Come the Holidays: Tails of Maine Lobster! There’s an upside to living through a pandemic. Practically everything is available to order from computer-to-doorstep. And that includes Maine hard shell lobsters, especially when you live in a state that is landlocked. Of course, you still have to do a little homework by reading reviews and asking questions on Live Chat websites. We found talking directly to a customer service representative can answer a lot of confusing questions and bring clarity. In turn, you never know when an actual salesperson of the company will offer an unexpected special to entice the purchase further. I guarantee you, it’s absolutely worth the time. The results are simply delicious.

TAILS OF MAINE LOBSTER

Ingredients:

2 6-ounce frozen lobster tails, thawed

2 tablespoons sea salt

1 cup unsalted butter

1 lemon, for zest

1 lemon, quartered for garnish

Instructions:

Before cooking the lobster tails, make the clarified butter. In a small, heavy bottomed saucepan, warm the butter over medium-low heat. Do not stir. Allow the butter to melt without turning brown. Gradually a white foam will appear on the surface. Allow the melted butter to stand for 5 minutes. Tilt the saucepan to carefully spoon the white foam off the top. This may take several steps. Strain the clarified butter through a cheesecloth to remove any milk solids. This will discard any brown bits on the bottom of the pan. Transfer clarified butter back to the saucepan to keep warm. Divide the lemon zest into single-serving dipping bowls. Set aside. To make the lobster tails, bring a pot of water to a boil. Reduce heat to a soft boil and add sea salt. Drop tails in one at a time. Cook the lobster for 5 minutes. Set a timer to avoid overcooking. The lobsters will be bright red when done. Using metal tongs and a large strainer, take the tails out of the boiling water. Transfer to two dinner plates. Pour the clarified butter over the lemon zest in the dipping bowls. Garnish with lemon wedge. Serve immediately.

Rosemary Lemon Roasted Turkey

What’s Cooking in Gail’s Kitchen? Here Come the Holidays: Rosemary Lemon Roasted Turkey! Did you know a frozen turkey will last up to two years in the freezer? First and foremost, it’s only a bargain if you have the space to store it. That being said, roasting a turkey is a great source of lean protein. A whole bird provides healthy meat that can be served several different ways. Unfortunately, our bodies need protein and cannot store it. We need to replenish protein in order to build strong bones, repair muscle, heal skin, and help keep blood sugar levels even. All the other vitamins and minerals are a bonus. A few words of advice: Remove and discard the skin of the roasted turkey, no matter how tempting that crispy, golden outer covering calls your name. It’s main purpose is to keep the meat moist. That, and for taking fabulous snapshots, of course.

ROSEMARY LEMON ROASTED TURKEY

Ingredients:

4-6 sprigs of fresh rosemary

2 lemons, quartered

12-pound turkey, thawed

2 tablespoons butter, melted

1 teaspoon kosher salt

1/2 teaspoon garlic powder

Instructions:

Preheat oven to 325°. Rinse turkey, pat dry. Insert rosemary and lemon pieces in the cavity of the turkey. Truss the turkey by wrapping the bird in cooking twine. Secure the legs and tuck the wings underneath. Transfer turkey to the roasting pan with the breast side up. Brush with melted butter. Sprinkle with kosher salt and garlic powder. Bake uncovered for 4 hours, or until a meat thermometer reads 180°. The juice of the turkey will run clear when the center of the thigh is cut. Remove from oven. Cover. Allow turkey to rest for 15 minutes before carving. Garnish with fresh rosemary sprigs and lemons.

Jiggers of Apple Cider Jello Shots

What’s Cooking in Gail’s Kitchen? Here Come the Holidays: Jiggers of Apple Cider Jello Shots! It’s a chilly winter’s evening where the crackling flames encompass the fireplace logs. My husband and I are snuggling under woolen blanket throws as we binge-watch another series on Netflix. I think we’re addicted. No judgement, please. Outside the windows, the ground takes on a blueish tint as the snow and ice reflect the elusive rays of fading daylight. From time to time, gusts of air beguile the wind chimes into dancing around in synchronized motion. It’s times like these where I slip my toes into sherpa-lined slippers and pad my way to the kitchen for a sinfully delicious elixir of life. You may, too. For adults only.

JIGGERS OF APPLE CIDER JELLO SHOTS

Ingredients for Jello Shots:

1 cup bourbon

2 cinnamon sticks

1 cup apple cider

1/4 cup sugar

2 packets gelatin

Ingredients for Serving:

1 cup sugar

4 teaspoons ground cinnamon

Lemon wedge

Whipped cream, for garnish

Star anise, for garnish

Instructions:

In a glass jar, combine bourbon and cinnamon sticks. Cover. Infuse flavor for two days; remove cinnamon sticks and discard. Set aside. Lightly spray 10-12 shot glasses with nonstick oil. Wipe away excess. In a saucepan, combine apple cider and sugar. Sprinkle gelatin over top. Allow to sit for 3 minutes, or until surface has a wrinkled appearance. Warm mixture on medium heat until sugar and gelatin have dissolved, about 2 minutes. Mixture will be smooth. Stir in spiced bourbon. Pour into prepared shot glasses. Refrigerate until firm, about 4 hours. To finish, combine sugar and ground cinnamon. Transfer mixture to a plate. Rub the lemon wedge around the rim of the shot glass. Dip into the cinnamon sugar topping. Place shot glass on a tray. Repeat with remaining desserts. Keep refrigerated. To serve, add a dollop of whipped cream and a star anise. Serve chilled.

Fried Cinnamon Sugar Pears

What’s Cooking in Gail’s Kitchen? Here Come the Holidays: Fried Cinnamon Sugar Pears! Impulse buys. We all get lambasted as soon as we step through the automated doors of the supermarket. The colorful array of succulent fruit and glistening vegetables appear as lush as if they were grown in the Garden of Eden. Before you know it, the grocery cart is overflowing with a mountain of luxuriant produce. In your mind, you’re already forming mental images of gastronomic creations where you spin around the kitchen like Julia Child waving a wooden spoon in the air. That is until you get home. The fruit is ripening faster than you can say, “go bananas”. Now two weeks in, you’ve already exhausted several different ways of consuming that box of winter pears. Allow me to offer a quick ‘n easy side dish. It goes especially well with pork loin or spiral ham. I promise you, your family will be singing your praises from now on.

FRIED CINNAMON SUGAR PEARS

Ingredients:

6 Oregon pears, peeled, cored, and sliced

2-3 tablespoons butter

1/4 cup sugar

2 tablespoons brown sugar

1 teaspoon ground cinnamon

1/2 cup apple cider

1 tablespoon cornstarch

Fresh lemon thyme, for garnish

Instructions:

In an iron skillet over low heat, warm butter. Combine sugar, brown sugar, and ground cinnamon in a bowl. Mix well; set aside. In another bowl, whisk together apple cider and cornstarch. Set aside. Add sliced pears to melted butter. Coat well; increase heat to medium setting. Stir gently for about 3 minutes. Sprinkle sugar mixture over pears. Stir. Cook 8-10 minutes, stirring occasionally, until pears are fork tender. Pour apple cider liquid over pears, stirring constantly for 2 minutes longer. Remove iron skillet from heat. Allow fried pears to cool slightly and thicken. Ladle into small bowls. Serve warm.

Double Lemon Poppyseed Bread

What’s Cooking in Gail’s Kitchen? Here Come the Holidays: Double Lemon Poppyseed Bread! Everyone has their favorite flavors and foods that remind them of happier times. A good friend of mine recently lost her husband, after challenging years with a slow-progressing disease. When I stopped by to visit her with a gift of food, it created an unexpected see-saw of emotion. At first, she was happy and delighted because it brought back memories of early morning get-togethers for Bible study at a local coffee shop. We’d laugh, chat, share, or reflect on scripture over coffee and pastries before heading off to work. It was a wonderful way to begin the day, often shifting gears from a trying mindset to a positive outlook. The emotional see-saw tipped from high to low that day when she realized how uncertain her future has become in consequence of widowhood magnified by isolation during a pandemic. Let us strive to remember the Golden Rule: “In everything, do to others what you would have them do to you.”

DOUBLE LEMON POPPYSEED BREAD

Ingredients for Bread:

16.25-ounce box white cake mix

3.5-ounce vanilla flavored instant pudding, powdered

4 eggs, room temperature

1 tablespoon lemon juice, freshly squeezed

1/2 cup vegetable oil

1 cup hot water

1 tablespoon lemon citrus peel

2 tablespoons poppyseeds

Ingredients for Icing:

2 cups powdered sugar

1 tablespoon butter, softened

1 teaspoon lemon juice, freshly squeezed

1/2 teaspoon vanilla extract

2-4 tablespoons light cream, slightly warmed

Lemon zest, for garnish

White nonpareil sprinkles, for garnish

Instructions:

Preheat oven to 350°. Line two loaf pans with parchment paper. Set aside. In a large bowl, combine white cake mix, vanilla pudding mix, eggs, lemon juice, vegetable oil, and hot water. Beat on Low speed for 1 minute. Scrape down sides of bowl. Increase speed to Medium setting; beat 2 minutes longer. Fold in lemon citrus peel and poppyseeds. Pour batter into prepared loaf pans. Bake 35-40 minutes or until a cake tester comes out clean. Cool loaves in pans for 10 minutes before transferring to a wire rack. To glaze, combine powdered sugar, softened butter, lemon juice, and vanilla extract. Stir to blend. Slowly add the warmed cream, stirring constantly for a smooth consistency. Drizzle over Lemon Poppyseed Loaves. Garnish with lemon zest and nonpareil sprinkles.

Vanilla Bee Pollen Ice Cream

What’s Cooking in Gail’s Kitchen? Splurge-Worthy Goodness: Vanilla Bee Pollen Ice Cream! What’s all the “buzz” about? The jury is still out on the benefits of bee pollen. Some claim amazing health results while others blame it for side effects. Bee pollen is actually intensified plant pollen picked up by honeybees and brought back to the hive as a source of food for the colony. So obviously, its characteristics depend solely on the geographic location of where it is collected. Just like honey, some say if you struggle with seasonal allergies, the best way to combat that is to take a teaspoon of raw honey every day from the area where you live. Bee pollen is made up of carbs, fat, protein, vitamins, minerals, and antioxidants. You can certainly see why naturalists call it a superfood. As with any herbal supplement, contact your health care provider before beginning something new. Many foodies like to add a teaspoon of bee pollen to their morning smoothie. Here it is sprinkled over no-churn ice cream.

VANILLA BEE POLLEN ICE CREAM

Ingredients:

2 cups heavy cream

14-ounce can sweetened condensed milk

1 vanilla bean pod, sliced horizontally, seeds extracted

2 tablespoons raw honey

1 teaspoon bee pollen

Agave nectar, for drizzling

Lemon thyme, for garnish

Instructions:

Be sure the mixing bowl, whisk, and loaf pan are chilled before using. (I placed mine in the freezer overnight. If the ingredients are warm, the mixture won’t thicken to desired texture. I also put the can of sweetened condensed milk in the refrigerator the night before.) In the chilled bowl of the stand mixer, combine heavy cream, sweetened condensed milk, vanilla bean seeds, and raw honey. Whip on medium-high speed until soft peaks form, about 4-5 minutes. Transfer to the chilled loaf pan. Freeze 6 hours or overnight. To serve, place three rounded ice cream scoops in a dish. Sprinkle bee pollen over top. Drizzle with agave nectar ribbons. Garnish with a sprig of lemon thyme.

Limoncello Upside Down Cake

What’s Cooking in Gail’s Kitchen? Splurge-Worthy Goodness: Limoncello Upside Down Cake! I love everything lemon, so imagine my excitement at trying this exquisite dessert with limoncello lemon liqueur. Limoncello is produced mainly along Italy’s scenic Amalfi Coast. Every sip transports you to the rugged hillsides along the deep blue cerulean waters of the Mediterranean Sea. Imagine the lemon trees engorged with ripe fruit. You can almost smell the heady scent of natural citrus wafting from the arbors. Now that I have your complete and undivided attention, read on.

LIMONCELLO UPSIDE DOWN CAKE

Ingredients:

1/4 cup brown sugar

1/2 cup water

1/2 cup plus 3 tablespoons sugar, divided

6 thin lemon slices, seeds removed

3 tablespoons olive oil

Zest of 1/2 lemon

1 tablespoon lemon juice

1/4 teaspoon vanilla extract

1/8 teaspoon sea salt

1 egg, room temperature

2 tablespoons limoncello lemon liqueur

1/2 cup flour plus 2 tablespoons flour

2 tablespoons cornmeal

1/2 teaspoon baking powder

1/4 teaspoon baking soda

Powdered sugar, for dusting

Instructions:

Preheat oven to 350°. Spray ramekins with nonstick oil. Cut 6 parchment paper circles to fit ramekins. Place a circle in the bottom of each. Set aside. Bring brown sugar, 1/4 cup sugar, and water to a simmer in a saucepan. Cook until reduced and sugar has dissolved, about 5 minutes. Turn off heat. Submerge lemon slices in syrup. Let sit until rind and pith are translucent, 20-30 minutes. Using a hand mixer on medium speed, beat olive oil, lemon zest, lemon juice, vanilla extract, sea salt, egg, remaining sugar, and limoncello just until blended. Whisk together flour, cornmeal, baking powder, and baking soda in a bowl. Gradually add wet mixture, beating just until blended. Pour one tablespoon syrup from lemon slices into each ramekin. Using tongs, gently place a lemon slice in each ramekin. Reserve remaining syrup. Place ramekins on a baking sheet. Evenly divide batter between them. Bake 25 minutes, or until a cake tester comes out clean. Let cool on a rack for 10 minutes. Run a small knife around the cake before inverting onto a platter. Remove parchment paper circles. Brush with remaining syrup. Dust with powdered sugar.

Honey Grilled Carrots

What’s Cooking in Gail’s Kitchen? Uplifting Aromas: Honey Grilled Carrots! You know that slightly sweet and smoky flavor grilled foods release into our memory banks? Welcome another member to the weekend cookout. Move over, corn-on-the-cob, you might have competition with grilled carrots. The sweet juices, combined with a bit of honey, create a caramelized flavor that makes them a match worthy of any backyard barbecue on the horizon. So the next time you need another vegetable to be a star attraction, pick up a bag of carrots and watch them both disappear.

HONEY GRILLED CARROTS

Ingredients:

8 large carrots, tops removed

1 1/2 tablespoons olive oil

1 tablespoon natural honey

Juice from one lemon

1 teaspoon za’atar seasoning

Instructions:

Preheat the gas grill to 450°. Place carrots in a single layer in a microwave-safe dish. Microwave carrots for 2 minutes on High before grilling. Whisk together olive oil, natural honey, lemon juice, and za’atar seasoning. Pour over carrots. Marinate until grill comes to set temperature. Using a tongs, transfer carrots directly onto heated grates. Grill for 6 minutes, turning as needed to char the carrots.

Fire-Roasted Strawberries

What’s Cooking in Gail’s Kitchen? Uplifting Aromas: Fire-Roasted Strawberries! Try something different with those exceptionally large strawberries you couldn’t resist buying (or picking). You want to choose berries which are firm to the touch, have an appealing aroma, are bright red in color, and taste naturally sweet. Some may elect to use stainless steel skewers to keep the fruit from tipping over or simply to have the appearance of charred grill marks. Kabobs have a charming finish as well. They’re all Strawberrylicious!

FIRE-ROASTED STRAWBERRIES

Ingredients:

1 quart fresh strawberries, washed whole

1 tablespoon butter, unsalted

2 tablespoons lemon olive oil

1 tablespoon natural honey

1 tablespoon balsamic vinegar

Instructions:

Preheat a gas grill to 300°. Grease a grill pan with unsalted butter. Set aside. Arrange strawberries in a single layer of a baking dish. Whisk together lemon olive oil, natural honey, and balsamic vinegar. Brush onto strawberries, turning to coat. Transfer the strawberries to the prepared grill pan. Place the pan over the direct heat; close lid, and cook 5 minutes. Turn and repeat until the strawberries are bubbly and beginning to slump. Remove from grill and transfer strawberries to a serving platter.