Kalamata Olive Oregano Loaf

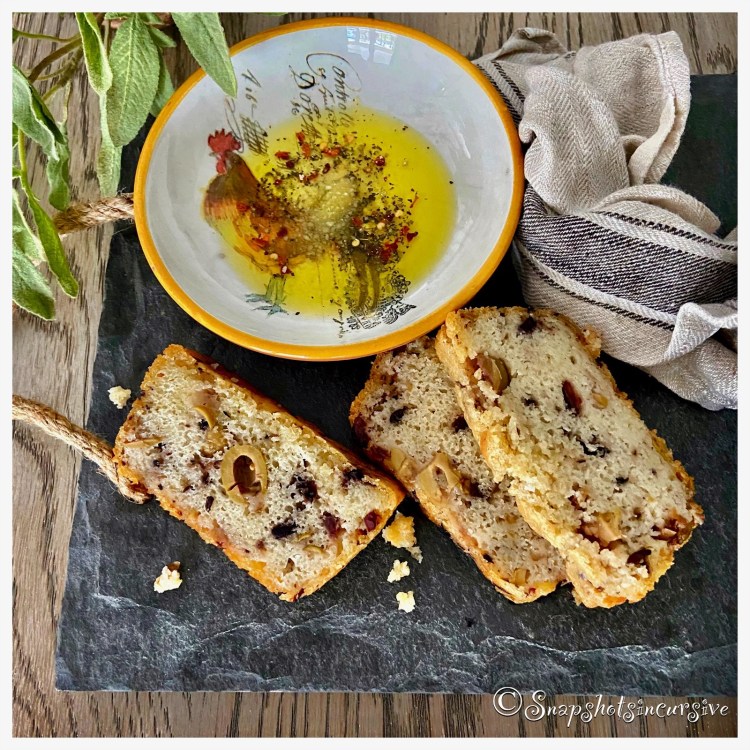
What’s Cooking in Gail’s Kitchen? Food With Soul: Kalamata Olive Oregano Loaf! Olive-Lovers rejoice. If olives are not in your wheelhouse, no worries. I’ll catch up with you later…….or you could simply substitute sun-dried tomatoes in this recipe. Just so you know, olives have heart-healthy fats. I’ve mentioned before how much I love bread. And in the World of Bread, there are so many options: whole wheat, multi-grain, sourdough, flax seed, rye, pumpernickel, focaccia, pretzel, and more. Focus today on the taste of Mediterranean culture where savory bread can be made without yeast. Talk about instant gratification for a weeknight treat. Don’t forget the bread dipping oil. It’s slurp-worthy.

KALAMATA OLIVE OREGANO LOAF

Ingredients:

2 cups flour

1 teaspoon baking soda

1/2 teaspoon sea salt

1 cup buttermilk

2 tablespoons butter, melted

2 egg whites, room temperature

1/4 cup Kalamata olive blend, pitted and chopped

1 teaspoon dried oregano

Instructions:

Preheat oven to 350°. Spray a loaf pan with nonstick oil. Line with parchment paper. Set aside. In a large bowl, combine flour, baking soda, and sea salt. Make a well in the center. In a separate bowl, whisk together buttermilk, melted butter, and egg whites. Add liquid mixture to the flour mixture, stirring just until moist. Fold in chopped olives and dried oregano. Spread batter into the prepared loaf pan. Bake for 45 minutes or until a wooden pick inserted in the center comes out clean. Cool 10 minutes on a wire rack. Remove loaf from pan. Serve slightly warm with seasoned olive oil.

Hard Salami Corkscrew Pasta

What’s Cooking in Gail’s Kitchen? Food With Soul: Hard Salami Corkscrew Pasta! Tricolor pasta always makes me feel like a special occasion. The burst of natural colors in spinach and tomato keep the dish from becoming humdrum, in my opinion. By adding veggies, cheese, or pickles, the salad becomes a meal-in-a-bowl. Mix things up by substituting artichokes, hard-boiled eggs, or cucumbers. It’s really up to your personal preference and cravings of the moment. Any leftovers can be stored in the refrigerator for up to five days. As if. (smile)

HARD SALAMI CORKSCREW PASTA

Ingredients for Pasta Salad:

1 1/2 cups rainbow rotini corkscrew pasta, uncooked

4 ounces hard salami, cut into strips

1/2 pint grape tomatoes, halved

1/4 cup green olives, halved

1/4 cup red onion, finely chopped

1/2 sweet bell pepper, chopped

Ingredients for Dressing:

3 tablespoons garlic wine vinegar

1/4 cup olive oil

1 tablespoon sugar

1/2 teaspoon sea salt

1/4 teaspoon black pepper

1/2 teaspoon oregano

1/2 teaspoon basil

1/2 teaspoon marjoram

1/4 teaspoon garlic powder

Instructions:

Cook pasta according to package directions. Drain. Rinse under cold water. In a serving bowl, combine cooked pasta, hard salami, grape tomatoes, green olives, red onion, and bell pepper. Gently toss. In a small bowl, whisk together garlic wine vinegar, olive oil, sugar, sea salt, black pepper, oregano, basil, marjoram, and garlic powder. Mix well. Pour the dressing over the pasta. Toss to coat. Refrigerate for one hour. Serve.

Garlic Wine Red Snapper

What’s Cooking in Gail’s Kitchen? Food With Soul: Garlic Wine Red Snapper! Before I begin, Rule Number One: When marinating fish, always refrigerate. As fish sits in a marinade at room temperature, it encourages bacteria growth, which can be a bad thing. The olive oil makes a wonderful tenderizer making the fish soft and juicy. When seasonings are added at the same time, the results elevate the flavor. By grilling the fish fillets at a high temperature, the meal transforms into perfection on a plate.

GARLIC WINE RED SNAPPER

Ingredients:

1/2 cup garlic wine vinegar

1/4 cup olive oil

2 6-ounce red snapper fillets

1/2 teaspoon Italian seasoning blend

1/8 teaspoon black pepper

Juice of fresh lemon

3 tablespoons butter, melted

Instructions:

Arrange the red snapper fillets in a shallow dish. Pour the garlic wine vinegar over the fish. Allow the vinegar to surround the fish. Pour olive oil over top. Sprinkle Italian seasoning blend and black pepper over all. Cover dish with plastic wrap and refrigerate for 30 minutes. Preheat the grill to 450°. Transfer red snapper directly onto the grill grates. Close lid. Set timer for 4 minutes. Discard marinade. Using a fish spatula, flip fish and grill 4 minutes longer with lid closed. Meanwhile, melt butter and pour into individual cups. Squeeze fresh lemon juice into warm butter. Remove red snapper fillets from grill. Serve with melted lemon butter poured over top.

Zucchini Meatball Bateaux

What’s Cooking in Gail’s Kitchen? Palatable Possibilities: Zucchini Meatball Bateaux! Call me “Fancy Shmancy” today since the title of this recipe makes it gourmet all-the-way. Bateaux means Boat. And in the world of food, nothing looks more like a boat than zucchini, especially when it’s sliced horizontally and scooped out. Amirite? Actually, I like this recipe because I always seem to have a bag of frozen Italian meatballs on hand in my freezer. Most days I make my own homemade marinara sauce because I like to stock my pantry with a variety of Italian Roma tomatoes that are imported from Italy. Obviously you can do the same. Recipes are designed to modify in ways that bring accolades to you for the extra effort. If time is of the essence, follow the instructions below. I promise you won’t be disappointed.

ZUCCHINI MEATBALL BATEAUX

Ingredients:

2 medium zucchini, sliced in half lengthwise

16 precooked frozen Italian meatballs, thawed

15-ounce jar prepared marinara sauce

1/2 cup mozzarella cheese, shredded

1/2 cup parmesan cheese, shredded

8 ounces fresh burrata cheese

1 tablespoon olive oil

1/4 teaspoon Italian herb blend

Fresh basil, for garnish

Instructions:

Preheat oven to 400°. Arrange sliced zucchini halves on a baking sheet that has been sprayed with nonstick oil. Scoop out the center of each zucchini, using a spoon, to remove seeds and create a well to hold the fillings. Spread a little marinara in each zucchini. Place 4 Italian meatballs in each. Divide the remaining marinara between them. Top with mozzarella and parmesan cheeses. Bake 20 minutes, or until cheese is melted and bubbly. Transfer zucchini boats to a platter. Place fresh basil leaves on each end. Divide the burrata into four sections and arrange dollops as desired. Drizzle each dollop with olive oil and sprinkle with Italian herbs. Serve immediately.

Yellow Squash Panko

What’s Cooking in Gail’s Kitchen? Palatable Possibilities: Yellow Squash Panko! Many of you already know this particular vegetable is a second cousin to zucchini. The skin is tender, glossy smooth, and edible which makes it a no-fuss dinner companion. Although its flavor is mild, when cooked it actually becomes buttery sweet with a slightly nutty nuance. Try to buy yellow squash that is 6”-8” in size. You’ll know because the larger it is, the more likely the skin will appear bumpy and less tender. You’ll also notice a lot of seeds, once you cut into it. By then you’ll need to rethink dinner and purée it for soup. Hindsight is 20/20 after all.

YELLOW SQUASH PANKO

Ingredients:

2 yellow squash

1-2 tablespoons olive oil, for sauté

Ingredients for Herbed Oil:

1 tablespoon lemon juice

1 tablespoon olive oil

1/8 teaspoon garlic powder

1 teaspoon dried parsley

1/4 teaspoon sea salt

1/8 teaspoon cracked black pepper

Ingredients for Crumb Topping:

1/4 cup panko bread crumbs

1/4 cup parmesan cheese, grated

1 teaspoon dried parsley

1/4 teaspoon sea salt

1/8 teaspoon red pepper flakes

Instructions:

Wash and pat dry yellow squash. Slice into 1/4” rounds; set aside. To make the herbed oil, whisk together lemon juice, olive oil, garlic powder, dried parsley, sea salt, and cracked black pepper. Set aside. To make the crumb topping, toss panko bread crumbs, grated parmesan cheese, dried parsley, sea salt, and red pepper flakes into a bowl. Mix well; set aside. To prepare yellow squash, warm olive oil in a large skillet over medium heat. Add the yellow squash and sauté for 8 minutes. Turn occasionally to cook both sides. Squash should be soft, but not mushy. Remove from heat. Drizzle herbed oil over yellow squash. Transfer to a platter. Top with panko crumb topping mixture. Garnish with fresh basil leaves, if desired. Serve immediately.

Teriyaki Chicken Bowl

What’s Cooking in Gail’s Kitchen? Palatable Possibilities: Teriyaki Chicken Bowl! Do-ahead meals take a little bit of planning, but the “devil is in the details”, they say. In this case it means, make sure the chicken breasts are thawed AND marinated 24 hours before you plan on serving them. I realize that requires the cook to be somewhat organized. Pantries don’t stock themselves. There’s nothing worse than trying to make a dish without all the ingredients. Take sesame oil, for example. I find it absolutely delicious because it adds an earthy nuttiness to Asian food. Vegetable oil tastes meh, in my opinion. Not only does it alter the taste, the texture will be different. When I can find it, I buy toasted sesame seeds so I don’t have to worry about toasting them on the stove or in the oven. That’s 10 minutes I could be planning tomorrow’s meal. Idiosyncratic, but true.

TERIYAKI CHICKEN BOWL

Ingredients:

2 chicken breasts, boneless and skinless

1/2 cup teriyaki sauce

2 tablespoons lemon juice

1 teaspoon fresh garlic, minced

1 teaspoon sesame oil

Green onion snips, for garnish

Toasted sesame seeds, for garnish

Instructions:

Place chicken breasts, teriyaki sauce, lemon juice, minced garlic, and sesame oil in a shallow dish. Baste chicken completely. Cover dish with plastic wrap. Refrigerate for 24 hours. When ready to cook, preheat grill to 450°. Lightly oil grill grate. Remove chicken breasts from marinade, place directly on grill, close lid, and cook for 5 minutes. Discard marinade. After 5 minutes, open lid, flip over chicken breasts, close lid, and cook 5 minutes longer, or until cooked through and no longer pink. Remove teriyaki chicken from grill and allow to rest for 5 minutes before serving. Garnish with green onion snips and toasted sesame seeds. Serve with sticky rice and mixed vegetables.

Swordfish On The Grill

What’s Cooking in Gail’s Kitchen? Palatable Possibilities: Swordfish on the Grill! Swordfish is called “Steak” for a reason. Forget fishy-tasting fish. (Say that 3 times really fast!) Swordfish, when grilled, looks more like a ribeye steak. It’s a dense, thick piece of fish. Now that doesn’t mean it is dry and tough. Actually the opposite is true. When you plan ahead and use a marinade, it becomes meaty and juicy, thereby satisfying both meat lovers and fish lovers. You can tell it is cooked because it actually changes color. One more thing, when setting the table…don’t forget the steak knife.

SWORDFISH ON THE GRILL

Ingredients:

4 6-ounce swordfish steaks

3 tablespoons olive oil

2 teaspoons soy sauce

1 tablespoon garlic red-wine vinegar

1 teaspoon dried rosemary

1 tablespoon minced garlic

2 teaspoons ground coriander

1 teaspoon ground cumin

2 teaspoons grated lemon rind

1/4 teaspoon red pepper flakes

Instructions:

Rinse swordfish; pat dry. Set aside. To make the marinade, combine olive oil, soy sauce, garlic red-wine vinegar, dried rosemary, minced garlic, ground coriander, ground cumin, grated lemon rind, and red pepper flakes. Whisk to blend. Place swordfish steaks in a single layer of a shallow dish. Pour marinade over all. Coat both sides of fish. Cover dish with plastic wrap and refrigerate for two hours. Remove dish from refrigerator and allow to come to room temperature while preheating the gas grill to 400°. Place swordfish steaks on the preheated grill. Close lid and cook for 5 minutes. Turn, close lid, and cook 5 minutes longer. Fish will be charred on the edges. Serve immediately.

Italian Sheet Pan Tilapia

What’s Cooking in Gail’s Kitchen? Palatable Possibilities: Italian Sheet Pan Tilapia! What’s for dinner? You gotta love a one-pan meal. It not only makes preparation and clean-up a breeze, it typically turns into a healthy option as well. Choose seafood, meat, or veggies and then customize the flavor with tangy spices, fresh herbs, and natural oils. Things honestly could not get any easier. You can even take things one step further and divide the pan to accommodate a spicier version on one end and something a little more bland on the other. No matter how you split things up, watch them disappear.

ITALIAN SHEET PAN TILAPIA

Ingredients:

1/4 cup unsalted butter, melted

1/2 teaspoon garlic powder

2 tablespoons lemon juice

1 teaspoon Italian seasoning mix

1 pound fresh asparagus, trimmed

1/4 cup olive oil, divided

1/2 teaspoon kosher salt

1/8 teaspoon black pepper

2 (6-ounce) tilapia fillets

2 Roma tomatoes, sliced and halved

Parsley, for garnish

Instructions:

Preheat oven to 425°. Spray a baking sheet with nonstick oil. Set aside. In a small bowl, whisk together melted butter, garlic powder, lemon juice, and Italian seasoning mix. Reserve 2 tablespoons and set aside. Place asparagus in a single layer on the left side of the prepared baking sheet. Drizzle with 2 tablespoons olive oil. Season with kosher salt and black pepper. Place Roma tomatoes in a single layer down the middle of the baking sheet. Drizzle with remaining olive oil, kosher salt, and black pepper. Arrange tilapia fillets in a single layer on the right side of the baking sheet. Drizzle with butter mixture. Bake 12-14 minutes, or until the fish flakes easily with a fork. Serve immediately with reserved butter mixture. Garnish with fresh parsley.

Haricot Vert Hot Off The Grill

What’s Cooking in Gail’s Kitchen? Palatable Possibilities: Haricot Vert Hot Off the Grill! I’m not trying to go all fancy shmancy with you. I just like the French language and use some terminology whenever I can. Cooking seems to be the logical place to do that. I bet you do, too. Ever hear the words aioli, béchamel sauce, baguette, charcuterie, julienne, pâté, roux, or soufflé? I’m sure you can come up with a few words yourself. We live in that kind of a world. Check out any list of restaurants in your area and you’ll see what I mean. Well, that being said, “haricot vert” translates into “green beans”. And this recipe may transport you to a place you’ve never been.

HARICOT VERT HOT OFF THE GRILL

Ingredients:

1 pound fresh green beans

1 tablespoon olive oil

1 tablespoon garlic herb seasoning

1 teaspoon sea salt

1 cup French fried onions, for garnish

Instructions:

Place a grill pan on the grill. Close the lid and preheat to 400°. Rinse the fresh green beans and pat dry. Trim the ends off the green beans and discard. In a large bowl, toss the green beans and olive oil. Sprinkle with garlic herb seasoning and sea salt. Gently toss. Using grill tongs, transfer the green beans to the grill pan. Close the grill cover and cook for 3 minutes. Open the lid, and toss the green beans. Cook 1-2 minutes longer. They should blister and slightly char. Transfer green beans to a serving dish and garnish with French fried onions before serving.