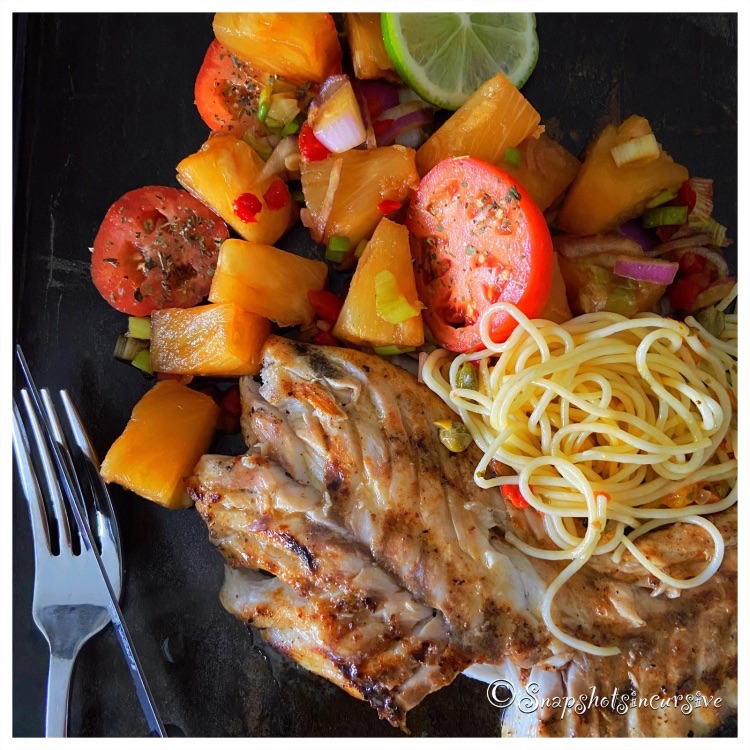
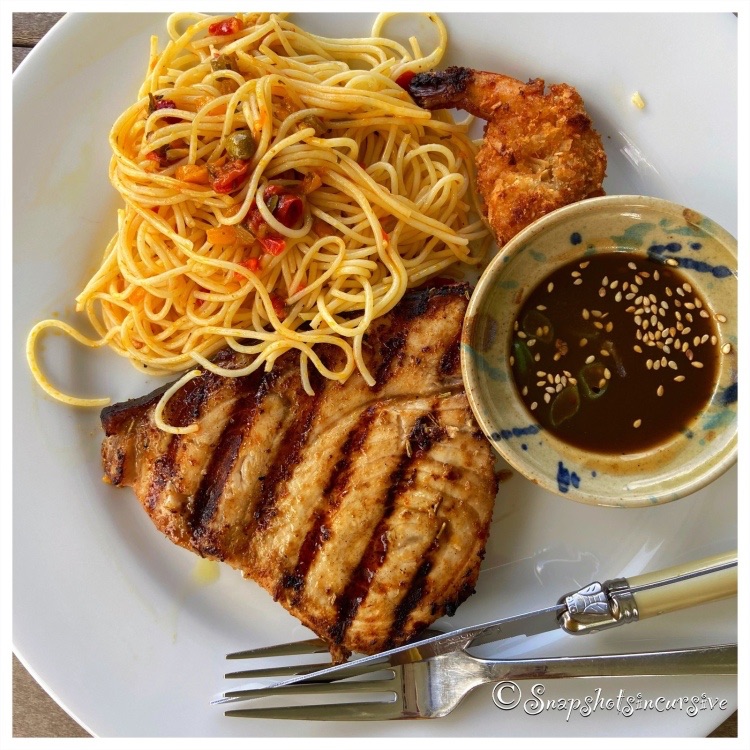
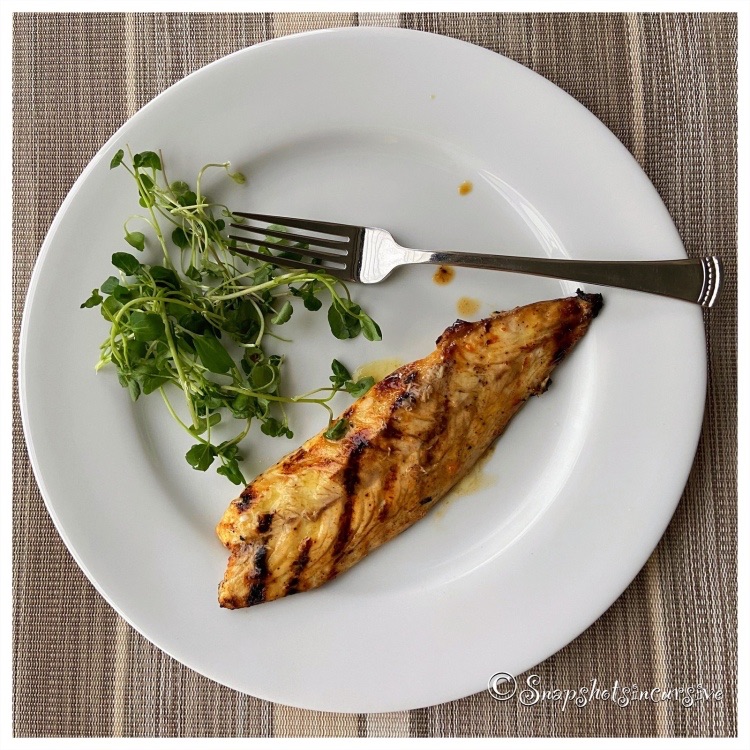
Yellow Squash Panko

What’s Cooking in Gail’s Kitchen? Palatable Possibilities: Yellow Squash Panko! Many of you already know this particular vegetable is a second cousin to zucchini. The skin is tender, glossy smooth, and edible which makes it a no-fuss dinner companion. Although its flavor is mild, when cooked it actually becomes buttery sweet with a slightly nutty nuance. Try to buy yellow squash that is 6”-8” in size. You’ll know because the larger it is, the more likely the skin will appear bumpy and less tender. You’ll also notice a lot of seeds, once you cut into it. By then you’ll need to rethink dinner and purée it for soup. Hindsight is 20/20 after all.

YELLOW SQUASH PANKO

Ingredients:

2 yellow squash

1-2 tablespoons olive oil, for sauté

Ingredients for Herbed Oil:

1 tablespoon lemon juice

1 tablespoon olive oil

1/8 teaspoon garlic powder

1 teaspoon dried parsley

1/4 teaspoon sea salt

1/8 teaspoon cracked black pepper

Ingredients for Crumb Topping:

1/4 cup panko bread crumbs

1/4 cup parmesan cheese, grated

1 teaspoon dried parsley

1/4 teaspoon sea salt

1/8 teaspoon red pepper flakes

Instructions:

Wash and pat dry yellow squash. Slice into 1/4” rounds; set aside. To make the herbed oil, whisk together lemon juice, olive oil, garlic powder, dried parsley, sea salt, and cracked black pepper. Set aside. To make the crumb topping, toss panko bread crumbs, grated parmesan cheese, dried parsley, sea salt, and red pepper flakes into a bowl. Mix well; set aside. To prepare yellow squash, warm olive oil in a large skillet over medium heat. Add the yellow squash and sauté for 8 minutes. Turn occasionally to cook both sides. Squash should be soft, but not mushy. Remove from heat. Drizzle herbed oil over yellow squash. Transfer to a platter. Top with panko crumb topping mixture. Garnish with fresh basil leaves, if desired. Serve immediately.

Swordfish on the Grill

What’s Cooking in Gail’s Kitchen? Palatable Possibilities: Swordfish on the Grill! Swordfish is called “Steak” for a reason. Forget fishy-tasting fish. (Say that 3 times really fast!) Swordfish, when grilled, looks more like a ribeye steak. It’s a dense, thick piece of fish. Now that doesn’t mean it is dry and tough. Actually the opposite is true. When you plan ahead and use a marinade, it becomes meaty and juicy, thereby satisfying both meat lovers and fish lovers. You can tell it is cooked because it actually changes color. One more thing, when setting the table…don’t forget the steak knife.

SWORDFISH ON THE GRILL

Ingredients:

4 6-ounce swordfish steaks

3 tablespoons olive oil

2 teaspoons soy sauce

1 tablespoon garlic red-wine vinegar

1 teaspoon dried rosemary

1 tablespoon minced garlic

2 teaspoons ground coriander

1 teaspoon ground cumin

2 teaspoons grated lemon rind

1/4 teaspoon red pepper flakes

Instructions:

Rinse swordfish; pat dry. Set aside. To make the marinade, combine olive oil, soy sauce, garlic red-wine vinegar, dried rosemary, minced garlic, ground coriander, ground cumin, grated lemon rind, and red pepper flakes. Whisk to blend. Place swordfish steaks in a single layer of a shallow dish. Pour marinade over all. Coat both sides of fish. Cover dish with plastic wrap and refrigerate for two hours. Remove dish from refrigerator and allow to come to room temperature while preheating the gas grill to 400°. Place swordfish steaks on the preheated grill. Close lid and cook for 5 minutes. Turn, close lid, and cook 5 minutes longer. Fish will be charred on the edges. Serve immediately.

Italian Sheet Pan Tilapia

What’s Cooking in Gail’s Kitchen? Palatable Possibilities: Italian Sheet Pan Tilapia! What’s for dinner? You gotta love a one-pan meal. It not only makes preparation and clean-up a breeze, it typically turns into a healthy option as well. Choose seafood, meat, or veggies and then customize the flavor with tangy spices, fresh herbs, and natural oils. Things honestly could not get any easier. You can even take things one step further and divide the pan to accommodate a spicier version on one end and something a little more bland on the other. No matter how you split things up, watch them disappear.

ITALIAN SHEET PAN TILAPIA

Ingredients:

1/4 cup unsalted butter, melted

1/2 teaspoon garlic powder

2 tablespoons lemon juice

1 teaspoon Italian seasoning mix

1 pound fresh asparagus, trimmed

1/4 cup olive oil, divided

1/2 teaspoon kosher salt

1/8 teaspoon black pepper

2 (6-ounce) tilapia fillets

2 Roma tomatoes, sliced and halved

Parsley, for garnish

Instructions:

Preheat oven to 425°. Spray a baking sheet with nonstick oil. Set aside. In a small bowl, whisk together melted butter, garlic powder, lemon juice, and Italian seasoning mix. Reserve 2 tablespoons and set aside. Place asparagus in a single layer on the left side of the prepared baking sheet. Drizzle with 2 tablespoons olive oil. Season with kosher salt and black pepper. Place Roma tomatoes in a single layer down the middle of the baking sheet. Drizzle with remaining olive oil, kosher salt, and black pepper. Arrange tilapia fillets in a single layer on the right side of the baking sheet. Drizzle with butter mixture. Bake 12-14 minutes, or until the fish flakes easily with a fork. Serve immediately with reserved butter mixture. Garnish with fresh parsley.

Easy Red Snapper and Tomatoes

What’s Cooking in Gail’s Kitchen? Palatable Possibilities: Easy Red Snapper and Tomatoes! When I was a kid, I couldn’t stand the “fishy” taste of Midwestern fish fillets. The fact that I practically choked on a bone really didn’t make it enjoyable either. But fast forward to the fresh catch from the salty waters of the Gulf of Mexico. Red snapper is quite delicious, I must say. Because they thrive on mostly shrimp and crab, it intensifies their flavor, making red snapper mild and slightly sweet. The local fishermen have me spoiled, especially Dilly’s Fish Company. They catch the fish, transfer it on ice to a central location, clean it, debone it, remove the scales, fins, and head. Then they fillet the fish, package it, and identify it, since I’m usually buying more than one variety. Fish is sold by weight as caught out of the water. Once I know what I want, I simply need to decide how I’m going to cook it. As you can guess….for me that’s the best part….until I eat it.

EASY RED SNAPPER AND TOMATOES

Ingredients:

1 pound red snapper fillets, fresh

3-4 tablespoons olive oil

1 teaspoon sea salt

1 teaspoon Italian seasoning

1/8 teaspoon garlic powder

1/8 teaspoon black pepper

2 Roma tomatoes, quartered

Instructions:

Wash red snapper fillets and pat dry. Line a grill pan with aluminum foil. Spray with nonstick oil. In a small bowl, combine olive oil, sea salt, Italian seasoning, garlic powder, and black pepper. Brush both sides of red snapper with mixture. Transfer fish to the grill pan. Arrange quartered tomatoes around fish. Drizzle remaining olive oil mixture over tomatoes. Preheat gas grill to medium-high heat, approximately 450°. Cook fish dinner for 4 minutes with the lid closed. Then carefully flip fish, close lid, and cook 4 minutes longer. Remove and serve immediately.

Drawn Butter Fish Favorite

What’s Cooking in Gail’s Kitchen? Palatable Possibilities: Drawn Butter Fish Favorite! Keeping it simple with a fresh catch is probably my favorite way of serving fish. Now that I’ve connected with a local fisherman, it practically feels like a luxury to plan evening meals. The marinade couldn’t get any easier; a couple of key ingredients do the trick. After all, the star attraction is the warm melted butter. You’ve heard me rave about the French sea salt butter we order once a year. It is ah-mazing. Serve dinner with fresh veggies from the produce bin and you’ll be smiling all through the meal.

DRAWN BUTTER FISH FAVORITE

Ingredients:

1 pound Almaco Jack fish fillets

1-2 tablespoons garlic wine vinegar

1-2 tablespoons olive oil

2 cloves garlic, minced

2 tablespoons sea salt butter

Juice of one Lemon

Instructions:

Rinse fish fillets and pat dry. In a shallow dish, combine garlic wine vinegar, olive oil, and minced garlic. Brush both sides of the fish fillets with marinade. Place fillets in the shallow dish, cover with plastic wrap, and refrigerate for one hour. To cook, warm butter in an iron skillet over medium-high heat. Add the fish fillets, cover, and cook for 4 minutes without turning. Flip and cook 4 minutes longer or until fish is crispy. Transfer fillets to a plate, drizzle with a squeeze of fresh lemon juice. Spoon drawn butter over all. Serve immediately.

Zesty Butter-Baked Crackers

What’s Cooking in Gail’s Kitchen? Bright Ideas: Zesty Butter-Baked Crackers! When you are looking for a crunchy snack and really have no interest in leaving the house, fancy crackers satisfy. More than likely, you have all the ingredients on hand. I think you’ll be surprised. In a few minutes, the kitchen will draw curiosity-seekers who put down their electronic devices to see what smells so good. Then go one step further, serve them with a slather of cream cheese, cocktail sauce, and baby shrimp. It can transform these buttery snacks into a culinary appetizer your family will remember. Better make more and hide them in the freezer.

ZESTY BUTTER-BAKED CRACKERS

Ingredients:

1/4 cup butter

1/4 cup olive oil

1 teaspoon onion powder

1 teaspoon red pepper flakes

1/2 teaspoon garlic powder

1/2 teaspoon seasoned salt

1/4 teaspoon cayenne pepper

1/4 teaspoon dill weed

1 sleeve saltine crackers

Instructions:

Preheat oven to 325°. Lightly mist a baking sheet with nonstick oil. Set aside. In a microwave-safe bowl, warm butter on Low setting for 20 seconds. Add olive oil, onion powder, red pepper flakes, garlic powder, seasoned salt, cayenne pepper, and dill weed. Stir to mix thoroughly. Take one cracker at a time, dip into the butter mixture to coat both sides, and place it on the baking sheet. Repeat until all crackers and butter are used. Arrange the crackers in a single layer by rows. Bake 10 minutes; turn over and bake 10 minutes longer. Watch carefully to avoid burning. Allow to cool before storing in an airtight container.

White Chicken Flatbread

What’s Cooking in Gail’s Kitchen? Bright Ideas: White Chicken Flatbread! Nowadays I look for any excuse to have pizza, or a close second. All I have to do is go to my freezer to decide what ingredients to use. In there is often naan flatbread, precooked grilled chicken strips, and previously oven-baked bacon. In lieu of marinara sauce, creamy ranch dressing makes a tasty sauce. People know cheese is always my friend, along with fresh veggies, herbs, and spices. Throw it all together and boom; 20 minutes later it’s ready to eat. I think I deserve a star for that.

WHITE CHICKEN FLATBREAD

Ingredients:

1 Naan flatbread

1 tablespoon olive oil

1 tablespoon cornmeal

1/2 cup prepared ranch dressing

4 ounces fresh mozzarella, sliced

1 cup precooked, grilled chicken chunks

1/4 cup precooked bacon, crumbled

2 tablespoons sweet onions, chopped

1/8 teaspoon red pepper flakes

1/2 teaspoon Italian seasoning

4 ounces mozzarella cheese, shredded

Instructions:

Preheat oven to 400°. Brush the bottom side of the naan flatbread with olive oil; dust with cornmeal. Transfer to a pizza stone. Bake 5 minutes. Remove from oven and assemble the ingredients. Spread the ranch dressing onto the top crust. Layer, in order, the fresh mozzarella slices, grilled chicken chunks, bacon crumbles, and sweet onions. Sprinkle with red pepper flakes and Italian seasoning. Top with shredded mozzarella cheese. Bake 10-15 minutes, or until cheese is melted and golden. Serve immediately.

Xtra Cheesy White Flatbread

What’s Cooking in Gail’s Kitchen? Time To Eat: Xtra Cheesy White Flatbread! Know what’s better than chewy pizza-like dough? Chewy pizza-like dough slathered in a mountain of cheese that turns gooey after it’s baked! Honestly, cheese can become addictive. I’ve (finally) broken my cravings for added salt by no longer reaching for the salt shaker at the kitchen table. But, cheese. Now, that’s another story. I’m crazy for extra sharp Cheddar, creamy Brie, pungent Bleu, nutty Jarlsberg, smoky Gouda, and the list goes on.

XTRA CHEESY WHITE FLATBREAD

Ingredients:

1 prepared flatbread

1 tablespoon olive oil

1 tablespoon cornmeal

1/8 teaspoon garlic powder

1/4 teaspoon sea salt

6 ounces fresh mozzarella cheese, sliced

4 ounces parmesan cheese, grated

4 ounces gorgonzola cheese, crumbled

Red pepper flakes and dried oregano, for garnish

Instructions:

Preheat the oven to 400°. Rub the bottom of the flatbread with olive oil; sprinkle with cornmeal, garlic powder, and sea salt. Place seasoned side down on a baking sheet. Bake 5 minutes; remove from oven. Cover the top side with fresh mozzarella cheese slices, grated parmesan cheese, and gorgonzola cheese crumbles. Bake 10 minutes longer, or until the cheese is completely melted, bubbly, and golden brown. Cool slightly before cutting into pieces.

Orecchiette Pea Asparagus

What’s Cooking in Gail’s Kitchen? Time To Eat: Orecchiette Pea Asparagus! Are you in a pasta rut? Do you always turn to spaghetti, rotini, ziti, or lasagna? Think outside the box with orecchiette pasta to add elegance and variety to ordinary meal-planning. It’s been nicknamed “little ears” for its unusual swirly shape. See how amusing that is already? Because the thicker pasta pairs better with earthy vegetables, its texture holds sauces and cheeses remarkably well. Turn mealtime into downtime any day of the week.

ORECCHIETTE PEA ASPARAGUS

Ingredients:

4 ounces orecchiette pasta

1 tablespoon olive oil

1/4 pound fresh asparagus, trimmed and cut into bite-sized pieces

1/4 cup baby peas, fresh or frozen

1 tablespoon lemon juice

1/4 cup Parmesan cheese, freshly grated

Instructions:

Bring a large pot of water to boiling. Add orecchiette pasta and cook according to package directions. In a large skillet, add olive oil. Sauté asparagus and baby peas until bright green, slightly cooked, and still crisp. Remove skillet from heat. Once the pasta is al dente, reserve 1/4 cup pasta water and drain the rest. Add the pasta to the skillet with the asparagus and peas. Add lemon juice and parmesan cheese. Return the skillet to the stove and heat on low setting. Stir to combine everything, adding pasta water to thin, as needed. Serve immediately.