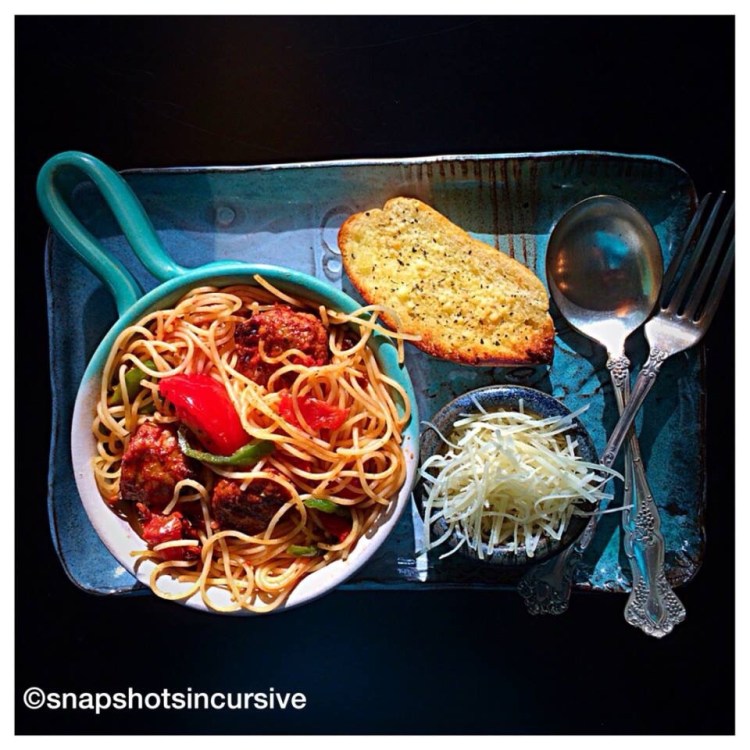
Watercress Bacon Dinner Salad

What’s Cooking in Gail’s Kitchen? Watercress Bacon Dinner Salad! If you like salad, you will find yourself saying, “OMG, I want a second helping!”  My husband and I can literally eat this dinner salad until we think we will burst! And then we’ll have one bite more! (P.S. Spring is the best time of year to pick up watercress at the Farmer’s Market.)

WATERCRESS BACON DINNER SALAD

Ingredients:

3 Eggs

7 slices Bacon

1 Vidalia Onion, Small

1 cup sliced Mushrooms

10 ounce package Grape Tomatoes

6 ounces Watercress

1 heart of Romaine Lettuce

1 cup seasoned croutons

1/2 cup Parmesan cheese

5 Tablespoons Reserved Bacon Grease (*or substitute with olive oil)

3 Tablespoons Garlic Wine Vinegar

2 teaspoons Honey

1/2 teaspoon Dijon Mustard

Instructions:

Cook eggs: cover with water, bring to a boil, then turn off heat and allow to sit in water for 20 minutes. Drain off water and add ice on top of eggs. Fry bacon until crisp. Drain on a paper towel. Remove 5 tablespoons grease and set aside. Use 2 tablespoons of grease in a separate skillet over medium heat. Slice thin the Vidalia onion, then add to skillet. Cook slowly until onions are caramelized and reduced. Remove to a plate and set aside. Add mushrooms to the same skillet. Cook slowly until caramelized and brown. Remove to a plate and set aside. Cut bacon into pieces. Peel and slice eggs. Mix romaine and watercress in a large bowl. Arrange onions, mushrooms, tomatoes, and bacon on top. 

Hot Bacon Dressing: Add 3 tablespoons bacon grease, vinegar, honey, and Dijon to a small saucepan or skillet over medium-low heat. Whisk mixture together and heat thoroughly.

Pour hot dressing over the salad; toss to combine. Arrange eggs over the top, add croutons, sprinkle on grated Parmesan cheese, and Voilà! Dinner is served!

Eggplant Parmesan

What’s Cooking in Gail’s Kitchen?  Eggplant Parmesan!  This incredible dish is the perfect substitute for lasagna.  It is hearty and filling without all the pasta.  If you’ve never cooked with eggplant before, pay attention to a little hint. This healthy vegetable can absorb moisture and oil like a sponge, so it requires advance preparation before baking. Slice the raw eggplant (skin on), place on several layers of paper towels, and salt it. The salt will draw moisture out. This takes about 2 hours. First problem solved. The second, instead of frying it in oil, bake the slices in a single layer before assembling into a casserole. 

EGGPLANT PARMESAN 

Ingredients:

1 Eggplant

1/2 teaspoon kosher salt

Extra Virgin Olive Oil

1 pound Fresh Mozzarella 

1/4 cup shaved Parmesan Cheese

Breading:

3/4 cup Italian seasoned breadcrumbs

1 teaspoon Herbs de Provence

1/4 cup grated Parmesan cheese

1/3 cup flour

2 eggs, beaten

1 tablespoon milk

Sauce:

1 tablespoon olive oil

1 garlic clove, minced

28 oz. can whole peeled tomatoes, diced and reserve juices

1 teaspoon sugar (optional)

1/2 teaspoon oregano 

1/2 teaspoon marjoram 

1/4 cup fresh basil

Instructions:

While eggplant is “resting”, make the sauce. Heat 1 tbsp. olive oil on medium heat. Add the minced garlic and gently cook for 1 minute until fragrant. Add the tomatoes and their juices, sugar, marjoram, and oregano. Increase heat to simmer for 15 minutes, uncovered. Add the minced basil and remove from heat. 

Combine the breading dry ingredients. Set aside. In a shallow bowl, mix the beaten eggs and milk.  Preheat the oven to 400°. Spray the bottom of a rimmed baking sheet pan with non-stick oil. Pat dry each eggplant slice. Dip in egg mixture, then dredge in breadcrumb mixture. Place on prepared sheet pan, single layer. Drizzle a little olive oil over the top of each eggplant round. Place the breaded eggplant slices in oven. Bake 10 minutes per side. They should be lightly browned. Let cool slightly. Remove from oven and reduce oven temperature to 350°. In a casserole dish spread 1/2 the tomato sauce over the bottom. Divide the eggplant in order to layer the rounds with mozzarella on top of each layer.  Top with remaining sauce and shaved Parmesan cheese. Bake uncovered for 35 minutes. Remove from oven and let sit for 10 minutes before cutting to serve. 

Honeycomb & Cheese

What’s Cooking in Gail’s Kitchen? A Symphony of Flavors: Honeycomb & Cheese! Raw honeycomb is such an elegant centerpiece for charcuterie boards and grazing stations at your next home entertainment gathering. It’s also a unique conversation-starter. Did you know it can take bees anywhere from one week to several months to build a full honeycomb? It all depends on the availability of natural nectar, the bee population, and how far the bees will fly to collect food. Now you, too, can get “busy as a bee” planning your next get together. 

HONEYCOMB & CHEESE

Ingredients:

8-ounce wedge of parmesan cheese

5.6-ounce block of raw acacia honeycomb 

Sprig of fresh thyme

Instructions:

Arrange a wedge of parmesan cheese on a marble serving plate. Break off a few bite-size pieces in chunks. Place a hunk of raw acacia honeycomb nearby with the hexagonal cells visible for appealing presentation. Garnish with a sprig of fresh thyme. The beeswax and natural honey are lightly sweet with subtle hints of vanilla. The honeycomb wax is completely edible, for those who wonder. Serve with warm bread, fresh fruit, assorted nuts, and cured meats. 

Grill Pan Supreme Pizza

What’s Cooking in Gail’s Kitchen? A Symphony of Flavors: Grill Pan Supreme Pizza! Who doesn’t like the taste of grilled foods? You know, that tiny bit of charred smokiness that delivers a presentation of black lines on pizza crust, vegetables, and meat. The raised edges keep food from sitting in fats or unnecessary grease, making it somewhat more healthy. The grill pan actually mimics cooking outdoors on a gas grill, without all the hassle, especially if it’s raining or snowing. Clean up is pretty simple, too. It gets my vote all day long. 

GRILL PAN SUPREME PIZZA

Ingredients:

1 prepared pizza crust, room temperature 

1 cup pizza sauce

8 slices pepperoni 

2 slices bacon, cooked and crumbled

2 slices deli ham, chopped

1/4 cup onion, chopped

1/4 cup green pepper, chopped

1/2 cup pizza sauce

1/2 cup fresh mozzarella, sliced

Giardiniera, for topping

Red pepper flakes, for garnish

Parmesan cheese, grated

Instructions:

Preheat the grill pan on medium-high heat for 5 minutes. Using a silicone brush, oil the pan to prevent sticking. Grill one side of the dough until bubbles begin to form on the top. Lift the edge to check for charred grill lines on the dough. Carefully, flip over and arrange toppings. Add pizza sauce and fresh mozzarella. Place the whole grill pan in a preheated 400° oven. Bake 5-7 minutes, or until cheese is melted. Remove and serve with giardiniera, red pepper flakes, and grated parmesan cheese. Enjoy!

Artichoke Garlic Parm Dip

What’s Cooking in Gail’s Kitchen? A Symphony of Flavors: Artichoke Garlic Parm Dip! Life Lesson—-Never go to a social event hungry. It’s probably not a good idea to starve yourself all day with words like, “Since I’m eating later, I’ll skip breakfast or lunch.” The best intentions fly out the window when you discover how the hostess has perfected stationed food to look irresistible and amazing. It’s no accident the food and beverage areas become the focal point. That’s kinda the idea. My suggestion? Do as the French do. Graze. Anything more than 3 bites of one item can lead to overindulgence. 

ARTICHOKE GARLIC PARM DIP

Ingredients:

1 cup mayonnaise 

1 cup parmesan cheese, grated

1/4 teaspoon garlic powder

14-ounce can marinated artichoke hearts, drained and chopped

Parsley, for garnish 

Garlic bagel chips

Rosemary olive oil crackers

Instructions:

Preheat oven to 350°. Spray a baking dish with nonstick oil. Set aside. Combine mayonnaise, parmesan cheese, and garlic powder in a bowl. Fold in the chopped artichoke hearts. Mix well. Spread into the prepared baking dish. Bake 20 minutes, or until bubbly and golden brown. Serve warm with garlic bagel chips and rosemary olive oil crackers. 

Jalapeño Crisps and Curls

What’s Cooking in Gail’s Kitchen? Uplifting Aromas: Jalapeño Crisps and Curls! I’m a pepper freak. I like habaneros, serrano, poblanos, jalapeños, chipotle, cayenne, banana peppers, and more. I’m not saying I want to burn the roof of my mouth, but I do appreciate the capsaicin-released adrenaline rush from time to time. I might even sneeze if I get a little too ambitious. The tangy flavor of chile peppers seem to be a natural substitute for using table salt, which I make an effort to limit in the daily diet. In case you’re wondering, if a hot pepper becomes too hot for you, reach for cheese instead of water. Cheese and dairy products actually neutralize the intensity and cool things down a bit. Then let the tug-of-war continue, because you know you want more. 

JALAPEÑO CRISPS AND CURLS 

Ingredients:

8 ounces sharp cheddar cheese, finely shredded 

1/4 cup parmesan cheese, grated

1 smidgen garlic powder 

1/4 teaspoon tajin seasoning 

1/4 teaspoon red pepper flakes 

1 jalapeño pepper, seeded and chopped 

Instructions:

In a bowl, combine parmesan cheese, garlic powder, tajin seasoning, and red pepper flakes. Toss to mix; set aside. Trim a piece of parchment paper to fit a microwave-safe plate. Scoop 1-2 tablespoons of sharp cheddar cheese onto the parchment paper, forming a pile. Sprinkle parmesan cheese mixture on top. Arrange jalapeño pieces on each pile. Microwave for 1 minute on High power. If needed, microwave an additional 30 seconds longer until the cheese is crisp and golden. Remove plate from microwave and allow cheese crisp to cool to the touch. Carefully transfer cheese crisps to a wire rack. For curls, quickly wrap a cheese crisp around the handle of a wooden spoon until molded. Reuse parchment paper. Repeat process until all the cheese ingredients are used. Store at room temperature. 

Cucumber Cylinder Salad

What’s Cooking in Gail’s Kitchen? Uplifting Aromas: Cucumber Cylinder Salad! How do you turn a salad from Humdrum to Aha? Keep it interesting and appealing to the eye. Or, if you’re like me…..think portion control. My husband tells me all the time I cannot keep a salad small. If I begin with a larger bowl (so he can toss the ingredients once the dressing is applied), I inevitably add more “stuff” and end up with the same results: too much salad for the size of the bowl. Now I have the solution. The cucumber cylinder becomes the bowl, so to speak. Problem solved. I guess living with an engineer has its benefits. 

CUCUMBER CYLINDER SALAD

Ingredients:

1 English cucumber

1 cup shredded lettuce

6 cherry tomatoes, cut in half

1 slice of red onion, chopped 

1/4 cup parmesan cheese, hand grated

Pinch Italian herbs

Instructions:

Using a sharp knife, cut along the length of the cucumber using the middle elongated slices. Chop the reserved outer sections to add as filling on the salad. Place each elongated slice upright onto a salad plate; secure with a decorative pick. Fill each cylinder with shredded lettuce. Arrange cherry tomato halves and red onion pieces. Top with roughly grated parmesan cheese. Sprinkle with Italian seasonings. Serve with your choice of salad dressings. 

Dutch Baby Buttery Potatoes

What’s Cooking in Gail’s Kitchen? Food With Soul: Dutch Baby Buttery Potatoes! These naturally buttery potatoes have a silky skin that can be eaten when baked. The creamy yellow flesh has a slightly nutty flavor that will give you reason enough to make an entire meal out of these gourmet nuggets. In fact, the aroma was so enticing, my husband and I did that exact thing. You see, once you’re an adult, you can make up any rule you want when it comes to meal-planning.

DUTCH BABY BUTTERY POTATOES

Ingredients:

24-ounce bag of Dutch Baby Yellow Potatoes

4 tablespoons butter, melted

1/4 teaspoon garlic powder

1 teaspoon parsley flakes

1 teaspoon dried oregano

1 teaspoon kosher salt

1/2 cup parmesan cheese, grated

Green onion snips, for garnish

Instructions:

Preheat oven to 400°. Boil whole potatoes on the stove in a pan of salted water for 15 minutes. Drain and allow potatoes to cool enough to handle. In a glass baking dish, combine melted butter, garlic powder, parsley flakes, dried oregano, kosher salt, and parmesan cheese. Cut boiled potatoes in half lengthwise. Arrange in a single layer. Using a pastry brush, cover the potatoes with the herbed butter and cheese mixture. Bake, uncovered, for 20 minutes until potato bottoms are crispy. Serve immediately.

Yellow Squash Panko

What’s Cooking in Gail’s Kitchen? Palatable Possibilities: Yellow Squash Panko! Many of you already know this particular vegetable is a second cousin to zucchini. The skin is tender, glossy smooth, and edible which makes it a no-fuss dinner companion. Although its flavor is mild, when cooked it actually becomes buttery sweet with a slightly nutty nuance. Try to buy yellow squash that is 6”-8” in size. You’ll know because the larger it is, the more likely the skin will appear bumpy and less tender. You’ll also notice a lot of seeds, once you cut into it. By then you’ll need to rethink dinner and purée it for soup. Hindsight is 20/20 after all.

YELLOW SQUASH PANKO

Ingredients:

2 yellow squash

1-2 tablespoons olive oil, for sauté

Ingredients for Herbed Oil:

1 tablespoon lemon juice

1 tablespoon olive oil

1/8 teaspoon garlic powder

1 teaspoon dried parsley

1/4 teaspoon sea salt

1/8 teaspoon cracked black pepper

Ingredients for Crumb Topping:

1/4 cup panko bread crumbs

1/4 cup parmesan cheese, grated

1 teaspoon dried parsley

1/4 teaspoon sea salt

1/8 teaspoon red pepper flakes

Instructions:

Wash and pat dry yellow squash. Slice into 1/4” rounds; set aside. To make the herbed oil, whisk together lemon juice, olive oil, garlic powder, dried parsley, sea salt, and cracked black pepper. Set aside. To make the crumb topping, toss panko bread crumbs, grated parmesan cheese, dried parsley, sea salt, and red pepper flakes into a bowl. Mix well; set aside. To prepare yellow squash, warm olive oil in a large skillet over medium heat. Add the yellow squash and sauté for 8 minutes. Turn occasionally to cook both sides. Squash should be soft, but not mushy. Remove from heat. Drizzle herbed oil over yellow squash. Transfer to a platter. Top with panko crumb topping mixture. Garnish with fresh basil leaves, if desired. Serve immediately.