Wild Chilean Shrimp Stuffing

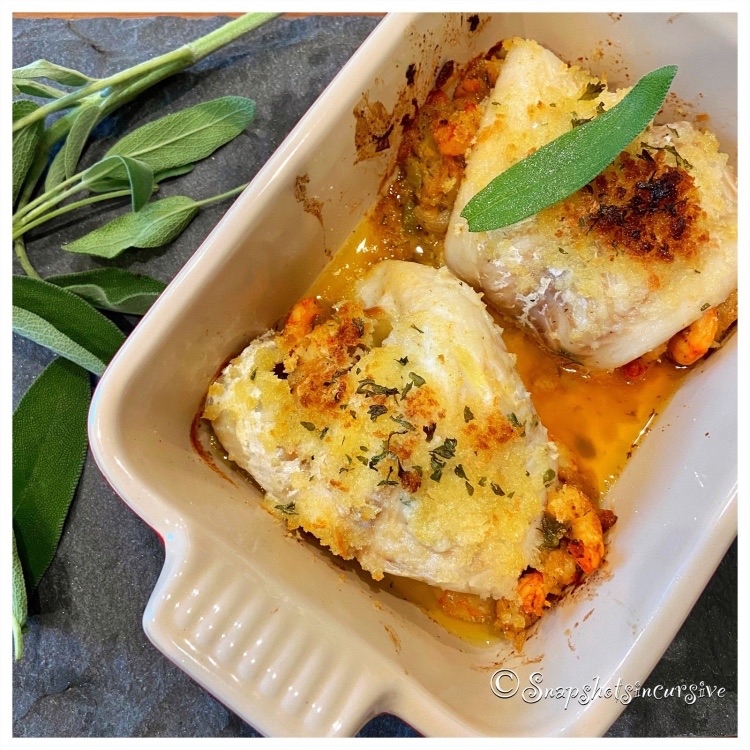
What’s Cooking in Gail’s Kitchen? Graze or Gobble: Wild Chilean Shrimp Stuffing! You’re probably wondering what is so special about Wild Chilean Shrimp. First of all, it is a cold water shrimp, rich in nutrients, caught wild along a small band of Chile. These shrimp contain no additives, making them a simple sustainable seafood option. The quality tastes better knowing each shrimp is hand peeled. The difference, you wonder? Here again the sweet briny flavor of the sea comes out in every bite. As the shrimp is cooked, it retains its flavor, color, and texture. With any product, tasting is believing. Perhaps the next time you spot these ocean treasures, you’ll pick up a bag. Discover how shrimp-ly wonderful they are. 

WILD CHILEAN SHRIMP STUFFING

Ingredients:

6 tablespoons butter, cubed

1 onion, finely chopped

1/4 cup celery, chopped

1/4 cup green pepper, chopped

12 ounces Wild Chilean Shrimp, fully cooked, peeled, deveined, and tail off

1/4 cup beef broth

1 teaspoon pimentos, drained and diced

1 teaspoon Worcestershire sauce

1/2 teaspoon dill weed

1/2 teaspoon chives, minced

1/8 teaspoon sea salt

1/8 teaspoon cayenne pepper 

1 1/2 cups soft bread crumbs

Instructions:

Preheat oven to 350°. Grease a one-quart casserole dish with nonstick oil. Set aside. In a large skillet over medium-high heat, warm butter. Add finely chopped onions, chopped celery, and chopped green pepper. Sauté until tender. Add wild Chilean shrimp; heat through. Add beef broth, diced pimentos, Worcestershire sauce, dill weed, minced chives, sea salt, and cayenne pepper. Stir occasionally to heat through. Remove from heat. Fold in soft bread crumbs. Transfer stuffing to the prepared casserole dish. Bake uncovered 20 minutes. Serve warm. 

Buttery Stuffed Haddock

What’s Cooking in Gail’s Kitchen? Graze or Gobble: Buttery Stuffed Haddock! If you’re looking for a break from red meat, look no further than fish. I used to think I only had only two choices when it came time for a homemade fish dinner: either bake it or fry it. Now that I have easier access to fresh fish, I’ve expanded my thought process beyond the ordinary. While I’m having fun with the outdoor kitchen, sometimes I want a little more than that as well. I’m here to say that stuffing is no longer just for turkey. Fish offers options like mixing in shrimp, crab, vegetables, herbs, or rice. How crazy is that? Stick around; I’ll show you how it’s done. 

BUTTERY STUFFED HADDOCK

Ingredients for Haddock:

2 – 6 ounce haddock fillets

5 tablespoons butter, melted

2 tablespoons lemon juice

1 teaspoon parsley, minced

1/2 teaspoon paprika 

Ingredients for Stuffing:

6 tablespoons butter, cubed

1 onion, finely chopped 

1/4 cup celery, finely chopped 

1/4 cup green pepper, finely chopped 

1 pound precooked shrimp, peeled, deveined, and chopped 

1/4 cup beef broth

1 teaspoon diced pimentos 

1 teaspoon Worcestershire sauce

1/2 teaspoon dill weed

1/2 teaspoon chives, minced

1/8 teaspoon sea salt

1/8 teaspoon cayenne pepper 

1 1/2 cups soft bread crumbs

Instructions: 

Preheat oven to 375°. Spray a baking dish with nonstick oil. Set aside. In a large skillet, warm butter over medium heat. Add chopped onion, chopped celery, and chopped green pepper. Sauté until tender. Add shrimp; stir 1-2 minutes. Add beef broth, diced pimentos, Worcestershire sauce, dill weed, minced chives, sea salt, and cayenne pepper. Heat through. Remove from heat and gently fold in bread crumbs. Divide the stuffing between the haddock fillets. Roll up; transfer stuffed fillets to the prepared baking dish, placing seam side down. Drizzle with melted butter and lemon juice. Sprinkle with parsley and paprika. Bake, uncovered, 20-25 minutes or until fish flakes easily with a fork. Serve immediately. 

Red Pepper Bruschetta Pasta

What’s Cooking in Gail’s Kitchen? Food With Soul: Red Pepper Bruschetta Pasta! I truly enjoy perusing Italian gourmet markets. There’s something charming and romantic about choosing a jar of private-label olive oil, flavored balsamic vinegar, house roasted red pepper bruschetta, or four-fruit jam. An extensive collection of imported products can send my mind spinning as I begin to salivate with serving ideas. There are often aromas of freshly baked bread, smoked and cured meats, unique deli offerings, an antipasto bar, pizza nook, and fresh burrata station. San Marzano tomatoes always seem to make it into my cart as well as olive tapenades and basil pesto or marinated artichoke hearts. Before you leave, don’t forget a nice bottle of Chianti.

RED PEPPER BRUSCHETTA PASTA

Ingredients:

8 ounces spaghetti pasta

1 tablespoon kosher salt

1/3-1/2 cup red pepper bruschetta, prepared

Basil leaves, for garnish

Instructions:

Bring a large pot of water to boil. Cook pasta in salted water for 8-10 minutes or until al dente, stirring occasionally. Drain pasta in a colander. Transfer cooked pasta back to the pot. Add prepared red pepper bruschetta mixture. Gently toss; heat through. Using tongs, place spaghetti clusters into a serving bowl. Garnish with fresh basil leaves. Serve immediately.

Legendary Pizza Burger

What’s Cooking in Gail’s Kitchen? Food With Soul: Legendary Pizza Burger! I’ll never forget my first experience eating a pizza burger. I was probably 16 years old at the time. I worked in a ladies retail clothing store downtown. On my dinner break, I walked across the street where a drugstore had a lunch counter with a grill and fryer. Being a crazy kid who loved anything pizza, I ordered it off the menu. Upon first bite, this white goo began to overflow across my hands to the plate below. My first thought was, “Ohmygosh, this burger is rotten with a slimy white stuff running out of it!” Fortunately my brain kicked in and I realized what I was actually tasting was mozzarella cheese. From that day on, I was a champion for anything pizza burger. And the remarkable afterthought is, now I compare every other menu item pizza burger to it. Unexpected, but true.

LEGENDARY PIZZA BURGER

Ingredients:

1 pound lean ground beef

1 teaspoon Italian seasoning

1 teaspoon sea salt

1/2 teaspoon black pepper

4 slices fresh mozzarella cheese

4 brioche buns, split and toasted

1/2 cup prepared pizza sauce, warmed

Fresh basil, for garnish

Instructions:

Preheat gas grill to 350°. In a large bowl, combine lean ground beef, Italian seasoning, sea salt, and black pepper. Form mixture into 8 patties. Place one slice of fresh mozzarella cheese into the diameter of a patty. Press another patty on top; pinching together to seal. Repeat until all four patties are formed. Cook directly on the grill. Close lid and grill for 6-7 minutes per side. Transfer pizza burgers to a platter. Serve between brioche buns. Top each pizza burger with a dollop of pizza sauce. Enjoy.

Garlic Wine Red Snapper

What’s Cooking in Gail’s Kitchen? Food With Soul: Garlic Wine Red Snapper! Before I begin, Rule Number One: When marinating fish, always refrigerate. As fish sits in a marinade at room temperature, it encourages bacteria growth, which can be a bad thing. The olive oil makes a wonderful tenderizer making the fish soft and juicy. When seasonings are added at the same time, the results elevate the flavor. By grilling the fish fillets at a high temperature, the meal transforms into perfection on a plate.

GARLIC WINE RED SNAPPER

Ingredients:

1/2 cup garlic wine vinegar

1/4 cup olive oil

2 6-ounce red snapper fillets

1/2 teaspoon Italian seasoning blend

1/8 teaspoon black pepper

Juice of fresh lemon

3 tablespoons butter, melted

Instructions:

Arrange the red snapper fillets in a shallow dish. Pour the garlic wine vinegar over the fish. Allow the vinegar to surround the fish. Pour olive oil over top. Sprinkle Italian seasoning blend and black pepper over all. Cover dish with plastic wrap and refrigerate for 30 minutes. Preheat the grill to 450°. Transfer red snapper directly onto the grill grates. Close lid. Set timer for 4 minutes. Discard marinade. Using a fish spatula, flip fish and grill 4 minutes longer with lid closed. Meanwhile, melt butter and pour into individual cups. Squeeze fresh lemon juice into warm butter. Remove red snapper fillets from grill. Serve with melted lemon butter poured over top.

Foiled Potatoes

What’s Cooking in Gail’s Kitchen? Food With Soul: Foiled Potatoes! Have I mentioned how much I like my new outdoor kitchen? Living in Florida, the weather is so tropical it makes cooking outdoors an effortless way to prepare meals. Grilling seems to make food taste better and roasted potatoes easily become a star attraction. And the best part is dining alfresco. This is what I call a “stay-cation”.

FOILED POTATOES

Ingredients:

2 baking potatoes

1/2 sweet onion, sliced

3 tablespoons butter

1/2 teaspoon seasoned salt

1/8 teaspoon black pepper

Instructions:

Preheat the grill to 400°. Wash the potatoes and pat dry. Pierce each potato with a knife. Microwave for 4 minutes on 100% power. Remove from microwave and allow to cool, slightly. Spray a sheet of aluminum foil with nonstick oil. Cut the potatoes into 1/4” slices. Arrange potatoes on foil. Top with sliced onions. Add pats of butter over all. Sprinkle with seasoned salt and black pepper. Fold the packet to seal. Place the sealed foil packet directly onto the grill grates. Close lid. Cook for 10 minutes; carefully flip packet and cook 10 minutes longer. Transfer foiled potatoes to a platter. Be aware of steam when the packet is opened. Serve immediately.

Egg Noodle Bowl

What’s Cooking in Gail’s Kitchen? Food With Soul: Egg Noodle Bowl! Cooking eggs in the microwave has spoiled me. No fuss, no mess, and practically perfect every time. Do-ahead noodles can be a time saver, as well. But back to the eggs. When using a custard dish, two eggs can easily be prepared in the same dish by increasing the time to 2 minutes. Always cover the dish with a silicone lid or paper towel in case the egg “pops”. Otherwise, it can be an annoying mess to clean up later. Trust me. Once the egg is finished, live boldly and add a dollop of sea salt butter to melt into it. That adds glorious flavor, without regrets

EGG NOODLE BOWL

Ingredients:

1 cup fine egg noodles, cooked according to package directions

1/2 cup grilled chicken strips, precooked and cut into chunks

1 tablespoon seasoned soy sauce

1/8 teaspoon red pepper flakes

1 green onion, chopped

1 egg

Pinch herb garlic seasoning

Sriracha sauce, to taste

Instructions:

Once the fine egg noodles are cooked, drain and transfer to a serving bowl. Microwave the chicken chunks on 40% for 2 minutes in the seasoned soy sauce sprinkled with red pepper flakes. Add to the noodle bowl; gently toss. Add the green onions. Set aside. Spray a custard dish with nonstick oil. Crack the egg into it. Pierce the yolk with a toothpick. Sprinkle herb garlic seasoning on top. Cover. Microwave egg on 40% power for 1 1/2 minutes, for runny results. Increase time at 12-second intervals for a hard cooked yolk. Transfer the egg to the top of the noodles. Top with sriracha sauce, to taste. Serve immediately.

Yellow Squash Panko

What’s Cooking in Gail’s Kitchen? Palatable Possibilities: Yellow Squash Panko! Many of you already know this particular vegetable is a second cousin to zucchini. The skin is tender, glossy smooth, and edible which makes it a no-fuss dinner companion. Although its flavor is mild, when cooked it actually becomes buttery sweet with a slightly nutty nuance. Try to buy yellow squash that is 6”-8” in size. You’ll know because the larger it is, the more likely the skin will appear bumpy and less tender. You’ll also notice a lot of seeds, once you cut into it. By then you’ll need to rethink dinner and purée it for soup. Hindsight is 20/20 after all.

YELLOW SQUASH PANKO

Ingredients:

2 yellow squash

1-2 tablespoons olive oil, for sauté

Ingredients for Herbed Oil:

1 tablespoon lemon juice

1 tablespoon olive oil

1/8 teaspoon garlic powder

1 teaspoon dried parsley

1/4 teaspoon sea salt

1/8 teaspoon cracked black pepper

Ingredients for Crumb Topping:

1/4 cup panko bread crumbs

1/4 cup parmesan cheese, grated

1 teaspoon dried parsley

1/4 teaspoon sea salt

1/8 teaspoon red pepper flakes

Instructions:

Wash and pat dry yellow squash. Slice into 1/4” rounds; set aside. To make the herbed oil, whisk together lemon juice, olive oil, garlic powder, dried parsley, sea salt, and cracked black pepper. Set aside. To make the crumb topping, toss panko bread crumbs, grated parmesan cheese, dried parsley, sea salt, and red pepper flakes into a bowl. Mix well; set aside. To prepare yellow squash, warm olive oil in a large skillet over medium heat. Add the yellow squash and sauté for 8 minutes. Turn occasionally to cook both sides. Squash should be soft, but not mushy. Remove from heat. Drizzle herbed oil over yellow squash. Transfer to a platter. Top with panko crumb topping mixture. Garnish with fresh basil leaves, if desired. Serve immediately.

Zesty Butter-Baked Crackers

What’s Cooking in Gail’s Kitchen? Bright Ideas: Zesty Butter-Baked Crackers! When you are looking for a crunchy snack and really have no interest in leaving the house, fancy crackers satisfy. More than likely, you have all the ingredients on hand. I think you’ll be surprised. In a few minutes, the kitchen will draw curiosity-seekers who put down their electronic devices to see what smells so good. Then go one step further, serve them with a slather of cream cheese, cocktail sauce, and baby shrimp. It can transform these buttery snacks into a culinary appetizer your family will remember. Better make more and hide them in the freezer.

ZESTY BUTTER-BAKED CRACKERS

Ingredients:

1/4 cup butter

1/4 cup olive oil

1 teaspoon onion powder

1 teaspoon red pepper flakes

1/2 teaspoon garlic powder

1/2 teaspoon seasoned salt

1/4 teaspoon cayenne pepper

1/4 teaspoon dill weed

1 sleeve saltine crackers

Instructions:

Preheat oven to 325°. Lightly mist a baking sheet with nonstick oil. Set aside. In a microwave-safe bowl, warm butter on Low setting for 20 seconds. Add olive oil, onion powder, red pepper flakes, garlic powder, seasoned salt, cayenne pepper, and dill weed. Stir to mix thoroughly. Take one cracker at a time, dip into the butter mixture to coat both sides, and place it on the baking sheet. Repeat until all crackers and butter are used. Arrange the crackers in a single layer by rows. Bake 10 minutes; turn over and bake 10 minutes longer. Watch carefully to avoid burning. Allow to cool before storing in an airtight container.