Grass-Fed Beef Tostadas

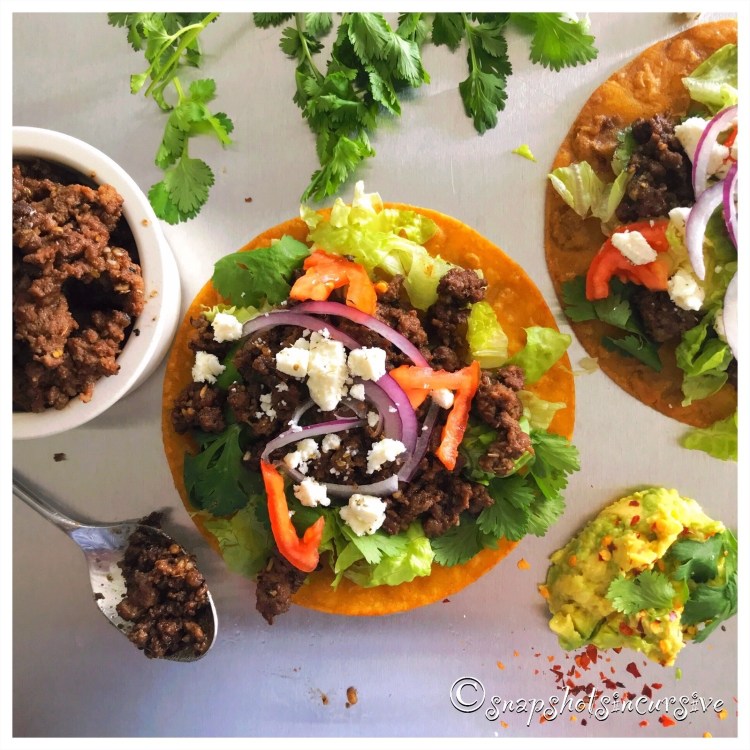
What’s Cooking in Gail’s Kitchen? Waste Not, Want Not: Grass-Fed Beef Tostadas! If you like the taste of corn tacos, the tostada is a distant cousin. Basically, one is folded, the other is flat. Brushed with oil, then “toasted” crisp, the tostada is made to hold the toppings. This recipe allows you to bend the tortilla if you prefer to eat it that way. Whatever falls onto the plate can be scooped back up into your mouth. No judgment here. Now, about grass-fed beef. It’s going to cost a little more per pound due to the lack of fat content, compounded by the extra time it takes to fatten the cow. Grain makes cows get fat faster, just like it does for humans. I like grass-fed because it is more nutritious with heart-healthy omega 3s plus vitamins. It’s all about the choices we make.

GRASS-FED BEEF TOSTADAS

Ingredients:

1 pound grass-fed ground beef

1 packet fajita seasoning dry mix

1/3 cup canola oil

8 corn tortillas

1/2 head iceberg lettuce, gently torn

1-2 Roma tomatoes, chopped

1/2 red onion, sliced thin

8 ounces feta cheese, crumbled

Fresh cilantro, leaves only

Instructions:

Preheat oven to 250°. Because grass-fed beef has a lower fat content, steaming it is a good option. In a medium skillet, cover the bottom with water. Crumble the ground beef into the water. Set the stovetop temperature to medium-high. Break up any large clumps. Allow the water to boil. Stir the meat to cook evenly. Turn often. When the meat is brown, it is done. Drain the cooked ground beef using a strainer. Dispose of water and grease. Return ground beef to the pan. Sprinkle with fajita seasoning mix. Stir well to coat. Have the burner on lowest setting to keep warm. Spray a shallow skillet with nonstick oil. Set heat to medium-high. Brush one side of corn tortilla with canola oil. Place oiled side down in skillet. Brush the remaining side with canola oil. Fry the shell until golden for 30 seconds to a minute per side. This makes the shell fairly stiff. If the pan begins to smoke, lower the heat setting slightly. Remove the tortilla and place it on a rimmed baking sheet. Keep tortillas warm in the oven. Repeat process with remaining tortillas. To assemble, begin with a fried tortilla. Layer with iceberg lettuce, seasoned ground beef, chopped tomatoes, red onions, feta cheese, and cilantro leaves. Serve immediately with guacamole and salsa.

Red Onion Mexican Street Tacos

What’s Cooking in Gail’s Kitchen? Enjoyable Eats: Red Onion Mexican Street Tacos! As promised, today’s feature recipe takes us down the road to Jalisco-style tacos. Forget about the “loaded” tortilla shells you may be familiar with, or even default to when making Mexican food at home. This handheld taco steps “outside the box”. The ingredients are fewer, yet focus on freshness. For those who appreciate it, cilantro is a star attraction. Roasted meat, shredded into small pieces, and chopped red onions with a squeeze of lime wedge create a flavor explosion that, honestly, will pull you back enough to slow down and savor every bite. Perhaps you may even chew your food 20 or 30 times before swallowing to appreciate this virtual trip to a seldom-traveled Mexican village.

RED ONION MEXICAN STREET TACOS

Ingredients:

24-count street-size corn tortillas

1 pound seasoned shredded turkey or pork carnitas

1 red onion, chopped

1 bunch fresh cilantro, chopped

2 limes, cut into wedges

Jalisco Pico de Gallo*

Instructions:

Warm shredded carnita meat in a microwave-proof covered casserole dish until steamy and heated through. Set aside. To warm street-size corn tortillas, place a dry iron skillet on the stove top over medium heat. Cook tortillas 30 seconds per side. Wrap a stack of five or six in aluminum foil to keep warm in a 200° preheated oven. When ready to assemble, place a portion of carnitas on each corn tortilla. Layer with chopped cilantro and red onions. Squeeze a lime wedge over all. Top with Jalisco Pico de Gallo.

*Follow the link for recipe.

http://Snapshotsincursive.com/2019/11/15

End-of-Season Tomato Salad

What’s Cooking in Gail’s Kitchen? Enjoyable Eats: End-of-Season Tomato Salad! Going, going, gone. Ever wonder why homegrown, backyard, garden tomatoes taste so good? Is it because we invest our own blood, sweat, and tears fighting weeds and combatting annoying insects? Surely not. Perhaps it’s because we allow them to ripen naturally on their own schedule, rather than picking them early to allow for transporting and packaging purposes. Whatever the reason, pat yourself on the back and enjoy. It’ll have to hold you til the next planting season rolls around again.

END-OF-SEASON TOMATO SALAD

Ingredients:

5/6 Roma tomatoes, sliced

6-8 cherry tomatoes, halved

1/2 red onion, thinly sliced

1/4 cup basil, coarsely chopped

2 tablespoons olive oil

1 tablespoon balsamic vinegar

1/2 teaspoon kosher salt

1/2 teaspoon Everything But Bagel seasoning

Instructions:

Arrange sliced Roma tomatoes and halved cherry tomatoes on a shallow platter. Tuck red onion strips between layers. Top with fresh basil pieces. Drizzle olive oil over tomatoes. Repeat with balsamic vinegar. Sprinkle salad with kosher salt and Everything But Bagel seasoning. Serve immediately.

Rosati’s Pizza in Estero, Florida

Dining Outside the Home: Rosati’s Pizza in Estero, Florida! You learn a lot about a business by talking to the owners. Perhaps that is why I sometimes visit a restaurant in the off hours of the day. You are more apt to find the owners working face-to-face with customers. Rosati’s Pizza is owned and operated by a family who not only strives for perfection, but also cares about the people who walk through their door. When they expanded their business in Estero for dine-in service, Covid hit with a vengeance and caused them to shift to delivery and carry-out service only. That takes a chunk out of overhead, which translates to selling a boatload of pizza. Yet, they endured. And thrived because they do things the old-fashioned way: like sourcing local ingredients, fresh mozzarella, and homemade crusts. Their story goes all the way back to the first pizzerias in Chicago; Italian roots to the core. So proud, they live by the motto, “We don’t cut corners, just slices of pizza.” Dine in, smell the aromas, chat with the staff, and over-order so you have extra servings for leftovers. Don’t forget to add a jar of the Hot Giardiniera. It is ah-mazing!

Underrated Summertime Salad

What’s Cooking in Gail’s Kitchen? Fab Foodstuff: Underrated Summertime Supper! Does anyone have a Himalayan Salt Block besides me? Well, one of the things I like about it is, it can take the guesswork out of adding seasoning to food. It’s a block of pink salt, after all. When serving cold foods like salads, fruits, and cheeses, refrigerate the salt block overnight before using. This helps to keep foods chilled for hours when you need it. Simply arrange the ingredients directly on the block, drizzle on the dressing, and you’re good-to-go. Clean up is easy. Never use soap; salt is naturally antibacterial. Remove food residue with a damp cloth or sponge. Rinse it with a clean swipe, then dab dry. Allow the salt block to air-dry before next use. You’re done.

UNDERRATED SUMMERTIME SUPPER

Ingredients:

4 ounces goat’s milk cheese, plain

1 teaspoon Italian dry mix spice blend

1/4 teaspoon red pepper flakes

8 ounces mixed greens, washed

1 Roma tomato, chopped

4 assorted mini sweet peppers, stems and seeds removed, sliced into rings

2 radishes, sliced very thin

1/4 red onion, thinly sliced

1 teaspoon Herbes de Provence

Balsamic Reduction Sauce

Crusty Artisan Bread

Instructions:

On a sheet of waxed paper, sprinkle Italian dry mix spice blend and red pepper flakes. Form the goat’s milk cheese into a ball. Roll it in the spice mix to cover all sides. Place cheese ball on the chilled Himalayan salt block. Next, arrange mixed greens in a single layer. Arrange Roma tomatoes, mini sweet peppers, radish slices, and red onion rings. Sprinkle Herbes de Provence over top. Drizzle balsamic reduction sauce over salad. Serve with crusty artisan bread.

Culinary Cauliflower

What’s Cooking in Gail’s Kitchen? Fab Foodstuff: Culinary Cauliflower! Not everyone is a fan of cauliflower. I get that. It might be because of the way it’s prepared. Or smells. Or possibly because it looks bland and boring. Meh. Well, here’s my solution if you promise to give it one more chance. Smother it in cheese. Good cheese, like smoky Gouda. Then take buttery garlic croutons and sprinkle them over the top. Get the picture? Sooo, if the family turns up their noses at the idea of eating cauliflower, simply shrug your shoulders, kick off your shoes, and curl up on the sofa with the entire bowl yourself.

CULINARY CAULIFLOWER

Ingredients:

1 head cauliflower

1 cup water

1/2 cup smoky bacon Gouda cheese, sliced thin

1 tablespoon milk

2 tablespoons butter

1/3 cup garlic croutons, coarsely crushed

1/8 teaspoon red pepper flakes

Fresh parsley for garnish

Instructions:

Preheat oven to 350°. Warm water over medium heat in a saucepan with a steamer basket. Cut off stem of cauliflower, removing the leaves. Make an “x” in the core with a sharp knife. Once the water is boiling, reduce it to a simmer, place cauliflower in the steamer basket. Cover and steam for 15 minutes until tender. Drain. Cut cauliflower into florets. Transfer to an ovenproof bowl. Combine sliced Gouda cheese and milk in a microwave-safe dish. Microwave on Low (30%) in 30-second intervals. Stir until smooth as it melts. Pour over cauliflower. Sprinkle red pepper flakes on top. Bake 5-10 minutes until golden and bubbly. Warm butter in a pan over medium heat. Add crushed garlic croutons. Stir occasionally until brown. Sprinkle breadcrumbs over melted cheese. Garnish with chopped parsley.

Red Chile Garlic Chicken

What’s Cooking in Gail’s Kitchen? The Next Step: Red Chili Garlic Chicken! If you are a fan of stir-fry, this sauce is often a staple inspired by the fusion flavors of the Far East. Take a quick peek at the ingredient list to see what I mean: ginger and garlic popular in China, chili peppers from Thailand, Vietnamese soy sauce, and sweet rice vinegar used in Japan. It’s all in there. Personally I’m a fan of the sweet heat mixed with the cashew crunch. Skip the take-out for tonight and try this version for yourself.

RED CHILI GARLIC CHICKEN

Ingredients:

1/2 cup dried red chiles

1-2 tablespoons olive oil

1 pound chicken tenders, boneless and skinless

1/4 teaspoon sea salt

1/8 teaspoon black pepper

1/4 teaspoon garlic powder

3/4 cup brown sugar

1/4 cup rice vinegar

2 tablespoons red wine

1 tablespoon soy sauce

1 tablespoon corn starch

1 teaspoon ginger powder

1 teaspoon paprika

1/8 teaspoon garlic powder

1/2 cup cashews

1 tablespoon toasted sesame seeds

3 green onions, snipped

Instructions:

In a microwave-safe bowl, heat 1 cup water for 2 minutes. Add clili peppers; cover. Set aside for 30 minutes, then drain water. Meanwhile, warm olive oil in medium skillet. Turn heat to high setting and add chicken tenders. Season with sea salt, black pepper, and 1/4 teaspoon garlic powder. After 3-4 minutes, when chicken turns brown, flip over. Reduce the heat to medium setting and cover. Cook chicken until firm, about 5 minutes longer. The chicken will release itself from the surface when it is ready. Set pan aside. For the sauce, in a medium skillet combine brown sugar, rice vinegar, red wine, soy sauce, corn starch, ginger powder, paprika, and garlic powder. Bring to a gentle boil on medium-high heat. Stir often. Mixture should not foam. Sauce will thicken after 7-8 minutes. Remove from heat. Pour sauce over chicken tenders. Add drained chiles, cashews, sesame seeds, and green onion snips. Heat through, stirring occasionally, to blend flavors. Serve with choice of cooked rice.

Kimchi Shrimp

What’s Cooking in Gail’s Kitchen? The Next Step: Kimchi Shrimp! Brace yourself for a wickedly sour Korean flavor with a crazy spicy kick. Some say it can be a bit salty, especially if you keep an eye on that sort of thing. Others notice the strong leaning toward fish, which is why I dove head first into this dish by adding naturally sweet shrimp, and of course, butter. Did you just do a double take? Stick around. You may end up on the hook.

KIMCHI SHRIMP

Ingredients:

1/2 cup prepared kimchi, chopped

1 pound frozen cooked jumbo shrimp, thawed

2-3 tablespoons butter

1 teaspoon ginger root, finely chopped

1/4 teaspoon garlic powder

1/2 teaspoon red pepper flakes

Romaine lettuce leaves

Green onions, for garnish

Instructions:

Using a mini chopper, pulse the prepared kimchi into a paste. Set aside. In a large skillet over medium heat, warm the butter. Layer the shrimp in the pan. Add chopped ginger. Sprinkle with garlic powder and red pepper flakes. Cook shrimp for one minute, then flip over. Add the kimchi paste, stirring to coat shrimp. Cook 2-3 minutes longer. Serve over romaine lettuce leaves. Garnish with green onion snips.

Egg Brekkie Pizza

What’s Cooking in Gail’s Kitchen? The Next Step: Egg Brekkie Pizza! Ever get the feeling you just aren’t in the mood to cook? I’ve been there. While you’re standing at the refrigerator, leaning on the door like it’s your best friend, don’t ignore last night’s leftover pizza. Butter up the iron skillet, toss in a couple slices of pizza, crack an egg on top, and put a lid on it. There’s gotta be an extra packet of red pepper flakes and parmesan cheese, not to mention, crushed oregano somewhere. Bingo! You’re done.

EGG BREKKIE PIZZA

Ingredients:

2 slices leftover pizza, any variety

1/8 teaspoon garlic powder

1 tablespoon butter

2 large eggs

Sprinkling of parmesan cheese, red pepper flakes, and oregano

Instructions:

Warm butter in an iron skillet over medium heat. Sprinkle garlic powder into butter. Place pizza slices in pan. Crack an egg onto each slice. Cover. Cook until bottom of pizza is crispy and eggs are barely set, about 5-7 minutes. Transfer to a plate. Sprinkle with parmesan cheese, red pepper flakes, and crushed oregano.