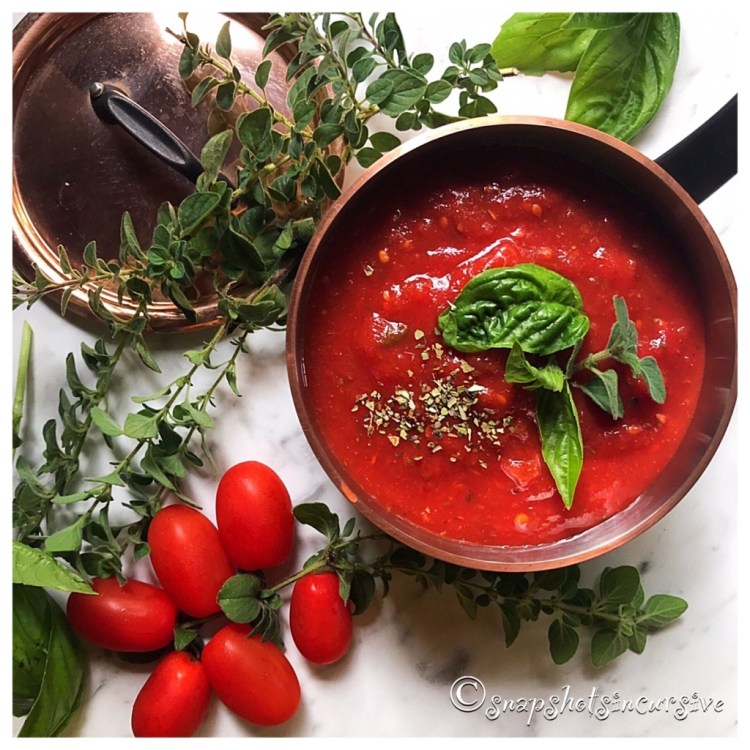
Oregano Roasted Fingerling Potatoes

What’s Cooking in Gail’s Kitchen? The Clean Plate Club: Oregano Roasted Fingerling Potatoes! Seasoning can change the taste of anything, especially when using fresh herbs. This is the time of year when I get excited about nurturing my herb garden. The hardier herbs, like mint, chives, and thyme withstand the winter months and breakthrough in the Spring with vim and vigor. Other favorites require renewing annually; rosemary, basil, cilantro, dill, and oregano are among them. Today’s recipe partners the delicate new fingerling potatoes, which grow small and narrow to live up to their name, alongside robust bleu cheese crumbles and the earthy flavor of fresh oregano. Together they produce a rustic dish characteristic of the south of France, Italy, and Greece. Enticing, isn’t it?

OREGANO ROASTED FINGERLING POTATOES

Ingredients:

1.5 pound bag of petite fingerling gourmet potatoes

1/4 cup vegetable oil

1 teaspoon sea salt

3 teaspoons dried oregano

1/2 cup bleu cheese crumbles

1/4 cup fresh oregano, chopped

Instructions:

Preheat the oven to 350°. Pour vegetable oil on a baking sheet to coat the pan with a thin layer. Using a 2-quart pan on the stovetop, cut fingerling potatoes in half and place in the pan with enough water to cover. Add sea salt. Bring to a boil; cook for 7-8 minutes. Drain well. Set aside. Sprinkle dried oregano over potatoes. Cover pan with lid and shake vigorously to slightly loosen potato skins. Carefully transfer oregano potatoes to the baking sheet. Turn to coat in oil. Bake 30-40 minutes until skins are golden and crispy. Turn occasionally to cook evenly. Once the potatoes are crisp on the outside and tender on the inside, transfer fingerling potatoes to a serving platter. Add bleu cheese crumbles and freshly chopped oregano. Serve immediately.

Yukon Gold Mashed Potatoes

What’s Cooking in Gail’s Kitchen? The Color of Food: Yukon Gold Mashed Potatoes! You say pō-tay-toe, I say pō-tah-toe, but either way we all love mashed potatoes. My husband would forego the milk completely and focus instead on more French butter. So we compromise. By choosing the beautifully yellow Yukon Gold variety, you’re already getting an earthy, buttery flavor to begin with, thus leaving room for milk, cream cheese, or sour cream additions. Mash up Yukons for the fluffiest, smoothest mound of creaminess. Mmmm. Just don’t forget the gravy.

YUKON GOLD MASHED POTATOES

Ingredients:

2 pounds yellow-skinned Yukon Gold potatoes, peeled and cut into chunks

1 teaspoon sea salt

4 tablespoons butter, room temperature

1/2-3/4 cup milk, warmed

Instructions:

Place cut potatoes into a 2-quart pan with enough water to cover the potatoes. Add sea salt. Bring to a boil; reduce to medium heat and cook 20 minutes or until potatoes are tender. Remove pan from heat. Drain potatoes, leaving them in the pan. Add butter. Cover the pan with the lid. Warm the milk slightly in the microwave. Using a hand mixer, begin adding milk in 1/4 cup increments. Beat potatoes until slightly chunky texture is reached. Continue on for a smoother consistency. Season with salt and pepper. Serve with brown gravy.

Unleavened Bread

What’s Cooking in Gail’s Kitchen? The Color of Food: Unleavened Bread! Nothing is more appetizing than the aroma of fresh bread baking in the oven, in my opinion. Unleavened Bread is a quick and easy flatbread made with flour, salt, olive oil, and water. No yeast needed. Choose between a crispy texture, like I have here for that luscious golden color, or shorten the baking time for softer, more chewy results. Eat it plain, slather it with French butter, or turn it into a personal-size pizza flatbread. You can thank me later.

UNLEAVENED BREAD

Ingredients:

1 1/3 cup flour

1/4 teaspoon sea salt

1/4 cup olive oil

1/4 cup water

Dill weed for garnish (optional)

Instructions:

Preheat oven to 400°. Brush a baking sheet with olive oil. Set aside. Combine flour and salt in a food processor. Pulse to mix. Gradually drizzle in the oil on Low speed. Dough will resemble crumbs. Continuing on Low speed, gradually add water until dough forms a ball. Turn dough onto a lightly floured surface. Knead until dough is elastic and smooth, but not sticky. Divide into 6 equal balls. Pat each ball into a circle, using a rolling pin or your hands. Transfer flattened dough onto prepared baking sheet. Do not crowd. Bake in two steps, if necessary. Use a fork to lightly prick the dough. Brush each flatbread round with olive oil and sprinkle with dill weed. Bake 15 minutes until golden brown. Cool on wire rack.

Roasted Chickpeas

What’s Cooking in Gail’s Kitchen? The Color of Food: Roasted Chickpeas! If you’re like me, some days instead of three squares, you graze your way through the day. It helps to have a high-protein snack on hand when the cravings kick in for something crisp and crunchy. Sure, potato chips might be handy, but would you really feel good after downing an entire bag while perusing the internet? I think not. Seasoned chickpeas can be just as satisfying with their naturally nutty flavor and fiber-filling benefits. Season them with maple syrup for sweetness, a kick of cayenne for spice, garlic for pizazz, or savory ranch flavoring. The best part is you get to choose. Just remember the basic rules: drain, pat dry, peel the skins, and bake. “Bada-bing bada-boom!”

ROASTED CHICKPEAS

Instructions:

30-ounces canned chickpeas, drained and patted dry. Skins removed.

2 tablespoons olive oil

2 tablespoons butter, melted

1 teaspoon Worcestershire sauce

1 teaspoon seasoned salt

1/4 teaspoon garlic powder

Instructions:

Preheat oven to 400°. Line a baking sheet with parchment paper. Combine olive oil, melted butter, Worcestershire sauce, seasoned salt, and garlic powder. Mix well. Drain chickpeas. Transfer to a clean tea towel. Cover and rub gently over the chickpeas. This will loosen the skins so you can easily peel them away and discard. When dry, place the chickpeas in a ziplock gallon bag. Pour olive oil seasoning mixture over chickpeas. Seal bag, squeeze out the air, and toss bag to coat the chickpeas all over. Transfer seasoned chickpeas to the parchment paper-lined baking sheet. Roast 30 minutes, turning every 10 minutes. Adjust time, if necessary. They should appear browned and crunchy. Do not burn. Cool 10 minutes.

Tuscan Tomato Bisque

What’s Cooking in Gail’s Kitchen? The Chow Down: Tuscan Tomato Bisque! Picture this. Autumn has set in, the air emits a crisp chill, and a warm fire is enough to make you snuggle inside for the night. For the robust concentrated flavor of tomatoes, slow-roasting them brings it all home. Earthy Italian herbs and spices add a little mystery to every bite. Cozy up to a bowl with your favorite afghan and reap the harvest.

TUSCAN TOMATO BISQUE

Ingredients:

6-8 Roma tomatoes, halved lengthwise

1 tablespoon kosher salt

1 teaspoon olive oil

1 sweet onion, chopped

1 garlic clove, minced

1/4 teaspoon paprika

1/4 teaspoon oregano

1/4 teaspoon marjoram

1/4 teaspoon basil

1 cup water

Fresh basil leaves

Instructions:

Preheat oven to 425°. Line baking sheet with foil. Arrange tomatoes, cut side up. Sprinkle with kosher salt. Roast tomatoes until they are soft, approximately 30 minutes. In a large saucepan over medium-high heat, warm olive oil. Sauté onion and garlic until fragrant and soft, about 3 minutes. Reduce heat to low, cover, and cook 8 minutes longer. Add paprika, oregano, marjoram, and basil. Increase heat to medium-high and add roasted tomatoes. Add water. Stir. Reduce heat slightly to medium, cover, and simmer for another 20-25 minutes. Remove from heat. Carefully transfer portions to a food processor. Pulse tomatoes until somewhat smooth. Repeat. Transfer soup back into the pan to reheat. Divide tomato bisque into soup bowls. Garnish with fresh basil leaves. Serve immediately with toasted bagels, crackers, or crusty bread.

Edamame Spicy Stix

What’s Cooking in Gail’s Kitchen? The Chow Down: Edamame Spicy Stix! You’ve probably been to a restaurant where the server placed a bowl of edamame on the table, in lieu of the bread basket. Next to it was an empty bowl for placing the discarded pods. If it was a first for you, no worries. Friends, this is one time you are allowed to eat with your fingers. Truth. Simply pick up one pod with your fingers and put it in your mouth, not letting go. Bite down with your teeth and slide the beans out as you pull the pod away. Tender green beans, about the size of peas, will drop onto your tongue. Chew and enjoy the flavor sensation. Easily toss the pod into the empty bowl and reach for another. Who would’ve thought eating edamame could be this much fun?

EDAMAME SPICY STIX

Ingredients:

12-ounce bag frozen Edamame with sea salt

2 tablespoons butter, divided

3 garlic cloves, minced

1/4 seasoned salt

1/8 teaspoon red pepper flakes

1 teaspoon sriracha sauce

Instructions:

Microwave edamame according to package directions. Let stand for one minute. Open package and set aside. In a cast iron skillet, melt one tablespoon butter over medium heat. Add minced garlic cloves, seasoned salt, and red pepper flakes. Cook for 1-2 minutes, stirring constantly. Reduce heat and add cooked edamame. Transfer to a serving bowl. Fit with remaining butter. Drizzle with sriracha sauce. Serve immediately. Remove shells before eating. Do not consume pods.

Dijon Deviled Eggs

What’s Cooking in Gail’s Kitchen? Front-Runner Favs: Dijon Deviled Eggs! Those who know me well fondly refer to me as a Francophile, someone who loves everything French. It goes all the way back to my school days when a sixth grade Social Studies teacher introduced the class to France, after having traveled there herself. From that moment on, it became a dream of mine to take a trip there someday. I studied the French language and Impressionist art. I admired the historical connection, the romantic countryside, and most of all the incredible food! Is it any surprise I chose to share today’s recipe of something a little French?

DIJON DEVILED EGGS

Ingredients:

6 hard boiled eggs

1 tablespoon French Dijon mustard

1 tablespoon Greek yogurt

1 teaspoon light cream

1 tablespoon mayonnaise

1/8 teaspoon sea salt

1/8 teaspoon white pepper

1-2 tablespoons red onion, thinly sliced and chopped

Fresh Basil for garnish

Instructions:

Once the eggs have cooled, remove the shells, and slice each egg in half lengthwise. Gently remove yolk and place in a bowl. Arrange the egg on a plate. Repeat until all eggs are divided. Lightly mash the egg yolks until crumbly, leaving a few chunks. Add Dijon mustard, Greek yogurt, light cream, mayonnaise, sea salt, and white pepper. Mix until almost smooth. Fold in a few red onion pieces. Spoon yolk mixture into egg halves. Garnish with chopped red onion and fresh basil snips. Refrigerate until ready to serve.

Zen Himalayan Plate

What’s Cooking in Gail’s Kitchen? Foodstuff Redefined: Zen Himalayan Plate! Go above ordinary ingredients and transform your palate with a meal on the Himalayan salt plate. Foods pick up a delicate saltiness that transcends the flavor and leaves behind monotony. By creating bite-size pieces of fish, shellfish, and cucumber sushi, nourishment balances out the inner peace from within. Good for health-crazed affenciados as well as those soul-searching for expression.

ZEN HIMALAYAN PLATE

Ingredients:

3.75-ounce tin Wild Caught Sardines, in olive oil

1 lemon, sliced and quartered

3.75-ounce tin smoked oysters

Fresh lemon thyme

7-ounces prepared crab dip

4 mini cucumbers, seedless

Fresh dill

Assorted crackers

Instructions:

Arrange sardines on a Himalayan salt plate. Drizzle with olive oil from the tin. Place lemon wedges on fish and garnish with fresh lemon thyme. Smoked oysters may be served in individual sea shells. Drizzle with sauce from the tin. Oysters may also be served on a cracker. To assemble the cucumber sushi, slice mini cucumbers into thick rolls. To remove the inside portion of each disc, place the cucumber on a cutting board, use a sharp knife, and rotate the cuke until the center is cut out. Make sure the walls remain. Discard fleshy pulp. Place the cucumber “rings” on the Himalayan salt plate. Spoon prepared crabmeat dip into each ring. Press gently to fill the sushi roll. Garnish with dill.

Yummy Spud Fries

What’s Cooking in Gail’s Kitchen? Foodstuff Redefined: Yummy Spud Fries! Choose a healthier way to have your fries and eat them, too. Take regular potatoes, preferably russet, cut them into thick strips leaving the skin on, and bake until crispy before adding a mound of toppings. I use both grated and shaved Parmesan cheese. You’ll know perfection when the outside is a lovely sunset golden color. One bite reveals a fluffy potato within. Now dunk them in sour cream and chives or slather on thick tomato ketchup. Mmmmm.

YUMMY SPUD FRIES

Ingredients:

4 russet potatoes, washed and cut into thick strips

1/4 cup olive oil

1/2 teaspoon garlic powder

1/2 teaspoon thyme

1 teaspoon seasoned salt

1/2 cup Parmesan cheese, grated

1/4 cup fresh parsley, chopped

1/4 cup Parmesan cheese, shaved

Garnish with bacon crumbles

Instructions:

Preheat oven to 425°. Put potato strips in a large bowl. Drizzle with olive oil. Toss to coat. Season with garlic powder, thyme, and seasoned salt. Coat well. Transfer potatoes to a nonstick baking sheet. Spread into a single layer. Reserve oil in bowl. Bake 15 minutes. Turn potatoes and bake 15 minutes longer. Transfer potatoes back into the bowl with reserved olive oil. Sprinkle with grated Parmesan cheese and fresh parsley. Coat well. Layer fries onto baking sheet. Return to oven for 10 minutes, or until cheese is melted. Before serving sprinkle spud fries with shaved Parmesan cheese and bacon crumbles. Serve immediately.