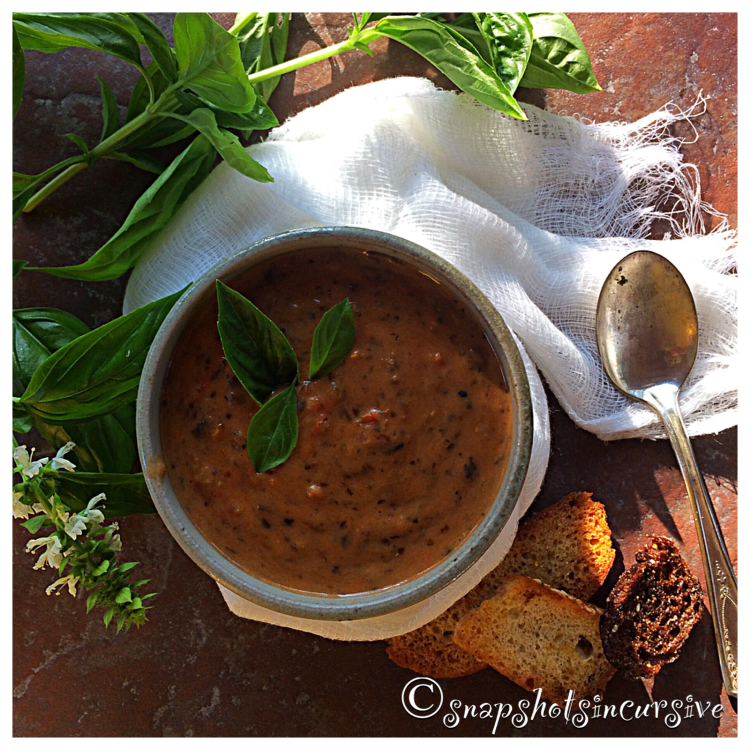
New Potato Salad

What’s Cooking in Gail’s Kitchen? Foodstuff Redefined: New Potato Salad! If I said it once, I’ve said it a hundred times: the French have it going on! The more I explore their recipes, the more I feel like a gourmet chef. You can, too. Trust me. When I tell you I’m going to have you make potato salad by skipping the mayo, just pretend you didn’t hear me and forge ahead. The results are worth it. Don’t make a big deal when you serve it as a side dish. You’re husband will do that for you. Husband-tested, rave reviews!

NEW POTATO SALAD

1 pound red-skinned new potatoes

1 teaspoon sea salt

3 tablespoons olive oil

2 tablespoons garlic red wine vinegar

1 tablespoon Dijon mustard

1/2 teaspoon kosher salt

Cracked black pepper, to taste

1/2 cup celery hearts, thinly sliced

1/4 cup fresh chervil, coarsely chopped

Instructions:

Place quartered potatoes, skin on, in a large saucepan with enough water to cover. Add sea salt. Bring to a boil over high heat, reduce to medium-low, and simmer until potatoes are tender when pierced with a knife, about 15-20 minutes. For dressing, combine olive oil, garlic red wine vinegar, Dijon mustard, kosher salt, and cracked black pepper. Whisk until blended. When potatoes are cooked, drain well. Transfer them to a bowl to cool. Pour the dressing over the potatoes. Add celery and chervil, gently folding to blend flavors. Serve warm or at room temperature.

Grilled Corn-on-the-Cob

What’s Cooking in Gail’s Kitchen? Foodstuff Redefined: Grilled Corn-on-the-Cob! Here’s an alternative to stovetop corn on the cob or microwave cooking. Throw the corn on the grill while the burgers are on their way to being well-done. You won’t believe the incredible taste. Or will you? If the results are slightly blackened or charred in spots, so much the better. That’s what makes it taste so good. By leaving the corn in the husk, natural steaming keeps the corn moist rather than dry and brittle. And if it rains? By all means, get out the kitchen torch and improvise. Toppings still apply.

GRILLED CORN ON THE COB

Ingredients:

4 ears corn, in husks

1 teaspoon sea salt

Butter to taste

1/4 cup parmesan cheese, grated

1/8 teaspoon red pepper flakes

1/8 teaspoon Mrs. Dash Garlic and Herb seasoning*

Salt to taste

Instructions:

Peel the husks without removing at the base. Strip away the corn silk. Fold the husks back into place. Fill a bowl with cold water. Add sea salt. Submerge the corn for 10 minutes. Heat the grill to medium-high. Remove corn and let drain. Place on the grill for 15 minutes. Cover. Turn the corn occasionally. Allow the corn to get slightly charred in places. When done, transfer corn cobs to a serving platter. Slather with butter. Sprinkle with grated parmesan cheese, red pepper flakes, and Mrs. Dash Garlic and Herb seasoning. Add sea salt to taste. Serve immediately.

*I receive no recompense for mentioning Mrs. Dash Garlic and Herb seasoning.

X-tra Virgin Olive Oil Dipping Sauce

What’s Cooking in Gail’s Kitchen? Sunshine Eats: X-tra Virgin Olive Oil Dipping Sauce! It’s no secret I’m a bread-lover. Just like chocolate, wine, and cheese….the key is moderation. I look to the French culture for validation. Their motto seems to be “use quality ingredients and fresh foods” for the best flavor. And I believe it. During my visit to Paris and the south of France, I noticed open markets everywhere and held often. Preservatives are pretty much absent. Nutrition rules. Grow an herb garden. Crush dried herbs to release flavor. That being said, go ahead and reach for the bread basket, just don’t eat the whole thing!

X-TRA VIRGIN OLIVE OIL DIPPING SAUCE

1/2 cup extra virgin olive oil

1/8 teaspoon garlic powder

1/8 teaspoon ground black pepper

1/4 teaspoon parsley

1/4 teaspoon oregano

1/4 teaspoon marjoram

1/4 teaspoon basil

1/2 teaspoon kosher salt

1 tablespoon parmesan cheese, grated

1 tablespoon red wine or balsamic vinegar

Bakery baguette, sliced

Instructions:

Pour olive oil into a measuring cup. Add garlic powder, black pepper, parsley, oregano, marjoram, basil, and kosher salt. Whisk to blend flavors. Add parmesan cheese. Stir. Marinate at room temperature for one hour to enhance flavors. Stir and pour onto a plate or shallow bowl. “Dot” oil with balsamic vinegar. Serve with baguette bread.

Tails of Maine Lobster

What’s Cooking in Gail’s Kitchen? After the Holidays: Tails of Maine Lobster! There’s an upside to living through a pandemic. Practically everything is available to order from computer-to-doorstep. And that includes Maine hard shell lobsters, especially when you live in a state that is landlocked. Of course, you still have to do a little homework by reading reviews and asking questions on Live Chat websites. We found talking directly to a customer service representative can answer a lot of confusing questions and bring clarity. In turn, you never know when an actual salesperson of the company will offer an unexpected special to entice the purchase further. I guarantee you, it’s absolutely worth the time. The results are simply delicious.

TAILS OF MAINE LOBSTER

Ingredients:

2 6-ounce frozen lobster tails, thawed

2 tablespoons sea salt

1 cup unsalted butter

1 lemon, for zest

1 lemon, quartered for garnish

Instructions:

Before cooking the lobster tails, make the clarified butter. In a small, heavy bottomed saucepan, warm the butter over medium-low heat. Do not stir. Allow the butter to melt without turning brown. Gradually a white foam will appear on the surface. Allow the melted butter to stand for 5 minutes. Tilt the saucepan to carefully spoon the white foam off the top. This may take several steps. Strain the clarified butter through a cheesecloth to remove any milk solids. This will discard any brown bits on the bottom of the pan. Transfer clarified butter back to the saucepan to keep warm. Divide the lemon zest into single-serving dipping bowls. Set aside. To make the lobster tails, bring a pot of water to a boil. Reduce heat to a soft boil and add sea salt. Drop tails in one at a time. Cook the lobster for 5 minutes. Set a timer to avoid overcooking. The lobsters will be bright red when done. Using metal tongs and a large strainer, take the tails out of the boiling water. Transfer to two dinner plates. Pour the clarified butter over the lemon zest in the dipping bowls. Garnish with lemon wedge. Serve immediately.

Rosemary Lemon Roasted Turkey

What’s Cooking in Gail’s Kitchen? After the Holidays: Rosemary Lemon Roasted Turkey! Did you know a frozen turkey will last up to two years in the freezer? First and foremost, it’s only a bargain if you have the space to store it. That being said, roasting a turkey is a great source of lean protein. A whole bird provides healthy meat that can be served several different ways. Unfortunately, our bodies need protein and cannot store it. We need to replenish protein in order to build strong bones, repair muscle, heal skin, and help keep blood sugar levels even. All the other vitamins and minerals are a bonus. A few words of advice: Remove and discard the skin of the roasted turkey, no matter how tempting that crispy, golden outer covering calls your name. It’s main purpose is to keep the meat moist. That, and for taking fabulous snapshots, of course.

ROSEMARY LEMON ROASTED TURKEY

Ingredients:

4-6 sprigs of fresh rosemary

2 lemons, quartered

12-pound turkey, thawed

2 tablespoons butter, melted

1 teaspoon kosher salt

1/2 teaspoon garlic powder

Instructions:

Preheat oven to 325°. Rinse turkey, pat dry. Insert rosemary and lemon pieces in the cavity of the turkey. Truss the turkey by wrapping the bird in cooking twine. Secure the legs and tuck the wings underneath. Transfer turkey to the roasting pan with the breast side up. Brush with melted butter. Sprinkle with kosher salt and garlic powder. Bake uncovered for 4 hours, or until a meat thermometer reads 180°. The juice of the turkey will run clear when the center of the thigh is cut. Remove from oven. Cover. Allow turkey to rest for 15 minutes before carving. Garnish with fresh rosemary sprigs and lemons.

Mexican Tarragon Turkey Breast

What’s Cooking in Gail’s Kitchen? After the Holidays: Mexican Tarragon Turkey Breast! If you’re tired of the “same old, same old”, ways of preparing poultry, try something a little different. Mexican tarragon can easily catapult chicken and turkey to gourmet status. First of all, that slight hint of licorice may go unnoticed in a café chicken salad sandwich. Yet, something tastes extraordinary. If only you could put your finger on it. So, you go on with your day perhaps thinking you were hungrier than usual and would have devoured anything. Until memory flashback, in the form of a craving, stimulates the taste buds for an encore. The quest is on for the heat-loving herb with the green narrow leaves and golden flowers. Who knows, it may end up as a regular plant in your garden herb bed.

MEXICAN TARRAGON TURKEY BREAST

Ingredients:

3 tablespoons Mexican tarragon leaves, chopped

2 tablespoons olive oil

1/2 teaspoon poultry seasoning

1/2 teaspoon seasoned salt

1/8 teaspoon white pepper

3-pound turkey breast, bone in

Sprigs of Mexican tarragon, for garnish

Instructions:

Preheat oven to 325°. Combine chopped Mexican tarragon leaves, olive oil, poultry seasoning, seasoned salt, and white pepper. Wash turkey breast; pat dry. Using your fingers, loosen skin of turkey breast. Rub half the mixture under the skin. Secure skin to the underside of breast with toothpicks. Brush outside of turkey with remaining mixture. Place turkey breast on a rack in a roasting pan. Roast until a meat thermometer reads 170°, about two hours. Remove from oven; tent with foil. Allow to rest 15 minutes. Remove and discard turkey skin and toothpicks before carving. Transfer turkey slices to a platter. Garnish with sprigs of Mexican tarragon. Serve warm.

Yeast Artisan Bread

What’s Cooking in Gail’s Kitchen? Elevated Edibles: Yeast Artisan Bread! There’s no doubt bread can be a family’s comfort food, even if you seldom bake it yourself. With more people setting up a home office or home schooling, suddenly bread-baking has turned into a thing. And if you own a bread machine, better yet. Dust it off and give it center stage on the quartz countertop in your gourmet kitchen. Baking bread is like therapy for the soul. We combine ingredients, knead dough, make decorative slits on top, and bake it to a rich golden color. From start to finish, it becomes a focused project. When the house begins to smell like the neighborhood corner bakery, everyone notices. It’s time to slice it up and slather on the butter.

YEAST ARTISAN BREAD

Ingredients:

1 cup water

2 tablespoons olive oil

1 teaspoon sea salt

3 cups flour

1/4 cup sugar

1 packet active yeast

Instructions:

Using a bread machine, add ingredients in the order listed. Always add the yeast last, creating a small indentation on the top of the dry ingredients. Pour yeast into indentation. Select the “Dough” setting. At the end of the cycle, turn the dough onto a lightly floured surface. Knead for one minute. Grease a bowl with olive oil. Transfer the dough to the bowl. Cover with plastic wrap and let rise in a warm place until doubled in size, about one hour. Cover bowl with a damp cloth. Turn the dough onto a lightly floured surface. Punch the dough down and knead for a few seconds. Form the dough into a ball and return to the bowl. Cover again and allow it to rise in a warm place 30 minutes longer. To bake in an iron skillet, preheat oven to 400°. Put the iron skillet in the oven while it is preheating. Place a roasting pan on the bottom shelf of the oven. Fill it with one inch of hot water. Using oven mitts, remove the hot skillet from the oven. Grease the inside of the skillet with olive oil. Sprinkle with one tablespoon cornmeal. Carefully transfer the puffed bread dough to the iron skillet. Dip a kitchen shears in hot water. Cut slits in the top of the dough. Sprinkle generously with water. Bake for 30-35 minutes until the loaf is a deep golden brown. When a cake tester is inserted in the center, it comes out clean. Remove the iron skillet from the oven. Immediately remove artisan bread to prevent over baking. Allow it to cool on a wire rack for 10 minutes before cutting.

New Potatoes Smashed

What’s Cooking in Gail’s Kitchen? Elevated Edibles: New Potatoes Smashed! Is it a baked potato? A mashed potato? A fried potato? Or all three?! What it is, is freaking fantastic! Forget about dinner conversation. As soon as you place a platter of these tasty gems on the table, all bets are off. Don’t blame your partner or the kids, they don’t want to talk with their mouths full. These potatoes have a soft, earthy flavor surrounded by a crispy outer skin. Cheese and bacon make them downright irresistible. But don’t get carried away. Repeat after me: “This is meant to be a side dish.”

NEW POTATOES SMASHED

Ingredients:

1 pound new red potatoes, skin on

2 teaspoons, plus 1/8 teaspoon sea salt, divided

2 tablespoons olive oil, divided

1/8 teaspoon garlic powder

1/8 teaspoon onion powder

1/8 teaspoon cracked black pepper

1 cup cheddar cheese, finely shredded

2 slices applewood bacon, cooked and crumbled

2 green onions, chopped

Instructions:

Put the red potatoes in a pot. Add enough water to cover by one inch. Add 2 teaspoons sea salt. Bring to a boil over medium-high heat. Reduce to medium and cook until potatoes pierce easily with a knife, about 20 minutes. While potatoes cook, preheat oven to 425°. Drizzle one tablespoon olive oil over a rimmed baking sheet. Drain potatoes; allow to cool for 5 minutes. Arrange the cooked potatoes on the prepared baking sheet. Carefully use a fork to gently “smash” the potatoes. Drizzle the remaining olive oil over potatoes. Sprinkle with the remaining sea salt, garlic powder, onion powder, and cracked black pepper. Bake 30 minutes until potatoes are crispy. Remove from oven, add shredded cheddar cheese and bacon crumbles. Broil for one minute, or until cheese is melted and bubbly. Remove from oven. Garnish with chopped green onions. Serve warm.

Yellow Cheddar Potato Rounds

What’s Cooking in Gail’s Kitchen? Table Food: Yellow Cheddar Potato Rounds! Who likes potatoes? I do, I do. Buy a bag of potatoes and you’ll never go hungry, I always say. The versatile potato is a chef’s marvel. It can be baked, fried, mashed, hashed, creamed into soups, stirred into casseroles, and even eaten raw. Add a sharper-flavored cheese and you can reach a perfect combination that will make a strong soul swoon. This is why we cook at home, we remind ourselves. It’s simply rich and made fresh. Enjoy, my peeps.

YELLOW CHEDDAR POTATO ROUNDS

Ingredients:

1/2 pound russet potatoes, skin on, washed, and sliced 1/2” thick

2 tablespoons butter, melted

1/2 teaspoon garlic and herb seasoning

1 teaspoon sea salt

1/8 teaspoon rosemary leaves

1 cup cheddar cheese, shredded

2 slices cooked bacon, crumbled

3 chives, snipped

Rosemary sprigs, for garnish

Instructions:

Preheat oven to 400°. Line baking sheet with parchment paper. In a large bowl, toss sliced potatoes with melted butter. Coat well. Arrange buttered potatoes in a single layer on the baking sheet. Sprinkle with garlic and herb seasoning, sea salt, and rosemary leaves. Bake potatoes 20 minutes; flip and bake 10 minutes longer. Top potato rounds with shredded cheddar cheese and crumbled bacon. Bake 5 minutes until cheese is melted and bubbly. Garnish with fresh chives and rosemary sprigs.