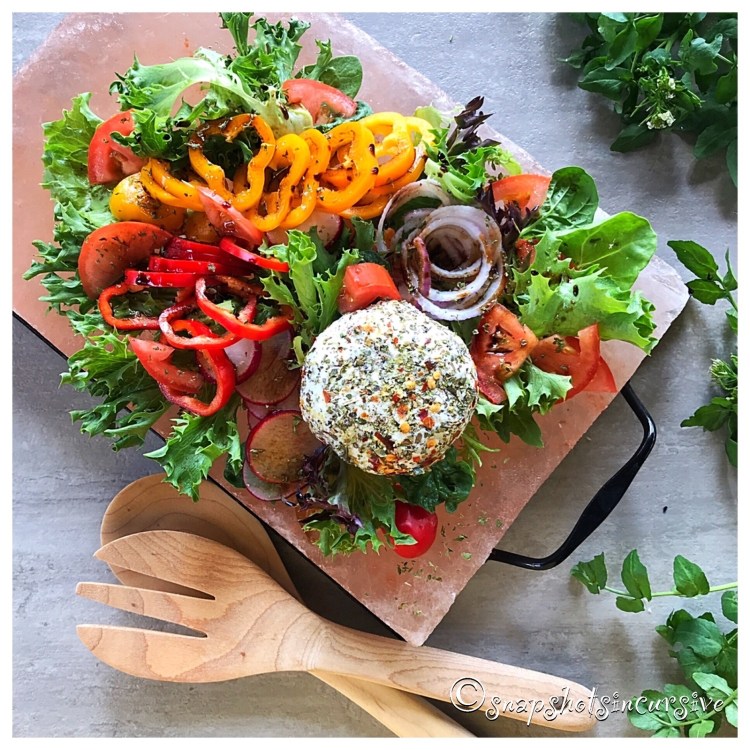
Green Chile Soup

What’s Cooking in Gail’s Kitchen? The Next Step: Green Chile Soup! I was rushing through an airport recently and knew I wanted something to eat. The waitress at the Mexican restaurant recommended the full bodied taste of Green Chile Soup. It hit the spot. From the first tangy spoonful of mild green chiles to the gentle creaminess on my tongue, I knew this wasn’t your typical soup. It may have been a regional delicacy, but by making it at home, I saved myself a round trip ticket to Colorado.

GREEN CHILE SOUP

Ingredients:

20 green chiles, large

1 yellow onion, chopped

1 tablespoon butter

1/2 teaspoon sea salt

1/4 teaspoon garlic powder

3 cups chicken broth

1 cup heavy cream

1/3 cup Greek yogurt

Monterey Jack cheese and cilantro, for garnish

Instructions:

Place green chiles on a wire rack over a foil-lined baking sheet. Roast on Broil until blistered and charred. Remove from oven. Cool. Discard stems and seeds. In a large pan, warm butter over medium heat. Add chopped onion. Sprinkle with sea salt and garlic powder. Cook until soft. Add roasted chiles and chicken broth. Reduce heat and simmer for 20 minutes. Transfer to a food processor and blend until smooth. Transfer mixture back to pan. Stir in cream and Greek yogurt. Gently warm mixture until soup is heated through. Serve with fresh cilantro and Monterey Jack cheese.

Zia Marianna’s Grilled Peppers

What’s Cooking in Gail’s Kitchen? Cheerful Choices: Zia Marianna’s Grilled Peppers! Did you know there are three ways to roast peppers? You can use a grill pan over a burner flame, a broiler for fast charring, or roast them in the oven. The results are amazing, compared to raw peppers sliced into a salad. The incredible flavor is so smoky and sweet you may wonder why you don’t take the time more often. Pay attention to your taste buds! This is how we add depth to any dish, I promise you that.

ZIA MARIANNA’S GRILLED PEPPERS

Ingredients:

10 mini sweet peppers, mix of red and orange

5 cloves garlic

1/2 cup vegetable oil

1/2 teaspoon seasoned salt

1/2 teaspoon cracked black pepper

Celery leaves

Instructions:

Heat a grill pan on high heat until hot. Rinse the mini sweet peppers and garlic cloves; pat dry. Place the whole peppers and garlic cloves onto the grill pan, charring the skin completely on all sides until black on the outside and soft on the inside, 5-8 minutes per side. Remove and discard charred skin of peppers, seeds, and stems. Cut the peppers into thin slices about 1/4” thick. Transfer the charred pepper slices and garlic cloves into a container with a lid. Slightly wilt celery leaves on grill pan. Add to pepper mixture. Drizzle with vegetable oil. Add the seasoned salt and cracked black pepper. Mix well. Cover and refrigerate overnight. Warm slightly before serving.

Yellow Wax Bean Pancetta

What’s Cooking in Gail’s Kitchen? Cheerful Choices: Yellow Wax Bean Pancetta! Yellow beans get a raw deal when it comes to the green bean family. It’s almost like they are the red-headed stepchild. Just because they don’t get their color from chlorophyll doesn’t mean they taste bad. Both taste sweet and “grassy”. If anything, green kinda turns dull when its cooked, but yellow turns golden. Now be honest with me….wouldn’t you rather go for the gold?!?

YELLOW WAX BEAN PANCETTA

Ingredients:

14.5-ounce can cut wax beans, drained

4 ounces pancetta, diced

3 tablespoons olive oil

1/2 teaspoon sea salt

1/4 teaspoon black pepper

Fresh parsley, chopped

Instructions:

Preheat oven to 400°. Spray a baking sheet with nonstick oil. Set aside. In a bowl, combine wax beans, diced pancetta, olive oil, sea salt, and black pepper. Gently toss to coat well. Transfer yellow wax bean pancetta mixture to prepared baking sheet. Spread to a single layer. Roast in the oven for 25 minutes or until golden brown on the edges. Remove from oven, transfer to a platter, and serve with fresh chopped parsley.

Xtra Tender Grilled Radishes

What’s Cooking in Gail’s Kitchen? Cheerful Choices: Xtra Tender Grilled Radishes! If you’ve avoided radishes because of their bitter earthy taste when eaten raw, perhaps it’s time to give them another chance. Keep in mind radishes are simply a root vegetable, no different than a potato or turnip. Once they are cooked, a natural sweetness emerges. Surprise! The slightly crisp outer core reveals a nice soft middle that makes your mouth go “Mmmm.”

XTRA TENDER GRILLED RADISHES

Ingredients:

4 cups radishes, stems removed and halved lengthwise

1 tablespoon olive oil

1 teaspoon garlic and herb seasoning

2 tablespoons butter, melted

1 teaspoon fresh thyme, chopped

1/2 teaspoon sea salt

1/4 teaspoon black pepper

Instructions:

Warm an iron skillet or grill pan over medium-high heat. Toss the radishes in olive oil to coat. Sprinkle with garlic and herb seasoning. Reduce the heat to medium. Place the radishes, cut side down, on the iron skillet. Sear the radishes for 3-4 minutes per side. They will start to soften without losing their crunch. Remove pan from heat. Drizzle the radishes with melted butter. Sprinkle with chopped thyme leaves, sea salt, and black pepper. Serve immediately.

Sweet Potato Wedges

What’s Cooking in Gail’s Kitchen? Cheerful Choices: Sweet Potato Wedges! Mention the word sweet potato french fries and watch everyone’s eyes glaze over. Just the thought of a crispy outer skin surrounding a fluffy center sounds too good to be true, doesn’t it? Add homemade ketchup or sriracha mayo for dipping. Ahhh. Suddenly it’s a meal in itself……unless family members think you should share. Better make more.

SWEET POTATO WEDGES

Ingredients:

2 sweet potatoes, skin on and cut into wedges

1 1/2 tablespoons olive oil

1/2 teaspoon chili powder

1/2 teaspoon coarse sea salt

1/8 teaspoon black pepper

2 teaspoons agave nectar

Green onion, snipped, for garnish

Instructions:

In a microwave-safe bowl, combine sweet potato wedges and olive oil. Toss to coat. Cover. Microwave on HIGH for 6 minutes or until tender when pierced with a knife, tossing and replacing lid after 3 minutes. Allow to cool 10 minutes. Add chili powder, coarse sea salt, and black pepper. Toss to coat. Preheat grill pan over medium-high heat. Brush with olive oil. Place sweet potato wedges on oiled grill pan. Cook 3 minutes per side until charred and tender. Remove from heat. Drizzle with agave nectar. Garnish with green onion snips. Serve immediately.

Himalayan Salt Plate Shrimp Skewers

What’s Cooking in Gail’s Kitchen? Cheerful Choices: Himalayan Salt Plate Shrimp Skewers! How to cook with an Himalayan salt plate can be tricky. The key is patience. This can be done on an outdoor gas grill very easily. First make sure the salt block is completely dry. Always begin on a low heat setting. Allow the block to heat at that temperature for 15 minutes. Then switch the heat to medium and let the block warm for another 15 minutes. Finally, turn the heat to high for the last 15 minutes. Then sprinkle a few drops of water on the block. Once it sizzles and immediately evaporates, you may add the prepared food. Let’s do it!

HIMALAYAN SALT PLATE SHRIMP SKEWERS

Ingredients:

1 pound shrimp, peel and deveined, tails intact

1 pound smoked sausage, skinless, cut into 1” pieces

2 tablespoons bacon olive oil

2 teaspoons lemon juice

1 tablespoon dried Italian seasoning blend

Olive oil for brushing salt plate

Instructions:

Place one shrimp around a piece of smoked sausage. Thread combo onto a skewer and lay in a large baking dish. Repeat until all pieces are used. In a small bowl, whisk together bacon olive oil, lemon juice, and Italian seasoning blend. Brush onto shrimp skewers. Cover and refrigerate while Himalayan salt plate is warming up. Preheat the grill to medium-high heat. At this time slowly preheat the Himalayan salt plate over 45 minutes.* See above. The internal grill temperature should be no higher than 450°. When ready, lightly brush the preheated salt plate with regular olive oil. Working in batches, place the shrimp/sausage skewers on the salt plate and cook, turning once, until the shrimp are pink, 2 to 3 minutes per side. Pieces will appear slightly charred. Transfer skewers to a warmed platter to prevent food from becoming too salty. Brush the salt plate with more olive oil between batches. Repeat. Serve immediately.

Dulce De Leche Turtle Bars

What’s Cooking in Gail’s Kitchen? Cheerful Choices: Dulce de Leche Turtle Bars! So today we learn that Dulce de Leche is another name for slow-cooked caramelized milk. And before you scroll down, I assure you it’s one of the easiest toppings you’ll ever make, and certainly worth your time. It’s Heaven in a jar….lusciously sweet and creamy. However, if you make it too far in advance, the most difficult challenge will come when you get the urge to dip a spoon into the jar to drizzle the decadent sauce over a scoop of ice cream. I know what you’re thinking…..but, Gail, it’s only one spoonful. Amirite? Don’t do it. Otherwise you’ll need another can of sweetened condensed milk for these turtle bars.

DULCE DE LECHE TURTLE BARS

Ingredients for the Crust:

2 cups flour

1/3 cup brown sugar

3/4 cup butter, softened

1/4 teaspoon sea salt

Ingredients for the Toppings:

1 1/4 cups Dulce de Leche*

1/4 cup heavy whipping cream

2 large egg yolks

2 teaspoons vanilla extract

3/4 cup semisweet chocolate morsels

3/4 cup pecans, chopped

*NOTE:

Dulce de Leche must be made in advance. Preheat oven to 425°. Pour a 14-ounce can of sweetened condensed milk into a 9” pie pan. (This will equal 1 1/4 cups.) Cover with foil. Carefully place the pie pan into a larger shallow pan. Fill the larger pan with 1/2” hot water to surround the pie pan. Bake 2 hours or until sauce is thick and caramel in color. Remove larger pan from oven. Carefully remove the pie pan; set aside for 15 minutes to cool. Pour Dulce de Leche into a jar until ready to use. Store in the refrigerator, if made days in advance.

Instructions for the Crust:

Preheat oven to 350°. Line a 9” square baking dish with parchment paper, leaving extra over the edges for easier removal of the dessert. Spray the parchment paper with nonstick oil. Set aside. Using a mixing bowl, combine flour, brown sugar, butter, and sea salt. Stir well until mixture resembles coarse crumbs. Press mixture into the bottom of prepared pan. Bake 20 minutes. Remove pan from oven; allow to cool for 5 minutes.

Instructions for the Toppings:

In a mixing bowl, combine Dulce de Leche, heavy whipping cream, egg yolks, and vanilla extract. Stir well; pour mixture over crust. Sprinkle chocolate morsels and chopped pecans over filling. Bake 20 minutes, or until set. Remove pan from oven. Cool completely before cutting onto bars.

Rollin’ in Lobstah

What’s Cooking in Gail’s Kitchen? Country Casual Cravings: Rollin’ in Lobstah! Ever wonder why lobster is so popular? I find the mildly sweet, delicate flavor irresistible. If you’re preparing it at home in a state that is landlocked, a lot of resources are at your fingertips. Did you know you can order it from Maine and have it delivered in 24 hours? That’s golden. There are numerous websites that offer delicious lobster choices to conveniently keep on hand in the freezer. I buy lobster meat and lobster tails only. Forget the labor-intensive task of twisting the head, legs, and claws apart from the tail. Then again, I’ve been called “high maintenance”. To each his own.

ROLLIN’ IN LOBSTAH

Ingredients:

4 cups cooked lobster meat, cut into chunks

1/4 cup mayonnaise

1 1/2 tablespoons lemon juice

1/8 teaspoon sea salt

1/8 teaspoon white pepper

4 split-top brioche hot dog buns

4 tablespoons butter, melted and divided

1 tablespoon chives, thinly sliced for garnish

Fresh lemon wedges, for garnish

Instructions:

In a bowl, combine lobster meat, mayonnaise, lemon juice, sea salt, and black pepper. Gently toss to coat. Spread butter on the outer sides of each bun. Place the buns on a griddle over medium heat. Cook 2-3 minutes per side until golden brown. Divide the lobster mixture among the buns. Garnish with fresh chives and lemon wedges. Serve immediately with remaining butter.

Instant Egg Brekkie

What’s Cooking in Gail’s Kitchen? Country Casual Cravings: Instant Egg Brekkie! Don’t you love it when you discover a healthy breakfast that can be prepared in a few minutes? Whenever I traveled with my husband, I seemed to be challenged with minimal ways to prepare meals. The one common denominator was a microwave and hot plate. Let me start off by saying, eggs can be tricky in a microwave. Two secrets I want to share: always pierce the egg yolk (or it will explode) and cook eggs on a low power setting in short segments. If you can master those two things, a dozen eggs will go far in the mini-fridge.

INSTANT EGG BREKKIE

Ingredients For One Serving:

3-5 fresh baby spinach leaves, for charring

1 nip seasoned salt

6-7 fresh baby spinach leaves

1/2 teaspoon water

1 slice cherrywood deli ham, gently torn

1 teaspoon feta cheese, crumbled

1 large egg

1 pinch Herbes de Provence seasoning

Garnish with charred spinach leaves and radish slices

Baguette slices

Instructions:

Preheat stovetop grill pan on highest setting for one minute. Spray baby spinach leaves with nonstick oil. Sprinkle with seasoned salt. Place the prepared spinach leaves directly on the grill pan. As they begin to char, using a tongs, flip them over. Watch carefully. When leaves appear slightly wilted and charred, transfer to a paper towel-lined plate. Set aside for garnish. Meanwhile, spray a ramekin with nonstick oil. Pack a layer of baby spinach leaves in the bottom of the dish, pressing down to create an even level. Drizzle with water. Gently tear the cherrywood deli ham over the spinach layer. Add the crumbled feta cheese. Crack an egg over the top. Pierce the egg yolk with a sharp knife or toothpick. Sprinkle with Herbes de Provence seasoning. Cover loosely with a paper towel. Microwave for one minute on 30% power. Gently swirl runny egg white. Microwave for one minute longer on 30% power. The yolk will be slightly runny. Transfer ramekin to a plate. Arrange the charred spinach leaves on top. Garnish with radish slices. Serve with baguette slices. Repeat for number of portions needed.