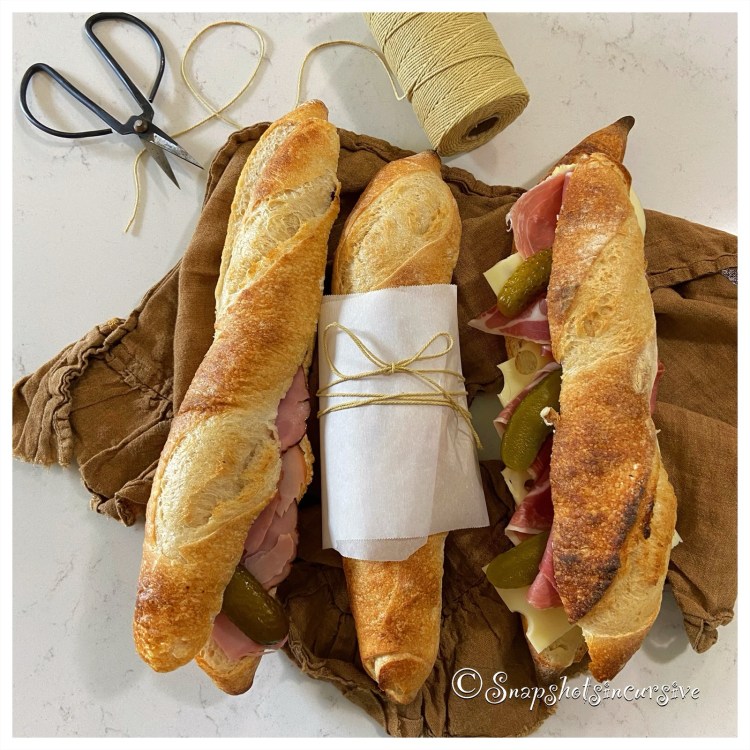
Green Onions With Sea Salt

What’s Cooking in Gail’s Kitchen? Food Plating: Green Onions with Sea Salt! My family could not have a picnic without a jar of raw green onions nearby. Typically the jar had a little water in bottom to keep the onions garden fresh. The vibrant color against a rustic backdrop served as a personal invitation to indulge. No matter who hosted the gathering, it wasn’t complete without the popular southern-style simple pleasure. Grab a lawn chair, kick off your shoes, let the grass tickle your toes, and be a child again. 

GREEN ONIONS WITH SEA SALT

Ingredients:

1 bunch of green onions

Individual condiment saucer, or salt cellar, of sea salt

Instructions:

Wash the green onions thoroughly, removing any wilted leaves from the outer layer. Trim the white root ends where the bulb is formed. Angle cut the green stalks at the opposite end. Place a bowl of coarse sea salt nearby. To eat, dip the white end of the green onion into the sea salt. Take a crunchy bite. Repeat until the entire green onion is consumed. 

Kalua Pork Roast

What’s Cooking in Gail’s Kitchen? Simple Sensations: Kalua Pork Roast!  This special blend of herbs is a tribute to warm, tropical summer nights. The term, “Kalua”, is Hawaiian for slow cooked. I have put this frozen roast in the oven and let flavors blend all day long for an exotic taste that will have your senses wondering if you’ve been transported to a private paradise. The extra meals provided are a bonus that will have others showering you with praise in the days following. 

KALUA PORK ROAST

Ingredients:

4 pound boneless pork butt roast

1 tablespoon Red Hawaiian Alaea Sea Salt*

1 teaspoon Mrs. Dash garlic and herb seasoning 

2 cups apple juice

2 cups apple cider vinegar 

1 tablespoon liquid smoke

1 bottle beer

Instructions:

Set oven to 275°. Place frozen pork roast in a covered roaster, fat side up. Pour apple juice and apple cider vinegar over roast. Next apply liquid smoke. Finish by sprinkling the Alaea sea salt and Mrs. Dash herb blend over the pork. Make sure the lid is on securely. You will begin to smell the heavenly aroma as it slowly cooks. Five hours later, check the roast, as the liquid will absorb. I discovered some roasters allow the liquid to evaporate a little sooner than I expected. I have found Le Creuset to be very reliable. If the roast needs more liquid, pour a bottle of beer over it. Keep it covered and slowly cook it at least another three hours. I have let it cook for ten hours total without a problem. It is so fork-tender you will be amazed. And the drippings can be used for gravy or barbecue sauce. 

*Available through Salty Wahine Gourmet Hawaiian Sea Salts. (I receive no recompense for promoting their product.)

Another Egg Salad Recipe

What’s Cooking in Gail’s Kitchen? Uplifting Aromas: Another Egg Salad Recipe! Just what you need…….another way to make egg salad at home. What’s the mystery, you ask, rolling your eyes and shaking your head from side to side. Well sometimes those extra calories in mayonnaise can blow up a diet, if you know what I mean. Besides, I’m a huge fan of olive oil and fresh basil to make a dish flavorful. Sweet vidalia onions are a nice compromise to its distant cousin, the purplish-red onions, so you choose which way to go. Fair warning, though, this scaled down version of egg salad won’t stick together like glue. You’re better off eating it with a fork, spooning it onto a bed of baby spinach leaves, or scooping it off the plate onto a multigrain cracker. 

ANOTHER EGG SALAD RECIPE

Ingredients:

4 hard boiled eggs, cooked and chopped

1/2 cup sweet onion, chopped

2 tablespoons olive oil

1 teaspoon Himalayan sea salt

2 stems fresh basil leaves, snipped

Instructions:

In a serving bowl, combine chopped hard boiled eggs and sweet onion pieces. Drizzle olive oil over all. Sprinkle Himalayan sea salt to taste. Add fresh basil snips. Gently toss and serve.

Za’atar Quail Eggs

What’s Cooking in Gail’s Kitchen? Graze or Gobble: Za’atar Quail Eggs! This isn’t just another hard-boiled egg post that makes you go “meh”. It’s one that will take you on an adventure; an adventure for the tastebuds. Everyone has figured out that eggs keep midday food cravings at bay. Imagine bringing your lunch to work, let’s say a half a dozen quail eggs, rolled in a crown of za’atar seasoning and sea salt. Already people are gathering around the refrigerator to see what makes them so special. You could tell them quail eggs provide more protein, have a rich taste, are hypoallergenic, and can boost the metabolism. But don’t get carried away. Otherwise come break time you may discover only 3 quail eggs in your lunchbox and suddenly everyone is too busy to chat. 

ZA’ATAR QUAIL EGGS

Ingredients:

12 quail eggs, natural farm raised

1 teaspoon sea salt 

2 teaspoons za’atar seasoning 

Instructions:

Gently place quail eggs in a medium pan of cold water. Bring to a boil for 4 minutes. Remove with a slotted spoon. Immediately transfer eggs to a bowl of water filled with ice to completely cool. In a shallow dish, combine sea salt and za’atar seasoning. Carefully peel each quail egg, removing tiny bits of shell and membrane. Roll each egg in the za’atar mixture to coat. Set upright on a platter or place eggs on a bed of mixed greens to serve. 

Yellow Squash Panko

What’s Cooking in Gail’s Kitchen? Palatable Possibilities: Yellow Squash Panko! Many of you already know this particular vegetable is a second cousin to zucchini. The skin is tender, glossy smooth, and edible which makes it a no-fuss dinner companion. Although its flavor is mild, when cooked it actually becomes buttery sweet with a slightly nutty nuance. Try to buy yellow squash that is 6”-8” in size. You’ll know because the larger it is, the more likely the skin will appear bumpy and less tender. You’ll also notice a lot of seeds, once you cut into it. By then you’ll need to rethink dinner and purée it for soup. Hindsight is 20/20 after all.

YELLOW SQUASH PANKO

Ingredients:

2 yellow squash

1-2 tablespoons olive oil, for sauté

Ingredients for Herbed Oil:

1 tablespoon lemon juice

1 tablespoon olive oil

1/8 teaspoon garlic powder

1 teaspoon dried parsley

1/4 teaspoon sea salt

1/8 teaspoon cracked black pepper

Ingredients for Crumb Topping:

1/4 cup panko bread crumbs

1/4 cup parmesan cheese, grated

1 teaspoon dried parsley

1/4 teaspoon sea salt

1/8 teaspoon red pepper flakes

Instructions:

Wash and pat dry yellow squash. Slice into 1/4” rounds; set aside. To make the herbed oil, whisk together lemon juice, olive oil, garlic powder, dried parsley, sea salt, and cracked black pepper. Set aside. To make the crumb topping, toss panko bread crumbs, grated parmesan cheese, dried parsley, sea salt, and red pepper flakes into a bowl. Mix well; set aside. To prepare yellow squash, warm olive oil in a large skillet over medium heat. Add the yellow squash and sauté for 8 minutes. Turn occasionally to cook both sides. Squash should be soft, but not mushy. Remove from heat. Drizzle herbed oil over yellow squash. Transfer to a platter. Top with panko crumb topping mixture. Garnish with fresh basil leaves, if desired. Serve immediately.

Lemon Butter Chilean Sea Bass

What’s Cooking in Gail’s Kitchen? Bright Ideas: Lemon Butter Chilean Sea Bass! Anyone, besides me, a fan of butter on seafood? Lobster. Crab Legs. Chilean Sea Bass. Shrimp. Scallops. You name it…if the seafood is slightly sweet, mild in flavor, moist and tender, or flaky yet firm, I practically kick everything else to the curb in favor of rich and decadent seafood. Now that I live in Florida, I can stretch my palate a bit with fresh seafood harvested or caught off the coastline. Not only does it support local fishermen, it also puts me in touch with seafood retail markets that thrive on this economy. And, yes, I’m spoiled. Some of the vendors even come directly to my community on a weekly basis. I see more fish in my future.

LEMON BUTTER CHILEAN SEA BASS

Ingredients:

2 8-ounce Chilean Sea Bass fillets

1/4 cup salted butter

1/8 teaspoon garlic powder

1/8 teaspoon parsley flakes

Juice of fresh 1/2 lemon

Instructions:

Preheat gas grill to 400°. Form a piece of aluminum foil into a baking sheet to accommodate the fillets. Be sure to raise the sides to contain the buttery juices. Spray foil with nonstick oil. Set aside. In a microwave-safe dish, warm the salted butter. Add garlic powder, parsley flakes, and lemon juice. Gently whisk. Wash Chilean sea bass fillets; pat dry with a paper towel. Before placing the fillets on the foil, brush both sides with melted lemon butter. Save the extra butter mixture for serving. Grill the Chilean Sea Bass for 5-6 minutes with the lid closed to maintain the internal temperature. Turn the grilled sea bass and repeat cooking time 5-6 minutes longer for even grilling. Brush with remaining butter mixture. Serve immediately.

Lemon Garlic Hummus

What’s Cooking in Gail’s Kitchen? Country Casual Cravings: Lemon Garlic Hummus! If you go crazy over hummus and veggies, here’s a variation that adds flavorful notes of citrus. The use of pink-colored Himalayan salt equals an added bonus of less sodium than table salt plus trace elements of healthy minerals like iron, which translates to protein that maintains good body chemistry. But that’s the boring news. The best part, in my opinion, is the guilt-free buttery taste of hummus. Discover how one creamy spoonful practically melts in your mouth. Then scoop away with crisp and zesty radish slices. It’s finger food on steroids.

LEMON GARLIC HUMMUS

Ingredients:

15-ounce can chickpeas, rinsed and drained, hulls removed

2 tablespoons olive oil

2 tablespoons fresh lemon juice

1/8 teaspoon garlic powder

1/2 teaspoon pink Himalayan salt

2 teaspoons sesame oil

Paprika, toasted sesame seeds, for garnish

Radish slices, for serving

Instructions:

In a food processor, combine chickpeas, olive oil, lemon juice, garlic powder, pink Himalayan salt, and sesame oil. Press Pulse to blend until very smooth. If necessary, add a tablespoon of water to create a smoother consistency. Transfer hummus to a serving bowl. Garnish with a sprinkling of paprika and toasted sesame seeds. Serve with sliced radishes.

Wild Ramps Charbroiled

What’s Cooking in Gail’s Kitchen? Table Food: Wild Ramps Charbroiled! Whether you stumble upon this coveted crop at your neighborhood Farmers Market, or are fortunate enough to forage them yourself, wild ramps are as rare as hens teeth. You better have a plan. Unless you pickle them or freeze them, the best you can hope for is a 4-5 day shelf life in the refrigerator. At that point they will begin to deteriorate, develop an offensive odor, and you will have lost your window of opportunity for the year. Practice sustainable harvest. Never take more than you intend to eat.

WILD RAMPS CHARBROILED

Ingredients:

1/2 pound wild ramps

1/3 cup olive oil

1 teaspoon sea salt

1/4 teaspoon crushed oregano

Instructions:

Preheat oven to 425°. Wash thoroughly every crevice and leaf stem of each ramp. Cut off and discard bulb roots. Rinse again. Gently pat dry with paper towels. Transfer ramps to a baking sheet that has been sprayed with nonstick oil. Arrange ramps in a single layer, alternating ends and extending leaves to lay flat. Brush with olive oil. Sprinkle with sea salt and crushed oregano. Bake until bulbs are tender golden, leaves have shrunk, and several spots are charred. Allow to cool slightly before serving. Leftover ramps maybe crushed into a topping for sprinkling over Wild Ramp Bacon Chowder.*

*Follow the link for Wild Ramp Bacon Chowder

http://Snapshotsincursive.com/2020/09/15