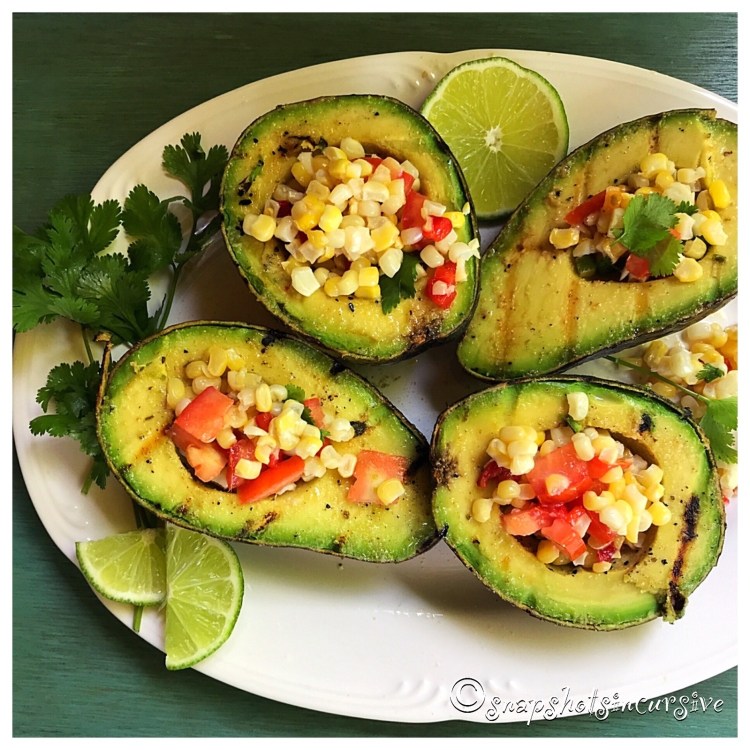
Himalayan Salt Plate Shrimp Skewers

What’s Cooking in Gail’s Kitchen? Cheerful Choices: Himalayan Salt Plate Shrimp Skewers! How to cook with an Himalayan salt plate can be tricky. The key is patience. This can be done on an outdoor gas grill very easily. First make sure the salt block is completely dry. Always begin on a low heat setting. Allow the block to heat at that temperature for 15 minutes. Then switch the heat to medium and let the block warm for another 15 minutes. Finally, turn the heat to high for the last 15 minutes. Then sprinkle a few drops of water on the block. Once it sizzles and immediately evaporates, you may add the prepared food. Let’s do it!

HIMALAYAN SALT PLATE SHRIMP SKEWERS

Ingredients:

1 pound shrimp, peel and deveined, tails intact

1 pound smoked sausage, skinless, cut into 1” pieces

2 tablespoons bacon olive oil

2 teaspoons lemon juice

1 tablespoon dried Italian seasoning blend

Olive oil for brushing salt plate

Instructions:

Place one shrimp around a piece of smoked sausage. Thread combo onto a skewer and lay in a large baking dish. Repeat until all pieces are used. In a small bowl, whisk together bacon olive oil, lemon juice, and Italian seasoning blend. Brush onto shrimp skewers. Cover and refrigerate while Himalayan salt plate is warming up. Preheat the grill to medium-high heat. At this time slowly preheat the Himalayan salt plate over 45 minutes.* See above. The internal grill temperature should be no higher than 450°. When ready, lightly brush the preheated salt plate with regular olive oil. Working in batches, place the shrimp/sausage skewers on the salt plate and cook, turning once, until the shrimp are pink, 2 to 3 minutes per side. Pieces will appear slightly charred. Transfer skewers to a warmed platter to prevent food from becoming too salty. Brush the salt plate with more olive oil between batches. Repeat. Serve immediately.

Yellowfin Tuna Nachos

What’s Cooking in Gail’s Kitchen? Country Casual Cravings: Yellowfin Tuna Nachos! I’m not much of a canned tuna fan, but I do appreciate sushi-grade tuna, even if it’s found in the freezer section of the grocery store. Yellowfin and Ahi are two favorites than have delicious flavor. Being mild, yet firm, they work well raw, cubed, seared, or grilled. Be adventurous. Who knows? You may occasionally substitute a beef burger for a tuna burger. But that’s a recipe for another day. Don’t knock it till you try it.

YELLOWFIN TUNA NACHOS

Ingredients:

Corn tortilla chips

1 cup Mexican cheese blend, shredded

1 tomato, diced

1 avocado, pitted and cut into chunks

1/4 teaspoon red pepper flakes

1/4 teaspoon dried oregano

1 tablespoon olive oil

2 4-ounce yellowfin tuna steaks

2 tablespoons black sesame seeds

1/2 cup Ranch dressing, prepared

2 tablespoons wasabi paste

Instructions:

Preheat the oven to 400°. Spray a baking dish with nonstick oil. Layer with corn tortilla chips. Next, layer Mexican shredded cheese over tortilla chips. Divide diced tomatoes and avocado chunks over all. Sprinkle with red pepper flakes and dried oregano. Bake for 10 minutes. Meanwhile, preheat a grill pan on high heat. Brush with olive oil. Sprinkle both sides of the tuna steaks with black sesame seeds. Sear steaks on the grill for 3 minutes; flip and sear 2 minutes longer. Remove to a plate and tent with aluminum foil for 2 minutes. Then slice yellowfin tuna steaks against the grain. Remove nachos from oven. Arrange sliced yellowfin tuna over nachos. In a small bowl, combine ranch dressing and wasabi paste. Stir until smooth. Drizzle over nachos. Serve immediately.

Xavier Dumpling Soup

What’s Cooking in Gail’s Kitchen? Country Casual Cravings: Xavier Dumpling Soup! Everyone loves dumplings, those little flavorful puffs of dough soaked in chicken broth, surrounded by fresh vegetables. Xavier soup got its name in honor of the patron saint of missionaries and may be served on the feast day celebration in December. I like the soup so much I can’t wait all year before making it again. Taste it once and you’ll see what I mean.

XAVIER DUMPLING SOUP

Ingredients:

1 tablespoon butter

1/2 yellow onion, diced

2 stalks celery, sliced

1/4 cup matchstick carrots

1 clove garlic, minced

2 cups chicken, cooked and shredded

4 ounces evaporated milk

10.5-ounce can cream of chicken soup, concentrated

20 ounces chicken broth

1/2 teaspoon sea salt

1/8 teaspoon black pepper

1 tube buttermilk biscuits

2 tablespoons flour

Parsley, for garnish

Instructions:

In a Dutch oven, warm butter over medium-high heat. Do not scorch. Add diced onions, sliced celery, matchstick carrots, and minced garlic. Sauté until tender, 6-8 minutes. Add shredded chicken, evaporated milk, condensed cream of chicken soup, and chicken broth. Bring to a simmer, stirring occasionally. Season with sea salt and black pepper. Cut the biscuits into quarter pieces; lightly toss in flour. Add the biscuit chunks to the pot; Cook 8-9 minutes. Once the biscuits are cooked through, ladle into bowls, garnish with parsley, and serve immediately.

Vineyard Pork Tenderloins

What’s Cooking in Gail’s Kitchen? Country Casual Cravings: Vineyard Pork Tenderloin! Pinot Noir is one of my favorite wines. Despite its complex flavors of woodsy cherry and forest-path raspberry, it leans toward a drier side without making your tongue stick to the roof of your mouth. That being said, it’s often challenging to figure out what food pairings work well with it. Obviously, pasta dishes provide a natural choice. But have you thought about grilled steak, roasted chicken, or pork tenderloin? Pause a moment; take a deep breath. Now transport yourself to a sun-soaked villa along a pebbled path to a harvest table overlooking acres of rolling hills bursting with ripe grape clusters. Taste and sip. Eventually you’re going to take a seat and linger over dinner. Read on.

VINEYARD PORK TENDERLOIN

Ingredients:

1 tablespoon olive oil

3/4 cup panko breadcrumbs

2 medium pork tenderloins, boneless

2 tablespoons mayonnaise

1 egg, beaten

1/4 teaspoon kosher salt

1/8 teaspoon black pepper

1/2 cup parmesan cheese, grated

1 tablespoon parsley flakes

1/2 teaspoon garlic powder

Instructions:

Preheat oven to 425°. Spray a wire rack with nonstick oil. Place rack onto a baking sheet. Set aside. Warm olive oil in a skillet over medium heat. Add panko breadcrumbs, stirring constantly, for 2 minutes until golden brown. Transfer crumbs to a shallow dish. Set aside to cool. To prepare pork tenderloins, place one piece in a gallon-size ziploc bag. Using a rolling pin, flatten the meat to 1/4” thickness. Place the pork loin aside and repeat with second piece. Pat dry on paper towels. In a shallow dish, whisk together mayonnaise, egg, kosher salt, and black pepper. Mix well. To the panko breadcrumbs, add parmesan cheese, parsley flakes, and garlic powder. Mix well. Dip each pork tenderloin in the egg mixture. Dredge completely in the breadcrumb mixture, pressing to stick. Repeat for extra crispy crust. Place tenderloins on wire rack. Bake for 15-20 minutes until tenderloins are golden brown. Serve immediately.

Toasted Cheese Ravioli

What’s Cooking in Gail’s Kitchen? Country Casual Cravings: Toasted Cheese Ravioli! Crunchy on the outside, creamy on the inside. Take a walk on the wild side by turning dumpling-style pasta dough into a flavorful, tart, and cheesy appetizer. Panko breadcrumbs provide a crunchier coating that taste more like a fried shell when baked. This is due to the fact that panko breadcrumbs are made from crustless bread, thereby making them have an airier texture. The results are amazing.

TOASTED CHEESE RAVIOLI

Ingredients:

8-ounces fresh cheese ravioli, found in the refrigerated section of the grocery store

1 egg

1 tablespoon milk

1/2 cup plain panko breadcrumbs

2 tablespoons grated parmesan cheese

1 teaspoon Italian seasoning

1/2 teaspoon garlic powder

1/2 teaspoon kosher salt

Marinara sauce, for dipping

Instructions:

Preheat oven to 425°. Spray a wire rack with nonstick oil. Place rack on a baking sheet. Set aside. In a shallow dish, whisk together egg and milk until fully incorporated. In another shallow dish, combine panko breadcrumbs, grated parmesan cheese, Italian seasoning, garlic powder, and kosher salt. Mix well. Working one at a time, dip ravioli in egg mixture. Allow excess to drip off before generously coating both sides with breadcrumb mixture. Place ravioli on prepared wired rack. Leave spaces between ravioli to allow even browning. Spray tops of ravioli with nonstick oil. Bake 10 minutes until ravioli is golden brown. Turn ravioli over and bake 10 minutes longer. Serve immediately with marinara sauce for dipping.

Quarantined Mac ‘n Cheese

What’s Cooking in Gail’s Kitchen? Country Casual Cravings: Quarantined Mac ‘n Cheese! We all know the effects of social distancing and being quarantined at home. It can reek havoc on mental health and increase anxiety, that’s for sure. Rising costs of groceries can contribute to feelings of fear, worry, and frustration as well. That’s when comfort foods come to the rescue. I actually made this dish when my kitchen was being renovated during the pandemic and all I had was a counter microwave for cooking meals. This one-bowl meal eased the pain of feeling like things were out of control. Perhaps it may help you, too.

QUARANTINED MAC ‘N CHEESE

Ingredients For One:

1/2 cup dried macaroni pasta

1/2 cup water

1/8 teaspoon sea salt

1/4 cup milk

1 tablespoon butter

1/2 cup cheddar cheese, finely shredded

Everything But Bagel Seasoning, for garnish

Instructions:

In a deep microwave-safe dish, combine macaroni pasta, water, and sea salt. Stir to combine. Microwave uncovered on high power for 2 minutes. Stir. Repeat for 4-8 minutes longer, stirring every 2 minutes until pasta is cooked. Using oven mitts, remove dish from microwave. Stir in milk, butter, and cheddar cheese. Microwave on high power in 30-second intervals until cheese has melted and forms a creamy sauce. This will take about 90 seconds total. Garnish with a sprinkling of Everything But Bagel Seasoning. Serve immediately.

Pom Pom Salad

What’s Cooking in Gail’s Kitchen? Country Casual Cravings: Pom Pom Salad! You can’t miss the incredibly bright red edible seeds of a ripe pomegranate. It’s actually the only part of the fruit that can be eaten. The naturally sweet and slightly tart flavor of an aril almost tastes like a piece of candy. They look incredibly enticing when sprinkled on a leafy salad. Wouldn’t you agree?

POM POM SALAD

Ingredients:

1 lime, juice of

1 tablespoon olive oil

1 tablespoon raw honey

1/8 teaspoon kosher salt

1 smidgen cinnamon

1/8 teaspoon chili-lime seasoning

25 baby spinach leaves, chopped

6 navel oranges, peeled and sliced into rounds

1/4 cup pomegranate arils

Instructions:

To make the dressing, in a small bowl combine the lime juice, olive oil, raw honey, kosher salt, cinnamon, and chili-lime seasoning. Whisk until smooth. Set aside. To assemble salad, place baby spinach leaves on a large platter or individual salad plates. Arrange orange slices on spinach. Drop pomegranate arils on top. Drizzle the prepared dressing over salad. Serve slightly chilled.

Everything Bagel Compound Butter

What’s Cooking in Gail’s Kitchen? Country Casual Cravings: Everything Bagel Compound Butter! This fabulous concoction is so versatile you may want to keep a roll on hand for the taste of gourmet at home. It promises to supercharge anything that comes near it. The buttery seeds, fried garlic, and sea salt combo transform ordinary foods into aromatic specialties. And the best part of all, is you’ve become the master chef who created it. Whether you make it a gift-giving delight or pantry staple, compound butters never disappoint.

EVERYTHING BAGEL COMPOUND BUTTER

Ingredients:

1 cup unsalted butter, softened

1 1/2 tablespoons Everything But Bagel Seasoning*

Instructions:

Instructions:

In a mixing bowl, combine unsalted butter and Everything But Bagel Seasoning. Stir until smooth. Place a sheet of waxed paper on the counter. Spoon compound butter onto waxed paper. Roll layer of waxed paper over butter to form a log. Roll tight; twist ends. Refrigerate for one hour or until firm. Mix into grits, spread on artisan breads, or drizzle over pizza crust.

*For a DIY homemade version, click the following link. Http://Snapshotsincursive.com/2018/07/17

Original Pistachio Party Ball

Eating My Way Through the Holidays. Festive Food Gifts: Original Pistachio Party Ball! Nothing says par-tay like a holiday cheese ball. Instead of picking one up at the grocery store this year, why not surprise the family and make something a little different. Pistachios tend to be shoved aside in favor of walnuts and pecans, mostly due to their cost. But I guarantee you, people will sit up and take notice of them embedded in this party cheese ball. A little goes a long way, especially when rolled on the outside of the cheese ball. For those who enjoy the experience of cracking the shell to pluck out the pistachio, you not only get to nibble as you crack, you also justify the savings involved over the cost of pistachios without shells. Now there’s a thought worth considering.

ORIGINAL PISTACHIO PARTY BALL

Ingredients:

8 ounces Neufchâtel cheese, room temperature

4 tablespoons unsalted butter, softened

1 teaspoon zesty Italian salad dressing dry mix

1 teaspoon Worcestershire sauce

1/2 teaspoon red pepper flakes

1 cup extra sharp cheddar cheese, shredded

1 cup pistachios, roughly chopped

Instructions:

In a bowl, cream together Neufchâtel cheese and unsalted butter until smooth. Sprinkle in zesty Italian dry mix. Mix well. Add Worcestershire sauce and red pepper flakes. Fold in sharp cheddar cheese. Stir until well combined. Place a sheet of plastic wrap on the counter. Layer with chopped pistachio nuts. Transfer cheese mixture onto the nuts. Wearing disposable gloves, form the cheese mixture into a ball, turning to cover each side with chopped nuts. When completely covered, wrap the pistachio cheese ball in a clean piece of plastic wrap. Refrigerate at least one hour to intensify flavors. Serve with assorted crackers.