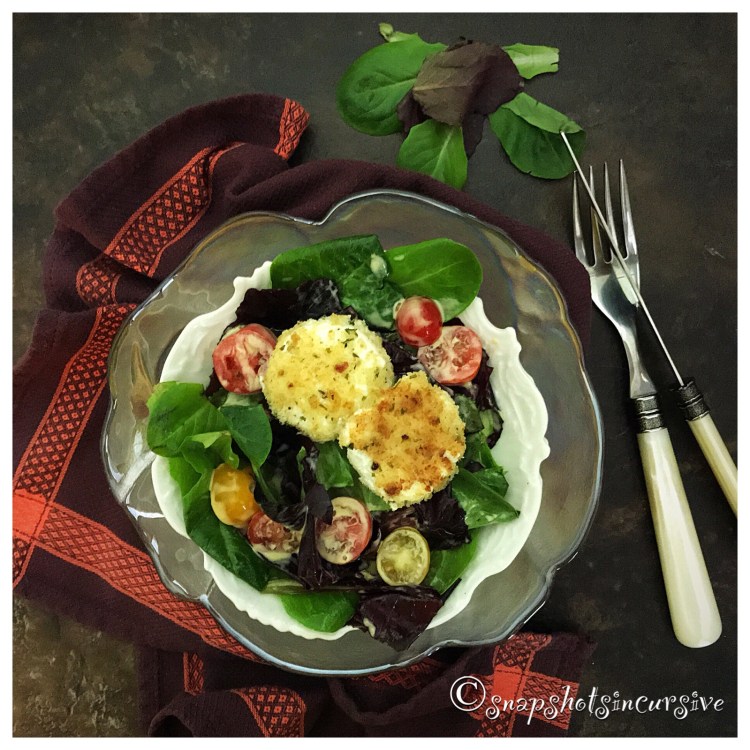
Eating My Way Through the Alphabet; Letter D

What’s Cooking in Gail’s Kitchen? Food for Sharing: Deveined Shrimp Queso! As the nights turn cool, cozy up around the fire with warm appetizers that are sure to please. Save prep time by beginning with precooked shrimp. It takes all the worry out of wondering if the shrimp is cooked through. I find the convenience of having frozen shrimp on hand an advantage. You will, too. 
DEVEINED SHRIMP QUESO
Ingredients:

2 tablespoons lemon olive oil

1 pound jumbo shrimp, cooked, peeled, and deveined 

1/8 teaspoon seasoned salt

1/2 teaspoon seafood seasoning 

1/8 teaspoon garlic powder

1/8 teaspoon red pepper flakes 

1/4 cup tequila 

1/4 cup margarita mix, liquid

1/2 teaspoon cornstarch 

1 tablespoon water

3/4 cup Monterey Jack cheese, shredded

1/4 cup Romano cheese, shaved

Fresh dill

Tortilla chips

Crostini 
Instructions:

Preheat oven to 350°. In a large skillet over medium heat, add olive oil, shrimp, seasoned salt, seafood seasoning, garlic powder, and red pepper flakes. Cook 5 minutes; turn and cook 2 minutes longer. Reduce heat to simmer. Cover shrimp with tequila and liquid margarita mixture. Add butter. Cook 5 minutes. Transfer shrimp to an ovenproof casserole dish. Arrange in single layer. Mix the cornstarch and water until smooth. Bring pan drippings to a boil. Gradually add cornstarch mixture. Stir constantly as sauce thickens. If necessary, add more water. Pour sauce over shrimp. Cover with Monterey Jack cheese, spreading evenly. Top with shaved Romano cheese. Bake for 20 minutes or until cheese is golden and bubbly. Garnish with fresh dill. Serve warm with tortilla chips or crostini. 

Eating My Way Through the Alphabet; Letter T

What’s Cooking in Gail’s Kitchen? Timeless Classics: Tex-Mex Tortilla Soup! One thing I love about Fall is the convenience of crockpot meals. Throw all the ingredients together, stir, and then forget about it for a few hours. Do something fun……and I don’t mean raking leaves or shelling walnuts. Take a nature walk, visit an apple orchard, choose a mum plant for your front door, photograph colorful pumpkins and gourds. You get the idea. Don’t let the season pass you by. Autumn is in full swing and Mother Earth has splattered the landscape with vibrant colors. 
TEX-MEX TORTILLA SOUP
Ingredients:

1 pound lean ground beef

20-ounce can diced tomatoes and green chilies, mild flavor

10-ounce can diced tomatoes, zesty flavor

15-ounce can black beans, organic

15-ounce can corn, drained

15-ounce can kidney beans, drained

4-ounce packet taco seasoning mix

4-ounce packet ranch seasoning mix

1/2 cup Monterey Jack cheese, shredded 

1/2 cup Greek yogurt

3 green onions, snipped

1/3 cup sliced jalapeño peppers 
Instructions:

Brown ground beef. Drain any liquid. Place ground beef, tomatoes (juice included), black beans, corn, kidney beans, taco dry seasoning mix, and ranch dry seasoning mix in a slow-cooker. Mix well. Cover and cook on High for 3-4 hours OR on Low for 6-8 hours. Uncover. Ladle Tex-Mex Tortilla Soup into bowl and garnish with Monterey Jack cheese, a dollop of Greek yogurt, onion snips, and jalapeño pepper rings. Serve with tortilla chips or crackers. 

Eating My Way Through the Alphabet; Letter B

What’s Cooking in Gail’s Kitchen? Eat More: Beef and Noodles! I decided to take the day off from cooking so I tag-teamed with Le Creuset. All the ingredients went into the enameled cast iron French oven pretty much all day. This reliable way of slow-cooking gave me the opportunity to spend time ironing tea towels and perusing my towering stack of current magazines. As the day wound down, the mouth-watering aromas filled the air and before I knew it, dinner was ready. The roast had basted in its own juices to blend with the herbs, wine, and vegetables for delicious results. Now leftover recipes will be a breeze. Well done! 
BEEF AND NOODLES 
Ingredients:

3 pound sirloin tip roast, frozen

1 can beef consommé 

1/2 cup ginger beer

1 tablespoon Hawaiian Rub*

8 ounces homestyle noodles

1/2 cup mushrooms, sliced

1/2 cup red wine

1/4 cup cornstarch 

Parsley sprigs
Instructions:

Place frozen sirloin roast in a Dutch oven with a lid. Add the can of beef consommé and ginger beer. Sprinkle Hawaiian Rub over roast. Cover. Put in oven and set the temperature to 225°. After six hours, add noodles and mushrooms. Bake covered 45 minutes longer. Remove pan from oven and ladle the roast drippings into a saucepan. It should be about 2 cups of liquid. Bring to a boil. Mix the red wine and cornstarch, stirring until smooth. Slowly stir into the roast drippings, stirring occasionally to prevent lumps. As gravy thickens, reduce heat to simmer. If necessary add water if it becomes too thick. Remove beef to a platter and shred, as needed. Return shredded beef to the noodle/mushroom mixture. Cover with gravy. Transfer to serving portions. Garnish each dish with parsley sprig.  
* Hawaiian Rub is available from the Salty Wahine Gourmet Hawaiian Sea Salts company. I get no recompense for mentioning this product in my recipe. 

Eating My Way Through the Alphabet; Letter Y

What’s Cooking in Gail’s Kitchen? All the Buzz: Yucca Crispy Sticks! From time to time I get a little help from my friends. Recently The Dancing Herbalist* suggested I share a post on the yucca root with my readers. To be honest, I have yucca plants growing all over my yard, and while I enjoy their hardy green foliage year round, and their beautiful white fan of blossoms every summer, I never gave them a second thought as a food source. Apparently they contain dietary fiber advantageous in controlling blood sugar and cholesterol levels in subtropical regions. Tasting very much like a potato, with roots that simulate a sweet potato, the yucca root is an healthy option loaded with antioxidants. I admit, I learn something new every day. 
YUCCA CRISPY STICKS
Ingredients:

1 large yucca, peeled and cut into sticks

1-2 tablespoons olive oil

1/2 teaspoon chili powder 

1 teaspoon seasoned salt

1/8 teaspoon cracked black pepper

1/2 cup Panko seasoned bread crumbs

1/3 cup Italian seasoned bread crumbs, finely ground

1/4 cup Parmesan cheese, grated
Instructions:

Preheat oven to 425°. Peel yucca with vegetable peeler to remove waxy skin. Cut into sticks, as uniform in thickness as possible. Do not make too thin. Place in a 2-quart pan with enough water to cover. Bring to boil. Cook 5-7 minutes. Remove and drain immediately. Submerge in an ice bath. Transfer drained sticks to a large bowl. Coat with olive oil and chili pepper, seasoned salt, and cracked black pepper. Mix together panko crumbs, Italian seasoned bread crumbs, and Parmesan cheese. Spread on waxed paper. Roll each seasoned yucca stick in the crust mixture to coat and line in a single layer on a wire rack nested on a baking sheet. Bake 10 minutes, turn and bake 5 minutes longer until golden brown. Serve warm with spicy mayo. 
Ingredients for Spicy Mayo:

3 tablespoons mayonnaise 

1-2 tablespoons sriracha sauce

1 teaspoon lemon juice

1 teaspoon soy sauce

1 teaspoon chili pepper rings
Instructions:

Combine mayonnaise, sriracha sauce, lemon juice, and soy sauce in a bowl. Mix well until smooth. Garnish with chili pepper rings. 
* Please visit The Dancing Herbalist at 

https://thedancingherbalist.wordpress.com

Eating My Way Through the Alphabet; Letter W

What’s Cooking in Gail’s Kitchen? Appetizers to Desserts: Winterfest Walking Tacos! Here’s the perfect “Grab and Go” snack when you’re heading out the door. This time of year towns all over the world celebrate the holiday season with dazzling displays of outdoor Christmas lights. From Santa’s Workshop to high-tech Winter Wonderlands, the animation never stops. Pile the kids on board and have a tailgate party in your car, truck, or SUV. Keep it simple by using plastic picnic tumblers for easy handling. Enjoy a tasty snack while embracing the spirit of the holidays. 
WINTERFEST WALKING TACOS 
Ingredients:

1 pound ground beef

1 package taco seasoning mix

15-ounce can chili beans

10-ounce can tomato bits and sauce 

2 cups shredded romaine

1 cup cheddar cheese, finely shredded 

10-ounce bag of corn chips, slightly crushed

1/3 cup salsa
Instructions:

Brown ground beef in a large skillet. Stir over medium heat until completely cooked. Drain. Add taco seasoning packet, chili beans, tomato bits and sauce. Stir well. Bring to a boil. Reduce heat and simmer uncovered for 20 minutes or until thickened. Stir occasionally. Before serving, assemble corn chips in the bottom of each cup followed by beef mixture and toppings of choice. Eat with a fork.  

Eating My Way Through the Alphabet; Letter P

What’s Cooking in Gail’s Kitchen? Appetizers to Desserts: Paleo Pepper Steak! Before you delete this post, hear me out for sec. Paleo does not mean blah, boring, and tasteless. In fact, this recipe gives you permission to only eat the stuff you crave. No hidden sauces or funky herbs. Basically, what you see is what you get. (Disclaimer: Pay no attention to that slice of garlic bread. It was put in the photo by my alter ego who loves carbs.) The green and red peppers are so fresh you may feel like nibbling on one or two as you slice them into strips. And the caramelized onions compliment the taste of steak, in my opinion.  
PALEO PEPPER STEAK
Ingredients:

1 large green bell pepper, sliced and seeds removed 

1 large sweet red pepper, sliced and seeds removed

1 large yellow onion, skin removed and sliced

2-3 tablespoons olive oil

1/2 teaspoon seasoned salt

1/8 teaspoon garlic powder 

1/8 teaspoon cracked black pepper
2-6 ounce filet mignon steaks

Sea salt, black pepper, and garlic powder steak to taste

1 pat of butter
Instructions:

Salt and pepper both sides of the steak while the gas grill is preheating from 450°-500°. At this time sprinkle the steak with garlic powder as well. The salt begins to draw out a little bit of moisture which makes the steak sizzle when it hits the grill grate, sealing in the flavor. For accuracy in grilling, my husband sets the timer on his cell phone, which is quite handy. Grill the steak for 2 1/2 minutes on one side before flipping over for the remaining 2 1/2 minutes. The finished steak will be medium-rare. Now this is the most difficult part. Let it rest for about 5 minutes before serving. The juice will reabsorb back into the steak to give you that moist and meaty taste. 
Meanwhile, sauté pepper and onion slices in olive oil and seasonings in a large skillet on medium heat. Turn often to gradually brown the vegetables and avoid burning. They will be tender in about 20 minutes. Reduce heat to low simmer to keep warm. Before serving, surround the steak with peppers and onions. Finish with a pat of butter.  

Eating My Way Through the Alphabet; Letter P

What’s Cooking in Gail’s Kitchen? The Daily Special: Prosciutto Wrapped Asparagus! For all the asparagus lovers out there, prepared to be impressed. Really impressed. And if you’ve never had the desire to taste a delicate stalk of asparagus that seems to demand an additional fee on the restaurant menu, you may have discovered a reason to give it a whirl. Prosciutto. These two ingredients were destined to marry forever and ever, in my opinion. 
PROSCIUTTO WRAPPED ASPARAGUS 
Ingredients:

1-pound fresh asparagus spears, ends trimmed

2 tablespoons olive oil

1/4 teaspoon seasoned salt

1/8 teaspoon Mrs. Dash Garlic & Herb Seasoning 

6 ounces prosciutto, thinly sliced
Instructions:

Raise the oven rack to its highest level, which should be about 5 inches below the coils of the broiler. Preheat the broiler. Meanwhile take the asparagus spears and place in a gallon zip-lock bag. Add the olive oil and seasonings. Seal the bag, squeezing out the air, and flip to coat all pieces. Slice the prosciutto lengthwise. Taking one asparagus spear at a time, begin wrapping prosciutto midway from the tip to the stem base, spiraling as you go, overlapping the seams slightly. Place it on a baking sheet sprayed with non-stick oil. Repeat until all pieces are prepared. Before broiling, make sure there is space between the asparagus. Broil for 3 minutes, remove the baking sheet, turn asparagus with a tongs, return to the oven, and broil another 3 minutes. Pieces should slightly char and appear crisp. The secret is to keep them spaced. For best results, choose medium-size asparagus instead of very thin stalks.