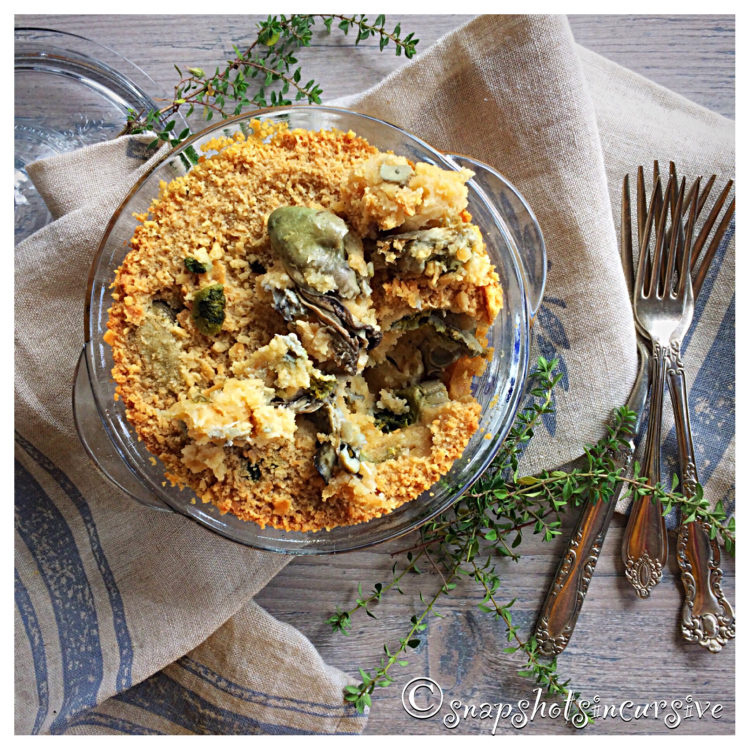
Red Pepper Bruschetta Pasta

What’s Cooking in Gail’s Kitchen? Food With Soul: Red Pepper Bruschetta Pasta! I truly enjoy perusing Italian gourmet markets. There’s something charming and romantic about choosing a jar of private-label olive oil, flavored balsamic vinegar, house roasted red pepper bruschetta, or four-fruit jam. An extensive collection of imported products can send my mind spinning as I begin to salivate with serving ideas. There are often aromas of freshly baked bread, smoked and cured meats, unique deli offerings, an antipasto bar, pizza nook, and fresh burrata station. San Marzano tomatoes always seem to make it into my cart as well as olive tapenades and basil pesto or marinated artichoke hearts. Before you leave, don’t forget a nice bottle of Chianti.

RED PEPPER BRUSCHETTA PASTA

Ingredients:

8 ounces spaghetti pasta

1 tablespoon kosher salt

1/3-1/2 cup red pepper bruschetta, prepared

Basil leaves, for garnish

Instructions:

Bring a large pot of water to boil. Cook pasta in salted water for 8-10 minutes or until al dente, stirring occasionally. Drain pasta in a colander. Transfer cooked pasta back to the pot. Add prepared red pepper bruschetta mixture. Gently toss; heat through. Using tongs, place spaghetti clusters into a serving bowl. Garnish with fresh basil leaves. Serve immediately.

Old Bay Mayo

What’s Cooking in Gail’s Kitchen? Food With Soul: Old Bay Mayo! First of all, there is no substitute for Old Bay seasoning as a core ingredient in this post. It’s a sacred concoction, invented in the 1940s and respected by Southerners, containing 18 unspecified ingredients. If you try to use Cajun, Jerk, or generic blends, don’t blame me if the results are less than phenomenal. What I can assure is that it taste ah-mazing with shrimp, crab cakes, seafood, and more. Turn Old Bay Mayo into an aioli for sandwiches, dressing for salads, or condiment for meats. I can see you coming up with a dip for french fries, too. Don’t blame me; I’m just the messenger.

OLD BAY MAYO

Ingredients:

1/2 cup mayonnaise

2 teaspoons fresh chives, chopped

2 teaspoons dill weed, snipped

2 teaspoons lemon zest, grated

1 tablespoon lemon juice

1 teaspoon Old Bay* seasoning

Instructions:

In a small bowl, whisk together mayonnaise, fresh chives, dill weed, lemon zest, lemon juice, and Old Bay seasoning. Stir until smooth. Cover and refrigerate for one hour. Serve as a condiment or dipping sauce for seafood.

*I receive no recompense for mentioning this product.

Legendary Pizza Burger

What’s Cooking in Gail’s Kitchen? Food With Soul: Legendary Pizza Burger! I’ll never forget my first experience eating a pizza burger. I was probably 16 years old at the time. I worked in a ladies retail clothing store downtown. On my dinner break, I walked across the street where a drugstore had a lunch counter with a grill and fryer. Being a crazy kid who loved anything pizza, I ordered it off the menu. Upon first bite, this white goo began to overflow across my hands to the plate below. My first thought was, “Ohmygosh, this burger is rotten with a slimy white stuff running out of it!” Fortunately my brain kicked in and I realized what I was actually tasting was mozzarella cheese. From that day on, I was a champion for anything pizza burger. And the remarkable afterthought is, now I compare every other menu item pizza burger to it. Unexpected, but true.

LEGENDARY PIZZA BURGER

Ingredients:

1 pound lean ground beef

1 teaspoon Italian seasoning

1 teaspoon sea salt

1/2 teaspoon black pepper

4 slices fresh mozzarella cheese

4 brioche buns, split and toasted

1/2 cup prepared pizza sauce, warmed

Fresh basil, for garnish

Instructions:

Preheat gas grill to 350°. In a large bowl, combine lean ground beef, Italian seasoning, sea salt, and black pepper. Form mixture into 8 patties. Place one slice of fresh mozzarella cheese into the diameter of a patty. Press another patty on top; pinching together to seal. Repeat until all four patties are formed. Cook directly on the grill. Close lid and grill for 6-7 minutes per side. Transfer pizza burgers to a platter. Serve between brioche buns. Top each pizza burger with a dollop of pizza sauce. Enjoy.

Jumbo Shrimp Over Avocado

What’s Cooking in Gail’s Kitchen? Food With Soul: Jumbo Shrimp Over Avocado! Grill marks on food are like a person’s signature tattoo. I don’t know about you, but when I see that food is slightly charred, visions of smoky goodness can cause me to drool. The creaminess of the warmed avocado filled with spicy salsa takes me down a country road to memorable experiences of Mexican favorites. The grilled shrimp is enhanced by the savory herbs, adding tangy flavors seductive to the tongue. Not only is this a quick meal or tempting appetizer, it transforms every cook into a gourmet chef. You should try it.

JUMBO SHRIMP OVER AVOCADO

Ingredients:

1 large ripe avocado, halved with pit removed

Fresh lime juice

6 frozen precooked jumbo shrimp, tail on and thawed

2 tablespoons olive oil

1 teaspoon Italian seasoning blend

1 teaspoon sea salt

1/4 teaspoon garlic powder

1/4 cup prepared salsa

Dill sprig, for garnish

Instructions:

Preheat grill to 400°. In a small dish, combine olive oil, Italian seasoning blend, sea salt, and garlic powder. Mix well; set aside. Squeeze lime juice onto both halves of avocado. Brush each avocado, as well as both sides of the shrimp, with the seasoned olive oil. Place directly onto the grill grates. Close lid. Cook the avocados for 4 minutes, or until slightly charred. Cook the jumbo shrimp for 2 minutes. Then flip the shrimp, close the lid, and cook 2 minutes longer. Transfer all to a platter. Spoon the salsa into the avocados. Arrange 3 jumbo shrimp over each portion. Garnish with a sprig of fresh dill. Serve immediately.

Garlic Wine Red Snapper

What’s Cooking in Gail’s Kitchen? Food With Soul: Garlic Wine Red Snapper! Before I begin, Rule Number One: When marinating fish, always refrigerate. As fish sits in a marinade at room temperature, it encourages bacteria growth, which can be a bad thing. The olive oil makes a wonderful tenderizer making the fish soft and juicy. When seasonings are added at the same time, the results elevate the flavor. By grilling the fish fillets at a high temperature, the meal transforms into perfection on a plate.

GARLIC WINE RED SNAPPER

Ingredients:

1/2 cup garlic wine vinegar

1/4 cup olive oil

2 6-ounce red snapper fillets

1/2 teaspoon Italian seasoning blend

1/8 teaspoon black pepper

Juice of fresh lemon

3 tablespoons butter, melted

Instructions:

Arrange the red snapper fillets in a shallow dish. Pour the garlic wine vinegar over the fish. Allow the vinegar to surround the fish. Pour olive oil over top. Sprinkle Italian seasoning blend and black pepper over all. Cover dish with plastic wrap and refrigerate for 30 minutes. Preheat the grill to 450°. Transfer red snapper directly onto the grill grates. Close lid. Set timer for 4 minutes. Discard marinade. Using a fish spatula, flip fish and grill 4 minutes longer with lid closed. Meanwhile, melt butter and pour into individual cups. Squeeze fresh lemon juice into warm butter. Remove red snapper fillets from grill. Serve with melted lemon butter poured over top.

Foiled Potatoes

What’s Cooking in Gail’s Kitchen? Food With Soul: Foiled Potatoes! Have I mentioned how much I like my new outdoor kitchen? Living in Florida, the weather is so tropical it makes cooking outdoors an effortless way to prepare meals. Grilling seems to make food taste better and roasted potatoes easily become a star attraction. And the best part is dining alfresco. This is what I call a “stay-cation”.

FOILED POTATOES

Ingredients:

2 baking potatoes

1/2 sweet onion, sliced

3 tablespoons butter

1/2 teaspoon seasoned salt

1/8 teaspoon black pepper

Instructions:

Preheat the grill to 400°. Wash the potatoes and pat dry. Pierce each potato with a knife. Microwave for 4 minutes on 100% power. Remove from microwave and allow to cool, slightly. Spray a sheet of aluminum foil with nonstick oil. Cut the potatoes into 1/4” slices. Arrange potatoes on foil. Top with sliced onions. Add pats of butter over all. Sprinkle with seasoned salt and black pepper. Fold the packet to seal. Place the sealed foil packet directly onto the grill grates. Close lid. Cook for 10 minutes; carefully flip packet and cook 10 minutes longer. Transfer foiled potatoes to a platter. Be aware of steam when the packet is opened. Serve immediately.

Zucchini Meatball Bateaux

What’s Cooking in Gail’s Kitchen? Palatable Possibilities: Zucchini Meatball Bateaux! Call me “Fancy Shmancy” today since the title of this recipe makes it gourmet all-the-way. Bateaux means Boat. And in the world of food, nothing looks more like a boat than zucchini, especially when it’s sliced horizontally and scooped out. Amirite? Actually, I like this recipe because I always seem to have a bag of frozen Italian meatballs on hand in my freezer. Most days I make my own homemade marinara sauce because I like to stock my pantry with a variety of Italian Roma tomatoes that are imported from Italy. Obviously you can do the same. Recipes are designed to modify in ways that bring accolades to you for the extra effort. If time is of the essence, follow the instructions below. I promise you won’t be disappointed.

ZUCCHINI MEATBALL BATEAUX

Ingredients:

2 medium zucchini, sliced in half lengthwise

16 precooked frozen Italian meatballs, thawed

15-ounce jar prepared marinara sauce

1/2 cup mozzarella cheese, shredded

1/2 cup parmesan cheese, shredded

8 ounces fresh burrata cheese

1 tablespoon olive oil

1/4 teaspoon Italian herb blend

Fresh basil, for garnish

Instructions:

Preheat oven to 400°. Arrange sliced zucchini halves on a baking sheet that has been sprayed with nonstick oil. Scoop out the center of each zucchini, using a spoon, to remove seeds and create a well to hold the fillings. Spread a little marinara in each zucchini. Place 4 Italian meatballs in each. Divide the remaining marinara between them. Top with mozzarella and parmesan cheeses. Bake 20 minutes, or until cheese is melted and bubbly. Transfer zucchini boats to a platter. Place fresh basil leaves on each end. Divide the burrata into four sections and arrange dollops as desired. Drizzle each dollop with olive oil and sprinkle with Italian herbs. Serve immediately.

Yellow Squash Panko

What’s Cooking in Gail’s Kitchen? Palatable Possibilities: Yellow Squash Panko! Many of you already know this particular vegetable is a second cousin to zucchini. The skin is tender, glossy smooth, and edible which makes it a no-fuss dinner companion. Although its flavor is mild, when cooked it actually becomes buttery sweet with a slightly nutty nuance. Try to buy yellow squash that is 6”-8” in size. You’ll know because the larger it is, the more likely the skin will appear bumpy and less tender. You’ll also notice a lot of seeds, once you cut into it. By then you’ll need to rethink dinner and purée it for soup. Hindsight is 20/20 after all.

YELLOW SQUASH PANKO

Ingredients:

2 yellow squash

1-2 tablespoons olive oil, for sauté

Ingredients for Herbed Oil:

1 tablespoon lemon juice

1 tablespoon olive oil

1/8 teaspoon garlic powder

1 teaspoon dried parsley

1/4 teaspoon sea salt

1/8 teaspoon cracked black pepper

Ingredients for Crumb Topping:

1/4 cup panko bread crumbs

1/4 cup parmesan cheese, grated

1 teaspoon dried parsley

1/4 teaspoon sea salt

1/8 teaspoon red pepper flakes

Instructions:

Wash and pat dry yellow squash. Slice into 1/4” rounds; set aside. To make the herbed oil, whisk together lemon juice, olive oil, garlic powder, dried parsley, sea salt, and cracked black pepper. Set aside. To make the crumb topping, toss panko bread crumbs, grated parmesan cheese, dried parsley, sea salt, and red pepper flakes into a bowl. Mix well; set aside. To prepare yellow squash, warm olive oil in a large skillet over medium heat. Add the yellow squash and sauté for 8 minutes. Turn occasionally to cook both sides. Squash should be soft, but not mushy. Remove from heat. Drizzle herbed oil over yellow squash. Transfer to a platter. Top with panko crumb topping mixture. Garnish with fresh basil leaves, if desired. Serve immediately.

Maryland-Style Crab Cakes

What’s Cooking in Gail’s Kitchen? Palatable Possibilities: Maryland-Style Crab Cakes! When my step-daughter, Brandi, gifted me with a copy of one of her favorite seafood cookbooks, I knew exactly what dish I was going to make first. After all, the cookbook is based on a popular Hilton Head Island restaurant that has become her family’s traditional spot whenever they visit. Because Florida has an abundance of connections for fresh seafood, vendors are able to get premium, wild-caught crab meat to sell to their customers. Farmers Markets, as well as fish companies specialize in pre-made crab cakes. One taste and I thought, why compete with the best? So, I use two or three resources for incredible tasting Maryland crab cakes. Supporting local businesses builds strong communities and helps everyone thrive. For dinner in a snap, read on.

MARYLAND-STYLE CRAB CAKES

Ingredients:

6 pre-made Maryland crab cakes

2 tablespoons olive oil

2 tablespoons red onion, diced

1 garlic clove, minced

1 cup diced tomatoes

1 cup spicy Bloody Mary mix

1/2 teaspoon Worcestershire sauce

1/4 teaspoon sea salt

1/8 teaspoon black pepper

Lemon slices, for garnish

Parsley flakes, for garnish

Instructions:

To make the gazpacho sauce, warm olive oil in a sauté pan over medium-high heat. Add red onion and minced garlic. Cook 1-2 minutes. Add diced tomatoes, Bloody Mary mix, Worcestershire sauce, sea salt, and black pepper. Stir to combine. Reduce heat and simmer 5 minutes. Transfer gazpacho to a bowl. Refrigerate until ready to use. To bake the crab cakes, preheat oven to 425°. Place crab cakes on a baking sheet that has been sprayed with nonstick oil. Bake 12 minutes, flip, and bake 3 minutes longer until golden brown. To serve, ladle the slightly chilled gazpacho onto a plate; center a crab cake on top. Arrange lemon slices. Sprinkle with parsley flakes.