Eating My Way Through the Alphabet: Letter C

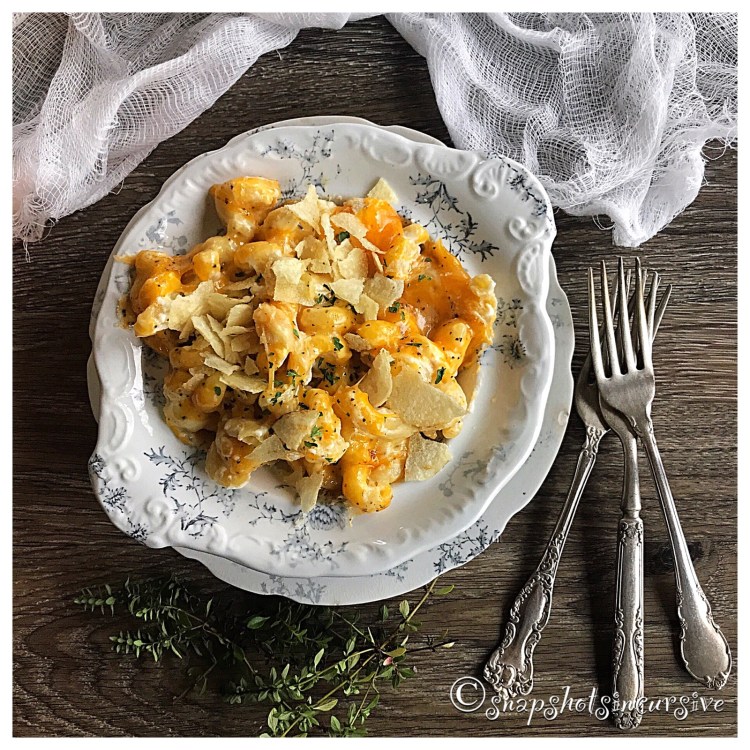
What’s Cooking in Gail’s Kitchen? The Color of Food: Crockpot Mac ‘n Cheese! I find this is seriously the best way to make macaroni and cheese for a crowd without all the fuss. It is so kid-friendly, in fact, you may discover you have an extra pair of helping hands without even asking. When using a slow cooker, the pasta softens as the sauce thickens into a hot, creamy, extra-cheesy youthful delight. Top it off with crushed potato chips for a heart-warming side dish.

CROCKPOT MAC ‘N CHEESE

Ingredients:

1 pound cellentani pasta, also known as cavatappi, uncooked

4 tablespoons butter, cut into tablespoon pieces

4 ounces cream cheese, cut into cubes

3/4 cup mayonnaise

1 teaspoon kosher salt

1/2 teaspoon cayenne pepper

1/2 teaspoon black pepper

3 cups milk

1/2 cup heavy cream

2 cups sharp cheddar cheese, shredded

1/2 cup pepper jack cheese, shredded

1 cup potato chips, crushed

Instructions:

Spray the crockpot with nonstick oil. Pour the uncooked pasta into the bottom of the slow cooker. Layer the butter and cream cheese chunks over the pasta. In a large bowl, combine mayonnaise, kosher salt, cayenne pepper, black pepper, milk, and cream. Mix well. Pour over pasta. Stir to blend. Spread pasta into an even layer, being sure to coat everything in sauce. Cover and cook on LOW for 1-2 hours, stirring every 30 minutes. Be sure to spread macaroni into one layer after stirring to keep pasta coated with sauce. When pasta is done, sprinkle shredded cheddar and pepper jack over all. Stir to combine. Replace cover and cook 10 minutes until cheese is creamy and melted. Sprinkle with crushed potato chips before serving.

Eating My Way Through the Alphabet: Letter A

What’s Cooking in Gail’s Kitchen? The Color of Food: Alphabet Soup! Remember when you were a kid and your mom placed a steaming bowl of alphabet soup in front of you? The first thing I did was grab the spoon and search for the letters in my name. My mother, in her wisdom, would say, “Begin by eating the letters you know don’t count.” Not only was it a lesson in letter recognition, but I ultimately ended up finishing my soup before it got cold. Smart lady. How do you eat Alphabet Soup?

ALPHABET SOUP

Ingredients:

8 cups chicken broth

1 pound boneless chicken tenders

1 cup yellow onion, chopped

1 cup mixed vegetables, frozen

3/4 cup celery, chopped

1 1/2 teaspoon seasoned salt

1/2 teaspoon black pepper

1/2 teaspoon dried thyme

1/4 cup dried parsley

3 bay leaves

1/4 cup butter

1 cup alphabet pasta

Instructions:

In a slow cooker, combine chicken broth, boneless chicken tenders, yellow onion, mixed vegetables, celery, seasoned salt, black pepper, dried thyme, dried parsley, and bay leaves. Cook on high for 4 hours. Remove chicken and shred. Return it back to the slow cooker. Add alphabet pasta and butter. Gently stir to combine. Cook 30 minutes longer. Remove bay leaves before serving.

Eating My Way Through the Alphabet: Letter O

What’s Cooking in Gail’s Kitchen? The Daily Special: Oven-Glazed Pears! Presenting a dessert as sweet as honey and as satisfying as a piece of pie. Make one for yourself or enough for a crowd. The recipe measurements below only need one pear, which is two servings. Perfect for dessert for two. The aroma alone will make your house smell amazing!

OVEN-GLAZED PEARS

Ingredients:

1 slightly firm pear; peeled, halved, and cored

2 tablespoons sweet dessert wine

1 tablespoon vanilla extract

1 tablespoon honey

1 tablespoon butter, unsalted

Cinnamon to taste

Instructions:

Preheat oven to 375°. Arrange pear halves in a small baking dish, cut side up. Sprinkle cinnamon, then vanilla over pears. Dot each pear with butter. Drizzle honey over each pear half. Pour in the sweet wine. Roast for 40 minutes. Using oven mitts, carefully remove the dish from the oven. Tilt the dish so the juices pool in one corner. Take a spoon and baste the pears. Turn each pear over and return to the oven to roast 20 minutes longer or until a paring knife inserts easily. Baste occasionally for a caramelized finish. The sauce will thicken slightly. Serve warm with vanilla bean ice cream.

Eating My Way Through the Alphabet: Letter G

What’s Cooking in Gail’s Kitchen? The Daily Special: Gourmet Shrimp Conchiglie Pasta!

(Inspired by Other Bloggers)

Every once in awhile you have to pause and share the inspiration of fellow bloggers. Today is that day for me. My friend, Andrea, of http://oliveandpastel.wordpress.com/2015/06/24

posted a wonderful recipe for shrimp fettuccine recently. I used her recipe with the ingredients I had on hand in my pantry and created a different version of an old favorite. You can do the same with recipes you find on my blog. It’s really very simple, and the results are tastefully rewarding. Here’s my version.

GOURMET SHRIMP CONCHIGLIE PASTA

Conchiglie is an Italian word which translates to “seashells”, which describes the shape of this pasta. The gourmet part is the color wheel of flavors: spinach, tomato, squid ink, wheat.

Ingredients:

1 cup Conchiglie Gourmet Pasta

1 pound shrimp, cooked, peeled, and tail shells removed

2 tablespoons olive oil

1/2 teaspoon Chesapeake Bay Style Seasoning

1/4 teaspoon dill

1/2 cup mushrooms, sliced

1 jar Bertolli Parmesan Alfredo sauce

Instructions:

In a deep skillet over medium heat, add olive oil and sauté shrimp in seasoning and dill. Remove from pan and brown mushrooms in pan drippings. Do not let pan go dry. If you need moisture, add a tablespoon of lemon juice or lime juice. (Water can be substituted.) Return shrimp to the mushrooms. Add Alfredo sauce and gently stir. Simmer while the pasta is cooking. Meanwhile, cook Conchiglie according to package directions. Drain well and add to the sauce. Mix completely. Simmer 5 minutes longer and then serve. Garnish with shaved Parmesan cheese.

Eating My Way Through the Alphabet: Letter C

What’s Cooking in Gail’s Kitchen? The Daily Special: Caramel-Bacon Spice Cake! For the sweet and savory child inside all of us, this recipe takes the cake. It is a combination of salty, sugary, and spicy…in every bite. Your mouth will think you’re at the circus being stimulated by all the contrasting flavors! Amazingly, they come together with moist results. Hop on board and take a ride with this incredible treat.

CARAMEL-BACON SPICE CAKE

Ingredients for Cake:

1 1/4 cups flour

3/4 cup brown sugar

2 teaspoons baking powder

2 tablespoons cornstarch

1/4 teaspoon sea salt

1/2 teaspoon ginger

1/2 teaspoon cinnamon

1/4 teaspoon nutmeg

1/4 teaspoon all spice

1/4 teaspoon ground cloves

1/2 cup milk

1 egg

1 teaspoon vanilla

1/3 cup butter

Instructions:

Preheat oven to 350°. Mix all dry ingredients in a bowl. Set aside. In a medium bowl beat eggs, milk, and vanilla until blended. Set aside. Using a mixer, cream butter until light and fluffy. On low speed, slowly alternate the egg mixture and the dry mixture until well blended. Pour batter into a greased 9″x13″ pan. Bake for 30 minutes or until a pick comes out clean.

Bacon-Caramel Frosting:

1 cup brown sugar

1/4 cup milk

1/2 cup butter

1 teaspoon vanilla

3 cups powdered sugar

2 ounces bacon bits

In a medium saucepan, mix brown sugar, milk, and butter. Bring to a boil, stirring constantly for 3 minutes. Remove from heat and add vanilla. Let cool for 15 minutes. Transfer to a medium bowl. Add powdered sugar and beat until creamy. It should be thick enough to spread on the cake. Top with crisp, crumbled bacon.

Eating My Way Through the Alphabet: Letter T

What’s Cooking in Gail’s Kitchen? Home Cooking: Tiki Tacos! There was a time I could eat a dozen tacos at one sitting. Seriously. I was 20 years old, working two full time jobs and rode my bicycle everywhere! Nowadays, I show a little more restraint and stop after two tacos. But it’s still one of my favorite meals. Sometimes I use corn tortilla shells and other times I use flour. The shell determines which spices to use. Today it’s flour tortillas.

TIKI TACOS

Ingredients:

1 pound lean ground beef

1/8 teaspoon garlic powder

1 teaspoon cumin powder

1/2 teaspoon sea salt

1/8 teaspoon black pepper

8 flour tortillas

1/4 cup butter, melted

Lettuce, torn

Tomato, chopped

1 cup sharp cheddar cheese, shredded

1/4 cup jalapeño peppers, sliced

1/2 cup prepared salsa

Instructions:

Preheat oven to 350°. In a medium skillet, brown ground beef. Drain. Stir in garlic, cumin, salt, and pepper. Set aside. Brush one side of tortillas with butter. Spoon about 1/4 cup of meat mixture onto center of unbuttered sides. Fold in half; place on a baking sheet. Repeat until all tortillas are filled and meat is distributed evenly between them. Bake in the oven about 15 minutes or until tortilla shells are crisp. Remove from oven and serve with lettuce, tomato, and cheese. Spoon salsa over too and garnish with jalapeño pepper slices.

Eating My Way Through the Alphabet: Letter L

What’s Cooking in Gail’s Kitchen? Home Cooking: Loco Moco! Living up to its name, this breakfast food is actually one of Hawaii’s local favorites. The serving size is so generous you might think it’s way too much for breakfast. I didn’t eat the rest of the day after trying it at a local restaurant there. However, when you prepare it at home, you have more control over serving sizes as well as the time of day for this meal. Basically, it is composed of four layers. The bottom is fried rice, the middle is a beef patty, the next is an egg over easy. And the top layer is a ladle of gravy. Don’t knock it till you try it!

LOCO MOCO

Ingredients for Rice Layer:

1 cup prepared brown rice

1 strips bacon, crisp and crumbled

1 sausage patty, crumbed*

2 ounces smoked sausage,

cut-up

2 tablespoons sesame oil

2 tablespoons onion, cut-up

*Hawaiians favor SPAM.

Instructions for Rice Layer:

In large skillet add sesame oil and sauté onions. Add remaining ingredients. Stir fry to blend flavors. Set aside.

Ingredients for Beef Patty Layer:

4 1/4-pound beef patties

1 can beef consommé

Dash of pepper

Instructions for Beef Patty Layer:

Cook beef in consommé until tender. I did this the day before in my slow-cooker. It’s worth the effort! Save the broth for turning into gravy.

Ingredients for Egg Layer:

4 fresh eggs

Instructions for Egg Layer:

Cook on stove to make eggs over-easy (or sunny-side up) so the yolks are still runny.

Ingredients for Gravy Layer:

1 cup beef consommé*

2 tablespoons flour

2 tablespoons butter

*Add water if necessary to make one cup of liquid.

Instructions for Gravy Layer:

Melt butter in saucepan. Add flour to the butter and stir to make a roux. Cook over medium-low heat until the flour is lightly browned, about 1 minute. Slowly whisk in the consommé juices and stir until thickened.

Now serve by assembling the layers in a shallow bowl: rice, beef, egg, and gravy. Loco Moco!

Eating My Way Through the Holidays! Yuletide Favs: Rich Ricotta Cannoli!

Eating My Way Through the Holidays! Yuletide Favs: Rich Ricotta Cannoli! For those of you like me, who can’t run down to the Italian bakery, try this recipe on for size. It’s perfect for the holidays and won’t leave you wringing your hands for something gourmet. By splurging on store bought cannoli shells, you can focus on the delectable filling instead. The results are astounding! Applause, applause!

RICH RICOTTA CANNOLI

Ingredients:

15 ounces ricotta cheese, whole milk

1/4 teaspoon almond extract

3/4 cup powdered sugar

1/8 teaspoon ground nutmeg

1/3 cup mini chocolate chips

12 miniature cannoli shells, ready-to-fill

Powdered sugar for dusting

Instructions:

In a medium bowl, using a hand mixer on low speed, whisk the ricotta cheese and almond extract until smooth. Gradually add the powdered sugar and nutmeg. Mix well. Refrigerate for one hour. To fill the cannoli shells, pipe the ricotta mixture into both ends of the shell, allowing the cream to fill the center. Garnish with mini chocolate chips. Dust with powdered sugar. Serve immediately. Prepared cannoli may be stored in the refrigerator in a covered container up to three days.

Eating My Way Through the Holidays! Yuletide Favs: Yellow Bloomin’ Onion!

Eating My Way Through the Holidays! Yuletide Favs: Yellow Bloomin’ Onion! Nothing is more fitting for cold weather than an appealing appetizer that resembles a winter flower, in my opinion. Now you can make a healthy version at home by baking the breaded onion instead of deep-frying it. The last few minutes under the broiler give it a crispy finish that adds extra crunch to the delicious petals. And the dipping sauce….oh my gosh, you have to try it!

YELLOW BLOOMIN’ ONION

Ingredients:

1 large yellow onion

2 tablespoons flour

1/4 cup Italian bread crumbs

1/4 cup Panko crumbs

1/4 cup Parmesan cheese, grated

1 tablespoon Cajun spices

2 eggs, beaten

1 tablespoon milk

1-2 tablespoons butter, melted

Seasoning salt to taste

Instructions:

Preheat oven to 400°. In one bowl, combine the flour, bread crumbs, Panko crumbs, Parmesan cheese, and Cajun spice. Mix well. Set aside. In another bowl, combine beaten eggs and milk. Whisk together. Set aside. Cut the top side of the onion. Turn over and carefully cut the root side just enough to peel the outer skin of the onion. Leave the root intact as this will be the base and hold the onion together. Discard onion skins. In order to give the appearance of an open flower, 16 sections are made. With the root side up, place the knife 1/8″ away from the core and slice straight down. It is best to begin with quarters and then make 3 slices in each quadrant all the way around. Carefully turn the onion over and spread the “petals” apart. Dip the onion in the milk bath and wash it completely using a pastry brush. Carefully transfer the onion to the bowl filled with breading. Beginning at the bottom, cover each petal with dry coating. Again using the pastry brush, continue coating the petals until the egg wash is gone. You may alternate the egg mixture and dry coating to cover the petals. Transfer the onion to an oven-safe pie plate or dish. Cover with foil and bake for 15 minutes. Using hot pads, take the pan from the oven and remove the foil. Using a pastry brush, coat the onion with melted butter. Return to the oven. Bake 10 minutes longer, or until crispy. I set the broiler on High and broiled it for 4-5 minutes to make it extra-crunchy. Watch carefully so it does not burn. Remove from oven. Sprinkle with seasoned salt. Place on a serving platter. Serve with dipping sauce.

DIPPING SAUCE

Ingredients:

1/4 cup mayonnaise

1/4 cup Greek yogurt

3 teaspoons ketchup

2 teaspoons Lea and Perrins

2 tablespoons horseradish

1/2 teaspoon paprika

1/8 teaspoon cayenne

Instructions:

Combine mayonnaise, yogurt, ketchup, Lea and Perrins, horseradish, paprika, and cayenne. Mix well and refrigerate for one hour. Pour into a small cup and place in the center of the onion.