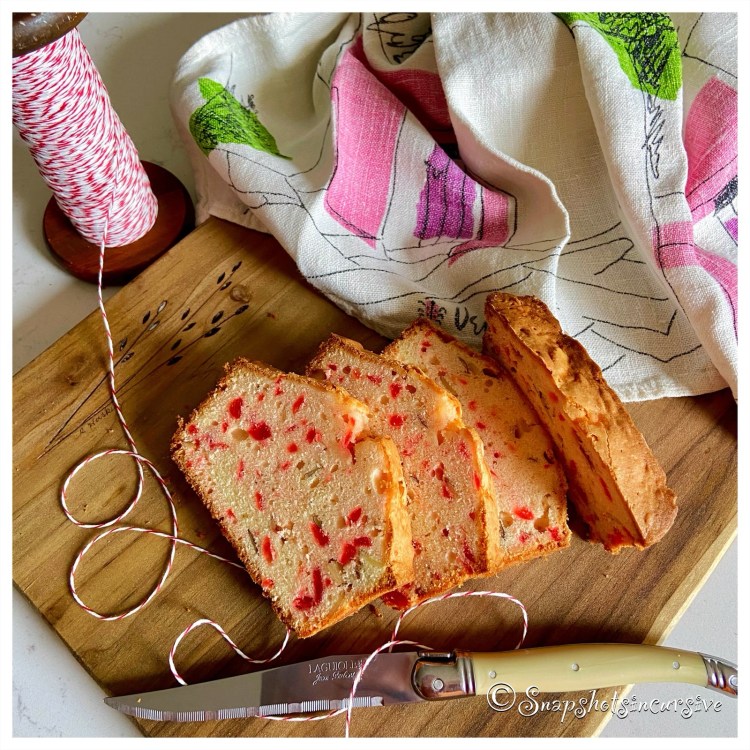
Caramelized Plum Sauce

What’s Cooking in Gail’s Kitchen? Here Come the Holidays: Caramelized Plum Sauce! A plum is one of those fruits whose skin is incredibly tender and easy to bite into. It offers a slightly tart taste before the sweetness of the flesh engulfs your senses. When I was a teenager living in Nebraska along the Missouri River, I remember puttering along winding country roads in the grain belt on a late summer afternoon. The weather was hot and humid, so the windows were rolled down on the beat up 1962 Plymouth Valiant that had seen better days. An irritated cicada beetle was screeching from the glove box where my boyfriend had tossed it after seeing it land on the front seat. I turned my head away to look beyond the car’s front fender when I saw a small native tree bursting to its limit with sweet, ripe, purple plums. “Look!” I exclaimed pointing my index finger, “It’s just like the plums in the grocery store!”

CARAMELIZED PLUM SAUCE

Ingredients:

4 fresh plums, washed, sliced, and stones discarded

4 tablespoons butter

4 tablespoons brown sugar

3 cinnamon sticks

1/2 teaspoon ground cinnamon

1 tablespoon raw honey

Instructions:

Cut stone fruit in half. Remove pits and slice into segments, leaving skin on. Set aside. In a large skillet, warm butter over medium heat. Do not scorch. Add brown sugar, cinnamon sticks, and raw honey. Stir. Bring to a simmer. Gradually add sliced plums; gently tossing to coat. Continue simmering for 5 minutes, stirring occasionally. Fruit will turn tender, not mushy. Remove pan from heat. Set aside to cool slightly. Spoon caramelized plum sauce over vanilla bean ice cream. Serve immediately. Once the sauce is cool, pour into a glass jar. Cover. Store in the refrigerator up to one month.

Zucchini ‘Nana Bread

What’s Cooking in Gail’s Kitchen? Splurge-Worthy Goodness: Zucchini ‘Nana Bread! This isn’t your usual old-fashioned banana bread. And if you’ve been hesitant to try zucchini bread, well…just because, then I implore you to give it one more chance. You honestly cannot taste the zucchini. What you will notice, though, is that the bread is incredibly moist, not gummy. And the cinnamon streusel topping is a winning combination worth shouting about. Remember to only stir the batter until it is mixed. The more you stir, the more gluten comes into play. While gluten is crucial in bread-baking, it is not your friend in quick breads. The results could be dense and rubbery. After all, the purpose of baking is to share with others. Slather on the butter or cream cheese…and Enjoy!

ZUCCHINI ‘NANA BREAD

Ingredients:

1 medium zucchini, shredded

1 ripe banana, mashed

2 eggs, room temperature

1/2 cup vegetable oil

3/4 cup sugar

1 cup flour

1/8 teaspoon baking powder

1/2 teaspoon baking soda

1 teaspoon cinnamon

1 teaspoon sea salt

1 teaspoon vanilla extract

Ingredients for Cinnamon Topping:

1/4 cup sugar

1 teaspoon cinnamon

Instructions:

Preheat oven to 350°. Line a loaf pan with parchment paper. Set aside. Peel zucchini. If there are seeds, remove them with a spoon; discard. Shred zucchini and set aside. Mash banana and set aside. In a mixing bowl, beat eggs, sugar, and vegetable oil until combined. Add flour, baking powder, baking soda, cinnamon, sea salt, and vanilla extract. Stir only until incorporated. Fold in shredded zucchini and mashed bananas. Stir slightly until blended. Pour into prepared loaf pan. Whisk together sugar and cinnamon in a small bowl. Sprinkle evenly over the top of the batter. Bake 45-55 minutes, or until cake tester comes out clean. Remove from oven and allow bread to cool 10 minutes before removing from pan. Cool Zucchini ‘Nana Bread on a wire rack before slicing.

Xmas Crinkle Cookies

What’s Cooking in Gail’s Kitchen? Splurge-Worthy Goodness: Xmas Crinkle Cookies! Shortcuts are the key to success for that next cookie-exchange the kids forgot to tell you about. “Oh yeah, Mom, sorry.” No worries. Head to the kitchen to clang some pans around, preheat the oven, and dust a little powdered sugar on your nose. They’ll be none the wiser. By the time the house begins to smell like a neighborhood bakery, you’ll have rows of cookies lined up ready to be boxed. And if you’re one of those organized parents, just so you know, these cookies freeze well. Arrange them in a freezer gallon bag, layered between squares of waxed paper. I have literally taken these crinkle cookies out of the freezer and handed them to a little girl to eat. Other than being slightly chilled, they retain a chewiness that makes them simply delicious. You deserve a pat on the back. You’re welcome.

XMAS CRINKLE COOKIES

Ingredients:

1/2 cup powdered sugar, for dusting

15.25-ounce box strawberry cake mix

1/2 cup vegetable oil

2 eggs, room temperature

Instructions:

Preheat oven to 350°. Place powdered sugar in a shallow dish. Set aside. In a mixing bowl, combine strawberry cake mix, vegetable oil, and eggs. Stir until a dough forms. Chill dough for 20 minutes. Shape dough into 1” balls. Roll in powdered sugar and place 2” apart on ungreased baking sheet. Bake 7-9 minutes, or until center is just set. Remove pan from oven; cool for 2 minutes. Transfer cookies to a wire rack. Dust with more powdered sugar.

School Cafeteria Peanut Butter Bars

What’s Cooking in Gail’s Kitchen? Splurge-Worthy Goodness: School Cafeteria Peanut Butter Bars! Remember the good old days when the grade school menu would come out and we’d peruse it like the Sears and Roebuck Christmas Catalog? We’d jump for joy when we saw Fish Sticks, Baked Meatloaf, Apple Crisp, Chocolate Cake, and Pizza Squares. On the other hand, Creamed Spinach made us wince and turn up our noses. Back then you had two options, buy a hot lunch ticket or bring a sack lunch from home. No in-betweens. As a general rule, the good canceled out the bad, especially in the category of scrumptious desserts. The “Lunchroom Ladies” really knew their business when it came down to sweets. Nobody could layer on the frosting like they could. And it was always homemade right there. I wonder who got to lick the spoon.

SCHOOL CAFETERIA PEANUT BUTTER BARS

Ingredients:

1/2 cup butter

3/4 cup peanut butter, creamy

3/4 cup sugar

1/4 cup brown sugar

3/4 teaspoon kosher salt

2 eggs, room temperature

1 1/2 teaspoons vanilla extract

1 cup flour

Ingredients for Icing:

1/2 cup powdered sugar

2 tablespoons creamy peanut butter, melted

2 tablespoons hot water

Instructions:

Preheat oven to 350°. Line a 9”x9” square baking pan with parchment paper. Set aside. Melt butter and peanut butter in a microwave-safe bowl on 50% for 30 seconds. Stir and repeat, if necessary. Set aside to cool to room temperature. In a large bowl, sift together sugar, brown sugar, and kosher salt. Whisk in one egg at a time until combined. Add vanilla extract. Whisk in peanut butter mixture until combined. Sift in flour; mix until flour disappears. Do not over mix. Pour into prepared pan. Bake for 35-40 minutes, or until cake tester comes out with tiny moist crumbs. Cool pan on a wire rack. Once the pan has cooled, remove the cake from pan and transfer on the parchment paper to a rimmed baking sheet. Combine powdered sugar, creamy peanut butter, and hot water. Stir until frosting has a smooth consistency. Drizzle over dessert. Allow icing to set up before cutting into individual bars.

Pan-Seared Tilapia

What’s Cooking in Gail’s Kitchen? Splurge-Worthy Goodness: Pan-Seared Tilapia! I don’t often “fry” foods, but once in awhile nothing else will do. The secret to pan-searing fish involves five key steps. First, make sure the skillet is nonstick or a trustworthy cast iron skillet. Secondly, choose a neutral-flavored oil which has a higher smoke point. You won’t need much, so it’s crucial to make sure the oil is not going to turn black from high heat. The third point, and this is just as important, make sure moisture is removed from the fish. If not, there is guaranteed to be steam-created soggy fish or dangerous grease splatters. Step Four: When the fish is placed in the pan, do not overcrowd it. The pieces should not touch each other at all. Finally, allow the fish to sear without moving it. This is how you get that beautiful crispy surface. Use a timer. Once the fillets are carefully flipped over, you’re almost done. By this time everyone in the house will be heading to the kitchen to discover what smells so incredibly good. Well Done, Grasshopper.

PAN-SEARED TILAPIA

Ingredients:

2 frozen tilapia fillets, thawed

1/2 tablespoon brown sugar

1/2 tablespoon chili powder

1/2 teaspoon kosher salt

1/4 teaspoon garlic powder

1/2 lime, juice and zest

2 tablespoons vegetable oil

1 pat butter, divided

Fresh dill, for garnish

Instructions:

Defrost fish fillets overnight in the refrigerator. Remove from package, pat dry with paper towels. Set aside. In a shallow dish, combine brown sugar, chili powder, kosher salt, garlic powder, and lime zest. Mix well. Warm vegetable oil in a cast iron skillet over medium-high heat. Rub both sides of each fillet with the spice mixture. Cook tilapia fillets for 4 minutes. Carefully flip them over. Squeeze lime juice over fish in pan. Divide a pat of butter over the top of each fillet. Cook 3 minutes longer, or until opaque and flaky. Transfer pan-seared tilapia fillets to a platter. Allow to rest for 5 minutes. Garnish with fresh dill. Serve immediately.

Mincemeat Quick Bread

What’s Cooking in Gail’s Kitchen? Splurge-Worthy Goodness: Mincemeat Quick Bread! Don’t look at me that way. I know what you’re thinking. “If this recipe has mincemeat in it, I’m not eating it.” But hold on a sec. There are plenty of foods with names that sound downright gross. Think about it: head cheese, tripe, mung beans, and blood sausage to name a few. I’m here to tell you mincemeat is a sweet and savory filling that basically contains dried fruits, citrus, spices, and brandy. Ahhh. Now I have your attention. This particular recipe has about 1/4 cup apricot brandy in it. Just know if you do choose to add brandy or rum to a jar of prepared mincemeat, be sure to allow it to marinate in the refrigerator at least 8 hours before using. Now you can understand why some people eat it straight out of the jar.

MINCEMEAT QUICK BREAD

Ingredients:

1 egg, room temperature

1/4 cup vegetable oil

1 tablespoon orange zest

2 tablespoons orange juice

2 cups prepared mincemeat pie filling (with 1/4 cup apricot brandy, optional)

2 cups flour

1/2 cup sugar

1 1/2 teaspoons baking powder

1/2 teaspoon baking soda

1/2 teaspoon sea salt

Instructions:

Preheat oven to 350°. Grease and flour a 9”x5” loaf pan. Set aside. Combine egg, vegetable oil, orange zest, orange juice, and mincemeat pie filling. Stir until well blended. Set aside. In another bowl, whisk together flour, sugar, baking powder, baking soda, and sea salt. Gradually add flour mixture to egg mixture, stirring just until combined. Pour into prepared loaf pan. Bake for 50-60 minutes. Check loaf with a cake tester to make sure center is done. Remove from oven. Cool on a wire rack. Slice and serve.

Limoncello Upside Down Cake

What’s Cooking in Gail’s Kitchen? Splurge-Worthy Goodness: Limoncello Upside Down Cake! I love everything lemon, so imagine my excitement at trying this exquisite dessert with limoncello lemon liqueur. Limoncello is produced mainly along Italy’s scenic Amalfi Coast. Every sip transports you to the rugged hillsides along the deep blue cerulean waters of the Mediterranean Sea. Imagine the lemon trees engorged with ripe fruit. You can almost smell the heady scent of natural citrus wafting from the arbors. Now that I have your complete and undivided attention, read on.

LIMONCELLO UPSIDE DOWN CAKE

Ingredients:

1/4 cup brown sugar

1/2 cup water

1/2 cup plus 3 tablespoons sugar, divided

6 thin lemon slices, seeds removed

3 tablespoons olive oil

Zest of 1/2 lemon

1 tablespoon lemon juice

1/4 teaspoon vanilla extract

1/8 teaspoon sea salt

1 egg, room temperature

2 tablespoons limoncello lemon liqueur

1/2 cup flour plus 2 tablespoons flour

2 tablespoons cornmeal

1/2 teaspoon baking powder

1/4 teaspoon baking soda

Powdered sugar, for dusting

Instructions:

Preheat oven to 350°. Spray ramekins with nonstick oil. Cut 6 parchment paper circles to fit ramekins. Place a circle in the bottom of each. Set aside. Bring brown sugar, 1/4 cup sugar, and water to a simmer in a saucepan. Cook until reduced and sugar has dissolved, about 5 minutes. Turn off heat. Submerge lemon slices in syrup. Let sit until rind and pith are translucent, 20-30 minutes. Using a hand mixer on medium speed, beat olive oil, lemon zest, lemon juice, vanilla extract, sea salt, egg, remaining sugar, and limoncello just until blended. Whisk together flour, cornmeal, baking powder, and baking soda in a bowl. Gradually add wet mixture, beating just until blended. Pour one tablespoon syrup from lemon slices into each ramekin. Using tongs, gently place a lemon slice in each ramekin. Reserve remaining syrup. Place ramekins on a baking sheet. Evenly divide batter between them. Bake 25 minutes, or until a cake tester comes out clean. Let cool on a rack for 10 minutes. Run a small knife around the cake before inverting onto a platter. Remove parchment paper circles. Brush with remaining syrup. Dust with powdered sugar.

Eagle Brand Magic Cookies

What’s Cooking in Gail’s Kitchen? Splurge-Worthy Goodness: Eagle Brand Magic Cookies! One definition of the word magic is “wonderful; exciting”. That’s what these quick and easy holiday cookies are all about. The magic ingredient is the sweetened condensed milk. It may not be something you use everyday, but special occasions call for special ingredients. Homemade cookies are chocked full of sweetness in chocolate morsels, flaked coconut, and chopped pecans. How delightful and different. That’s what I call exciting. Create your own magical moment for the next festive gathering, after school snack, or weekend party-for-two.

EAGLE BRAND MAGIC COOKIES

Ingredients:

3/4 cup flour

1/2 teaspoon baking powder

1/8 teaspoon sea salt

7 tablespoons butter, room temperature

1 tablespoon sugar

1/4 cup sweetened condensed milk

1/4 cup mini chocolate chips

1/4 cup butterscotch chips

3 tablespoons sweetened coconut flakes

2 tablespoons pecans, finely chopped

Sugar, for dusting

Instructions:

In a bowl, whisk together flour, baking powder, and sea salt. Set aside. Using a hand mixer, beat the butter and sugar together until creamy. Add the sweetened condensed milk. Beat until combined. Slowly add the flour mixture until thoroughly combined. Fold in the mini chocolate chips, butterscotch chips, flaked coconut, and chopped pecans. Cover dough and refrigerate for 20 minutes. Preheat oven to 350°. Line a baking sheet with parchment paper. Take a heaping teaspoon of cookie dough, roll into a ball, and place on the parchment paper-lined baking sheet. Repeat. Bake 8-10 minutes; cool 2 minutes. Dust cookies with sugar and transfer to a wire rack. Enjoy!

Decadent Chocolate Cheesecake Cookies

What’s Cooking in Gail’s Kitchen? Splurge-Worthy Goodness: Decadent Chocolate Cheesecake Cookies! Mention the word “cheesecake” and wait for an automatic human response. It might be a low sensuous moan or perhaps a catch of breath. Either way, the reaction is suggestive of a rewarding self-indulgence. Add chocolate for a superb combination. Now you can make your own bite-size cheesecake cookie that is worthy of bakery status. The cookie becomes a soft crust for the creamy vanilla filling. Can you imagine? If so, you’re only a few steps away from making it a dream-come-true.

DECADENT CHOCOLATE CHEESECAKE COOKIES

Ingredients:

1/4 cup butter, room temperature

1/4 cup vegetable oil

1 egg

1 teaspoon vanilla extract

1/4 teaspoon kosher salt

18-ounce box Dark Chocolate Fudge Cake mix

Powdered sugar, for dusting

Fresh strawberries, for garnish

Ingredients for Filling:

8-ounces cream cheese, softened

1/2 cup sugar

1 egg

1/2 teaspoon vanilla extract

Instructions:

In a large bowl, beat butter, vegetable oil, egg, and vanilla extract until smooth and creamy. Add kosher salt and prepared chocolate cake mix. Thoroughly blend together, scraping sides, as needed. Refrigerate dough for one hour. While cookie dough is chilling, beat cream cheese, sugar, egg, and vanilla extract until smooth. Set aside. Preheat oven to 350°. Remove chilled cookie dough from the refrigerator. Form tablespoon-size portions into a ball. Make an indentation in the center. Place onto ungreased baking sheet. Fill with one teaspoon of cream cheese filling. Repeat with remaining dough and filling. Bake until edges are set, about 12 minutes. Allow cookies to cool completely, about 20 minutes, before removing from baking sheet. Transfer cookies to a wire rack. Dust with powdered sugar. Serve with fresh strawberries.