Jell-O Shots with Sugared Cranberries

Experience the Holidays: Jell-O Shots With Sugared Cranberries! The holidays ring in the cheer with festive activities, enticing food, and snappy beverages. Make things awesome with dressed up Jell-O shots that cap off any occasion. Not only do they have an elegant look, but they satisfy the sweet tooth as a miniature dessert. By creating a garnish of fresh fruit with the sugared cranberries, it’s a classy finish with a gourmet twist!

JELL-O SHOTS WITH SUGARED CRANBERRIES

For Make-Ahead Sugared Cranberries:

2 cups sugar, divided

1/2 cup filtered water

12-ounce bag fresh cranberries

1 cinnamon stick

1 tablespoon lemon juice

Instructions:

Combine 1/2 cup sugar and 1/2 cup filtered water in a saucepan over medium heat. Stir until sugar is dissolved, about 3-5 minutes. Add cranberries. To prevent cranberries from bursting, do not boil. Stir until well coated. Using a slotted spoon, transfer cranberries to a wire rack. Let dry for one hour. Working in batches, roll cranberries in remaining sugar until well coated. Refrigerate for one hour or overnight. Store in airtight container.

Ingredients for Jell-o Shots:

3-ounce package raspberry gelatin

1 cup boiling water

1/2 cup amaretto liqueur

1/2 cup ice water

Sugared cranberries Rosemary sprigs

Instructions:

Empty contents of raspberry gelatin packet into a mixing bowl. Add boiling water. Stir until completely dissolved, approximately 2-3 minutes. Add iced water and amaretto liqueur and iced water. Stir well. Pour into shot glasses. Refrigerate until set, 4 hours or overnight. Garnish with sugared cranberries and rosemary sprigs just before serving.

Nonpareil Thumbprint Cookies

Experience the Holidays: Nonpareil Thumbprint Cookies! Ask my husband what his favorite candy is and without hesitation, he’ll respond “Nonpareils”. Think about it… dark chocolate buttons sprinkled with tiny beads of white candy. And they’re French! With today’s recipe, the nonpareil takes center stage crowned over a dark chocolate thumbprint cookie as rich as a brownie. Dusted in powdered sugar, it’s just the right size for nibbling.

NONPAREIL THUMBPRINT COOKIES

Ingredients:

2 cups flour

1 cup cocoa powder

1 teaspoon coarse salt

1 cup butter, softened

1 1/3 cups sugar

2 egg yolks

2 tablespoons heavy cream

2 teaspoons vanilla

3/4 cup powdered sugar for rolling

40 nonpareils

Instructions:

Preheat oven to 350°. Sift flour, cocoa powder, and salt into a small bowl. Using a mixer, cream butter and sugar until fluffy. Reduce speed to medium, add yolks, cream, and vanilla. Beat in flour mixture just until combined. Roll balls using 1/2 tablespoon sized scoops of dough. Roll each ball in powdered sugar. Place on parchment-lined baking sheets. Press gently in the center to form an indentation. Bake 10 minutes or until set. Remove from oven. While cookies are warm, place one nonpareil in the middle of each cookie. Let cool before transferring to wire rack.

Unicorn Holiday Bark

Experience the Holidays: Unicorn Holiday Bark! Everyone remembers a childhood of mythical creatures, especially the unicorn which resembled a horse with a pointed horn spiraling out of its forehead. Some believed it had magical powers in addition to being a symbol of purity and grace. Only a virgin had the power to tame the unicorn, according to art from the Middle Ages now hanging on museum walls. Today the thought of unicorns make us happy. Perhaps they represent childhood dreams, or wishes, filled with hope for a future. It should be no surprise that pink swirls of white chocolate and candy glitter in sparkly hues appear in food to further those good feelings. Think of Unicorn Holiday Bark for your next festive occasion. Kid-friendly, husband-approved.

UNICORN HOLIDAY BARK

Ingredients:

2 pounds white chocolate chips

Food coloring of choice

1 tablespoon rainbow sprinkles

1 tablespoon glitter sprinkles

1 tablespoon candy pearls

Instructions:

Line a baking sheet with waxed paper. Depending on how many colors you choose (I used 3), place 1/3 cup white chocolate chips per color in separate microwave-safe bowls. Warm on Low setting for 15 second intervals in microwave, stirring often. Continue until chips are melted. Add food coloring to desired tint. Hint: One drop of red will produce a pastel pink. Prepare tinted chocolate first before finishing with the remaining plain white chocolate. Once the white chocolate is melted, spread it onto the baking sheet. Smooth into an even layer, approximately 1/4” thick. Working quickly, dot tinted colors over the white chocolate in a random pattern. Take a wooden skewer, or toothpick, and drag it through the colors creating swirls. Next, scatter the rainbow sprinkles, glitter sprinkles, and candy pearls on top. Refrigerate baking sheet for 30 minutes, or until firm. Once set, break the bark into pieces, reserving a curved edge for the unicorn’s horn. Let the magic begin!

Velvet-Filled Pumpkin Roll

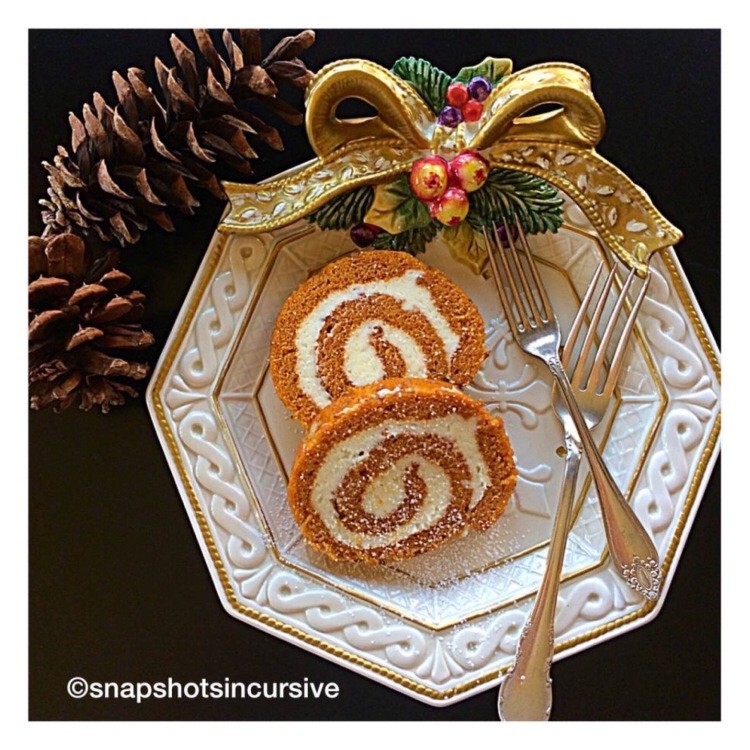
Experience the Holidays: Velvet-Filled Pumpkin Roll! Announcing a festive cake that looks as though you stopped by the bakery. Anyone can feel like a professional pastry chef with this holiday specialty. In a few simple steps, the rich pumpkin flavor is enhanced by the velvety cream filling. Afterwards all you have to do is sit back and bask in the accolades.

VELVET-FILLED PUMPKIN ROLL

Ingredients for Pumpkin Roll:

3 eggs

2/3 cup pumpkin purée

1 cup sugar

1 teaspoon baking soda

1/2 teaspoon cinnamon

3/4 cup flour

1/3 cup chopped pecans

Ingredients for Velvet Filling:

8 ounces Neufchâtel cheese

3/4 teaspoon vanilla

2 tablespoons butter, softened

1 cup powdered sugar

Instructions:

Preheat oven to 375°. Grease and line a 10″x15″ jelly roll pan with waxed paper. For pumpkin roll combine eggs, pumpkin purée, sugar, baking soda, cinnamon, and flour. Mix until well blended. Pour into jelly roll pan and spread evenly to edges. Sprinkle with chopped pecans. Bake 12-15 minutes. Watch carefully. Remove from oven. Sprinkle powdered sugar on a tea towel, turn cake onto towel, and remove the waxed paper. Starting at one end, roll the cake up, and refrigerate for one hour. Meanwhile, combine Neufchâtel cheese, vanilla, butter, and powdered sugar. Mix together until smooth and velvety. After one hour, unroll cake and spread the filling all the way to the edges. Reroll cake and refrigerate two hours longer. Dust with powdered sugar. Slice and serve.

Xmas Pizzelle Cookies

Experience the Holidays: Xmas Pizzelle Cookies! I’m obsessed with food that has eye appeal. That’s one reason I was drawn to pizzelles, a traditional Italian waffle cookie. I could make you crazy by telling you we’re going to make them from scratch, but hey, my time is in high demand just like yours. Besides, since I don’t own a pizzelle iron, sometimes it’s better to leave things to an expert. I’m here today to save you time when someone suggests a Holiday Cookie Exchange. Pick up a package of Classic Italian Pizzelles on your way home from work, dip the cookies in melted chocolate, and sprinkle with nuts. You can thank me later when you’re sitting back relaxing with a glass of wine.

XMAS PIZZELLE COOKIES

Ingredients:

7-ounce package Vanilla Flavored Pizzelle Cookies

2 cups semisweet chocolate chips

1 tablespoon vegetable oil

4 ounces pistachios, chopped

Instructions:

Line a baking sheet with waxed paper. In a microwave-safe bowl, combine semisweet chocolate chips and vegetable oil. Heat in microwave on 50% setting for 30 seconds. Stir. Repeat in 30-second intervals until melted. Stir until smooth. Dip half of each pizzelle cookie into melted chocolate. Sprinkle both sides with chopped pistachios. Place on baking sheet. Refrigerate for 30 minutes or until set.

Mincemeat Cookies

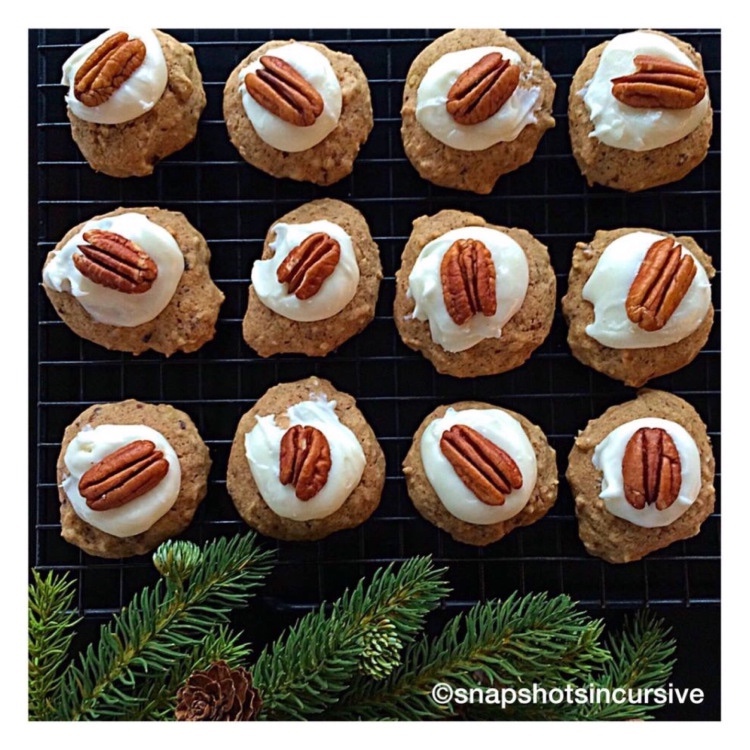
Experience the Holidays: Mincemeat Cookies! When my friend, Ray, “gifted” me with a batch of his time-honored traditional homemade mincemeat, I felt as though I had received a portion of the Holy Grail. Could this secret from the past hold special powers? Would one bite provide happiness, eternal youth, and food in infinite abundance? You tell me. Ray carefully coached me on how to “season” the mixture by adding flavored brandy (I chose apricot) over a three-week period, stirring it occasionally in a covered clay crock. I was an awestruck student following his instructions to the letter. The results were phenomenal and elegant. Don’t let anyone tell you mincemeat is awful. When prepared correctly, some things are worth the wait.

MINCEMEAT COOKIES

Ingredients for Cookies:

2/3 cup butter, softened

2/3 cup brown sugar

1 teaspoon cinnamon

1/2 teaspoon nutmeg

1/2 teaspoon sea salt

1/2 teaspoon baking soda

1/2 teaspoon baking powder

2 eggs

1 cup mincemeat*

2 cups flour

1 cup pecans, chopped

Pecan halves for garnish

Ingredients for Icing:

3 cups powdered sugar

3 tablespoons butter, softened

1 tablespoon apricot brandy

1 teaspoon vanilla extract

1-2 tablespoons warm milk, as needed

Instructions:

Preheat oven to 375°. Cream together butter and brown sugar until fluffy. Beat in cinnamon, nutmeg, salt, baking soda, and baking powder. Add eggs and mincemeat. Gradually stir in the flour. Fold in chopped pecans. Drop by spoonfuls onto a parchment lined baking sheet. Bake 8-10 minutes until tops of cookies are dry and set. Bottoms will be slightly golden. Remove from oven. Transfer to a wired rack. Frost while slightly warm. Top each cookie with a pecan half before frosting sets.

Instructions for Icing:

In a medium bowl gently mix powdered sugar and butter until smooth. Add brandy and vanilla. Stir well. As needed, add warm milk to create a thick consistency. Place a dollop of icing on each cookie. Garnish with pecan half.

*The “Elegant Homemade Mincemeat” recipe can be found in the 1972 Farm Journal’s Country Cookbook, page 371.

Traditional English Toffee

Experience the Holidays: Traditional English Toffee! So often we have those cherished childhood memories of homemade candy and cookies that accompanied holiday celebrations. They stick with us for life. I can remember being in eighth grade and determined to replicate a batch of my mother’s English Toffee. I waited for her to go into town and then pulled out her secret recipe. You know, the ones scratched on a 3.5”x5” card. More often than not, they showed a list of ingredients with instructions that simply said, “Bake at 350° for 30 minutes”. Let’s face it, that’s pretty vague compared to what we explain nowadays. As you can imagine, I melted the butter along with the brown sugar and stirred. And stirred. And stirred. So how come it wasn’t turning into this crisp crunchy texture of rich golden butter that fueled my addiction? What could I possibly be doing wrong? There was nothing written on the card to correct this runny, gooey mess. Alas, I scraped it all into the trash, washed the pan, and plopped myself at the kitchen table with my Algebra book. She walked in, smiled, and never said a word.

TRADITIONAL ENGLISH TOFFEE

Ingredients:

1 cup pecans, chopped

3/4 cup brown sugar, packed

1/2 cup butter

1/2 cup semisweet chocolate chips

Instructions:

Butter a baking sheet. Spread pecans in a single layer in the center. Heat butter and brown sugar to boiling in a heavy saucepan, stirring constantly. Boil over Medium heat, stirring constantly, for 7 minutes. Immediately spread mixture over pecans on baking sheet. Sprinkle chocolate chips over hot mixture. Place a cookie sheet over pan until chocolate chips are melted. Spread melted chocolate over candy. Refrigerate until firm. Break toffee into pieces.

Experience the Holidays!

Experience the Holidays! This year things will be a little different. Unsettling times of chaos and confusion can still accompany satisfying food. Some people will gather virtually, others behind plastic shields, window panes, and face masks. Christmas cards, letters, texts, and phone calls are especially important right now. It is critical to stay connected. Every family has its favorites from the past. Some indulge in time-worn traditions while others enjoy modern classics. As you embrace the holidays with limited companionship, sentimental yearnings, enjoyable food, or jubilant festivities, celebrate the spirit of the season. In the next few weeks, join me as I share festive foods as well as healthy options. Experience the holidays with gifts that never go out of style: Faith, Hope, Joy, and Love. These are the things worth sharing.

Zucchini ‘Nana Bread

What’s Cooking in Gail’s Kitchen? Splurge-Worthy Goodness: Zucchini ‘Nana Bread! This isn’t your usual old-fashioned banana bread. And if you’ve been hesitant to try zucchini bread, well…just because, then I implore you to give it one more chance. You honestly cannot taste the zucchini. What you will notice, though, is that the bread is incredibly moist, not gummy. And the cinnamon streusel topping is a winning combination worth shouting about. Remember to only stir the batter until it is mixed. The more you stir, the more gluten comes into play. While gluten is crucial in bread-baking, it is not your friend in quick breads. The results could be dense and rubbery. After all, the purpose of baking is to share with others. Slather on the butter or cream cheese…and Enjoy!

ZUCCHINI ‘NANA BREAD

Ingredients:

1 medium zucchini, shredded

1 ripe banana, mashed

2 eggs, room temperature

1/2 cup vegetable oil

3/4 cup sugar

1 cup flour

1/8 teaspoon baking powder

1/2 teaspoon baking soda

1 teaspoon cinnamon

1 teaspoon sea salt

1 teaspoon vanilla extract

Ingredients for Cinnamon Topping:

1/4 cup sugar

1 teaspoon cinnamon

Instructions:

Preheat oven to 350°. Line a loaf pan with parchment paper. Set aside. Peel zucchini. If there are seeds, remove them with a spoon; discard. Shred zucchini and set aside. Mash banana and set aside. In a mixing bowl, beat eggs, sugar, and vegetable oil until combined. Add flour, baking powder, baking soda, cinnamon, sea salt, and vanilla extract. Stir only until incorporated. Fold in shredded zucchini and mashed bananas. Stir slightly until blended. Pour into prepared loaf pan. Whisk together sugar and cinnamon in a small bowl. Sprinkle evenly over the top of the batter. Bake 45-55 minutes, or until cake tester comes out clean. Remove from oven and allow bread to cool 10 minutes before removing from pan. Cool Zucchini ‘Nana Bread on a wire rack before slicing.