Icy Limoncello Slushie

What’s Cooking in Gail’s Kitchen? Fab Foodstuff: Icy Limoncello Slushie! Talk about refreshing. Imagine yourself strolling along the Amalfi Coast of southern Italy. Pause a moment near the rugged shoreline to allow the cool breezes to caress your skin. Admire the sheer cliffs where coastal roads hug towering rock formations. Pay attention to the landscaped vineyards and lemon groves winding down the slope that practically appear to plunge into the sea. This is home to Limoncello, an Italian lemon liqueur produced in the region. It is enjoyed as an aperitif or a digestive around evening mealtime, due to its pleasing effect on the palate. What better time to gratify your taste buds.

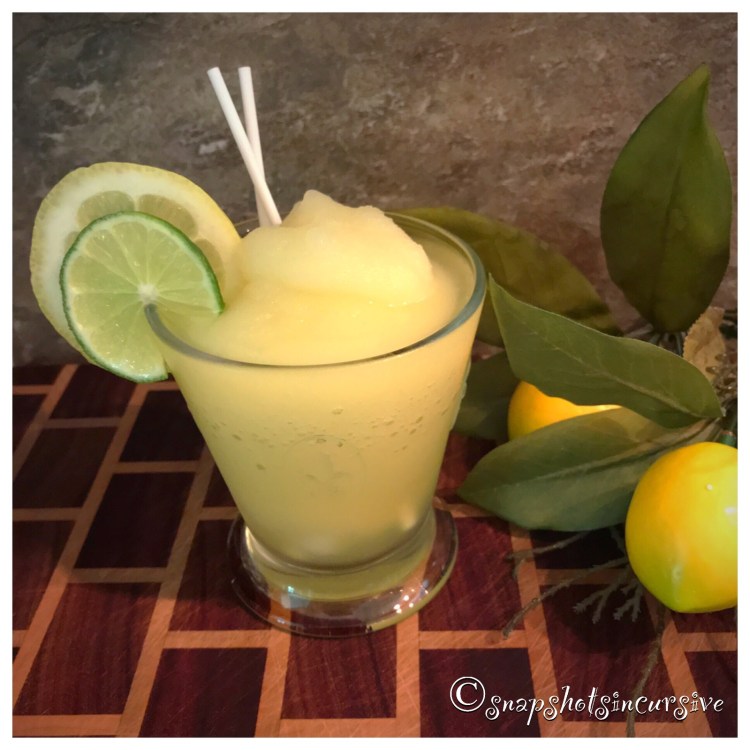
ICY LIMONCELLO SLUSHIE

Ingredients:

1/2 cup sugar

1/2 cup water

1 tablespoon lemon zest

3 cups ice cubes

1/2 cup fresh lemon juice

1/2 cup Limoncello liqueur

Lemon and Limes, for garnish

Instructions:

In a small saucepan over medium heat, combine sugar and water. Heat 3 minutes, or until sugar dissolves, stirring constantly. Remove pan from heat. Add lemon zest. Allow mixture to cool for 30 minutes. Strain sugar mixture, using a sieve to remove solids. Pour simple syrup into a blender. Add ice cubes, lemon juice, and Limoncello liqueur. Process until smooth and ice chunks no longer remain. Pour slushie into glasses. Garnish with fresh lemon slices.

Herbed Watercress Pistachio Salad

What’s Cooking in Gail’s Kitchen? Fab Foodstuff: Herbed Watercress Pistachio Salad! Everyone knows leafy greens can supercharge your diet. But not everyone is crazy about kale and arugula. Ask my husband. The strong pungent flavors of the former can step aside, as far as I’m concerned. Watercress is the new sheriff in town. Its delicate leaves reveal a slight hint of horseradish or wasabi, but with a crispier texture. To combat the bitter tang, simply add a nice citrus fruit along with the ancient royal pistachio nut. Did you know the Queen of Sheba found pistachios so delightful, she declared it was forbidden for commoners to harvest pistachio nuts for themselves? Alas, I digress. Watercress is the star attraction. Rich in vitamins, iron, calcium, and folic acid, its roots thrive in creek bottoms where clear running water encourages natural growth. Most farmers cultivate it in very wet ground providing constant moisture. Ask around at the Farmers Markets. It sells quickly to those who desire it.

HERBED WATERCRESS PISTACHIO SALAD

Ingredients:

1 bunch watercress, roots trimmed

8 leaves fresh basil

8-10 leaves fresh mint

20 leaves Mexican tarragon

1/2 cup mandarin orange slices

1/3 cup red onion, thinly sliced

1/4 cup pistachio nuts, lightly toasted

2 tablespoons lemon juice

1 drop orange extract

1/4 teaspoon sea salt

1/8 teaspoon white pepper

4 tablespoons olive oil

Instructions:

Arrange watercress, basil, mint, and Mexican tarragon on a platter. Tuck mandarin orange slices and red onion pieces throughout. Sprinkle toasted pistachio nuts over all. In a small bowl, whisk together lemon juice, orange extract, sea salt, and pepper. Slowly add olive oil while continuing to whisk. Dressing will emulsify. Before serving, drizzle salad dressing evenly over salad.

Grilled Avocado Bowls

What’s Cooking in Gail’s Kitchen? Fab Foodstuff: Grilled Avocado Bowls! Now you have a reason to eat more than mashed avocados in guacamole. Anyone can become a grill master with this perfect side dish. By grilling these sumptuous half moons, you not only get a portion all to yourself, the protein-packed morsels will give you energy enough to tackle whatever else is on your list. The touch of lime compliments the earthy hint of outdoor smoke. Top them off with farm fresh sweet corn niblets, chopped Roma tomatoes, and leafy cilantro snips. See what you’ve been missing.

GRILLED AVOCADO BOWLS

Ingredients:

2 avocados, halved and pitted

1 tablespoon lime juice

1 tablespoon olive oil

1/8 teaspoon garlic powder

1 tablespoon Italian salad dressing dry mix

1/2 cup sweet corn

1 tablespoon pimento, diced

1 slices Roma tomato, chopped

Fresh Cilantro

Lime wedges

Instructions:

Preheat an outdoor grill to medium heat. Drizzle each avocado half with lime juice. Use a pastry brush to coat the cut side of the avocados with olive oil. Avoid surplus in the well; it may cause a flare up. Sprinkle on garlic powder. Divide the Italian dry mix over all. Place the avocados on the hot grill, cut side directly on the grate. Cook for 3 minutes or until grill marks and slight charring is visible. Meanwhile, combine sweet corn, diced pimento, chopped tomato, and cilantro leaves in a bowl. Gently toss. Using a tongs, carefully transfer avocado bowls to a platter. Fill the centers with a scoop of the sweet corn mixture. Before serving, squeeze lime juice over all.

Furikake Party Mix

What’s Cooking in Gail’s Kitchen? Fab Foodstuff: Furikake Party Mix! Popular in the Hawaiian Islands, furikake is a seasoning with leanings toward seaweed, sesame seeds, sea salt, and a pinch of sugar. It can be sprinkled on anything from popcorn to tuna. By taking a classic snack mix and adding a candied Japanese twist, you may leave the former far behind for awhile. To prove a point, I gave out jars of Furikake Party Mix to some friends of mine for taste-testing. After one bite, they eagerly devoured its contents within a couple days and then asked for more. Proof positive as far as I’m concerned.

FURIKAKE PARTY MIX

Ingredients:

1/2 cup butter

1/2 cup sugar

1/2 cup vegetable oil

1/2 cup pure maple syrup

2 tablespoons organic soy sauce

6 cups Crispix cereal

5 cups gluten-free pretzel twists

2 cups honey roasted peanuts

2 cups wasabi peas

1/2 cup furikake seasoning

2 tablespoons red pepper flakes

Instructions:

Preheat oven to 225°. Line two baking sheets with parchment paper. Set aside. Melt the butter and sugar over medium-low heat, about 3 minutes. When the sugar is melted, remove pan from stove and add vegetable oil, pure maple syrup, and organic soy sauce. Mix well. Set aside. In a large bowl, combine Crispix cereal, gluten-free pretzel twists, honey roasted peanuts, and wasabi peas. Slowly pour the butter mixture over all; gently turning the ingredients to coat well. Sprinkle on the furikake seasoning and red pepper flakes. Toss again to mix things up equally. Divide the cereal mixture between the two baking sheets. Bake for one hour, turning every 15 minutes to keep from scorching. (It may be necessary to alternate the pans between upper and lower oven racks for even browning.) The cereal will begin to dry as it bakes. After one hour, allow the Furikake Party Mix to cool before storing in airtight jars or containers.

Elbow Macaroni Salad

What’s Cooking in Gail’s Kitchen? Fab Foodstuff: Elbow Macaroni Salad! I owe freshness to the farmer’s market. And so should you. After all, they are a great resource for locally grown produce, herbs, eggs, and meats. Without a doubt, they are popping up everywhere. However, it’s okay to ask a few questions when you’re chatting with the growers. An important one might be if there are pesticides used. “Organic” does not always mean pesticide-free. Soil quality may be another concern. GMO seeds, animal treatment, and ideas for food preparation are also topics of discussion. Once I am familiar with a grower, I glean ideas for ways to store and cook the products. Some days I even walk away with recipes. The bottom line is, support your community. We’re all in this together.

ELBOW MACARONI SALAD

Ingredients:

2 cups elbow macaroni, cook according to package directions, then cool

2 tablespoons sweet onion, sliced

1/2 cup baby carrots, julienned

1/2 cup snow peas, sliced horizontally

4 radishes, thinly sliced

1/4 cup garlic vinegar

2 tablespoons lemon juice

1 tablespoon water

1 envelope Italian salad dressing dry mix

1/2 cup olive oil

Instructions:

In a large bowl, combine cooked macaroni and sweet onion slices. Add julienned carrots, sliced snow peas, and radish discs. Gently toss. In a measuring cup, combine garlic vinegar, lemon juice, water, Italian seasoning packet, and olive oil. Whisk together until completely blended. Drizzle dressing over the macaroni salad. Gently toss to coat ingredients. Refrigerate until ready to serve.

Desperado Dinner Nachos

What’s Cooking in Gail’s Kitchen? Fab Foodstuff: Desperado Dinner Nachos! The title says it all. I had been running all day long from this to that when I finally returned home to realize I had made no plans for supper. Going back out was not an option. So things got a little desperate. Thank goodness I had some leftover roasted turkey (chicken would work just fine) plus a half a bag of tortilla chips. The rest of the toppings were a given. So you see, sometimes making mediocre effort will suffice, especially if you make it look downright delicious!

DESPERADO DINNER NACHOS

Ingredients:

1/2 bag corn tortilla chips

2 cups roasted turkey or rotisserie chicken, shredded

2 cups Mexican-blend cheese, shredded

1 tomato, chopped

1/3 cup pickled jalapeños, sliced

2-3 green onions, snipped

Greek yogurt or Sour cream

Salsa

Instructions:

Preheat the oven to 400°. Coat a baking sheet with nonstick oil. Sprinkle lightly with sea salt. In a single layer, line the baking sheet with tortilla chips, covering every space. Sprinkle on shredded cheese, reserving a little as a final sprinkling. Arrange roasted meat over cheese layer. Top with chopped tomatoes, sliced jalapeños, and green onion snips. Toss on the remaining cheese. Bake for 15 minutes until the cheese is melted and bubbly. Serve nachos with yogurt and salsa to taste.

Culinary Cauliflower

What’s Cooking in Gail’s Kitchen? Fab Foodstuff: Culinary Cauliflower! Not everyone is a fan of cauliflower. I get that. It might be because of the way it’s prepared. Or smells. Or possibly because it looks bland and boring. Meh. Well, here’s my solution if you promise to give it one more chance. Smother it in cheese. Good cheese, like smoky Gouda. Then take buttery garlic croutons and sprinkle them over the top. Get the picture? Sooo, if the family turns up their noses at the idea of eating cauliflower, simply shrug your shoulders, kick off your shoes, and curl up on the sofa with the entire bowl yourself.

CULINARY CAULIFLOWER

Ingredients:

1 head cauliflower

1 cup water

1/2 cup smoky bacon Gouda cheese, sliced thin

1 tablespoon milk

2 tablespoons butter

1/3 cup garlic croutons, coarsely crushed

1/8 teaspoon red pepper flakes

Fresh parsley for garnish

Instructions:

Preheat oven to 350°. Warm water over medium heat in a saucepan with a steamer basket. Cut off stem of cauliflower, removing the leaves. Make an “x” in the core with a sharp knife. Once the water is boiling, reduce it to a simmer, place cauliflower in the steamer basket. Cover and steam for 15 minutes until tender. Drain. Cut cauliflower into florets. Transfer to an ovenproof bowl. Combine sliced Gouda cheese and milk in a microwave-safe dish. Microwave on Low (30%) in 30-second intervals. Stir until smooth as it melts. Pour over cauliflower. Sprinkle red pepper flakes on top. Bake 5-10 minutes until golden and bubbly. Warm butter in a pan over medium heat. Add crushed garlic croutons. Stir occasionally until brown. Sprinkle breadcrumbs over melted cheese. Garnish with chopped parsley.

Buffalo Chicken Pizza

What’s Cooking in Gail’s Kitchen? Fab Foodstuff: Buffalo Chicken Pizza! Combine two bar and grill favorites to equal one outstanding supper on game night. From the creamy ranch dressing slathered over a crispy olive oil crust to the tender rotisserie chicken dotted with robust bleu cheese and crunchy celery, you will not believe your taste buds. This is good stuff. Decide how high you want to crank up the heat by using spicy sriracha sauce and red pepper flakes. Go wingless for a sensational show-stopper that will leave everyone cheering.

BUFFALO CHICKEN PIZZA

Ingredients:

1 prepared naan, flatbread, or pizza crust

1-2 tablespoons olive oil

1 tablespoon cornmeal

1/8 teaspoon garlic powder

1/4-1/3 cup ranch salad dressing

1/2 cup mozzarella cheese, shredded

1 cup deli-roasted chicken, shredded

1/2 cup bleu cheese crumbles

1/2 cup chopped celery

2-3 tablespoons sriracha sauce

1 teaspoon red pepper flakes

Instructions:

Preheat oven to 400°. Brush both sides of a prepared pizza crust. Sprinkle cornmeal on the bottom only. Sprinkle garlic powder over top. Bake seasoned crust on a pizza stone for 5 minutes. Carefully remove from oven. Spread ranch salad dressing evenly over top crust. Sprinkle with shredded mozzarella cheese. Layer on shredded chicken. Dot with bleu cheese crumbles. Bake 10 minutes longer. Arrange chopped celery over pizza. Drizzle with sriracha sauce. Garnish with red pepper flakes. Serve immediately.

Alfalfa Sprouts at Home

What’s Cooking in Gail’s Kitchen? Fab Foodstuff: Alfalfa Sprouts at Home! Remember the time you stopped at the corner bistro for a super-healthy bite to eat? You know the sammie. It’s made with the crusty artisan bread, hearty summer veggies, creamy herbed cheese, and stacked high with alfalfa sprouts instead of lettuce. Afterwards you thought, “Hey, I can make this at home.” So you went to the grocery and found everything you needed…except alfalfa sprouts. What’s up with that? Unfortunately, alfalfa sprouts are extremely vulnerable to contamination for one reason or another. A lot can go awry from harvesting to produce aisle. Problem solved. DIY kits are available, along with certified organic seeds. Now you, too, can enjoy one of the most nutritious greens around. Supplies include a quart jar, screening lids, and seeds. You’re welcome.

ALFALFA SPROUTS AT HOME

Ingredients:

1 tablespoon organic alfalfa seeds

Water

Instructions:

Measure dry seeds and place in a quart canning jar. Add warm water. Soak overnight. The next morning, use a fine screen top to drain all the water. Do not soak again. Rinse the seeds under a faucet using tepid water. Gently swirl and drain. For faster growth, repeat this process again in the evening. Place the jar at an angle with the screened lid facing down. This allows proper drainage and ventilation. Repeat on Day 2. As the sprouts grow, change to a larger screened lid. You will notice the seed hulls wash away during rinsing. By swirling under running water, most hulls are flushed out through the lid. This may take two or more rinsings. Drain well. Continue to rinse and drain every 8-12 hours. Harvest on Day 6 when the leaves are open and have mostly turned green. Store finished sprouts in the refrigerator until ready to eat.