Open-Faced Sammie

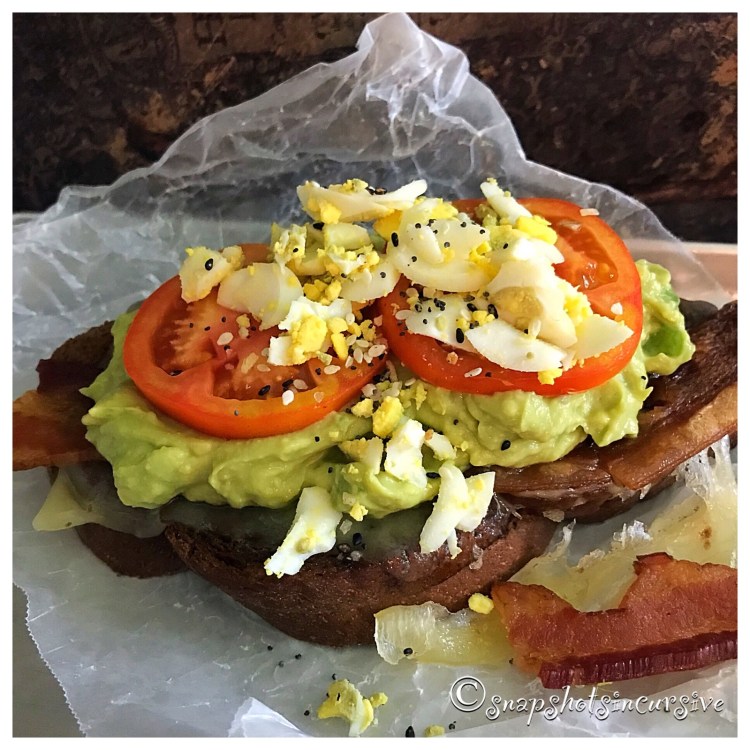
What’s Cooking in Gail’s Kitchen? Equal Measures: Open-Faced Sammie! The popularity of open-faced sandwiches has been brewing since the 15th century, when it was typically eaten for breakfast, lunch, snack, or supper. Although the layers have changed, butter or cheese remain the favorites as spreads, plus any combination of meat and vegetables. This is where your personal palate comes in. Or, perhaps whatever you have on hand in the refrigerator. Gardens abound with peppers, tomatoes, cucumbers, and radishes. But don’t limit yourself there. I find avocados to be perfectly satisfying, especially with a crispy slab of applewood smoked bacon. Like I said, the choice is yours. One thing is for certain, it’s definitely easier to eat an open faced sandwich with a fork and knife.

OPEN-FACED SAMMIE

Ingredients:

2 slices pumpernickel rye bread, artisan-style

1 tablespoon sea salt butter

3 slices Swiss cheese, divided

3 slices bacon, cooked

1 ripe avocado, pitted and mashed

1 teaspoon lime juice

1/8 teaspoon garlic powder

1 tomatillo, chopped

1 tomato, sliced

1 egg, hard-boiled and chopped

1/8 teaspoon Everything But Bagel seasoning

Instructions:

Toast artisan pumpernickel rye bread. Butter with sea salt. Place 1 1/2 slices of Swiss cheese on each piece of toast. Microwave on High 15 seconds to melt cheese. Layer with 1 1/2 slices crisp bacon. In a small bowl, combine mashed avocado, lime juice, and garlic powder. Mix well. Fold in chopped tomatillo. Spread over each sandwich. Place two tomato slices over avocado mixture. Spoon chopped hard-boiled egg pieces over tomatoes. Sprinkle with Everything But Bagel seasoning. Makes two open-face sandwiches.

Incredibly Delish Chocolate Bliss

What’s Cooking in Gail’s Kitchen? Equal Measures: Incredibly Delish Chocolate Bliss! Is it a cake? Is it a confection? Who cares? It’s smooth, creamy dreamy chocolate and it is incredible. The fact that it is flourless is a plus for those who avoid desserts for that particular reason. The dark chocolate and butter combination is divinely rich, which is why a little bit goes a long way. I find a nice cuppa joe or herbal tea creates a balance that works. As always, share a little bliss with those around you. They’ll thank you for it.

INCREDIBLY DELISH CHOCOLATE BLISS

Ingredients:

4 ounces bittersweet chocolate, chopped

6 tablespoons butter, cubed

2 eggs

1/4 cup sugar

1 teaspoon espresso powder

1/4 teaspoon almond extract

6 teaspoons chocolate hazelnut spread

Crushed pistachios for garnish

Instructions:

Preheat oven to 375°. Use paper muffin cups or buttered ramekins. Set aside. Combine bittersweet chocolate and butter in a microwave-proof bowl. Melt in microwave on high setting at 30-second intervals until melted and smooth. Stir occasionally. In a mixer bowl, combine eggs, sugar, espresso powder, and almond extract. Beat on medium-high speed for 5 minutes or until mixture is lightened. Reduce speed to low setting. Add melted chocolate/butter mixture until combined. Spoon into muffin cups or buttered ramekins. Add one half teaspoon of hazelnut spread in the center of each muffin cup batter. Bake 10 minutes until edges are set, but center is still soft. Do not over bake. Garnish with crushed pistachios. Cool 5 minutes before serving.

Honeycomb Cheese Wheel

What’s Cooking in Gail’s Kitchen? Equal Measures: Honeycomb Cheese Wheel! Remember when you were a kid and for fun you puckered up with those candy red wax lips? Me and my girlfriends would put them on, batt our eyes, sashay our hips, and laugh hysterically. Most often we’d find ourselves chewing on the sugary insides before spitting them out into tiny red blobs on our way home from school. I’m sure that made quite an impression on the neighborhood boys. Well today’s honeycomb is a distant cousin, twice-removed, to those artificial candy lips. Even better, raw honeycomb is completely safe to eat and naturally sweet. A little goes a long way simply because it is seeping with honey. Dress it up with a wheel of Camembert or Brie cheese, seasoned with a clove of garlic and a couple of sprigs from the herb garden. Spread it across baguette slices for an open-air treat.

HONEYCOMB CHEESE WHEEL

Ingredients:

1 wheel Camembert cheese

1 garlic clove, sliced

1 sprig rosemary

2 sprigs thyme

1 tablespoon butter, melted

Small section honeycomb

Instruction:

Preheat oven to 350°. Remove cheese from plastic wrap. Return cheese to its wooden box. Place box on a baking sheet. Take a knife and score a criss-cross pattern halfway through the cheese. Tuck garlic clove slices in the cuts. Sprinkle rosemary and thyme herbs over top. Drizzle butter over all. Bake, uncovered, 20 minutes until cheese is soft, bubbling, and fragrant. Serve immediately by spreading the golden cheese over toasted baguette slices. Then spoon the oozing honeycomb pieces over all. Garnish with fresh herbs.

ZZ “Zucchini” Topped Potatoes

What’s Cooking in Gail’s Kitchen? A Burst of Flavor: ZZ “Zucchini” Topped Potatoes! This recipe is going to be rock music to your ears. (If you pre-bake several potatoes on the weekend, it’ll eliminate one step during the week.) Create a fast meal by loading baked potatoes with yummy ingredients. Then top them off with sautéed zucchini, sweet onions, and hickory-smoked bacon. Can you feel the beat? Put this toe-tapping favorite in your recipe box…….and Rock On!

ZZ “ZUCCHINI” TOPPED POTATOES

Ingredients:

4 large potatoes, baked

Sea Salt

1 cup Greek yogurt

1/4 cup milk

2 green onions, snipped

1/4 cup butter

1 cup cheddar cheese, finely shredded

1 medium zucchini, chopped

1/2 sweet onion, chopped

2 tablespoons olive oil

4 slices bacon, fried crisp and crumbled

Instructions:

Preheat oven to 350°. Wash potatoes, pat dry. Pierce each one on top. Spray with nonstick oil and sprinkle sea salt on skins. Bake for one hour. When done, let cool for ten minutes. Meanwhile, cook bacon. Drain on paper towels and crumble. Sauté onions and zucchini in olive oil. Slice potatoes in half lengthwise. Remove the flesh into a bowl leaving enough skin to form a shell. Place skins in a shallow baking dish. To the flesh, add yogurt, milk, green onions, butter, and 1/3 cup cheddar cheese. Blend until creamy. Spoon the filling into the potato skins. Top with remaining cheese, sautéed zucchini, onions, and crumbled bacon. Bake 15 minutes longer or until cheese is melted and bubbly.

Understated Stuffed Stromboli

What’s Cooking in Gail’s Kitchen? A Burst of Flavor: Understated Stuffed Stromboli! Everyone likes finger food. Take a ready-made French bread dough, add your favorite meats, and cheeses….and Voilà, you have a speedy sandwich assembled in minutes. I often serve it with a side of marinara sauce for dipping. Leftovers make a tasty midnight snack, whether you warm it up or eat it cold. Either way, you won’t see this understated grinder hang around very long.

UNDERSTATED STUFFED STROMBOLI

Ingredients:

1 tube refrigerated crusty French bread

1 cup mozzarella cheese, finely shredded

1 cup cheddar cheese, finely shredded

1/4 pound deli smoked ham, thinly sliced

1/4 pound deli salami, thinly sliced

1 tablespoon butter, melted

3 tablespoons Parmesan cheese, grated

1/8 teaspoon dill weed

Instructions:

Preheat the oven to 375°. Unroll the dough and pat into a rectangle about 12″ x 14″. Sprinkle with mozzarella to within half an inch from the edges. Layer ham over mozzarella cheese. Top ham with cheddar cheese. Then layer salami over the cheddar cheese. Roll up lengthwise; seam side down on an ungreased baking sheet. Tuck ends under. Brush with melted butter. Sprinkle with Parmesan cheese. Garnish with dill weed. Bake for 25-30 minutes or until golden brown. Slice into four servings.

Southern-Style Sausage Gravy and Biscuits

What’s Cooking in Gail’s Kitchen? A Burst of Flavor: Southern-Style Sausage Gravy and Biscuits! Some call it “comfort food”, others say it reminds them of Home. Whether you’re from the southern states or not, this meal is a hardy choice for an early breakfast, mid-day brunch, or late-night dinner. Add a side of tomatoes, eggs, cheese, or grits and you’ll soon have another family favorite.

SOUTHERN-STYLE SAUSAGE GRAVY AND BISCUITS

Ingredients:

12-ounces of bulk pork sausage

1/8 teaspoon cracked black pepper

1/4 teaspoon seasoned salt

1/8 teaspoon crushed red pepper flakes

1/4 cup butter

1/4 cup flour

2 cups milk

1 tube buttermilk biscuits

Instructions:

In a large skillet over medium heat, brown sausage with black pepper, 1/8 teaspoon seasoned salt, and red pepper flakes, stirring occasionally. It will be crumbly when cooked through. Set aside. In a 2-quart pan, melt butter and remaining 1/8 teaspoon seasoned salt over medium-low heat, being careful not to scorch. Add flour all at once into the butter to make a roux. Whisk vigorously for about one minute. The mixture will thin and begin to bubble. Reduce heat to low and let it cook for two minutes more, stirring occasionally. Continue whisking and gradually pour the milk into the mixture, eliminating any lumps. Bring the gravy to a boil, stirring often. Lower the heat and gently simmer for two minutes longer or until thickened. Using a slotted spoon, transfer sausage to the gravy, reserving 1/3 cup for garnish. Meanwhile, bake biscuits according to package directions. Remove from oven.

Split biscuits in half and top with sausage gravy. Sprinkle crumbled sausage over all and serve immediately.

Peanut Buster Oreo Perfection

What’s Cooking in Gail’s Kitchen? A Burst of Flavor: Peanut Buster Oreo Perfection! This icebox treat will satisfy every craving you have, as long as it’s for something cold, salty, and sweet. The Oreo cookie crust is amazing! The layer of fudge nestled between natural vanilla bean ice cream and fluffy light whipped cream is a lip-smacking delight for the palate. The best advice I can give you is… SHARE. Otherwise, you’ll be tempted to eat the entire pan.

PEANUT BUSTER OREO PERFECTION

Ingredients:

1 package of Oreo cookies

1/2 cup butter, melted

1/2 gallon vanilla bean ice cream

12 ounces of hot fudge sauce

1 cup Spanish peanuts

8 ounces of frozen whipped topping

Instructions:

Preheat oven to 350°. Grease bottom of 9″x13″ pan. Crush 24 Oreo cookies and mix well with the melted butter. Spread into the bottom of the pan making a thin, even layer. Bake for 5 minutes. Remove from oven and let cool. Slice the ice cream and place in an even layer over cookie crust. Pour the hot fudge topping over the ice cream. Sprinkle peanuts over fudge sauce. Spread the whipped topping over all. Crush two more Oreo cookies and sprinkle lightly as garnish. Freeze overnight. Enjoy the perfection!

Luscious Lavender Puff Cookies

What’s Cooking in Gail’s Kitchen? A Burst of Flavor: Luscious Lavender Puff Cookies! Before we begin, let me assure you, baking the cookies for 45 minutes per batch, IS NOT a misprint. Dried lavender buds as well as lavender extract can be found at farmers markets, organic health food stores, or your local co-op. (I went one step further and made my own lavender extract from dried buds, which took longer to ferment.) I also have the convenience of a nearby Amish community as a resource for dried herbs and spices. These cookies are definitely worth the effort. Put on a pot of coffee or tea…. and enjoy!

LUSCIOUS LAVENDER PUFF COOKIES

Ingredients:

1 cup butter, softened

5 tablespoons sugar

1 tablespoon lavender buds

1 teaspoon lemon citrus peel, granulated

1 teaspoon lavender extract

1 teaspoon lemon extract

1/4 teaspoon sea salt

3/4 cup pecans, chopped

2 cups flour

Powdered Sugar for rolling

Lavender buds for garnish

Instructions:

Preheat oven to 300°. Beat butter until soft. Crush lavender buds in sugar using a mortar and pestle; then combine sugared lavender buds with butter. Blend until creamy. Mix in citrus peel, lavender extract, and lemon extract. Add pecans, flour, and salt to butter mixture. Combine thoroughly. Roll the dough into 1-inch balls, then place on ungreased cookie sheet. Bake 45 minutes or until set, but not brown. Remove from cookie sheet and cool on wire rack for 5 minutes. Roll in powdered sugar to coat when cookies are still slightly warm. Sprinkle with dried lavender buds. Cool completely on wire rack.

Five-Minute Grilled Steak

What’s Cooking in Gail’s Kitchen? A Burst of Flavor: Five-Minute Grilled Steak! In the time it takes to caramelize the onions, you can have a no-fuss mouth-watering T-bone steak. Make sure the steak is Choice beef from the loin and rib so it will taste tender and juicy. It has a little less marbling, but is well-suited for the dry heat of a gas grill. I gave my sliced onions a head-start by microwaving them for 2 minutes on high while the grill was preheating.

FIVE-MINUTE GRILLED STEAK

Ingredients:

1 pound USDA Choice T-bone steak, 1/2″ thick at room temperature

Sea salt and cracked black pepper to taste

Pinch of garlic powder

1-2 tablespoons olive oil

1 sweet onion, sliced

1/8 teaspoon seasoned salt

1 tablespoon butter

Instructions for Grilling Steak:

First of all, let me clarify that my husband and I prefer steak to be cooked Medium Rare, which is seared on the outside and pink in the middle.

Salt and pepper both sides of the steak while the gas grill is preheating from 450°-500°. At this time sprinkle the steak with garlic powder as well. The salt begins to draw out a little bit of moisture which makes the steak sizzle when it hits the grill grate, sealing in the flavor. For accuracy in grilling, my husband sets the timer on his cell phone, which is quite handy. Grill the T-bone steak for 2 1/2 minutes on one side before flipping over for the remaining 2 1/2 minutes. The finished steak will be medium-rare. Now this is the most difficult part. Let it rest for about 5 minutes before serving. The juice will reabsorb back into the steak to give you that moist and meaty taste.

Meanwhile, in Gail’s Kitchen the microwaved onion slices have been transferred to a medium skillet on the stove. They continue to sauté on medium high heat in the olive oil and seasoned salt. Turn and coat the onions without allowing them to burn. If necessary, reduce the heat. The onions will brown as they cook down. The rich flavor and caramelized color are the results of allowing the onions to breathe and have room to finish. When this happens, I add a tablespoon of butter for additional flavor.