Kid-Friendly Breadsticks & Knots

What’s Cooking in Gail’s Kitchen? Enjoyable Eats: Kid-Friendly Breadsticks & Knots! Here’s a treat that will get your kids involved in cooking for a tasty after school snack. I learned a long time ago, when the kids get cooking, they get pretty excited about the results. By choosing a prepared pizza crust from the dairy section of the grocery store, there’s no time needed for the dough to rise. Plus, moms and dads can be particular about the ingredients. I chose a European bakery-style dough that had no artificial flavors or colors, no high fructose corn syrup, no hydrogenated oils, and no bleach flour. It was made with olive oil and suitable for vegetarians. It even came with parchment paper for baking. Now you’re talking!

KID-FRIENDLY BREADSTICKS & KNOTS

Ingredients:

14-ounce package of refrigerated classic pizza dough, family-style crust

1-2 tablespoons olive oil

1 tablespoon Everything But Bagel seasoning

1 teaspoon dill weed

1-2 tablespoons butter, melted

3 tablespoons Parmesan cheese, grated

Instructions:

Preheat oven to 400°. Line a baking sheet with a silpat mat or parchment paper. Unroll pizza dough. Cut into 12 strips. Twist the dough into ropes before laying them on the baking sheet. If you prefer knots, tie the dough as you would a pretzel; over, under, and through. Place them on the baking sheet. Lightly brush breadsticks and knots with olive oil. Sprinkle on Everything But Bagel seasoning and dill weed. Bake 15-20 minutes. Remove from oven. Brush with melted butter. Sprinkle grated Parmesan cheese over all. Serve warm.

Feta Morning Fried Egg

What’s Cooking in Gail’s Kitchen? Enjoyable Eats: Feta Morning Fried Egg! Thank goodness this is a healthy way to begin my day. Honestly, I think I might be seriously addicted to it. Remember when your kids were little and could go days eating nothing but peanut butter sandwiches? We’d roll our eyes as the pediatrician assured us they would be fine. “It’s a phase”, he’d say, “You’ll see.” And he was right. My kids grew up to be healthy, active teens, and so on. But I’m an adult. And I’ve been making this breakfast for 3 weeks now. Granted, the avocados are in abundance along with the price of eggs being so affordable I feel as though the grocery store is practically paying me to take them home. Do me a favor, try this recipe yourself and give me your feedback. I’d like to know it’s just not me going through a midlife crisis.

FETA MORNING FRIED EGG

Ingredients: (Serves two)

2 slices quinoa multigrain bread, toasted and buttered

1 avocado, pitted and sliced

2 eggs, sunny side up

1 tablespoon butter, melted (optional)

2 tablespoons herbed feta cheese, crumbled

1 Roma tomato, sliced

1/2 teaspoon Italian seasoning

Green onion, for garnish

Instructions:

While quinoa bread is toasting, cook two eggs in melted butter or nonstick oil, over medium heat, according to taste. Set aside. Butter toast. Divide avocado slices between toast. Slide cooked egg onto avocado toast. Sprinkle with herbed feta cheese. Garnish with green onion strips. Serve with sliced Roma tomatoes sprinkled with Italian seasoning.

Dang Good Mac & Cheese

What’s Cooking in Gail’s Kitchen? Enjoyable Eats: Dang Good Mac & Cheese! I just cranked up this all-time favorite dish a notch, maybe two. Cheddar cheesy? It’s in there. Mozzarella madness? Oh, yeah. Palatable parmesan? Absolutely. Sooo, what’s the big deal, you wonder. Well…I kinda switched out the macaroni pasta noodles for gnocchi’s pillow-like tender dumplings that swaddle themselves in a blanket of creamy cheese sauce. Hold on. Then I topped it all with a buttery crunch topping of panko and Italian bread crumbs. Mmmwah! Life doesn’t get any better that this.

DANG GOOD MAC & CHEESE

Ingredients:

1-pound package gnocchi

1 1/2 tablespoons cornstarch

1/2 cup chicken broth

1 tablespoon olive oil

1 clove garlic, chopped

1/2 cup milk, warmed

3/4 cup mozzarella cheese, shredded

1/2 cup sharp cheddar cheese, shredded

1/4 cup parmesan cheese, grated

1/4 teaspoon sea salt

1/8 teaspoon black pepper

1/4 cup panko and Italian bread crumbs

1 tablespoon butter, melted

Parsley, for garnish

Instructions:

Preheat oven to 325°. Spray a casserole dish with nonstick oil. Set aside. Cook the gnocchi, according to package directions. Drain, transfer to a large bowl, and set aside. Whisk together cornstarch and chicken broth in a measuring cup until completely dissolved. Set aside. Warm olive oil in a large saucepan over medium heat. Add garlic. Sauté 1-2 minutes until fragrant. Slowly add cornstarch mixture, stirring constantly to make a light brown roux. Add warm milk, stirring until smooth as the mixture reaches a low boil. Remove pan from heat; stir in mozzarella, cheddar, and parmesan cheeses until melted and smooth. Season with sea salt and black pepper. Pour the cheese sauce over the gnocchi until evenly coated. Transfer to the prepared casserole dish. Combine panko and Italian seasoned breadcrumbs with the melted butter. Sprinkle over the cheesy gnocchi. Bake 15 minutes to brown the topping. Garnish with fresh parsley. Serve immediately.

Yams in Pecan Glaze

What’s Cooking in Gail’s Kitchen? Start Smart: Yams in Pecan Glaze! Oh. My. Gosh. You have got to make this recipe. There’s still plenty of time before the holidays to switch back to your traditional family favorite if you don’t like it, but think about this a moment. By using canned yams, or sweet potatoes, preparation is a snap. Who knows? You could end up making both. Remember what I said about “Start Smart”? Sometimes that means taking advantage of the numerous products that eliminate the extra leg work. Sugared pecans are such a gourmet treat. Pick up a package of those to add to the decadent pure maple syrup sauce. Read on if you’re curious.

YAMS IN PECAN GLAZE

Ingredients:

29-ounce can cut sweet potatoes in syrup

4 tablespoons butter

1 teaspoon sage, finely chopped

1 teaspoon thyme, finely chopped

1/4 teaspoon cinnamon

1/4 teaspoon sea salt

1/8 teaspoon cracked black pepper

Fresh thyme sprigs, for garnish

For Pecan Glaze:

1 tablespoon butter

1/2 cup sugared pecans

1/4 cup pure maple syrup

Instructions:

Preheat oven to 375°. Drain liquid from sweet potatoes into a saucepan. Carefully slice and arrange yams in a casserole dish. Set aside. Boil the liquid over medium heat until only 1/4” covers the bottom of the saucepan. Add butter, sage, thyme, cinnamon, sea salt, and cracked black pepper. Mix well. Pour over sweet potatoes. Bake 15 minutes. While potatoes are baking, make the pecan glaze. Add butter to a skillet over medium heat. Add sugared pecans. Toss to coat. Sauté for 2 minutes. Add pure maple syrup. Cook 5 minutes longer, or until the pecans are caramelized and syrupy. Pour over sweet potatoes. Return casserole to the oven and bake 5 minutes longer, or until the glaze becomes thick. Garnish with fresh thyme sprigs before serving.

Quick Savory Butter

What’s Cooking in Gail’s Kitchen? Start Smart: Quick Savory Butter! For some time now we’ve gotten pretty spoiled by restaurants, bistros, and cafés serving compound butter with the artisan bread basket. You almost hear us clapping our hands as we sink our teeth into the savory herbs or sweet concoctions. I know it makes me feel special. Chefs have been creating compound butters for years, though. It’s one of the ways they save time and add a level of sophistication for the customer. In my own kitchen, I found it’s best to begin with unsalted butter. That way I can add just enough sea salt to tease the palate. Lemon, believe it or not, adds a hint of flavor that embellishes steak or seafood. I see you nodding your head in agreement. Although I began smearing this combination on rolls and crackers, I couldn’t resist warming it to pour over a bowl of freshly popped popcorn. Talk about gourmet!

QUICK SAVORY BUTTER

Ingredients:

1 stick (1/2 cup) unsalted butter, room temperature

1 tablespoon lemon juice

1/4 teaspoon garlic powder

1/2 teaspoon sea salt

1 tablespoon fresh rosemary, chopped

2 tablespoons fresh parsley, chopped

Instructions:

In a mixing bowl, cream butter with lemon juice. Add garlic powder and sea salt; stir. Fold in fresh rosemary and parsley leaves. Mix until combined. Place a sheet of waxed paper on the counter. Spoon compound butter onto sheet. Roll the waxed paper over butter to form a log. Roll tight and twist both ends. Refrigerate one hour or until firm.

Oven-Roasted Golden Peaches

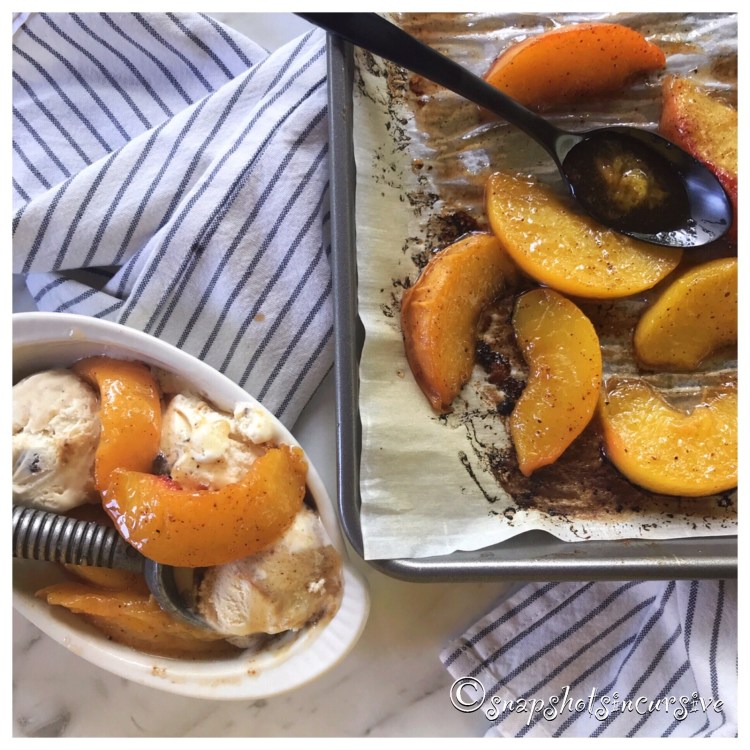
What’s Cooking in Gail’s Kitchen? Start Smart: Oven-Roasted Golden Peaches! Forget about cleanup of baking sheets by utilizing a perfect nonstick solution. Parchment paper. Never confuse it with wax paper, though, which will smoke in the oven. That’s a big mistake. Parchment paper is made to withstand oven temperatures during the baking or roasting process. Not only that, parchment paper contains a release agent that prevents foods from sticking to it. Bonus points, in my opinion. Because we’re covering the sliced peaches with pure maple syrup, you can imagine how difficult that would be to scrape off the pan once it’s baked in. May as well throw the pan away and buy another. Or…you could do what I did the first time I baked a galette. My husband took his sander tool and ground the petrified sugar off. Hey, don’t judge me. It was my favorite baking sheet. Still is.

OVEN-ROASTED GOLDEN PEACHES

Ingredients:

3-4 ripe peaches, pitted and sliced

2-3 tablespoons butter, melted

2-3 tablespoons pure maple syrup

1/4 teaspoon cinnamon

Instructions:

Preheat the oven to 425°. Cover a baking sheet with parchment paper. Place sliced peaches in a single layer, without touching. Drizzle with melted butter and maple syrup. Sprinkle with cinnamon. Bake 15 minutes, then flip peaches over. Spoon excess sauce over peaches. Bake 10 minutes longer. Serve warm with sea salt caramel ice cream.

Juicy Roast Turkey

What’s Cooking in Gail’s Kitchen? Start Smart: Juicy Roast Turkey! There’s nothing worse than dry-as-dust turkey, around the holidays. Watch your guests if they keep asking you to pass the gravy. Today I’m going to give you a few tips to keep that from happening. You can thank me when it’s your turn to host the holiday meal. Number one: Truss loosely, or not at all. The secret is to allow heat to get to all sides of the legs. Cooking the turkey until the legs are done may result in overcooking the breast meat. Number two: Don’t overcook. The timetable on the package is an estimate. Always use a meat thermometer, even if the turkey comes with a pop-up version. Always. Number three: (and this one is the hardest for me) Let the turkey “rest” before carving. I’m talking 20-30 minutes. Evidently, during the roasting process, the oven heat forces all the juices to the center of the turkey. When you allow it to “rest”, after it’s done, the juices seep back into the cavities and make the turkey moist. It’s definitely worth the wait.

JUICY ROAST TURKEY

Ingredients:

10-15 pound turkey, thawed

1/2 cup butter

1 lemon, juiced and zested

1 teaspoon thyme

Instructions:

Preheat the oven to 350°. Wash the turkey, pat dry, and transfer to a roasting pan with a roasting rack. Stuff the turkey as desired. Otherwise, salt and pepper the inside of the cavity. In a small saucepan, warm the butter over low heat. Add the lemon juice, zest, and thyme. Brush the outside of the turkey with the butter mixture. Insert a meat thermometer into the thickest part of the thigh, avoiding the bone. Cover the roaster with the lid. Transfer pan to oven. Bake for two hours, basting the turkey every half hour. This insures even browning of the skin. Remove lid and roast turkey an additional 1 1/2 hours, continuing to baste at half hour intervals. When the meat thermometer reads 185°, remove the turkey from the oven. Transfer it to a cutting board; cover with foil. Let it rest for half an hour. This makes carving easier and produces a juicy roast turkey.

Apple Orchard Pie

What’s Cooking in Gail’s Kitchen? Start Smart: Apple Orchard Pie! Nothing conjures up autumnal nostalgia like a slice of apple pie, still warm enough from the oven to soften a scoop of vanilla ice cream. Inhale the aromas of cinnamon, nutmeg, and allspice. It’s delectable, isn’t it? I realize making pies may not be on the top of the list for everyone who loves it. So, I’m telling you today, it’s okay to begin with a prepared pie crust. There are some pretty decent brands out there for you to try. Some refrigerated brands are made to unroll and crimp the edges; others are frozen and meant to be thawed. Some are buttery, super-flaky, and even taste as good as homemade. That’s where you’ll need the help of an assistant, or taste-tester, so to speak. Just remember, pie doesn’t have to be picture perfect to taste spot on. It’s dessert, after all.

APPLE ORCHARD PIE

Ingredients:

1 prepared pie crust, 9”

4-5 large sweet apples, peeled, cored, and sliced

4 large tart apples, peeled, cored, and sliced

1 cup sugar

1/2 teaspoon cinnamon

1/4 teaspoon nutmeg

1/4 teaspoon allspice

1/4 teaspoon sea salt

2 tablespoons butter

Ingredients for Crumb Topping:

1 cup flour

3/4 cup brown sugar

1/3 cup butter, softened

1/2 teaspoon cinnamon (optional)

Instructions:

Preheat oven to 350°. Form prepared pie crust into a pie plate that has been sprayed with nonstick oil. Crimp edges. Set aside. Combine sugar, flour, cinnamon, nutmeg, allspice, and sea salt. Sprinkle about a quarter cup of mixture over the bottom of the pie crust. In a large bowl, toss the apple slices with the remaining sugar mixture. Coat well. Transfer apples to the pie plate, forming a mound in the center. Dot with 2 tablespoons of butter. Bake for 30 minutes. Meanwhile, combine flour, brown sugar, butter, and cinnamon for crumb topping. It should resemble small peas when mixed. Carefully add the topping to the apple pie. Bake 30 minutes longer. If necessary, cover the pie with foil to prevent burning.

Nutmeg Cinnamon Popovers

What’s Cooking in Gail’s Kitchen? Be Our Guest: Nutmeg Cinnamon Popovers! Don’t hate me. These bakery-style popovers come with a warning label: Highly Addictive! Perhaps I might include a disclaimer. If you never suffer with sweet tooth cravings or for some unknown reason dislike cinnamon, no worries. For the rest of us, all I can say is “Try to resist licking your fingers!”.

NUTMEG CINNAMON POPOVERS

Ingredients:

6 large eggs

2 cups light cream

1/4 cup unsalted butter, melted

2 teaspoons almond extract

2 teaspoons vanilla extract

1 teaspoon sea salt

3 tablespoons sugar

2 cups flour

Topping:

2 tablespoons butter, melted

1 cup sugar

1 tablespoon ground cinnamon

1/2 teaspoon nutmeg

Instructions:

Preheat oven to 400°. Move the oven rack one setting below the middle row. Grease a 12-count bouchon pan. In a food processor, combine eggs, light cream, butter, almond extract, vanilla extract, sea salt, sugar, and flour. Blend until no lumps remain and batter is light yellow and frothy, approximately one minute. Fill each bouchon cup 2/3 full. Do not overfill. (Refrigerate leftover batter until ready to make the next batch. At that time, use a whisk to vigorously stir the batter.) Place bouchon pan in the oven; bake for 30 minutes or until golden brown. Do not open the oven door during baking or the popovers will deflate. When golden brown, remove from the oven. After 2 minutes in the pan, transfer popovers to a wire rack. Do not allow them to cool in the pan or they may turn soggy. Meanwhile place melted butter in a small bowl. In another bowl, combine sugar, cinnamon, and nutmeg. Mix well. Take a popover and brush it with melted butter to coat. Place the popover in the sugar mixture and roll to coat. Repeat with entire batch of popovers.