Velvet-Filled Pumpkin Roll

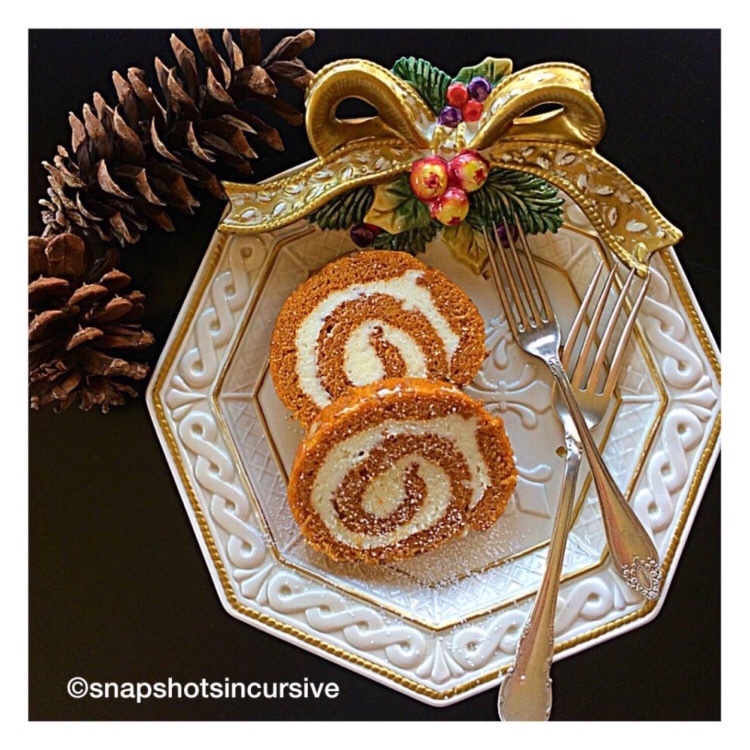
Experience the Holidays: Velvet-Filled Pumpkin Roll! Announcing a festive cake that looks as though you stopped by the bakery. Anyone can feel like a professional pastry chef with this holiday specialty. In a few simple steps, the rich pumpkin flavor is enhanced by the velvety cream filling. Afterwards all you have to do is sit back and bask in the accolades.

VELVET-FILLED PUMPKIN ROLL

Ingredients for Pumpkin Roll:

3 eggs

2/3 cup pumpkin purée

1 cup sugar

1 teaspoon baking soda

1/2 teaspoon cinnamon

3/4 cup flour

1/3 cup chopped pecans

Ingredients for Velvet Filling:

8 ounces Neufchâtel cheese

3/4 teaspoon vanilla

2 tablespoons butter, softened

1 cup powdered sugar

Instructions:

Preheat oven to 375°. Grease and line a 10″x15″ jelly roll pan with waxed paper. For pumpkin roll combine eggs, pumpkin purée, sugar, baking soda, cinnamon, and flour. Mix until well blended. Pour into jelly roll pan and spread evenly to edges. Sprinkle with chopped pecans. Bake 12-15 minutes. Watch carefully. Remove from oven. Sprinkle powdered sugar on a tea towel, turn cake onto towel, and remove the waxed paper. Starting at one end, roll the cake up, and refrigerate for one hour. Meanwhile, combine Neufchâtel cheese, vanilla, butter, and powdered sugar. Mix together until smooth and velvety. After one hour, unroll cake and spread the filling all the way to the edges. Reroll cake and refrigerate two hours longer. Dust with powdered sugar. Slice and serve.

Mincemeat Cookies

Experience the Holidays: Mincemeat Cookies! When my friend, Ray, “gifted” me with a batch of his time-honored traditional homemade mincemeat, I felt as though I had received a portion of the Holy Grail. Could this secret from the past hold special powers? Would one bite provide happiness, eternal youth, and food in infinite abundance? You tell me. Ray carefully coached me on how to “season” the mixture by adding flavored brandy (I chose apricot) over a three-week period, stirring it occasionally in a covered clay crock. I was an awestruck student following his instructions to the letter. The results were phenomenal and elegant. Don’t let anyone tell you mincemeat is awful. When prepared correctly, some things are worth the wait.

MINCEMEAT COOKIES

Ingredients for Cookies:

2/3 cup butter, softened

2/3 cup brown sugar

1 teaspoon cinnamon

1/2 teaspoon nutmeg

1/2 teaspoon sea salt

1/2 teaspoon baking soda

1/2 teaspoon baking powder

2 eggs

1 cup mincemeat*

2 cups flour

1 cup pecans, chopped

Pecan halves for garnish

Ingredients for Icing:

3 cups powdered sugar

3 tablespoons butter, softened

1 tablespoon apricot brandy

1 teaspoon vanilla extract

1-2 tablespoons warm milk, as needed

Instructions:

Preheat oven to 375°. Cream together butter and brown sugar until fluffy. Beat in cinnamon, nutmeg, salt, baking soda, and baking powder. Add eggs and mincemeat. Gradually stir in the flour. Fold in chopped pecans. Drop by spoonfuls onto a parchment lined baking sheet. Bake 8-10 minutes until tops of cookies are dry and set. Bottoms will be slightly golden. Remove from oven. Transfer to a wired rack. Frost while slightly warm. Top each cookie with a pecan half before frosting sets.

Instructions for Icing:

In a medium bowl gently mix powdered sugar and butter until smooth. Add brandy and vanilla. Stir well. As needed, add warm milk to create a thick consistency. Place a dollop of icing on each cookie. Garnish with pecan half.

*The “Elegant Homemade Mincemeat” recipe can be found in the 1972 Farm Journal’s Country Cookbook, page 371.

Experience the Holidays!

Experience the Holidays! This year things will be a little different. Unsettling times of chaos and confusion can still accompany satisfying food. Some people will gather virtually, others behind plastic shields, window panes, and face masks. Christmas cards, letters, texts, and phone calls are especially important right now. It is critical to stay connected. Every family has its favorites from the past. Some indulge in time-worn traditions while others enjoy modern classics. As you embrace the holidays with limited companionship, sentimental yearnings, enjoyable food, or jubilant festivities, celebrate the spirit of the season. In the next few weeks, join me as I share festive foods as well as healthy options. Experience the holidays with gifts that never go out of style: Faith, Hope, Joy, and Love. These are the things worth sharing.

Xmas Crinkle Cookies

What’s Cooking in Gail’s Kitchen? Splurge-Worthy Goodness: Xmas Crinkle Cookies! Shortcuts are the key to success for that next cookie-exchange the kids forgot to tell you about. “Oh yeah, Mom, sorry.” No worries. Head to the kitchen to clang some pans around, preheat the oven, and dust a little powdered sugar on your nose. They’ll be none the wiser. By the time the house begins to smell like a neighborhood bakery, you’ll have rows of cookies lined up ready to be boxed. And if you’re one of those organized parents, just so you know, these cookies freeze well. Arrange them in a freezer gallon bag, layered between squares of waxed paper. I have literally taken these crinkle cookies out of the freezer and handed them to a little girl to eat. Other than being slightly chilled, they retain a chewiness that makes them simply delicious. You deserve a pat on the back. You’re welcome.

XMAS CRINKLE COOKIES

Ingredients:

1/2 cup powdered sugar, for dusting

15.25-ounce box strawberry cake mix

1/2 cup vegetable oil

2 eggs, room temperature

Instructions:

Preheat oven to 350°. Place powdered sugar in a shallow dish. Set aside. In a mixing bowl, combine strawberry cake mix, vegetable oil, and eggs. Stir until a dough forms. Chill dough for 20 minutes. Shape dough into 1” balls. Roll in powdered sugar and place 2” apart on ungreased baking sheet. Bake 7-9 minutes, or until center is just set. Remove pan from oven; cool for 2 minutes. Transfer cookies to a wire rack. Dust with more powdered sugar.

White Chocolate Lavender Berry Scones

What’s Cooking in Gail’s Kitchen? Splurge-Worthy Goodness: White Chocolate Lavender Berry Scones! Butter and Buttermilk, two main ingredients that lasso the moon. This is not your ordinary pastry. It’s not a doughnut. It’s not a muffin. It is a flavorful raised vessel for smearing on more butter. Granted, the American version may be filled with fresh fruit and chocolate chips, but hey, it’s all good. And since I was doing it my way, I went one step further and added a lavender glaze on top. There’s no way I’m going to be accused of making a dry-as-dust scone. I’m living with a man who conjures up that image whenever he hears the word “scone”. I believe for now, I’m okay with him thinking that way. More for me!

WHITE CHOCOLATE LAVENDER BERRY SCONES

Ingredients:

1 1/4 cups flour

1 tablespoon sugar

1 1/2 teaspoons baking powder

1/4 teaspoon sea salt

4 tablespoons cold butter, grated

1 egg, room temperature

3 ounces buttermilk, plus more for brushing

1 1/2 teaspoons vanilla extract

3/4 cup fresh blackberries

1/2 cup white chocolate chips

Ingredients for Lavender Glaze:

1 cup powdered sugar

2 tablespoons lemon juice

2 teaspoons dried lavender buds

Fresh mint, for garnish

Instructions:

Preheat oven to 400°. Line 2 baking sheets with parchment paper. In a mixing bowl, combine flour, sugar, baking powder, and sea salt. Add the grated butter; toss with flour mixture. Add the egg, buttermilk, and vanilla extract. Stir just until combined. Do not over mix. Fold in blackberries and white chocolate chips. Turn the dough onto a floured surface; then pat into squares. Cut into equal triangles. Place formed dough 2 inches apart on prepared baking sheets. Brush tops with buttermilk. Bake until golden brown, 15-18 minutes. Rotate baking sheets halfway through. Allow the scones to cool slightly. To make the glaze, combine powdered sugar, lemon juice, and 1 teaspoon dried lavender. Stir until smooth. Drizzle scones with lavender glaze. Garnish with remaining lavender buds and fresh mint leaves. Serve warm with butter.

Vanilla Bee Pollen Ice Cream

What’s Cooking in Gail’s Kitchen? Splurge-Worthy Goodness: Vanilla Bee Pollen Ice Cream! What’s all the “buzz” about? The jury is still out on the benefits of bee pollen. Some claim amazing health results while others blame it for side effects. Bee pollen is actually intensified plant pollen picked up by honeybees and brought back to the hive as a source of food for the colony. So obviously, its characteristics depend solely on the geographic location of where it is collected. Just like honey, some say if you struggle with seasonal allergies, the best way to combat that is to take a teaspoon of raw honey every day from the area where you live. Bee pollen is made up of carbs, fat, protein, vitamins, minerals, and antioxidants. You can certainly see why naturalists call it a superfood. As with any herbal supplement, contact your health care provider before beginning something new. Many foodies like to add a teaspoon of bee pollen to their morning smoothie. Here it is sprinkled over no-churn ice cream.

VANILLA BEE POLLEN ICE CREAM

Ingredients:

2 cups heavy cream

14-ounce can sweetened condensed milk

1 vanilla bean pod, sliced horizontally, seeds extracted

2 tablespoons raw honey

1 teaspoon bee pollen

Agave nectar, for drizzling

Lemon thyme, for garnish

Instructions:

Be sure the mixing bowl, whisk, and loaf pan are chilled before using. (I placed mine in the freezer overnight. If the ingredients are warm, the mixture won’t thicken to desired texture. I also put the can of sweetened condensed milk in the refrigerator the night before.) In the chilled bowl of the stand mixer, combine heavy cream, sweetened condensed milk, vanilla bean seeds, and raw honey. Whip on medium-high speed until soft peaks form, about 4-5 minutes. Transfer to the chilled loaf pan. Freeze 6 hours or overnight. To serve, place three rounded ice cream scoops in a dish. Sprinkle bee pollen over top. Drizzle with agave nectar ribbons. Garnish with a sprig of lemon thyme.

School Cafeteria Peanut Butter Bars

What’s Cooking in Gail’s Kitchen? Splurge-Worthy Goodness: School Cafeteria Peanut Butter Bars! Remember the good old days when the grade school menu would come out and we’d peruse it like the Sears and Roebuck Christmas Catalog? We’d jump for joy when we saw Fish Sticks, Baked Meatloaf, Apple Crisp, Chocolate Cake, and Pizza Squares. On the other hand, Creamed Spinach made us wince and turn up our noses. Back then you had two options, buy a hot lunch ticket or bring a sack lunch from home. No in-betweens. As a general rule, the good canceled out the bad, especially in the category of scrumptious desserts. The “Lunchroom Ladies” really knew their business when it came down to sweets. Nobody could layer on the frosting like they could. And it was always homemade right there. I wonder who got to lick the spoon.

SCHOOL CAFETERIA PEANUT BUTTER BARS

Ingredients:

1/2 cup butter

3/4 cup peanut butter, creamy

3/4 cup sugar

1/4 cup brown sugar

3/4 teaspoon kosher salt

2 eggs, room temperature

1 1/2 teaspoons vanilla extract

1 cup flour

Ingredients for Icing:

1/2 cup powdered sugar

2 tablespoons creamy peanut butter, melted

2 tablespoons hot water

Instructions:

Preheat oven to 350°. Line a 9”x9” square baking pan with parchment paper. Set aside. Melt butter and peanut butter in a microwave-safe bowl on 50% for 30 seconds. Stir and repeat, if necessary. Set aside to cool to room temperature. In a large bowl, sift together sugar, brown sugar, and kosher salt. Whisk in one egg at a time until combined. Add vanilla extract. Whisk in peanut butter mixture until combined. Sift in flour; mix until flour disappears. Do not over mix. Pour into prepared pan. Bake for 35-40 minutes, or until cake tester comes out with tiny moist crumbs. Cool pan on a wire rack. Once the pan has cooled, remove the cake from pan and transfer on the parchment paper to a rimmed baking sheet. Combine powdered sugar, creamy peanut butter, and hot water. Stir until frosting has a smooth consistency. Drizzle over dessert. Allow icing to set up before cutting into individual bars.

Raw Honey Peanut Butter Cookies

What’s Cooking in Gail’s Kitchen? Splurge-Worthy Goodness: Raw Honey Peanut Butter Cookies! No baking required. Wait, whaaat? These bite-size morsels are not only healthy as an energy snack, they can be made in a matter of minutes with ingredients you probably already have on hand in your pantry. So, what exactly is raw honey, you wonder. Most beekeepers will tell you it simply means the honey is strained right before it is bottled. That translates to nature’s sweetness with all its beneficial nutrients and antioxidants. By eliminating the intense processing stage of heat filtration, what you get instead is honey that comes from the bee hive to your home. No extra sugar is added either. To make sure you are getting raw honey, always check the label.

RAW HONEY PEANUT BUTTER COOKIES

Ingredients:

1/3 cup raw honey

1/2 cup plus 2 tablespoons natural peanut butter, creamy

1 tablespoon vegetable oil

2 teaspoons vanilla extract

2 1/2 cups whole grain oats

Sprinkles, for garnish

Instructions:

Line a baking sheet with waxed paper. Pour sprinkles into a dish. Set aside. In a microwave-safe bowl, combine raw honey, creamy peanut butter, and vegetable oil. Microwave on High for 30 seconds. Stir. Repeat. Add vanilla extract. Mix well. Add whole grain oats. Stir to incorporate until cookie dough forms a large ball. Using a cookie scoop, press dough to make bite-size uniform cookies. Dip into sprinkles. Place on prepared baking sheet. Cookies will “set up” on their own. Transfer to a covered container for storage.

Limoncello Upside-Down Cake

What’s Cooking in Gail’s Kitchen? Splurge-Worthy Goodness: Limoncello Upside-Down Cake! I love everything lemon, so imagine my excitement at trying this exquisite dessert with limoncello lemon liqueur. Limoncello is produced mainly along Italy’s scenic Amalfi Coast. Every sip transports you to the rugged hillsides along the deep blue cerulean waters of the Mediterranean Sea. Imagine the lemon trees engorged with ripe fruit. You can almost smell the heady scent of natural citrus wafting from the arbors. Now that I have your complete and undivided attention, read on.

LIMONCELLO UPSIDE-DOWN CAKE

Ingredients:

1/4 cup brown sugar

1/2 cup water

1/2 cup plus 3 tablespoons sugar, divided

6 thin lemon slices, seeds removed

3 tablespoons olive oil

Zest of 1/2 lemon

1 tablespoon lemon juice

1/4 teaspoon vanilla extract

1/8 teaspoon sea salt

1 egg, room temperature

2 tablespoons limoncello lemon liqueur

1/2 cup flour plus 2 tablespoons flour

2 tablespoons cornmeal

1/2 teaspoon baking powder

1/4 teaspoon baking soda

Powdered sugar, for dusting

Instructions:

Preheat oven to 350°. Spray ramekins with nonstick oil. Cut 6 parchment paper circles to fit ramekins. Place a circle in the bottom of each. Set aside. Bring brown sugar, 1/4 cup sugar, and water to a simmer in a saucepan. Cook until reduced and sugar has dissolved, about 5 minutes. Turn off heat. Submerge lemon slices in syrup. Let sit until rind and pith are translucent, 20-30 minutes. Using a hand mixer on medium speed, beat olive oil, lemon zest, lemon juice, vanilla extract, sea salt, egg, remaining sugar, and limoncello just until blended. Whisk together flour, cornmeal, baking powder, and baking soda in a bowl. Gradually add wet mixture, beating just until blended. Pour one tablespoon syrup from lemon slices into each ramekin. Using tongs, gently place a lemon slice in each ramekin. Reserve remaining syrup. Place ramekins on a baking sheet. Evenly divide batter between them. Bake 25 minutes, or until a cake tester comes out clean. Let cool on a rack for 10 minutes. Run a small knife around the cake before inverting onto a platter. Remove parchment paper circles. Brush with remaining syrup. Dust with powdered sugar.