Oven-Roasted Golden Peaches

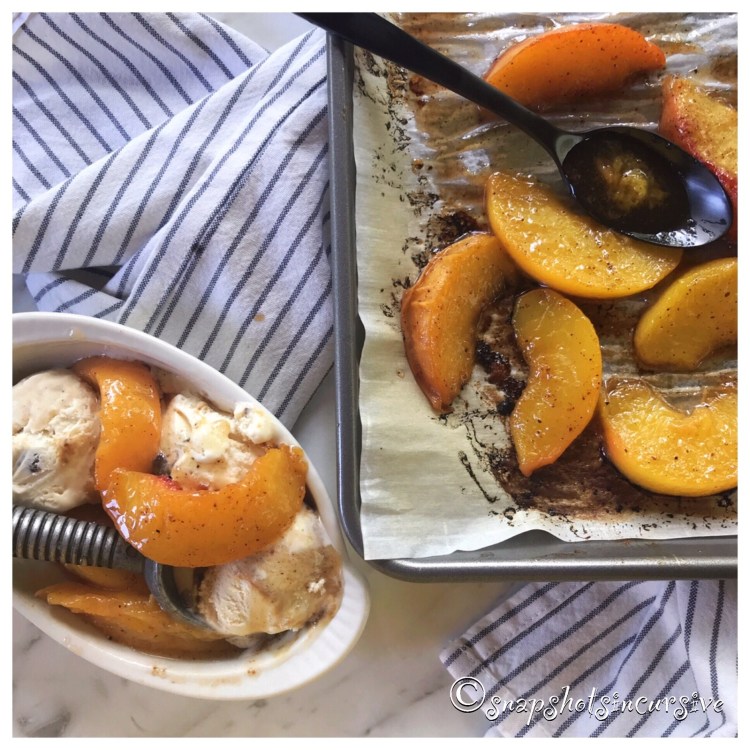
What’s Cooking in Gail’s Kitchen? Start Smart: Oven-Roasted Golden Peaches! Forget about cleanup of baking sheets by utilizing a perfect nonstick solution. Parchment paper. Never confuse it with wax paper, though, which will smoke in the oven. That’s a big mistake. Parchment paper is made to withstand oven temperatures during the baking or roasting process. Not only that, parchment paper contains a release agent that prevents foods from sticking to it. Bonus points, in my opinion. Because we’re covering the sliced peaches with pure maple syrup, you can imagine how difficult that would be to scrape off the pan once it’s baked in. May as well throw the pan away and buy another. Or…you could do what I did the first time I baked a galette. My husband took his sander tool and ground the petrified sugar off. Hey, don’t judge me. It was my favorite baking sheet. Still is.

OVEN-ROASTED GOLDEN PEACHES

Ingredients:

3-4 ripe peaches, pitted and sliced

2-3 tablespoons butter, melted

2-3 tablespoons pure maple syrup

1/4 teaspoon cinnamon

Instructions:

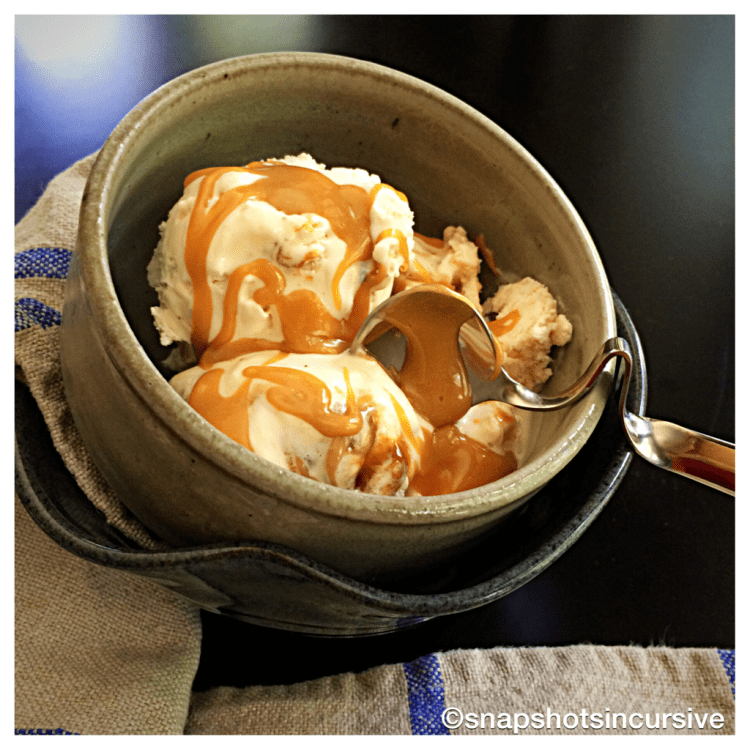
Preheat the oven to 425°. Cover a baking sheet with parchment paper. Place sliced peaches in a single layer, without touching. Drizzle with melted butter and maple syrup. Sprinkle with cinnamon. Bake 15 minutes, then flip peaches over. Spoon excess sauce over peaches. Bake 10 minutes longer. Serve warm with sea salt caramel ice cream.

Hibiscus Passion Tea Icing

What’s Cooking in Gail’s Kitchen? Start Smart: Hibiscus Passion Tea Icing! If you ever get bored, take a stroll down the Tea Aisle at your nearby grocers. Choose from any assortment of gourmet blends; especially one containing full-leaf sachets. Read the label. In a few seconds, you will feel as though you have been transported to a magical land “bursting with life and tinged with the color of true love to make sure you never have to live a day without passion”.* And that’s only the beginning. Turn to the side panel for an invigorating adventure that awakens the senses as well as the imagination. After that when I decided to steep this delicacy to flavor buttercream icing, I knew it would be nothing short of fabulous. Perhaps you may think so, too.

HIBISCUS PASSION TEA ICING

Ingredients:

2 1/2 tablespoons brewed hibiscus passion tea

1/4 cup butter, room temperature

2 cups powdered sugar

1/2 teaspoon almond extract

Garnish with loose tea leaves

Instructions:

Brew a cup of hibiscus passion tea, according to package directions. (Since you won’t need all of it, the reserve tea can be sipped over ice.) Refrigerate until slightly cool. In a medium bowl, cream together softened butter and powdered sugar. Add the hibiscus passion tea and almond extract. Stir until smooth. Spread a thin layer of icing over your favorite cake. I made a gluten-free chocolate cake.** Open a dry tea sachet and sprinkle the tea leaves over one side. When serving, place a dollop of extra icing on the side of the plate or on top of the cake. Either way, it will disappear, I promise you that.

*TAZO Passion Tea.

**For Gluten-Free Chocolate Cake, follow the link.

http://Snapshotsincursive.com/2017/12/18

Bowlful of Cherries

What’s Cooking in Gail’s Kitchen? Start Smart: Bowlful of Cherries! Aren’t they lovely? Ripe cherries are an ideal snack, by the handful. For some, it’s so simple to remove the pit with your teeth. I knew a guy once who could tie the cherry stem into a bow. (I think he did it to impress his wife.) Ripe cherries pair well with Goat cheese, Camembert cheese, or Bleu cheese garnished with a sprig of thyme, basil, or mint. Their ruby-red color is as appealing as their natural sweetness. The possibilities are endless. Add chocolate pieces for a dessert charcuterie board if you like a relaxed atmosphere at the end of a meal. Whatever you choose, get a pound of cherries before they’re gone. And don’t forget a nice bottle of Chardonnay.

BOWLFUL OF CHERRIES

1 pound ripe cherries, stems on

1/2 pound cheese of choice

Fresh herbs

Dark Chocolate candies

Instructions:

Fill a small bowl with sweet cherries. Set aside. Make available a plate of pitted cherries. To pit a cherry, place the fruit on a cutting board. Using a sharp paring knife, press down gently on one side of the stem. Firmly slice an incision from top to bottom until the cherry loosens the pit. Do not crush the cherry. Gently pull on either side to expose the pit. Remove it with your fingernail. One side will have the stem, the other will not. Provide colorful toothpicks for piercing.

Apple Orchard Pie

What’s Cooking in Gail’s Kitchen? Start Smart: Apple Orchard Pie! Nothing conjures up autumnal nostalgia like a slice of apple pie, still warm enough from the oven to soften a scoop of vanilla ice cream. Inhale the aromas of cinnamon, nutmeg, and allspice. It’s delectable, isn’t it? I realize making pies may not be on the top of the list for everyone who loves it. So, I’m telling you today, it’s okay to begin with a prepared pie crust. There are some pretty decent brands out there for you to try. Some refrigerated brands are made to unroll and crimp the edges; others are frozen and meant to be thawed. Some are buttery, super-flaky, and even taste as good as homemade. That’s where you’ll need the help of an assistant, or taste-tester, so to speak. Just remember, pie doesn’t have to be picture perfect to taste spot on. It’s dessert, after all.

APPLE ORCHARD PIE

Ingredients:

1 prepared pie crust, 9”

4-5 large sweet apples, peeled, cored, and sliced

4 large tart apples, peeled, cored, and sliced

1 cup sugar

1/2 teaspoon cinnamon

1/4 teaspoon nutmeg

1/4 teaspoon allspice

1/4 teaspoon sea salt

2 tablespoons butter

Ingredients for Crumb Topping:

1 cup flour

3/4 cup brown sugar

1/3 cup butter, softened

1/2 teaspoon cinnamon (optional)

Instructions:

Preheat oven to 350°. Form prepared pie crust into a pie plate that has been sprayed with nonstick oil. Crimp edges. Set aside. Combine sugar, flour, cinnamon, nutmeg, allspice, and sea salt. Sprinkle about a quarter cup of mixture over the bottom of the pie crust. In a large bowl, toss the apple slices with the remaining sugar mixture. Coat well. Transfer apples to the pie plate, forming a mound in the center. Dot with 2 tablespoons of butter. Bake for 30 minutes. Meanwhile, combine flour, brown sugar, butter, and cinnamon for crumb topping. It should resemble small peas when mixed. Carefully add the topping to the apple pie. Bake 30 minutes longer. If necessary, cover the pie with foil to prevent burning.

Start Smart

The secret to a good cook is pretty basic. Look to their kitchen for essential tools and you will discover why food preparation comes as naturally as breathing. Start Smart. For instance, a chef’s knife makes short work for cutting and chopping. Wooden spoons are perfect for stirring and mixing, plus they look great in a counter caddy. My son recently introduced me to the handy-dandy fat separator for making unbelievable lump-free gravy. How did I not know of this? It’s pure genius! I could go on and on about food processors, dutch ovens, spiralizers, and rice cookers, but you get the idea. Recently I froze some Farmers Market corn by removing the kernels from the cob with my corn peeler. (There really is such a thing.) Now you know…anyone can be a gourmet chef…like me. lol. Some of my posts have been favored by the “Food Network” on Twitter (Snapshotsincursive @DornaGail) as well as Ina Garten’s The Barefoot Contessa, on Instagram (gail _dorna). You can even find me on Pinterest at Gail Dorna. I’d love to connect with you there as well. I also met Chef Michelle Tribble of Hell’s Kitchen reality cooking show. Fun times. Experience different flavors and textures one bite at a time. Catch a glimpse of “Eating My Way Through the Alphabet: Start Smart.” This remarkable journey of the palate is unique because it gives me a few moments with you. Thanks very much to all of my guests and followers on http://snapshotsincursive.com for the uplifting support, award nominations, and moving words of encouragement. As of this writing, WordPress has acknowledged that I’m on a 1641-day streak. Let’s keep it going!

Yogurt Frozen Fruit Pops

What’s Cooking in Gail’s Kitchen? Be Our Guest: Yogurt Frozen Fruit Pops! Take a look in the freezer and choose the berries you love the most. You are about to make a delicious fruit popsicle without high fructose corn syrup. By using only natural ingredients, with honey as a sweetener, the berry flavors are intensified with guilt-free results that make your heart swoon. The hardest part is waiting overnight for the pops to become firm. As a special indulgence, sprinkle them with mini chocolate chips and crushed nuts.

YOGURT FROZEN FRUIT POPS

Ingredients:

1 1/2 cups strawberries, frozen

1 cup raspberries, frozen

1 tablespoon pomegranate arils, frozen

1/2 cup all natural Greek yogurt

2 tablespoons natural honey

1 1/2 teaspoons lemon juice

Mini chocolate chips, for garnish

Crushed pecan pieces, for garnish

Instructions:

Arrange 8 treat cups in the bottom of a loaf pan. Have 8 craft sticks set aside. Combine frozen strawberries, raspberries, and pomegranate arils in a food processor. Add Greek yogurt, natural honey, and lemon juice. Mix on HIGH until smooth and blended, stopping occasionally to scrape down the sides. Pulse until smooth and creamy. Spoon frozen fruit yogurt into the treat cups. Insert one craft stick into each cup. Sprinkle tops with mini chocolate chips and nut mixture. Place in freezer overnight. Remove yogurt frozen fruit pops by tearing the paper cup and serve. Enjoy!

Krispy ‘Mallow Bars

What’s Cooking in Gail’s Kitchen? Be Our Guest: Krispy ‘Mallow Bars! Remember when you were a kid and your lunchbox treats made all the other kids envious? Well, this quick and easy dessert bar has the same effect. Chocolate-lovers appreciate the crunch of miniature M&Ms as much as marshmallow-lovers crave the sugary sweetness. Some say it’s the best of both worlds.

KRISPY ‘MALLOW BARS

Ingredients:

3/4 cup M&M miniature chocolate candies

3 tablespoons butter

7-ounce jar of marshmallow creme

6 cups of crispy rice cereal

Instructions:

Spray a 9″x13″ pan with nonstick oil. Set aside. Melt butter, over low heat, in a 2 1/2 quart pan. Do not burn add marshmallow creme. Stir until melted. Remove from heat. Working quickly, add rice cereal. Stir until rice is completely coated. With buttered hands, or wearing disposable gloves, press mixture, gently but firmly, over candy in pan. Cool. Cut into bars. Serve candy side up.

Foolproof Strawberry Galette

What’s Cooking in Gail’s Kitchen? Be Our Guest: Foolproof Strawberry Galette! It’s more than the sweet strawberries that make this an appealing dessert. In my opinion, the delicious buttery cream cheese crust is as good as it gets. First of all, to keep your galette foolproof, here are a few tips. Make sure the dough is not too moist or it will turn chewy instead of crisp. Pay attention to the strawberries. If they appear too juicy, add more cornstarch to help the filling thicken. And don’t overfill the galette. Remember, there is no pie plate to contain the abundance. It’s better to make two smaller galettes than a big sloppy one. And lastly, be sure to use parchment paper on the baking sheet or you may find yourself replacing bakeware from the runoff. All that being said, let’s roll.

FOOLPROOF STRAWBERRY GALETTE

Ingredients:

1 1/4 cups flour

1/4 teaspoon sea salt

1 tablespoon sugar

4 ounces Neufchâtel cheese, cubed

1/2 cup butter, cold and cubed

2 pounds strawberries, hulled and cut up

1-2 tablespoons cornstarch

1 teaspoon vanilla extract

1 teaspoon lemon zest

1/4 cup sugar

1 egg, beaten

2 tablespoons sanding sugar

Instructions:

Pulse flour, sea salt, and 1 tablespoon sugar in a food processor. Add Neufchâtel cheese and butter. Pulse until crumbly. Add 3-4 tablespoons of ice water and pulse just until dough forms a ball. Remove onto a lightly floured board. Gently knead to tighten dough. Pat into a disk and wrap in plastic wrap. Refrigerate one hour. Unwrap dough and roll to 1/8 inch thickness between 2 sheets of parchment paper. Create a 12″ diameter circle. Transfer dough to a baking sheet. Refrigerate for 30 minutes. Meanwhile preheat oven to 350°. In a large bowl, toss strawberries with cornstarch, vanilla extract, lemon zest, and 1/4 cup sugar. Leaving an inch border, arrange strawberries atop dough. Fold border up and over strawberries to create a rim. Brush crust with egg wash. Sprinkle with sanding sugar. Bake galette 45-50 minutes or until crust is golden. Cool on a wire rack.

Eagle Brand Caramel Rum Sauce

What’s Cooking in Gail’s Kitchen? Be Our Guest: Eagle Brand Caramel Rum Sauce! For caramel-lovers all over the world, this recipe can be your legacy. It’s rich, it’s thick, it’s buttery, and it’s laced with a hint of dark rum that gets the party started. Take a moment to tick off the countless ways you can drizzle caramel sauce over food. Spread it on toast, then sprinkle with cinnamon. Add it to coffee for a smooth latte. Turn it into an apple dip coated with salted peanuts. Whip it into pudding or smoothies. Top off a bowl of ice cream. You get the idea. If your imagination stalls out, simply dip a teaspoon into the jar and enjoy the caramel sauce all by itself.

EAGLE BRAND CARAMEL RUM SAUCE

Ingredients:

14-ounce can Eagle Brand Sweetened Condensed Milk

2 tablespoons dark rum

2 teaspoons vanilla extract

Instructions:

Preheat oven to 425°. Pour sweetened condensed milk into a 9-inch pie plate. Cover with foil. Carefully place the pie plate into a shallow pan. Fill the larger pan with 1/2 inch hot water. It will surround the pie plate. Bake 2 hours or until sauce is thick and caramel in color. Remove larger pan from oven. Take the pie plate out; remove foil and pour caramel into a large bowl. Using a hand mixer, beat on LOW speed for one minute. Add dark rum and vanilla extract. Continue beating on LOW speed until liquid is blended. Increase speed to HIGH for one minute longer. Caramel will appear smooth and creamy. Cool 15 minutes before serving. Store in the refrigerator.