Teriyaki Chicken Bowl

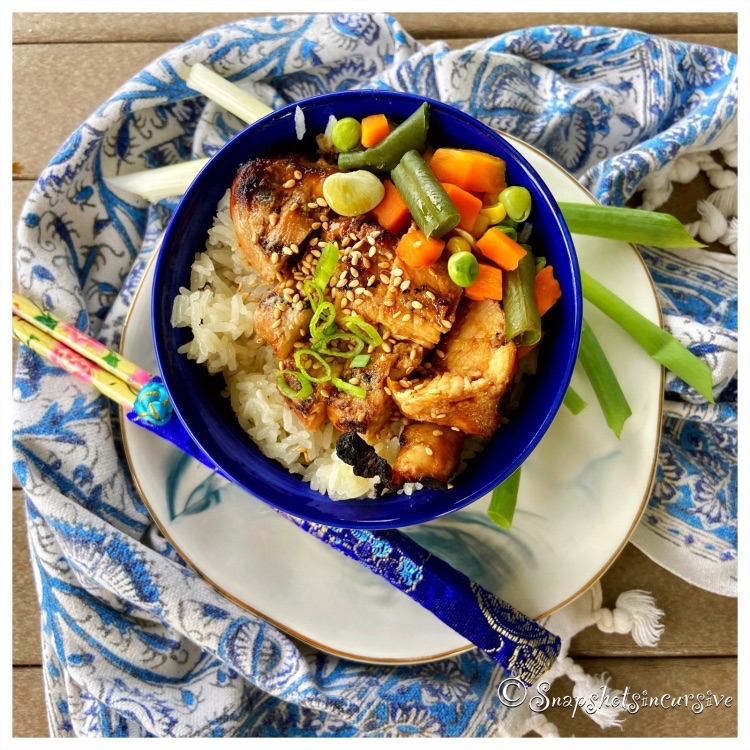
What’s Cooking in Gail’s Kitchen? Palatable Possibilities: Teriyaki Chicken Bowl! Do-ahead meals take a little bit of planning, but the “devil is in the details”, they say. In this case it means, make sure the chicken breasts are thawed AND marinated 24 hours before you plan on serving them. I realize that requires the cook to be somewhat organized. Pantries don’t stock themselves. There’s nothing worse than trying to make a dish without all the ingredients. Take sesame oil, for example. I find it absolutely delicious because it adds an earthy nuttiness to Asian food. Vegetable oil tastes meh, in my opinion. Not only does it alter the taste, the texture will be different. When I can find it, I buy toasted sesame seeds so I don’t have to worry about toasting them on the stove or in the oven. That’s 10 minutes I could be planning tomorrow’s meal. Idiosyncratic, but true.

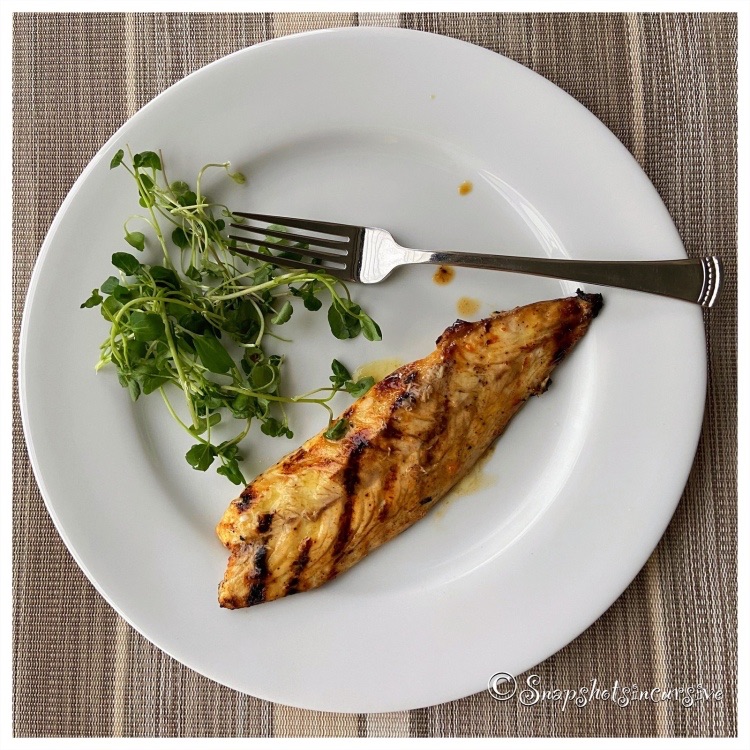
TERIYAKI CHICKEN BOWL

Ingredients:

2 chicken breasts, boneless and skinless

1/2 cup teriyaki sauce

2 tablespoons lemon juice

1 teaspoon fresh garlic, minced

1 teaspoon sesame oil

Green onion snips, for garnish

Toasted sesame seeds, for garnish

Instructions:

Place chicken breasts, teriyaki sauce, lemon juice, minced garlic, and sesame oil in a shallow dish. Baste chicken completely. Cover dish with plastic wrap. Refrigerate for 24 hours. When ready to cook, preheat grill to 450°. Lightly oil grill grate. Remove chicken breasts from marinade, place directly on grill, close lid, and cook for 5 minutes. Discard marinade. After 5 minutes, open lid, flip over chicken breasts, close lid, and cook 5 minutes longer, or until cooked through and no longer pink. Remove teriyaki chicken from grill and allow to rest for 5 minutes before serving. Garnish with green onion snips and toasted sesame seeds. Serve with sticky rice and mixed vegetables.

Maryland-Style Crab Cakes

What’s Cooking in Gail’s Kitchen? Palatable Possibilities: Maryland-Style Crab Cakes! When my step-daughter, Brandi, gifted me with a copy of one of her favorite seafood cookbooks, I knew exactly what dish I was going to make first. After all, the cookbook is based on a popular Hilton Head Island restaurant that has become her family’s traditional spot whenever they visit. Because Florida has an abundance of connections for fresh seafood, vendors are able to get premium, wild-caught crab meat to sell to their customers. Farmers Markets, as well as fish companies specialize in pre-made crab cakes. One taste and I thought, why compete with the best? So, I use two or three resources for incredible tasting Maryland crab cakes. Supporting local businesses builds strong communities and helps everyone thrive. For dinner in a snap, read on.

MARYLAND-STYLE CRAB CAKES

Ingredients:

6 pre-made Maryland crab cakes

2 tablespoons olive oil

2 tablespoons red onion, diced

1 garlic clove, minced

1 cup diced tomatoes

1 cup spicy Bloody Mary mix

1/2 teaspoon Worcestershire sauce

1/4 teaspoon sea salt

1/8 teaspoon black pepper

Lemon slices, for garnish

Parsley flakes, for garnish

Instructions:

To make the gazpacho sauce, warm olive oil in a sauté pan over medium-high heat. Add red onion and minced garlic. Cook 1-2 minutes. Add diced tomatoes, Bloody Mary mix, Worcestershire sauce, sea salt, and black pepper. Stir to combine. Reduce heat and simmer 5 minutes. Transfer gazpacho to a bowl. Refrigerate until ready to use. To bake the crab cakes, preheat oven to 425°. Place crab cakes on a baking sheet that has been sprayed with nonstick oil. Bake 12 minutes, flip, and bake 3 minutes longer until golden brown. To serve, ladle the slightly chilled gazpacho onto a plate; center a crab cake on top. Arrange lemon slices. Sprinkle with parsley flakes.

Italian Sheet Pan Tilapia

What’s Cooking in Gail’s Kitchen? Palatable Possibilities: Italian Sheet Pan Tilapia! What’s for dinner? You gotta love a one-pan meal. It not only makes preparation and clean-up a breeze, it typically turns into a healthy option as well. Choose seafood, meat, or veggies and then customize the flavor with tangy spices, fresh herbs, and natural oils. Things honestly could not get any easier. You can even take things one step further and divide the pan to accommodate a spicier version on one end and something a little more bland on the other. No matter how you split things up, watch them disappear.

ITALIAN SHEET PAN TILAPIA

Ingredients:

1/4 cup unsalted butter, melted

1/2 teaspoon garlic powder

2 tablespoons lemon juice

1 teaspoon Italian seasoning mix

1 pound fresh asparagus, trimmed

1/4 cup olive oil, divided

1/2 teaspoon kosher salt

1/8 teaspoon black pepper

2 (6-ounce) tilapia fillets

2 Roma tomatoes, sliced and halved

Parsley, for garnish

Instructions:

Preheat oven to 425°. Spray a baking sheet with nonstick oil. Set aside. In a small bowl, whisk together melted butter, garlic powder, lemon juice, and Italian seasoning mix. Reserve 2 tablespoons and set aside. Place asparagus in a single layer on the left side of the prepared baking sheet. Drizzle with 2 tablespoons olive oil. Season with kosher salt and black pepper. Place Roma tomatoes in a single layer down the middle of the baking sheet. Drizzle with remaining olive oil, kosher salt, and black pepper. Arrange tilapia fillets in a single layer on the right side of the baking sheet. Drizzle with butter mixture. Bake 12-14 minutes, or until the fish flakes easily with a fork. Serve immediately with reserved butter mixture. Garnish with fresh parsley.

Greek Oven Potatoes

What’s Cooking in Gail’s Kitchen? Palatable Possibilities: Greek Oven Potatoes! This sounds crazy, but these potatoes are baked and steamed at the same time. The end result is tenderness and flavorful, an extraordinary combination. It sounds like a lot of liquid, but trust me, the potatoes literally soak up the moisture. They can handle it. The spice mix does a great job of penetrating the potatoes while teasing the senses with a whiff of aromatic pleasantness. For a side dish that is anything but hum-drum, give this one a whirl. No regrets.

GREEK OVEN POTATOES

Ingredients:

1/2 teaspoon seasoned salt

1/2 teaspoon black pepper

1/2 teaspoon smoky paprika

1/2 teaspoon dried rosemary

4 red potatoes, peeled and cut into wedges

4 garlic cloves, chopped

2 tablespoons olive oil

1/2 lemon, juiced

2/3 cup vegetable broth

1/3 cup parmesan cheese, grated

Fresh basil, for garnish

Instructions:

Preheat oven to 400°. Spray a small baking dish with nonstick oil. Set aside. In a small bowl, combine seasoned salt, black pepper, smoky paprika, and dried rosemary. Set aside. Arrange red potato wedges in the prepared baking dish. Sprinkle with spice mix. Toss briefly to cover all. In a bowl, whisk together garlic cloves, olive oil, lemon juice, and vegetable broth. Pour over potatoes. Cover with foil and bake for 40 minutes. Carefully take the baking dish from the oven, remove the foil, and sprinkle the potatoes with parmesan cheese. Return dish to oven and bake, uncovered, for 15 minutes longer. Potatoes will be cooked through and golden brown in color. Garnish with fresh basil. Serve immediately.

Drawn Butter Fish Favorite

What’s Cooking in Gail’s Kitchen? Palatable Possibilities: Drawn Butter Fish Favorite! Keeping it simple with a fresh catch is probably my favorite way of serving fish. Now that I’ve connected with a local fisherman, it practically feels like a luxury to plan evening meals. The marinade couldn’t get any easier; a couple of key ingredients do the trick. After all, the star attraction is the warm melted butter. You’ve heard me rave about the French sea salt butter we order once a year. It is ah-mazing. Serve dinner with fresh veggies from the produce bin and you’ll be smiling all through the meal.

DRAWN BUTTER FISH FAVORITE

Ingredients:

1 pound Almaco Jack fish fillets

1-2 tablespoons garlic wine vinegar

1-2 tablespoons olive oil

2 cloves garlic, minced

2 tablespoons sea salt butter

Juice of one Lemon

Instructions:

Rinse fish fillets and pat dry. In a shallow dish, combine garlic wine vinegar, olive oil, and minced garlic. Brush both sides of the fish fillets with marinade. Place fillets in the shallow dish, cover with plastic wrap, and refrigerate for one hour. To cook, warm butter in an iron skillet over medium-high heat. Add the fish fillets, cover, and cook for 4 minutes without turning. Flip and cook 4 minutes longer or until fish is crispy. Transfer fillets to a plate, drizzle with a squeeze of fresh lemon juice. Spoon drawn butter over all. Serve immediately.

Lemon Butter Chilean Sea Bass

What’s Cooking in Gail’s Kitchen? Bright Ideas: Lemon Butter Chilean Sea Bass! Anyone, besides me, a fan of butter on seafood? Lobster. Crab Legs. Chilean Sea Bass. Shrimp. Scallops. You name it…if the seafood is slightly sweet, mild in flavor, moist and tender, or flaky yet firm, I practically kick everything else to the curb in favor of rich and decadent seafood. Now that I live in Florida, I can stretch my palate a bit with fresh seafood harvested or caught off the coastline. Not only does it support local fishermen, it also puts me in touch with seafood retail markets that thrive on this economy. And, yes, I’m spoiled. Some of the vendors even come directly to my community on a weekly basis. I see more fish in my future.

LEMON BUTTER CHILEAN SEA BASS

Ingredients:

2 8-ounce Chilean Sea Bass fillets

1/4 cup salted butter

1/8 teaspoon garlic powder

1/8 teaspoon parsley flakes

Juice of fresh 1/2 lemon

Instructions:

Preheat gas grill to 400°. Form a piece of aluminum foil into a baking sheet to accommodate the fillets. Be sure to raise the sides to contain the buttery juices. Spray foil with nonstick oil. Set aside. In a microwave-safe dish, warm the salted butter. Add garlic powder, parsley flakes, and lemon juice. Gently whisk. Wash Chilean sea bass fillets; pat dry with a paper towel. Before placing the fillets on the foil, brush both sides with melted lemon butter. Save the extra butter mixture for serving. Grill the Chilean Sea Bass for 5-6 minutes with the lid closed to maintain the internal temperature. Turn the grilled sea bass and repeat cooking time 5-6 minutes longer for even grilling. Brush with remaining butter mixture. Serve immediately.

Dill-Sprinkled Cocktail Shrimp

What’s Cooking in Gail’s Kitchen? Bright Ideas: Dill-Sprinkled Cocktail Shrimp! When you live where seafood is easily accessible, the natural thing to do is buy it and eat it as often as possible. Especially if you like it. And I’m crazy about shrimp. Thus, “Seafood Thursday” came into being at our house. It doesn’t hurt that a seafood vendor makes a scheduled stop, like clockwork, in our community every Wednesday afternoon. Taking advantage of specials at your doorstep not only helps us to expand our palate, but it also keeps me engaged by identifying new ways to prepare things at home. Luckily, I have a husband who doesn’t mind being a taste-tester for me. Granted, sometimes I’m the one finishing the portions in the days that follow, but it does keep meals interesting. This appetizer is pretty basic. Please note: adding wasabi definitely adds a spicy kick to the cocktail sauce. Go easy.

DILL-SPRINKLED COCKTAIL SHRIMP

Ingredients:

1/2 cup cocktail sauce

1 teaspoon prepared Japanese wasabi, in a tube (optional)

Romaine Lettuce, shredded

1 pound frozen jumbo shrimp, tail on; precooked and thawed

1 tablespoon fresh dill, chopped

Lemon wedge, for garnish

Instructions:

In a mixing bowl, combine cocktail sauce and Japanese wasabi. Mix well; set aside. Divide shredded romaine lettuce between individual serving dishes. Arrange 3-4 cocktail shrimp over lettuce. Add a dollop of cocktail sauce. Sprinkle with freshly chopped dill. Garnish with a lemon wedge. Refrigerate until ready to serve.

Orecchiette Pea Asparagus

What’s Cooking in Gail’s Kitchen? Time To Eat: Orecchiette Pea Asparagus! Are you in a pasta rut? Do you always turn to spaghetti, rotini, ziti, or lasagna? Think outside the box with orecchiette pasta to add elegance and variety to ordinary meal-planning. It’s been nicknamed “little ears” for its unusual swirly shape. See how amusing that is already? Because the thicker pasta pairs better with earthy vegetables, its texture holds sauces and cheeses remarkably well. Turn mealtime into downtime any day of the week.

ORECCHIETTE PEA ASPARAGUS

Ingredients:

4 ounces orecchiette pasta

1 tablespoon olive oil

1/4 pound fresh asparagus, trimmed and cut into bite-sized pieces

1/4 cup baby peas, fresh or frozen

1 tablespoon lemon juice

1/4 cup Parmesan cheese, freshly grated

Instructions:

Bring a large pot of water to boiling. Add orecchiette pasta and cook according to package directions. In a large skillet, add olive oil. Sauté asparagus and baby peas until bright green, slightly cooked, and still crisp. Remove skillet from heat. Once the pasta is al dente, reserve 1/4 cup pasta water and drain the rest. Add the pasta to the skillet with the asparagus and peas. Add lemon juice and parmesan cheese. Return the skillet to the stove and heat on low setting. Stir to combine everything, adding pasta water to thin, as needed. Serve immediately.

Lobster Grilled in Butter

What’s Cooking in Gail’s Kitchen? Time To Eat: Lobster Grilled in Butter! We all like grilling and usually can’t wait for summer weather. Who can blame us?!? Food just seems to taste better when it’s grilled. It might be the high heat, or perhaps the exposure to fiery flames. The again, it could be the way foods absorb the smoky flavors and signature grill marks. A little charring only seems to get the mouth salivating for a scrumptious meal soon thereafter. My opinion? Dining al fresco is the culmination of a perfectly-prepared meal.

LOBSTER GRILLED IN BUTTER

Ingredients:

2 4-ounce lobster tails

1/4 teaspoon sea salt

1/8 teaspoon garlic powder

1 tablespoon olive oil

1/4 cup butter, melted

Lemon wedges, for garnish

Instructions:

Preheat gas grill to 400°. Clean the grate and lightly coat with olive oil. Using kitchen shears, carefully cut through the top shell lengthwise, stopping just before the tail fins. Gently pull the meat partially out, keeping it attached at the base. Brush each lobster tail with olive oil; season with sea salt and garlic powder. Place the lobster tails on the grill, meat side down. Close the cover. Grill the lobster for 5 minutes, or until slightly charred with grill marks. Using tongs, gently flip them over and grill for 3 minutes longer until the flesh turns opaque. The shells will turn a bright reddish-orange. Brush the lobster with melted butter, adding a squeeze of lemon juice. Serve immediately with extra melted butter for dipping. Garnish with lemon wedge.