Old Bay Mayo

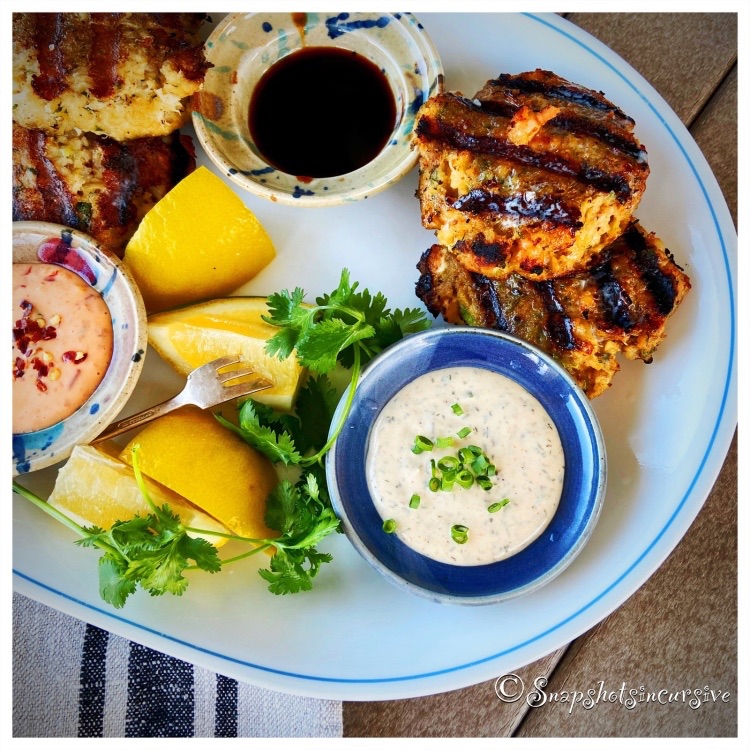
What’s Cooking in Gail’s Kitchen? Food With Soul: Old Bay Mayo! First of all, there is no substitute for Old Bay seasoning as a core ingredient in this post. It’s a sacred concoction, invented in the 1940s and respected by Southerners, containing 18 unspecified ingredients. If you try to use Cajun, Jerk, or generic blends, don’t blame me if the results are less than phenomenal. What I can assure is that it taste ah-mazing with shrimp, crab cakes, seafood, and more. Turn Old Bay Mayo into an aioli for sandwiches, dressing for salads, or condiment for meats. I can see you coming up with a dip for french fries, too. Don’t blame me; I’m just the messenger.

OLD BAY MAYO

Ingredients:

1/2 cup mayonnaise

2 teaspoons fresh chives, chopped

2 teaspoons dill weed, snipped

2 teaspoons lemon zest, grated

1 tablespoon lemon juice

1 teaspoon Old Bay* seasoning

Instructions:

In a small bowl, whisk together mayonnaise, fresh chives, dill weed, lemon zest, lemon juice, and Old Bay seasoning. Stir until smooth. Cover and refrigerate for one hour. Serve as a condiment or dipping sauce for seafood.

*I receive no recompense for mentioning this product.

Garlic Wine Red Snapper

What’s Cooking in Gail’s Kitchen? Food With Soul: Garlic Wine Red Snapper! Before I begin, Rule Number One: When marinating fish, always refrigerate. As fish sits in a marinade at room temperature, it encourages bacteria growth, which can be a bad thing. The olive oil makes a wonderful tenderizer making the fish soft and juicy. When seasonings are added at the same time, the results elevate the flavor. By grilling the fish fillets at a high temperature, the meal transforms into perfection on a plate.

GARLIC WINE RED SNAPPER

Ingredients:

1/2 cup garlic wine vinegar

1/4 cup olive oil

2 6-ounce red snapper fillets

1/2 teaspoon Italian seasoning blend

1/8 teaspoon black pepper

Juice of fresh lemon

3 tablespoons butter, melted

Instructions:

Arrange the red snapper fillets in a shallow dish. Pour the garlic wine vinegar over the fish. Allow the vinegar to surround the fish. Pour olive oil over top. Sprinkle Italian seasoning blend and black pepper over all. Cover dish with plastic wrap and refrigerate for 30 minutes. Preheat the grill to 450°. Transfer red snapper directly onto the grill grates. Close lid. Set timer for 4 minutes. Discard marinade. Using a fish spatula, flip fish and grill 4 minutes longer with lid closed. Meanwhile, melt butter and pour into individual cups. Squeeze fresh lemon juice into warm butter. Remove red snapper fillets from grill. Serve with melted lemon butter poured over top.

Yellow Squash Panko

What’s Cooking in Gail’s Kitchen? Palatable Possibilities: Yellow Squash Panko! Many of you already know this particular vegetable is a second cousin to zucchini. The skin is tender, glossy smooth, and edible which makes it a no-fuss dinner companion. Although its flavor is mild, when cooked it actually becomes buttery sweet with a slightly nutty nuance. Try to buy yellow squash that is 6”-8” in size. You’ll know because the larger it is, the more likely the skin will appear bumpy and less tender. You’ll also notice a lot of seeds, once you cut into it. By then you’ll need to rethink dinner and purée it for soup. Hindsight is 20/20 after all.

YELLOW SQUASH PANKO

Ingredients:

2 yellow squash

1-2 tablespoons olive oil, for sauté

Ingredients for Herbed Oil:

1 tablespoon lemon juice

1 tablespoon olive oil

1/8 teaspoon garlic powder

1 teaspoon dried parsley

1/4 teaspoon sea salt

1/8 teaspoon cracked black pepper

Ingredients for Crumb Topping:

1/4 cup panko bread crumbs

1/4 cup parmesan cheese, grated

1 teaspoon dried parsley

1/4 teaspoon sea salt

1/8 teaspoon red pepper flakes

Instructions:

Wash and pat dry yellow squash. Slice into 1/4” rounds; set aside. To make the herbed oil, whisk together lemon juice, olive oil, garlic powder, dried parsley, sea salt, and cracked black pepper. Set aside. To make the crumb topping, toss panko bread crumbs, grated parmesan cheese, dried parsley, sea salt, and red pepper flakes into a bowl. Mix well; set aside. To prepare yellow squash, warm olive oil in a large skillet over medium heat. Add the yellow squash and sauté for 8 minutes. Turn occasionally to cook both sides. Squash should be soft, but not mushy. Remove from heat. Drizzle herbed oil over yellow squash. Transfer to a platter. Top with panko crumb topping mixture. Garnish with fresh basil leaves, if desired. Serve immediately.

Teriyaki Chicken Bowl

What’s Cooking in Gail’s Kitchen? Palatable Possibilities: Teriyaki Chicken Bowl! Do-ahead meals take a little bit of planning, but the “devil is in the details”, they say. In this case it means, make sure the chicken breasts are thawed AND marinated 24 hours before you plan on serving them. I realize that requires the cook to be somewhat organized. Pantries don’t stock themselves. There’s nothing worse than trying to make a dish without all the ingredients. Take sesame oil, for example. I find it absolutely delicious because it adds an earthy nuttiness to Asian food. Vegetable oil tastes meh, in my opinion. Not only does it alter the taste, the texture will be different. When I can find it, I buy toasted sesame seeds so I don’t have to worry about toasting them on the stove or in the oven. That’s 10 minutes I could be planning tomorrow’s meal. Idiosyncratic, but true.

TERIYAKI CHICKEN BOWL

Ingredients:

2 chicken breasts, boneless and skinless

1/2 cup teriyaki sauce

2 tablespoons lemon juice

1 teaspoon fresh garlic, minced

1 teaspoon sesame oil

Green onion snips, for garnish

Toasted sesame seeds, for garnish

Instructions:

Place chicken breasts, teriyaki sauce, lemon juice, minced garlic, and sesame oil in a shallow dish. Baste chicken completely. Cover dish with plastic wrap. Refrigerate for 24 hours. When ready to cook, preheat grill to 450°. Lightly oil grill grate. Remove chicken breasts from marinade, place directly on grill, close lid, and cook for 5 minutes. Discard marinade. After 5 minutes, open lid, flip over chicken breasts, close lid, and cook 5 minutes longer, or until cooked through and no longer pink. Remove teriyaki chicken from grill and allow to rest for 5 minutes before serving. Garnish with green onion snips and toasted sesame seeds. Serve with sticky rice and mixed vegetables.

Maryland-Style Crab Cakes

What’s Cooking in Gail’s Kitchen? Palatable Possibilities: Maryland-Style Crab Cakes! When my step-daughter, Brandi, gifted me with a copy of one of her favorite seafood cookbooks, I knew exactly what dish I was going to make first. After all, the cookbook is based on a popular Hilton Head Island restaurant that has become her family’s traditional spot whenever they visit. Because Florida has an abundance of connections for fresh seafood, vendors are able to get premium, wild-caught crab meat to sell to their customers. Farmers Markets, as well as fish companies specialize in pre-made crab cakes. One taste and I thought, why compete with the best? So, I use two or three resources for incredible tasting Maryland crab cakes. Supporting local businesses builds strong communities and helps everyone thrive. For dinner in a snap, read on.

MARYLAND-STYLE CRAB CAKES

Ingredients:

6 pre-made Maryland crab cakes

2 tablespoons olive oil

2 tablespoons red onion, diced

1 garlic clove, minced

1 cup diced tomatoes

1 cup spicy Bloody Mary mix

1/2 teaspoon Worcestershire sauce

1/4 teaspoon sea salt

1/8 teaspoon black pepper

Lemon slices, for garnish

Parsley flakes, for garnish

Instructions:

To make the gazpacho sauce, warm olive oil in a sauté pan over medium-high heat. Add red onion and minced garlic. Cook 1-2 minutes. Add diced tomatoes, Bloody Mary mix, Worcestershire sauce, sea salt, and black pepper. Stir to combine. Reduce heat and simmer 5 minutes. Transfer gazpacho to a bowl. Refrigerate until ready to use. To bake the crab cakes, preheat oven to 425°. Place crab cakes on a baking sheet that has been sprayed with nonstick oil. Bake 12 minutes, flip, and bake 3 minutes longer until golden brown. To serve, ladle the slightly chilled gazpacho onto a plate; center a crab cake on top. Arrange lemon slices. Sprinkle with parsley flakes.

Italian Sheet Pan Tilapia

What’s Cooking in Gail’s Kitchen? Palatable Possibilities: Italian Sheet Pan Tilapia! What’s for dinner? You gotta love a one-pan meal. It not only makes preparation and clean-up a breeze, it typically turns into a healthy option as well. Choose seafood, meat, or veggies and then customize the flavor with tangy spices, fresh herbs, and natural oils. Things honestly could not get any easier. You can even take things one step further and divide the pan to accommodate a spicier version on one end and something a little more bland on the other. No matter how you split things up, watch them disappear.

ITALIAN SHEET PAN TILAPIA

Ingredients:

1/4 cup unsalted butter, melted

1/2 teaspoon garlic powder

2 tablespoons lemon juice

1 teaspoon Italian seasoning mix

1 pound fresh asparagus, trimmed

1/4 cup olive oil, divided

1/2 teaspoon kosher salt

1/8 teaspoon black pepper

2 (6-ounce) tilapia fillets

2 Roma tomatoes, sliced and halved

Parsley, for garnish

Instructions:

Preheat oven to 425°. Spray a baking sheet with nonstick oil. Set aside. In a small bowl, whisk together melted butter, garlic powder, lemon juice, and Italian seasoning mix. Reserve 2 tablespoons and set aside. Place asparagus in a single layer on the left side of the prepared baking sheet. Drizzle with 2 tablespoons olive oil. Season with kosher salt and black pepper. Place Roma tomatoes in a single layer down the middle of the baking sheet. Drizzle with remaining olive oil, kosher salt, and black pepper. Arrange tilapia fillets in a single layer on the right side of the baking sheet. Drizzle with butter mixture. Bake 12-14 minutes, or until the fish flakes easily with a fork. Serve immediately with reserved butter mixture. Garnish with fresh parsley.

Greek Oven Potatoes

What’s Cooking in Gail’s Kitchen? Palatable Possibilities: Greek Oven Potatoes! This sounds crazy, but these potatoes are baked and steamed at the same time. The end result is tenderness and flavorful, an extraordinary combination. It sounds like a lot of liquid, but trust me, the potatoes literally soak up the moisture. They can handle it. The spice mix does a great job of penetrating the potatoes while teasing the senses with a whiff of aromatic pleasantness. For a side dish that is anything but hum-drum, give this one a whirl. No regrets.

GREEK OVEN POTATOES

Ingredients:

1/2 teaspoon seasoned salt

1/2 teaspoon black pepper

1/2 teaspoon smoky paprika

1/2 teaspoon dried rosemary

4 red potatoes, peeled and cut into wedges

4 garlic cloves, chopped

2 tablespoons olive oil

1/2 lemon, juiced

2/3 cup vegetable broth

1/3 cup parmesan cheese, grated

Fresh basil, for garnish

Instructions:

Preheat oven to 400°. Spray a small baking dish with nonstick oil. Set aside. In a small bowl, combine seasoned salt, black pepper, smoky paprika, and dried rosemary. Set aside. Arrange red potato wedges in the prepared baking dish. Sprinkle with spice mix. Toss briefly to cover all. In a bowl, whisk together garlic cloves, olive oil, lemon juice, and vegetable broth. Pour over potatoes. Cover with foil and bake for 40 minutes. Carefully take the baking dish from the oven, remove the foil, and sprinkle the potatoes with parmesan cheese. Return dish to oven and bake, uncovered, for 15 minutes longer. Potatoes will be cooked through and golden brown in color. Garnish with fresh basil. Serve immediately.

Drawn Butter Fish Favorite

What’s Cooking in Gail’s Kitchen? Palatable Possibilities: Drawn Butter Fish Favorite! Keeping it simple with a fresh catch is probably my favorite way of serving fish. Now that I’ve connected with a local fisherman, it practically feels like a luxury to plan evening meals. The marinade couldn’t get any easier; a couple of key ingredients do the trick. After all, the star attraction is the warm melted butter. You’ve heard me rave about the French sea salt butter we order once a year. It is ah-mazing. Serve dinner with fresh veggies from the produce bin and you’ll be smiling all through the meal.

DRAWN BUTTER FISH FAVORITE

Ingredients:

1 pound Almaco Jack fish fillets

1-2 tablespoons garlic wine vinegar

1-2 tablespoons olive oil

2 cloves garlic, minced

2 tablespoons sea salt butter

Juice of one Lemon

Instructions:

Rinse fish fillets and pat dry. In a shallow dish, combine garlic wine vinegar, olive oil, and minced garlic. Brush both sides of the fish fillets with marinade. Place fillets in the shallow dish, cover with plastic wrap, and refrigerate for one hour. To cook, warm butter in an iron skillet over medium-high heat. Add the fish fillets, cover, and cook for 4 minutes without turning. Flip and cook 4 minutes longer or until fish is crispy. Transfer fillets to a plate, drizzle with a squeeze of fresh lemon juice. Spoon drawn butter over all. Serve immediately.

Lemon Butter Chilean Sea Bass

What’s Cooking in Gail’s Kitchen? Bright Ideas: Lemon Butter Chilean Sea Bass! Anyone, besides me, a fan of butter on seafood? Lobster. Crab Legs. Chilean Sea Bass. Shrimp. Scallops. You name it…if the seafood is slightly sweet, mild in flavor, moist and tender, or flaky yet firm, I practically kick everything else to the curb in favor of rich and decadent seafood. Now that I live in Florida, I can stretch my palate a bit with fresh seafood harvested or caught off the coastline. Not only does it support local fishermen, it also puts me in touch with seafood retail markets that thrive on this economy. And, yes, I’m spoiled. Some of the vendors even come directly to my community on a weekly basis. I see more fish in my future.

LEMON BUTTER CHILEAN SEA BASS

Ingredients:

2 8-ounce Chilean Sea Bass fillets

1/4 cup salted butter

1/8 teaspoon garlic powder

1/8 teaspoon parsley flakes

Juice of fresh 1/2 lemon

Instructions:

Preheat gas grill to 400°. Form a piece of aluminum foil into a baking sheet to accommodate the fillets. Be sure to raise the sides to contain the buttery juices. Spray foil with nonstick oil. Set aside. In a microwave-safe dish, warm the salted butter. Add garlic powder, parsley flakes, and lemon juice. Gently whisk. Wash Chilean sea bass fillets; pat dry with a paper towel. Before placing the fillets on the foil, brush both sides with melted lemon butter. Save the extra butter mixture for serving. Grill the Chilean Sea Bass for 5-6 minutes with the lid closed to maintain the internal temperature. Turn the grilled sea bass and repeat cooking time 5-6 minutes longer for even grilling. Brush with remaining butter mixture. Serve immediately.