Zinfandel Pairings

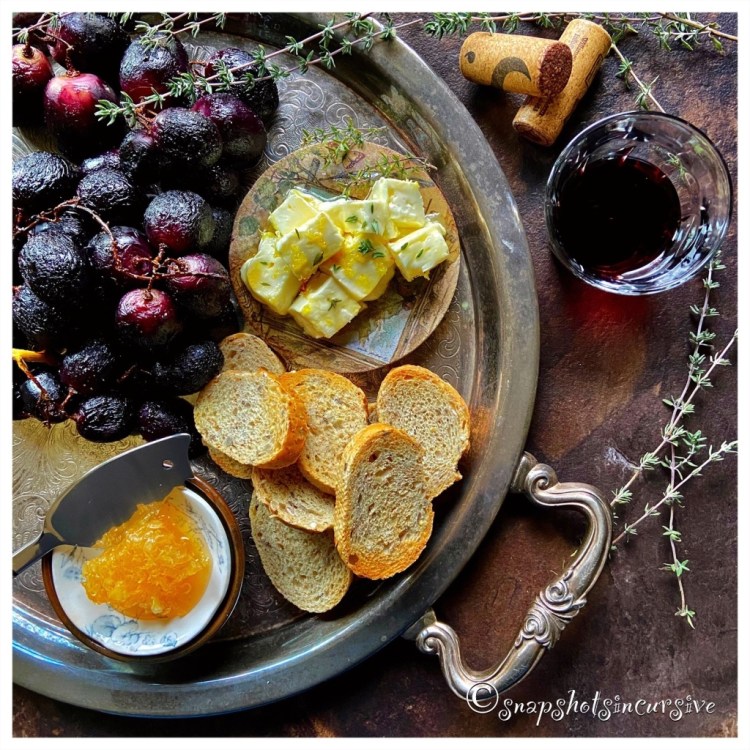
Eating My Way Through the Holidays. Festive Food Gifts: Zinfandel Pairings! Just when I thought I’d seen it all, there in the produce department perched on the bottom shelf below its green and red cousins, was a small bin of larger-than-life black seedless grapes. Immediately I was intrigued. The hand-scribbled sign boasted sweet and tart beyond your wildest dreams. That’s it. Nothing more than “Product of USA” on the package. It didn’t matter. It was love-at-first-sight. I knew immediately that a Zinfandel wine and tangy cheese would join the impromptu Date Night that was forming in my mind. Later on, after I got home, I read all kinds of powerful benefits these precious little gems do for the body, mind, and soul. What a perfect prologue for guilt-free delicacies.

ZINFANDEL PAIRINGS

Ingredients:

1 pound black seedless grapes

1 tablespoon olive oil

2 teaspoons sugar

1/4 teaspoon kosher salt

1/8 teaspoon black pepper

4 ounces feta cheese, block

1 teaspoon olive oil

1 teaspoon lemon zest

1/4 cup honeycomb

Multigrain French Bread slices, lightly toasted

Raw Honey, for drizzling

Lemon Thyme, for garnish

Instructions:

Preheat oven to 425°. Line a baking sheet with parchment paper. Set aside. In a small dish, combine olive oil, sugar, kosher salt, and black pepper. Wash cluster of black grapes; pat dry. Place grapes on the prepared baking sheet. Using a pastry brush, generously coat the grapes with the olive oil mixture. Roast for 30 minutes. Grapes will release juice and begin to wrinkle. Remove pan from oven to cool on a wire rack. Reduce oven temperature to 375°. Break the feta cheese into rough chunks. Transfer to a baking dish sprayed with nonstick oil. Sprinkle with olive oil and lemon zest. Drizzle with raw honey. Bake for 15 minutes until softened. Broil until slightly golden. Watch carefully. To serve, spread warm cheese on toasted baguette slices. Top with a piece of honeycomb. Place a roasted grape over the cheese. Drizzle with raw honey. Garnish with lemon thyme. Serve with a slightly chilled glass of red Zinfandel.

New Asparagus Spears

What’s Cooking in Gail’s Kitchen? The Food Whisperer: New Asparagus Spears! Every once in awhile I have an “Ah-ha” moment when I come across fresh produce that I haven’t seen in awhile. This was one of those times. New asparagus smells clean and earthy. It also looks incredibly bright green with splashes of purple on the tips, which should be tightly closed. Make sure the stalks are firm and straight. If they seem to bend quite easily, they’ve already begun to wilt. Put them back. Personally, I prefer the thinner stalks simply because they cook much faster.

NEW ASPARAGUS SPEARS

Ingredients:

15-16 asparagus spears

1/2 red onion, sliced

1/2 cup caper berries, halved

2 tablespoons olive oil

Everything But Bagel seasoning, to taste

Fennel stalks, for garnish

Instructions:

Preheat oven to 400°. Wash and trim asparagus spears. Place into an iron skillet. Arrange the red onion slices and caper berries. Brush generously with olive oil. Sprinkle with Everything But Bagel seasoning. Bake in the oven for 8-10 minutes, or until slightly charred. Remove from oven and garnish with fennel stalks. Serve immediately.

Sweet Potato Stacks

What’s Cooking in Gail’s Kitchen? Equal Measures: Sweet Potato Stacks! Bring gourmet taste, with a quirk of presentation, to the dinner table tonight. It’s not rocket science. In fact, you may find yourself giggling at how ridiculously simple this is to make. When I pierced each stack with a rosemary sprig, my husband nearly fell out of his chair in amusement. (It’s not at all necessary. The sweet potato stacks stand upright on their own.) Roasted in a muffin tin, and drizzled with pure maple syrup are two trade secrets you can share with others. Or keep to yourself. Either way, it’s a tower of Yum.

SWEET POTATO STACKS

Ingredients:

3 sweet potatoes, peeled and sliced

4 tablespoons olive oil

1 tablespoon rosemary leaves

1/4 teaspoon garlic powder

1/2 cup pure maple syrup

1 cup parmesan cheese, grated

Fresh rosemary leaves, chopped

Instructions:

Preheat oven to 400°. Spray a 12-cup muffin tin with nonstick oil. In a bowl, mix together olive oil, rosemary leaves, and garlic powder. Coat slices of sweet potatoes. Place a slice of sweet potato in each muffin cup. Top with parmesan cheese between layers of potato slices. Continue until the muffin cup is filled. Going above the top is okay since the cooked sweet potatoes will shrink a little. Repeat with remaining sweet potato slices. Drizzle maple syrup over each stack. Sprinkle extra parmesan cheese over all. Bake stacks 35-40 minutes until tender. Transfer to a serving plate. Spoon reserve maple syrup mixture over top. Garnish with fresh rosemary.

Grilled Romaine with Strawberries

What’s Cooking in Gail’s Kitchen? Equal Measures: Grilled Romaine with Strawberries! I call this a lazy cook’s meal. After all, it’s pretty simple. More than likely, most ingredients are probably there in the fruit and vegetable crispers of the refrigerator. You know, those drawers down at the bottom that regulate humidity. (Quick tutorial: most fruits like LOW humidity, most vegetables like HIGH humidity. If set correctly, everything stays fresher and crisper longer.) Heat up the grill, sear the romaine, layer on ripe strawberries, red onion slices, and shaved parmesan cheese. Drizzle olive oil over all. You’re done. The hubs will think you planned the meal with attention to detail. Just nod your head and smile.

GRILLED ROMAINE WITH STRAWBERRIES

Ingredients:

1 romaine heart, cut lengthwise

Nonstick olive oil spray

1/4 teaspoon sea salt

1/8 teaspoon black pepper

1/2 pint strawberries, sliced in half, stems removed

1/4 red onion, sliced

1/4 cup parmesan cheese, shaved

1/4 cup olive oil

Instructions:

Preheat grill to 400°. Spray both sides of romaine halves with nonstick oil. Sprinkle with sea salt and black pepper. Place cut side down on the hot grill. Sear 3 minutes, until charred. Carefully flip over and sear 3 minutes longer until slightly wilted. Transfer to a platter. Layer with fresh strawberries and red onion slices. Drizzle with olive oil. Garnish with shaved parmesan cheese. Serve immediately.

Broiled Bay Scallops

What’s Cooking in Gail’s Kitchen? Equal Measures: Broiled Bay Scallops! Tender and sweet, bay scallops are a miniature version of the large-size sea scallops. When sautéed in garlic butter and dill, with a light squeeze of lemon juice, the end result is a splendid appetizer. Be festive and serve them on a half shell.

BROILED BAY SCALLOPS

Ingredients:

1 tablespoon olive oil

1 tablespoon butter

1 clove garlic, minced

1 pound bay scallops

1/8 teaspoon red pepper flakes

1/8 teaspoon dill weed

1/4 teaspoon sea salt

1 teaspoon lemon juice

1 cup mayonnaise

1 cup parmesan cheese, grated

1/8 teaspoon garlic powder

Instructions:

Preheat oven to 350°. Warm olive oil and butter in a skillet over medium heat. Add garlic clove; sauté until fragrant, 2-3 minutes. Increase heat to medium-high, add scallops. Sprinkle with red pepper flakes, dill weed, and sea salt. Sauté until lightly browned. Squeeze lemon juice over all. Remove from heat. Combine mayonnaise, grated parmesan cheese, and garlic powder. Gently fold in bay scallops. Transfer mixture to a greased casserole dish or clam shells. Bake 20 minutes. Broil 3-4 minutes on High until tops are golden. Watch carefully. Remove from oven. Serve with bagel chips.

Tomato Burrata Crostini

What’s Cooking in Gail’s Kitchen? The Clean Plate Club: Tomato Burrata Crostini! One look, one whiff, and one bite is all you need to be satisfied with this gastronomic appetizer. The intensity of slow-roasted tomatoes releases a tangy sweetness that marries well with the luscious creaminess of burrata cheese. Now balance that out with the subtle smokiness of paper-thin hard salami intermingling with aromatic basil leaves. You have just been transported to seventh heaven, inspired by the taste of Italy. Need I say more?

TOMATO BURRATA CROSTINI

Ingredients:

1 pint grape tomatoes

1 tablespoon olive oil

1/2 teaspoon sea salt

1/8 teaspoon black pepper

1 bakery flatbread, plain

1 tablespoon olive oil

1/8 teaspoon oregano

1/8 teaspoon marjoram

1/8 teaspoon basil

1/8 teaspoon garlic powder

8 ounces burrata cheese

8 thin slices of hard salami

Fresh basil

Instructions:

Preheat oven to 400°. Toss tomatoes in olive oil, sea salt, and black pepper. Warm an iron skillet over medium-high heat. Add seasoned tomatoes. Roast tomatoes 15-20 minutes until they blacken slightly and begin to burst. Brush both sides of flatbread with olive oil. Cut flatbread into 8 pieces and place on a pizza pan. Sprinkle with oregano, marjoram, basil, and garlic powder. Bake in the preheated oven for 5 minutes. Remove. Place burrata in a shallow dish. Divide it into 8 portions, cutting slowly to keep the creamy filling in the mozzarella shell. Transfer each portion to the flatbread, spreading burrata cheese as needed. Layer thin salami over burrata. Tear or fold to fit the shape of the flatbread. Add roasted tomatoes. Bake 5-8 minutes until edges begin to char. Remove crostini from oven. Garnish with fresh basil leaves. Serve warm.

Unleavened Bread

What’s Cooking in Gail’s Kitchen? The Color of Food: Unleavened Bread! Nothing is more appetizing than the aroma of fresh bread baking in the oven, in my opinion. Unleavened Bread is a quick and easy flatbread made with flour, salt, olive oil, and water. No yeast needed. Choose between a crispy texture, like I have here for that luscious golden color, or shorten the baking time for softer, more chewy results. Eat it plain, slather it with French butter, or turn it into a personal-size pizza flatbread. You can thank me later.

UNLEAVENED BREAD

Ingredients:

1 1/3 cup flour

1/4 teaspoon sea salt

1/4 cup olive oil

1/4 cup water

Dill weed for garnish (optional)

Instructions:

Preheat oven to 400°. Brush a baking sheet with olive oil. Set aside. Combine flour and salt in a food processor. Pulse to mix. Gradually drizzle in the oil on Low speed. Dough will resemble crumbs. Continuing on Low speed, gradually add water until dough forms a ball. Turn dough onto a lightly floured surface. Knead until dough is elastic and smooth, but not sticky. Divide into 6 equal balls. Pat each ball into a circle, using a rolling pin or your hands. Transfer flattened dough onto prepared baking sheet. Do not crowd. Bake in two steps, if necessary. Use a fork to lightly prick the dough. Brush each flatbread round with olive oil and sprinkle with dill weed. Bake 15 minutes until golden brown. Cool on wire rack.

Roasted Chickpeas

What’s Cooking in Gail’s Kitchen? The Color of Food: Roasted Chickpeas! If you’re like me, some days instead of three squares, you graze your way through the day. It helps to have a high-protein snack on hand when the cravings kick in for something crisp and crunchy. Sure, potato chips might be handy, but would you really feel good after downing an entire bag while perusing the internet? I think not. Seasoned chickpeas can be just as satisfying with their naturally nutty flavor and fiber-filling benefits. Season them with maple syrup for sweetness, a kick of cayenne for spice, garlic for pizazz, or savory ranch flavoring. The best part is you get to choose. Just remember the basic rules: drain, pat dry, peel the skins, and bake. “Bada-bing bada-boom!”

ROASTED CHICKPEAS

Instructions:

30-ounces canned chickpeas, drained and patted dry. Skins removed.

2 tablespoons olive oil

2 tablespoons butter, melted

1 teaspoon Worcestershire sauce

1 teaspoon seasoned salt

1/4 teaspoon garlic powder

Instructions:

Preheat oven to 400°. Line a baking sheet with parchment paper. Combine olive oil, melted butter, Worcestershire sauce, seasoned salt, and garlic powder. Mix well. Drain chickpeas. Transfer to a clean tea towel. Cover and rub gently over the chickpeas. This will loosen the skins so you can easily peel them away and discard. When dry, place the chickpeas in a ziplock gallon bag. Pour olive oil seasoning mixture over chickpeas. Seal bag, squeeze out the air, and toss bag to coat the chickpeas all over. Transfer seasoned chickpeas to the parchment paper-lined baking sheet. Roast 30 minutes, turning every 10 minutes. Adjust time, if necessary. They should appear browned and crunchy. Do not burn. Cool 10 minutes.

Poke Tuna Bowl

What’s Cooking in Gail’s Kitchen? The Color of Food: Poke Tuna Bowl! Allow me to introduce you to the rice cooker. In a mere 10 minutes, sweet Asian rice is transformed into a steamy sticky rice that can be eaten with your fingers. Simply scoop it into a ball, dip it in your favorite sauce, and nibble away. It’s that good. And gluten-free. Join the craze of poke bowls by adding ahi tuna and avocado chunks. Basically, you can dress it up to match your taste buds. It’s healthy, it’s colorful, and most of all, it’s Yumolicious!

POKE TUNA BOWL

Ingredients:

2 ahi tuna steaks, skinless

1 tablespoon olive oil

1 tablespoon vegetable oil

1/2 teaspoon sesame oil

2 tablespoons furikake seasoning

1 teaspoon toasted sesame seeds

1 1/4 cup water

1 cup sweet rice

1 tablespoon olive oil

1 ripe avocado, peeled and cut into chunks

Instructions:

To prepare ahi steaks, combine olive oil, vegetable oil, and sesame oil in a shallow dish. Sprinkle with furikake seasoning and toasted sesame seeds. Marinate ahi tuna steaks ten minutes per side to coat evenly. Remove from marinade and set aside. In a medium skillet over medium-high heat, warm oil mixture. Cook steaks 2-3 minutes per side. Remove from heat. Transfer ahi steaks to a cutting board and tent with foil for 10 minutes. To prepare rice, combine water, sweet rice, and olive oil in a rice cooker. Secure lid with knob set to Pressure. Set timer for 10 minutes and press Start. Meanwhile, cut ahi tuna into 1/4” thick slices. Chop avocado into chunks. When rice is finished, turn lever to Steam on rice cooker; wait until steam is released and then carefully remove lid. Scoop sticky rice into bowls. Add sliced ahi tuna and avocado chunks. Serve with dipping sauce.*

*For homemade Vietnamese Dipping Sauce, follow the link.

https://snapshotsincursive.com/2017/04/17