Eating My Way Through the Holidays! Special Edition: Cheesy Pimento Spread

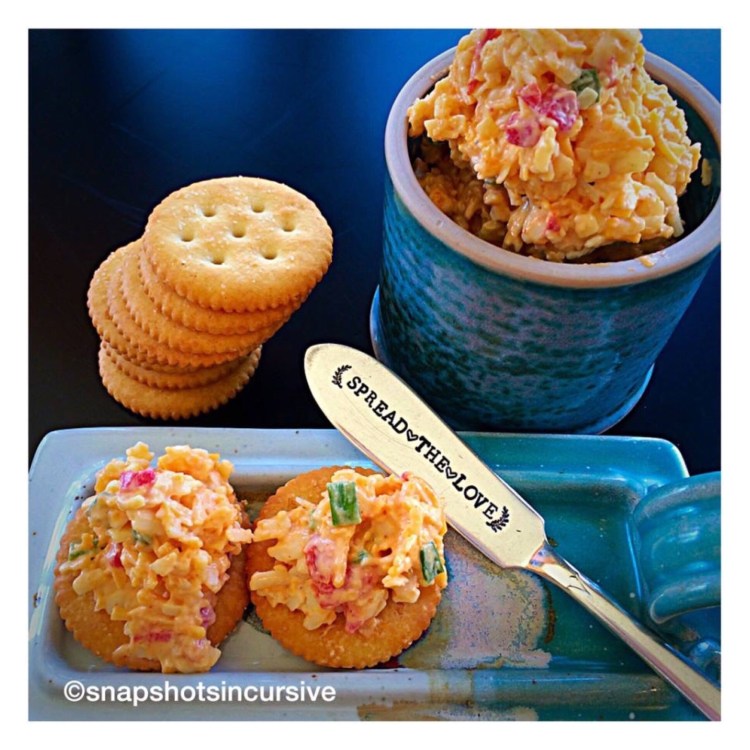
Eating My Way Through the Holidays! Special Edition: Cheesy Pimiento Spread! If you’re a cheese lover, this is a “must-do” appetizer. It is guaranteed to bring big raves at the next holiday gathering. The smokey-peppery version is sure to test your willpower. Should it just be slathered on crackers or bagel chips? What about apple slices? Or will you take it one step further and build a grilled cheese sandwich on sourdough bread? Whatever you choose, create all sorts of ideas for enhancing this nostalgic Southern favorite. 
CHEESY PIMENTO SPREAD 
Ingredients:

1/2 cup mayonnaise 

2 teaspoons French Dijon mustard 

1 teaspoon Worcestershire sauce 

1/4 teaspoon crushed red pepper flakes

1/4 teaspoon seasoned salt

1/8 teaspoon white pepper 

4-ounce jar of diced pimientos, drained

2 green onions, snipped

8 ounces extra sharp yellow cheddar cheese, finely shredded 

10 ounces sharp white cheddar cheese, medium shredded 

1 teaspoon sriracha hot chili sauce (optional)
Instructions:

In a large bowl, stir together mayonnaise, mustard, Worcestershire sauce, red pepper flakes, seasoned salt, and pepper. Mix well. Fold in pimientos and onions. Stir in both cheeses until blended. Add sriracha for a kick of heat. Chill one hour or overnight. 
Serving Suggestion: Serve as an Appetizer with crackers or assorted vegetables. Also excellent as finger sandwiches. 
*For block cheeses, grate one kind with small holes and the other with medium holes on a box grater or using food processor blades. 

Eating My Way Through the Alphabet; Letter U

What’s Cooking in Gail’s Kitchen? Food for Sharing: Uvetta Apple Chutney Grilled Cheese! When I was a kid, the word “chutney” meant something yucky with raisins and spices. That was before my taste buds matured and I acquired an exotic palate. Nowadays I appreciate the characteristics of fancy foods filled with specialized ingredients. By adding a spoonful of apple chutney to a grilled cheese sandwich, it transforms an ordinary meal into an extraordinary one. You should try it. 
UVETTA APPLE CHUTNEY GRILLED CHEESE
Ingredients:

1 1/2 teaspoons olive oil

1/4 cup sweet onion, finely chopped

1 candied ginger disc, chopped

2 teaspoons pineapple juice

2 tablespoons apple cider vinegar 

1 tablespoon cognac (optional)

2 tablespoons raisins

1/8 teaspoon garlic powder 

1/4 teaspoon turmeric 

1/4 teaspoon cinnamon 

1/4 teaspoon cumin powder

1/8 teaspoon cayenne pepper

2 tablespoons brown sugar 

1 tablespoon natural honey

2 Granny Smith apples, peeled, cored, and chopped
Instructions:

In a large saucepan over medium heat, add olive oil, sweet onions, and candied ginger. Cook 5 minutes, stirring occasionally. Reduce heat. Add pineapple juice, apple cider vinegar, cognac, and raisins. Cook on low another 2 minutes. Stir in garlic powder, turmeric, cinnamon, cumin powder, cayenne pepper, brown sugar, and honey. Mix well. Add chopped apples. Coat with sauce. Simmer 10-15 minutes until apples are soft and sauce is like syrup. Remove from heat. Serve as a condiment on your favorite grilled cheese sandwich. 

Eating My Way Through the Alphabet; Letter C

What’s Cooking in Gail’s Kitchen? Food for Sharing: Chef’s Plate! Pull together a party-friendly charcuterie platter where finger foods rule. Make it as elaborate as you choose, depending on the size of the guest list. Obviously for an intimate dinner for two, something like this is a perfect balance of contrasting flavors. Keep the bread crunchy and the jam or jelly sweet. It offsets the fatty, salty meat by cutting through the richness of the buttery cheese. The tartness of gherkins is a classic choice for nibbling in between. Be creative. Anything goes. 
CHEF’S PLATE
Ingredients:

Jalapeño Pepper Jelly

Cornichons Gherkins 

Red Onion 

Baguette Toast

Mixed Nuts

Summer Sausage Sticks

Aged Bleu Cheese

Bite-size Dry Salami
Instructions:

Fill small condiment bowls with pepper jelly, baby gherkins, and assorted mixed nuts. Slice baguette. Rub with olive oil and bake in a 350° oven for 10 minutes. Turn over and bake 5 minutes longer. Place on a chef’s board or in a bread basket. Arrange cured hard sausages around the wedge of Bleu cheese. Slices red onion and “fan” near the bread. Once the food is arranged, open a bottle of wine, and enjoy the experience of grazing. 

Eating My Way Through the Alphabet; Letter B

What’s Cooking in Gail’s Kitchen? Food for Sharing: Butternut Squash Bisque! You’ll know this squash by its half-dumbbell cylindrical shape. Its tan skin can be tough to peel, so exert caution in preparation. This is nothing like peeling potatoes. I worked in small sections. Once the hard rind has been removed, cut the squash in half lengthwise and scoop out the seeds. From there, cutting into chunks is a breeze. As with anything, the first time can seem challenging, but once you’ve experienced the taste of the sweet buttery orange flesh, you’ll find yourself wanting more. 
BUTTERNUT SQUASH BISQUE 
Ingredients:

1 butternut squash, peeled, seeded, and cut in 1″ chunks

1 onion, chopped

1 green pepper, chopped 

2-3 tablespoons olive oil

2 cloves garlic, chopped

1 teaspoon kosher salt

1/8 teaspoon seasoned salt

1/8 teaspoon cracked black pepper 

4-6 slices bacon, cooked and crumbled

1/2 teaspoon thyme 

14 ounces chicken broth 

2 tablespoons dry roasted sunflower seeds

Fresh thyme 
Instructions:

Preheat oven to 400°. Spray a baking sheet with nonstick oil. In a large bowl, combine butternut squash, onion, and green pepper. Add olive oil and garlic. Season with kosher salt, seasoned salt, and cracked black pepper. Gently toss to coat evenly. Transfer to the baking sheet. Arrange in a single layer. Bake 15 minutes, turn over and bake 15 minutes longer until tender. In a large skillet over medium heat, cook bacon until brown and crispy. Drain on paper towels. Set aside. Working in batches, transfer cooked vegetables to a food processor. Pulse to puréed consistency. Transfer to a heavy bottomed 4-quart pan. Add thyme and chicken broth. Blend well. Bring to a boil. Reduce heat and simmer until slightly thickened, about 10 minutes. Serve immediately. Garnish with bacon crumbles, sunflower seeds, and fresh thyme. 

Eating My Way Through the Alphabet; Letter V

What’s Cooking in Gail’s Kitchen? Timeless Classics: Vidalia Onion Tart! For those of you who adore caramelized onions, but need the confidence to make them at home, read on for some helpful hints that bring astounding results. Begin with yellow sweet onions. I choose Vidalias right now because they are in season. Slice them thicker than you would for a sandwich. If the onions are too thin, they burn and stick to the bottom of the pan. This is not the time to be using olive oil. Butter is your friend. The flavor is makes a difference, so do not scorch the butter. Make sure the onions are coated, top and bottom, with melted butter. It helps them to turn soft and caramelized. Also, make sure the pan is large enough to prevent overcrowding. The last thing you want is steam, which turns the onions mushy. Maintain a constant heat for the onions’ sugars to caramelize. If they char a little, don’t sweat it. Believe me, the results are worth the wait. Besides, the aromas will drive everyone else crazy, too. 
VIDALIA ONION TART
Ingredients for Tart:

1 cup flour

1/4 teaspoon sea salt

6 tablespoons butter, chilled and cut into chunks

4-5 tablespoons iced water
Instructions:

Using a food processor, mix together flour and sea salt. Add the chilled butter and pulse until mixture resembles small peas. With the machine running, gradually add iced water until dough forms a ball. Remove dough, flatten into a disk, wrap it in plastic, and refrigerate for one hour. 
Remaining Ingredients:

5 tablespoons butter, unsalted 

2 large Vidalia sweet onions, thinly sliced

1 teaspoon Worcestershire sauce

1 teaspoon Herbs de Provence 

Sea salt and cracked black pepper, to taste

1 tablespoon corn meal, coarsely ground 

2 slices baby Swiss cheese

1 egg yolk, beaten

Fresh tarragon for garnish
Instructions:

Preheat oven to 375°. In a medium skillet over medium high heat, melt the butter. Do not scorch. Add the Vidalia onions and cook until soft and translucent, about 10 minutes. Reduce heat to low. Add Worcestershire sauce, Herbs de Provence, sea salt, and black pepper. Cook until onions are golden, about 35-45 minutes longer. Remove from heat and let cool. Line a baking sheet with parchment paper. Sprinkle cornmeal evenly. On a lightly floured surface, divide the dough in half. Roll out each portion into an 8″ round. Transfer to the baking sheet. Place one slice of Swiss cheese in the center of each round. Spread the onions over the cheese, leaving a 1 1/2″ border. Fold the edge of the dough up and over the filling. Brush the edges with the egg yolk wash. Bake for 40 minutes, until the bottom crust is brown. Transfer the baking sheet to the top shelf and continue baking 5 minutes longer. Top crust will be golden brown. Cool tarts on a wire rack to prevent them from getting soggy. Garnish with fresh tarragon. Cut into wedges and serve warm. Makes two tarts. 

Eating My Way Through the Alphabet; Letter L

What’s Cooking in Gail’s Kitchen? Timeless Classics: Lamb Burger Sliders! For all the meat-lovers out there, lean lamb is a healthier choice simply because it is good for the heart. Personally, I prefer the tender cut of meat with its mellow flavor, especially when partnered with garden fresh vegetables. By adding a touch of spice, it actually enhances the flavor. If you’re looking for a break from beef, chicken, or pork…think lamb. 
LAMB BURGER SLIDERS 
Ingredients:

1 pound ground lamb

1/8 teaspoon Mrs. Dash Herb and Garlic Seasoning

1/8 teaspoon sea salt

2 tablespoons olive oil

1 tomato, sliced

1 cucumber, sliced

1/2 red onion, sliced

1/2 cup tzatziki sauce with feta chunks

6 ciabatta slider buns
Instructions:

Form ground lamb meat into six mini patties. Sprinkle with Mrs. Dash Herb and Garlic Seasoning; sprinkle with sea salt. Brush both sides of patties with olive oil. Grill lamb patties 2-3 minutes per side over medium-high heat, turning once. Set aside. Toast ciabatta buns. To assemble lamb sliders, spread tzatziki sauce on the bottom of the buns. Next layer buns with cucumber slice, tomatoes, lamb burger, and red onion. Serve immediately. 

Eating My Way Through the Alphabet; Letter W

What’s Cooking in Gail’s Kitchen? Be Our Guest: Wacho Nachos! What do you get when you mix sweet potato waffle fries and savory nacho toppings? Wacho Nachos! The grilled chicken, vine-ripe tomatoes, and spicy jalapeños provide a familiar face, but it’s all about the base. By choosing a healthy serving of sweet potato waffle fries, the crispy crunch offers an appealing meal instead of a junk food snack. Step aside tortilla chips, waffle fries are taking center stage!
WACHO NACHOS

19-ounce bag frozen sweet potato fries

2 cups precooked grilled chicken strips, cut into chunks

2 cups Colby and Monterey Jack Cheese, finely shredded

1 large vine-ripe tomato, chopped

1/4 cup sliced jalapeños 

1/4 cup Greek yogurt

1/4 cup green onion snips
Instructions:

Bake the waffle fries according to package directions. Arrange individual casserole dishes with a single layer of crispy sweet potato waffle fries, lining the edges to hold in the toppings. Divide the grilled chicken chunks and shredded cheese equally. Top with tomatoes and jalapeño slices. Return to the oven until cheese is melted, about 10 minutes. Remove casseroles from the oven. Top with Greek yogurt and green onions. Serve immediately. 

Eating My Way Through the Alphabet; Letter S

What’s Cooking in Gail’s Kitchen? Be Our Guest: Street Tacos! This is literally Cooking 101. I have been making tacos since I was 16 years old, before microwave ovens and gourmet kitchens were commonplace. My Aunt Gail, in Michigan, taught me the timeless secrets of a classic Mexican staple. First of all, you must use authentic yellow corn tortillas. Forget the box because you’re going to fry up the shells for freshness. It’s worth the effort, believe me. 
STREET TACOS
Ingredients:

16-ounce package yellow corn tortillas

2-4 tablespoons vegetable oil

1 pound ground beef, lean

2 cloves garlic, minced

1 teaspoon cumin powder

1/8 teaspoon onion powder

1 teaspoon sea salt

1/8 teaspoon black pepper

2 green onions, snipped

1 cup cheddar cheese, finely shredded

Shredded lettuce

Fresh cilantro

Pico de Gallo or salsa
Instructions:

Preheat oven to 250°. Brown ground beef in a medium skillet over medium-high heat. Cook until the beef is crumbly. Drain, if necessary. Season beef with garlic, cumin powder, onion powder, sea salt, and black pepper. Set aside. In a small skillet, heat 2 tablespoons oil over medium-high heat. Add tortilla; cook 10 seconds per side. Remove to a paper towel-lined plate. Repeat until all tortillas have been fried. Reduce heat. One at a time, place a tortilla back into the skillet. Add 1-2 tablespoons ground beef mixture into each tortilla. Fold in half and place on a baking sheet. Repeat until all tortillas and ground beef are used. Warm in the oven until ready to serve. Assemble street tacos, per taste, with shredded lettuce, onion, cheese, cilantro, and Pico de Gallo. 

Eating My Way Through the Alphabet; Letter R

What’s Cooking in Gail’s Kitchen? Be Our Guest: Roasted Corn Salad! Nothing tastes better than fresh corn. Shuck it off the cob to make a spectacular side dish that goes well with quesadillas, tacos, and grilled meats. This make-ahead roasted corn salad is another picnic basket favorite that travels well and satisfies a crowd. Simply modify the portions to match the event. It’s fresh, it’s spicy, and it’ll keep ’em coming back for more. 
ROASTED CORN SALAD
Ingredients:

3 ounces cider vinegar

1/2 teaspoon water

1/4 cup olive oil

1/2 cup sugar

1/2 teaspoon sea salt

1/4 teaspoon white pepper

3 ears bicolor corn, shucked off cob

2 tablespoons vegetable oil

1/2 cup black beans, drained

1/8 teaspoon garlic powder

1/8 teaspoon cumin powder

1/4 teaspoon Cajun seasoning 

1 jalapeño pepper, chopped

1 ripe tomato, chopped

1 green pepper, chopped

2 celery stalks, chopped

1/2 red onion, chopped

1 tablespoon fresh cilantro, chopped
Instructions:

Combine the cider vinegar, water, olive oil, sugar, sea salt, and white pepper in a saucepan; bring to a boil, stirring occasionally. Set aside to cool at room temperature. In an iron skillet over medium-high heat, add vegetable oil. Drop the corn kernels into the skillet; stir to coat. Every few minutes, turn corn with a spatula. As the kernels begin to char, continue turning until corn is tender, about 6-7 minutes. It may be necessary to reduce heat. Place black beans in a large covered bowl. Transfer roasted corn to same bowl. Sprinkle with garlic powder, cumin powder, and Cajun seasoning. Add chopped jalapeño pepper, tomato, green pepper, celery, red onion, and cooled marinade. Mix thoroughly. Refrigerate overnight. Before serving, garnish with fresh cilantro.