Olive Oil Herb Potatoes

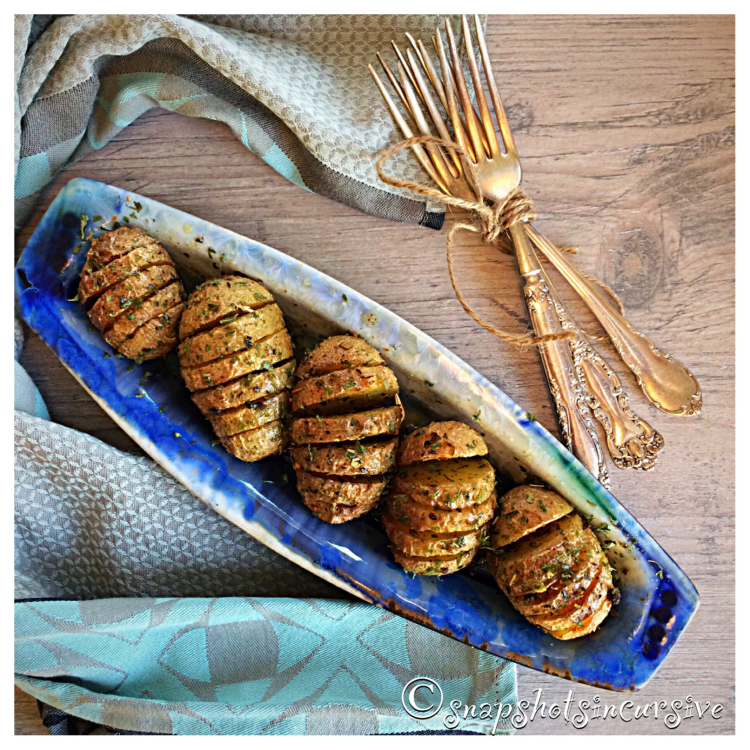
What’s Cooking in Gail’s Kitchen? Something to Savor: Olive Oil Herb Potatoes! Being raised in the Midwest, practically every evening meal consisted of meat, potato, and vegetable. Perhaps that is why I love potatoes so much. I learned how to make homemade potato soup at the hem of my mother’s apron, without measuring or a recipe. But that’s a story for another day. I like the baby potatoes available now at the supermarket. By slicing them, with the skin on, and drizzling them with herbs and olive oil, the taste is unbelievable! Who wouldn’t fall in love with these tasty little nuggets?

OLIVE OIL HERB POTATOES

Ingredients:

5 baby potatoes, washed and sliced

2 tablespoons olive oil

1/8 teaspoon garlic powder

1/4 teaspoon Herbes de Provence

2 tablespoons rosemary, chopped

1 teaspoon sea salt

Instructions:

Preheat oven to 400°. Leaving skin on potatoes, wash thoroughly and pat dry. Put one potato on a soup spoon. Beginning at one end, slice in strips, being careful to stop before slicing the bottom skin. The knife will hit the spoon to prevent it from cutting through. Transfer to a shallow baking dish. Continue until all potatoes are sliced. In a small bowl, mix olive oil, garlic powder, Herbes de Provence, and chopped rosemary leaves. Brush each potato with herbed olive oil, separating slices to coat both sides. Drizzle remaining oil over all. Sprinkle with sea salt. Bake potatoes one hour until crispy, basting occasionally. Serve immediately.
Fondue Pizza Party

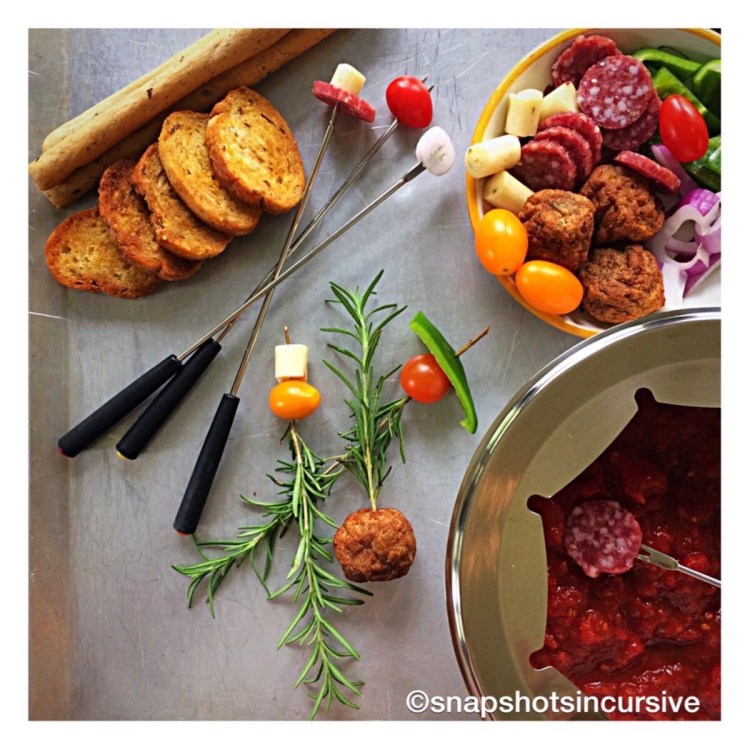
What’s Cooking in Gail’s Kitchen? Food for Sharing: Fondue Pizza Party! Revitalize the 1970s by throwing a fondue party. Gather up the dipping forks, where everyone chooses their favorite color. Remember, these forks are for spearing and dipping only. Never allow your guests to eat from the sharp pointed ends. Another reason eating from the fondue forks is a no-no is to avoid adding germs to the fondue sauce. So, set the table and let the fun begin!

FONDUE PIZZA PARTY

Ingredients:

1 pound Italian meatballs, pre-cooked and ready-to-serve

8 ounces bite size dry salami or pepperoni slices

1 green pepper, chopped

1 red onion, chopped

1 pound cherry tomatoes

8 ounces mozzarella sticks, cut into chunks

28-30 ounce jar pizza sauce or spaghetti sauce

Breadsticks

Bagel chips

Rosemary sprigs

Instructions:

Heat pizza sauce to boiling, then reduce to simmer, stirring constantly. Keep warm. Transfer to a fondue pot when ready to serve. Set on low heat to maintain a constant temperature. Arrange meatballs, pepperoni slices, green pepper, onion, cherry tomatoes, and cheese chunks on one or two serving platters. Include breadsticks, crostini, or bagel chips as another option. Spear dippers with fondue forks or rosemary sprigs. Dip ingredients into the fondue sauce for pizza party magic.

Rosemary Parmesan Popovers

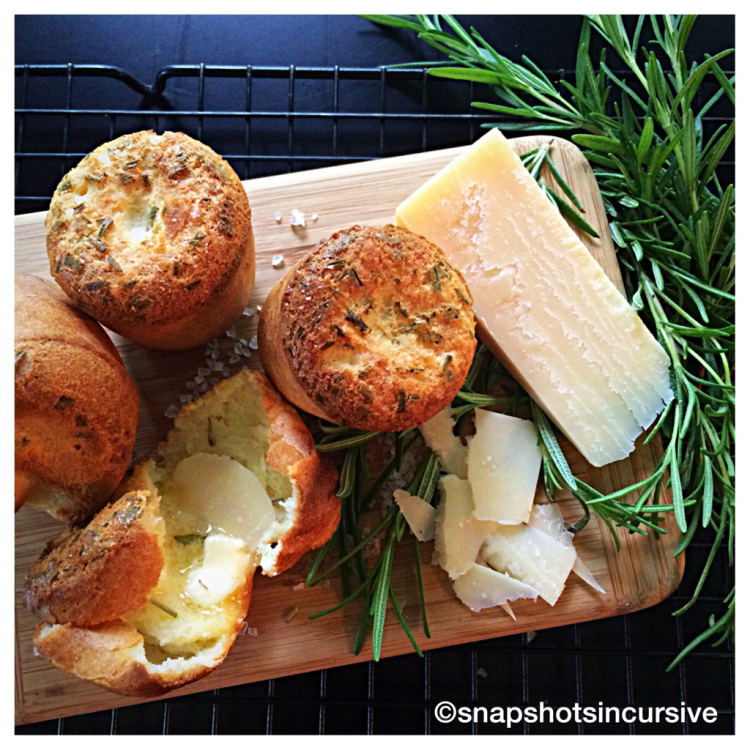
What’s Cooking in Gail’s Kitchen? Timeless Classics: Rosemary Parmesan Popovers! For a light and airy alternative to reaching for the bread basket, try an herb and cheese popover instead. Rosemary provides a nice earthy pine taste which compliments the saltiness of Parmesan cheese. It’s a match made in heaven, like bread and butter. No pun intended.

ROSEMARY PARMESAN POPOVERS

Ingredients:

6 large eggs

2 cups light cream

1/4 cup unsalted butter, melted

1 teaspoon sea salt

3 tablespoons sugar

1 tablespoon fresh rosemary, chopped plus more for garnish

1/4 cup Parmesan cheese, grated

2 cups flour

Instructions:

Preheat oven to 400°. Move the oven rack one setting below the middle row. Grease a 12-count bouchon pan. In a food processor, combine eggs, light cream, butter, sea salt, sugar, rosemary, cheese, and flour. Blend until no large lumps remain and batter is light yellow and frothy, approximately one minute. Fill each bouchon cup 2/3 full. Do not overfill. Sprinkle tops with rosemary leaves. (Refrigerate leftover batter until ready to make the next batch. At that time, use a whisk to vigorously stir the batter.) Place bouchon pan in the oven; bake for 30 minutes or until golden brown. Do not open the oven door during baking or the popovers will deflate. When golden brown, remove from the oven. After 2 minutes in the pan, remove and transfer popovers to a wire rack. Do not allow them to cool in the pan or they may turn soggy. Serve warm as is or with a dollop of French butter.

Quickly Grilled Pork Loin Chops

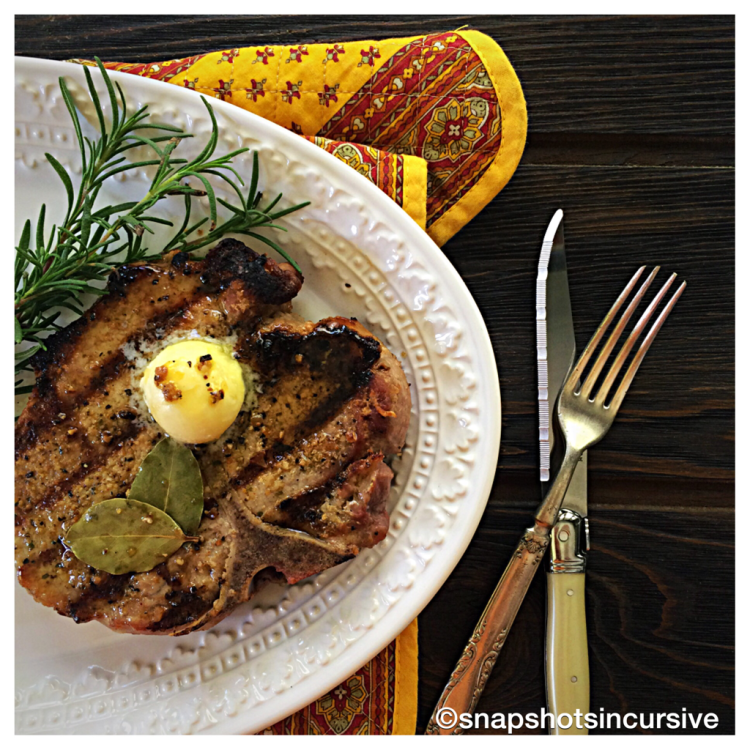
What’s Cooking in Gail’s Kitchen? Timeless Classics: Quickly-Grilled Pork Loin Chops! Uncover the grill for another mouth-watering main course that is sure to please. Imagine the sound of a sizzle soon followed by an aroma-filled cloud of char-grilled pork that is enough to make your stomach growl. Within minutes, a tender moist slice is tested and savored before anything else.

QUICKLY-GRILLED PORK LOIN CHOPS

Ingredients:

4 bone-in pork loin chops, center cut 3/4″ thick

3-4 tablespoons olive oil

1 teaspoon Mrs. Dash Herb and Garlic seasoning*

1 teaspoon seasoned salt

1 tablespoon butter, unsalted

Rosemary sprigs to garnish

Instructions:

Place 2 tablespoons olive oil in a shallow dish. Sprinkle with half the Mrs. Dash Herb and Garlic seasoning plus the seasoned salt. Place pork loin chops in a single layer, pressing down slightly to absorb the spices. Pour remaining olive oil over top; sprinkle with seasonings. Cover with plastic wrap and refrigerate one hour. Remove dish from refrigerator 15 minutes before grilling. Preheat grill on medium-high heat, about 375°. Cook pork loins for 6 minutes per side for 3/4″ chops. Turn only once. Cut time in half for thinner chops. Discard marinade. Do not over cook. The internal color of cooked pork is white fading to light pink in the center. Transfer pork loin chops to a serving platter; let rest for 10 minutes before serving. This results in juicier meat. Garnish with a dab of butter and rosemary sprigs.

Jell-o Shots with Sugared Cranberries

Eating My Way Through the Holidays! Sweet Celebrations: Jell-o Shots With Sugared Cranberries! The holidays ring in the cheer with festive activities, enticing food, and snappy beverages. Make things awesome with dressed up Jell-O shots that cap off any occasion. Not only do they have an elegant look, but they satisfy the sweet tooth as a miniature dessert. By creating a garnish of fresh fruit with the sugared cranberries, it’s a classy finish with a gourmet twist!

JELL-O SHOTS WITH SUGARED CRANBERRIES

For Make-Ahead Sugared Cranberries:

2 cups sugar, divided

1/2 cup filtered water

12-ounce bag fresh cranberries

1 cinnamon stick

1 tablespoon lemon juice

Instructions:

Combine 1/2 cup sugar and 1/2 cup filtered water in a saucepan over medium heat. Stir until sugar is dissolved, about 3-5 minutes. Add cranberries. To prevent cranberries from bursting, do not boil. Stir until well coated. Using a slotted spoon, transfer cranberries to a wire rack. Let dry for one hour. Working in batches, roll cranberries in remaining sugar until well coated. Refrigerate for one hour or overnight. Store in airtight container.

Ingredients for Jell-o Shots:

3-ounce package raspberry gelatin

1 cup boiling water

1/2 cup amaretto liqueur

1/2 cup ice water

Sugared cranberries

Rosemary sprigs

Instructions:

Empty contents of raspberry gelatin packet into a mixing bowl. Add boiling water. Stir until completely dissolved, approximately 2-3 minutes. Add iced water and amaretto liqueur and iced water. Stir well. Pour into shot glasses. Refrigerate until set, 4 hours or overnight. Garnish with sugared cranberries and rosemary sprigs just before serving.

Gift-Wrapping Like a Pro

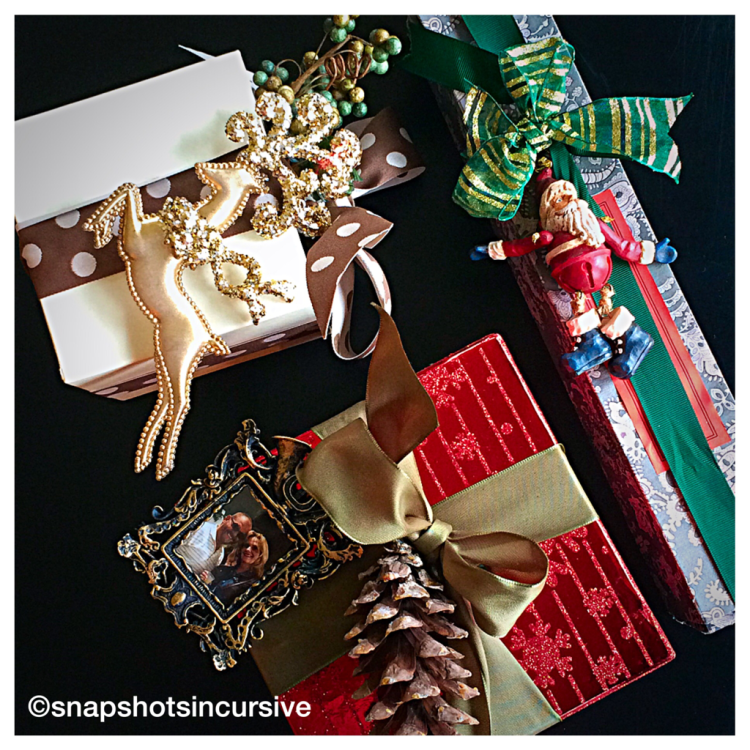
When a fellow blogger encouraged me to share my love of gift-wrapping in a “How To” post on my blog, I couldn’t resist! Supplies are simple: satin ribbons, decorative boxes, colorful berries, gift tags, quirky embellishments, and framed photographs. Put them all together and you have a captivating gift-wrapped package that will have your friends and family adoring its beauty rather than trying to sneak a peek inside. Place the the gifts under the Christmas tree or on the fireplace hearth to spread excitement as well as anticipation of an upcoming event. Decorated packages become “Instant Décor”. Interesting boxes can be found anywhere all year long. Often greeting cards, scented candles, exotic fragrances, and luxury beauty products are packaged in unique and vibrant boxes. It’s a shame to discard them after opening when you can go “green” and give them a facelift as a phenomenal package for someone else. Satin ribbon is classy and elegant, in my opinion. Choose polka dots, geometrics, or muted tones. Make single or multiple bows. Angle cut the ends to create a nice finish. Incorporate any embellishment such as a sprig of rosemary, a pine cone, a branch of holly, or an interesting ornament. Let your creativity shine! Sometimes I attach a gift tag, other times I take a snapshot of the recipient and put it in a miniature frame. Who doesn’t love seeing photos? Afterwards, the frames hang on the tree as memorable ornaments. Just be sure to include the date on the back for reminiscing years later. Whatever you design, have fun and be creative. Anything goes!

Noel Charcuterie Tray

What’s Cooking in Gail’s Kitchen? Enjoyable Eats: Noel Charcuterie Tray! Everyone loves a party. As the host or hostess, you should too. Instead of picking up a ho-hum relish tray at the local supermarket, make a charcuterie tray because they’re fun…and easy entertaining. Basically, it consists of cured meats, cheeses, nuts, fruit, and olives. And there’s no rhyme or reason for arranging things on a tray or platter. The more random the pattern, the better. Fresh herbs can add an aromatic ambiance making your guests feel special. Candles have the same effect, as long as they are away from the direct line to finger food. Crackers or artisan bread are a nice platform for spreadable cheeses or gourmet jams. Getting ideas? I see you nodding your head in agreement, so let’s get this party started.

NOEL CHARCUTERIE TRAY

Ingredients:

4-ounce assorted Antipasto Italiano sliced meats

8-ounces Bleu cheese, wedge

8-ounces Colby Jack cheese cubes

6-ounces Wasabi & Soy Sauce almonds

6-ounce jar Kalamata olives, pitted

1 cup moonshine maraschino cherries

1 cup candied orange peel*

4.25-ounces sea salt snack crackers

4.25-ounces sesame artisan crackers

Fresh Rosemary, for garnish

Instructions:

First, arrange some items in small bowls, like olives, nuts, and fruits. It keeps them contained for easy replenishment. Cured meats and cheese wedges are often the spotlight. As larger items, place then on the tray once you have the bowls in place. Crackers or bread go next. Don’t be afraid to pile them on. Feel free to fill in the “spaces” with salty nuts, cheese cubes, and fresh rosemary sprigs. Enhance your presentation with knotted bamboo picks or cocktail toothpicks for spearing small bites.

*Follow the link for recipe.

http://Snapshotsincursive.com/2019/11/06

Quick Savory Butter

What’s Cooking in Gail’s Kitchen? Start Smart: Quick Savory Butter! For some time now we’ve gotten pretty spoiled by restaurants, bistros, and cafés serving compound butter with the artisan bread basket. You almost hear us clapping our hands as we sink our teeth into the savory herbs or sweet concoctions. I know it makes me feel special. Chefs have been creating compound butters for years, though. It’s one of the ways they save time and add a level of sophistication for the customer. In my own kitchen, I found it’s best to begin with unsalted butter. That way I can add just enough sea salt to tease the palate. Lemon, believe it or not, adds a hint of flavor that embellishes steak or seafood. I see you nodding your head in agreement. Although I began smearing this combination on rolls and crackers, I couldn’t resist warming it to pour over a bowl of freshly popped popcorn. Talk about gourmet!

QUICK SAVORY BUTTER

Ingredients:

1 stick (1/2 cup) unsalted butter, room temperature

1 tablespoon lemon juice

1/4 teaspoon garlic powder

1/2 teaspoon sea salt

1 tablespoon fresh rosemary, chopped

2 tablespoons fresh parsley, chopped

Instructions:

In a mixing bowl, cream butter with lemon juice. Add garlic powder and sea salt; stir. Fold in fresh rosemary and parsley leaves. Mix until combined. Place a sheet of waxed paper on the counter. Spoon compound butter onto sheet. Roll the waxed paper over butter to form a log. Roll tight and twist both ends. Refrigerate one hour or until firm.

Alpine Cheese Crisps

What’s Cooking in Gail’s Kitchen? The Next Step: Alpine Cheese Crisps! If you ever get the munchies but want a low-carb snack, here’s something you can make at home in a matter of minutes. Not only that, it saves you the cost of paying for the prepackaged varieties available in the deli department of your favorite grocery store. Go to the refrigerator because you can take an ordinary slice of Swiss cheese and transform it into a thin crunchy chip, simply by using the microwave. No kidding. Add a sprinkling of grated parmesan cheese plus a smidgen of garlic and rosemary for a gourmet finish. The secret? Be sure to use parchment paper.

ALPINE CHEESE CRISPS

Ingredients:

8 ounces Alpine Swiss cheese, sliced

1/4 cup parmesan cheese, grated

1 smidgen garlic powder

1 teaspoon rosemary leaves

Instructions:

In a small bowl, mix parmesan cheese, garlic powder, and rosemary leaves. Set aside. Trim a piece of parchment paper to the size of a microwave-safe plate. Break one slice of Swiss cheese into small pieces over the parchment paper, forming a pile. Sprinkle parmesan cheese mixture on top. All microwave ovens cook differently so begin with 1 1/2 minutes on full power. Then microwave 20-30 seconds longer until the cheese is crisp and golden. Remove plate from oven and allow cheese crisp to cool to the touch. Carefully transfer cheese crisp to a wire rack. Reuse parchment paper. Repeat process until all cheese is used. Store at room temperature.